Lessons
Lesson Info
Enhancing 3D Layers
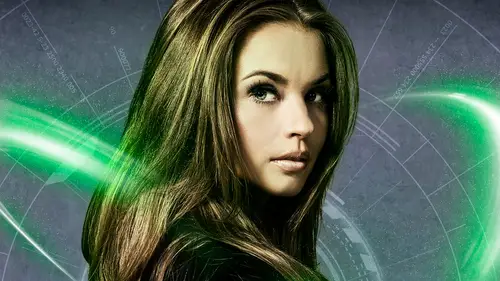
now, this looks pretty good so far, but we're going to enhance it even more. So first thing is, we're gonna add a layer style to it, just like we did with the other big ring flare. I'm gonna go in here and add an outer glow to this. But this time I wanted to be a warm color. Remember I said I wanted a coolness around her, but I want the warm light coming from the conjuring her hands going to make this red. And I think hard line is gonna be files boost at a pass a little bit. But when you're doing when you're adding a glow like this to an object, depending on the background, you were going to play with different blend modes because depending on if the lighter, dark background, a particular blend mode may or may not work. So you see, like a vivid light worked really well on the background earlier, but not so much here. So hard light works really well here, I think. Dial that up quite a bit, Riggio. That looks really good. Now, when I was experimenting with this, I thought, Well, the glow...
looks good. It looks really good there. Wow, it's gonna work like this. Okay, But I thought the global school, But then I started looking at posters of, you know, like Harry Potter movies and magic, you know, things like and this watching movies. And I wanted to have a little bit of, like, a pixie dust little particle element around it. And this again goes back to what I was talking about with looking at layer styles a little bit differently. And when I discover, was if you turn on drop shadow and set the default here so the drop shadow is designed for what it suggests. A drop shadow. It's dark. Just give you a little bit of a cast shadow office. But if you go in here and do something like change the color to, ah, brighter, maybe even white and then put the blend mode, this is another one of those features that no one ever uses. Its the blend mode dissolve. What dissolve does is it gives you depending on the density of it. It gives you this little particle effect around the subject around the element there by dialing it down to a very low opacity, like in this case, I've got it to about 10. You'll see that the really doesn't look. It's a little much, and this is where most people would probably say, No, no, like it will turn it off, but dial it down. It lessens the effect. But the cool thing is, it's being applied as a drop shadow. You can actually go in here manually, moving around just like you got a drop shot. You could have it trailing off the element or doing whatever, like you can line it right up on top of it, but adding that when to dial that capacity down a little bit more. But see how? Adding that simple element really puts Atmore magical spin to it. Spin it. But again, that's using drop shadows in a way you perhaps never thought so. It's always about what it does. One of my favorite quotes from a movie is from the movie Apollo 13 and that Harris is character and he says they're in the middle. You know, we've all seen Apollo 13 writes about the way there's a scene where Jean, um, Ed Harris is telling Easy is like, Look, I don't care what something was designed to do only worry about what it can do when you were trying to fix the Apollo chip that has. So we stuck with me, and that's the kind of the approach I take the photo shop. But I look in here and I say, I don't care what it was designed to do. I want to want only what it can do. That is what led me to discover things like these types of effects like this. And of course, it is a layer style. You can always go back and try and change it. Modify it later on. So, uh, okay, and they're so now because it's a layer style. We've applied a layer style to a three D layer. Now that is certainly something you can do because a three D layer is basically a photo shop layer so it can have. You can even put a layer mask on a three D lair and because it's three d, even with all these effects applied to it, we can still go in here and manipulated positioning or do whatever we want because it's three d. There we go. Now you'll see that graininess when you're basically a draft mode kind of look to it. And even the graininess you see now apart from the effect will get cleaned up when you do a render on it. So now what I wanna do is at a little bit more to that. It's gonna make a new layer, and I'm gonna get my great aunt Tool. I was going to a simple, white, radiant white radio, Grady it right here in the middle of that design moment, right above her hand here and just kind of like this. And I want to use that same layer style, that same red glow with the particles on this layer as well. I'm gonna hold down the option key once again grab that effects icon and drag it to that layer. There we go. Scale that down to something a little bit. Now, this next thing I want to show is a cool brush effect. I quite literally discovered yesterday I had a brush that I was gonna show you. It is this and ended up being actually is kind of the same brush mix. But I added something to it just makes it even cooler. This I was inspired by for that from the movie Doctor. Strange. You see that? It's really good. If you haven't seen it. Check it out. I wasn't paid to say that. Anyway, um, what I want to do here is create a new layer. In addition to what I said about putting on building my elements in separate layers of bringing them in. I always try to as much as I can put each effect on its own layer within the main document here. So I could probably add what I'm about to do to the layer that contains the flare here. But I don't want to. I mean, I may want to just that flare change it later. So I'm gonna go and put this element on its own layer. But this is really cool. At least I think it is. So we go in here and get a brush, and we're going to use a brush that I created this one right here. There is. So this was actually a kind of particle brush I created, which again, I'll make available. You know, this is actually I used it to create us no effect, and it actually works really well you can see it. This kind of you know, this isn't a winter scene, so that's no good. But the point is, I had the brush made for a particular effect. Why not take something you've already created and take it a step further? See what you do it. So go into my brush options with that very brush selected and turn off all the features that I've applied to it. I'm gonna bring the spacing in a little bit, but I'm going here into this now, here and flatten the brush and it gives me this. This basically squash is worth It was more of a rounded effect, but now it's just kind of squashing it down. But I'm also going here into the shape dynamics and was going dial this when I got still got all these turned on. Let's assume always air off. We'll take the angle, jitter and dial it up just a little bit. We get a little bit of rotation in there. You can suddenly see. Can you see this preview window? Supposed to give you a little preview of what's going on here? But I was kind of zoom it in here and just so you can see the effect take shape more. I'm gonna go in and copy and paste that layer style to this new layer. It's gonna option drag this same red glow. We'll zoom in here. So I've got Let's just recap what I've done to the brush here. So I took the brush itself, squashed it down, adjusted the spacing, went into shape Dynamics, increase the size dinner a little bit. That's just gonna vary the size just a little bit as I paint angle jitters. Probably round that 15 or 20 should be fine. I'm going to go in here running the document and all I'm gonna do is paint right in a very specific area to make a really small swirls with the brush here, right at the center of that, um, a little flare element. And as I do that we're gonna get these kind of particle elements kind of flaring off. They that element Now they're a bit small, so let's actually undo that. Squashed the brush on a little bit more. Yeah, let's go. Should be a lot bigger than there We go. OK, let's get a little crazy in the center. So I'm gonna add a layer mask to that. And it was just kind of And that flare a little bit more there. I want to see a little bit more of the flare. They're gonna do a little bit more of the brush effect on the layer here. So it really gives a sense that there some riel electric things happening, you know, some real activity and movement there. But I'm gonna enhance that a little bit. Mawr, by getting my elliptical marquee selection tool here analysis, Go right to the center of that flare in the hold down option and shift and drag out. That's gonna give me a circular selection around that element. Let me go to filter blur and do a radio blur, and we're gonna do it. Zoom at about 10 is fine. What's going do that? You can see what that deal that's giving me a little bit more sense of movement like these elements are bursting out of that subject. There was the amount here. You can see that that's coming along really good. So now we'll zoom out here and get a kind of a big picture of you. What we got so far. So now that I'm seeing this, um, the flares looking pretty good the outer fire looks okay as well, but I want to do is add a little bit of a Grady int at the top of the bottom. I want to kind of had those tops and bottoms fading to black. So I'm gonna go ahead and to the bottom layer here, action, That based texture there that we have created the very beginning and put a new layer right above it. And once again, I'm gonna get my great aunt tool and let's get foreground to transparent. I want to put one in the top one of the bottom summer foreground color to black and was gonna start a little bit on the outside edge of the document. Just dragged down. Make that linear, Grady. It rather there we go, OK, and give out a little bit of a fate like that and actually put it above that graphic element layer there. So there, this. So that's helping. There we go now. So now I want to do is I want to take kind of the spirit of what's going on around her hand here and have a trail coming up from the other hand, you know, I wanna have a look like there's some kind of magical wave going between their hands here that's generating this. So played around with a lot of different ways to do that. And very, very simply. Once again, I'm gonna do a new blank layer. I am gonna go ahead and copy the layer style. Just option. Drag the effects icon here. There it is. And it's going Get a brush. Now I've got a brush that I've kind of been playing with others. Is this one right here? There we go. So this is a brush once again, that is a kind of a particle brush. It was really kind of Ah, liken inks Platt. Then I created a brush out of and it once again using it in a little bit different way. It's a little bit dense, more dense than the particle when I just was using on the flare element. But I'm gonna do the same thing I did a moment ago. Take this brush and squash it down, and I have to have to take a couple steps back because I'm using the wrong tool do you want to use a brush? But I want to use a different tool, and this is another cool effect. This is another one of those things where using it in a way it wasn't necessarily designed for it wasn't away. But not really go in here and use the smudge tool. That's much tool is exactly what you might think. It allows you to smudge pixels around. It's almost got creating like a It was like a finger painting effect. What I wanna do here is I have squashed the brush down and my spacing and let's go into shape dynamics give it a little bit of a turn, and I'm also setting the control right here to direction. So wherever direction I go with it, it's going to kind of adjust its direction of the brush as I paint now, sent my foreground color toe white, so I've got the brush set up. We're using this much tool, and we've got the layer with the layer styling on it. The critical thing here is with the smudge tool is up here in the options bar. We've got the brush selected. As I said, we're gonna set the strength to 99%. Why 99? Because I don't like three letter three numbers. Um, I don't know why this is actually the number that works perfectly. And the funny thing is, if you go a little bit lower, if you do even drop it to 95 it drastically changes the effect. 100% is too much. I know. That's a That's a large degree from 99 to 100%. I don't know. Why would This is just how it really works for me. So 99% and you see you've got a finger paintings setting over here. Make sure that is checked on and networks again, quite literally, as you might think. In a sense, you know, real finger painting. You take a little bit paint. You lay it down, you smoke around your finger. Same sense here, although it's a lot less messier because you're laying down pixels and you're just using that tool so much, um, around. So if I go right next to the subject here and just paint once I am painting, I'm laying down the pixels. But now I'm smearing it, and it's giving me this mystical wave effect. So again, all I'm doing is just dabbing once it lays down the pixels. And when you don't release your mouth and just drag around and it creates it and I'm going a little crazy with it here, that was for demonstration purposes. But we go right up here and have this emanating from her upper hand here, and I'm just gonna dab a few times. Now again, dab it. Just tapping or clicking once will lay down a few pixels and it's using that scattering setting right here. So it's gonna do that a couple of times here just to kind of create a little bit of an effect in her hand and then when I have that effect trailing out so it's gonna click again once and then drag it down and I haven't released yet, but I'm just smearing that effect around. I want to have it coming down and just kind of getting around who are hand there now, when you want to suspend the the finger painting effect without actually going there and checking it off, just hold down the option key and it will just give you the smudge tool so you can actually go in here and just much it around. When your release option, you can lay down pixels again and to start adding the effect, I'm gonna hold on option again, and you can just kind of, in a sense, sculpt or carve the effect in the direction you want to go. I want to make this a little bit more subtle. That's all it is there. One thing I discovered, though. And even though I come from a traditional background of being an artist, do you think you get used to making a stroke and living with it? I never can. But what I do if you paint this effect and you like yet, but it's not really in a position you want it to be. Here's a little trick. Once it's done, press command control T they right click on it and then choose warp, and now you can manipulate it the overall effect and position it exactly where you want it to be so I can have this wave kind of coming right over her hand here. So you're not simultaneously wrestling with achieving the effect and its positioning. You can get the affect the way you want it and then manipulate it into its position because who wants to get it right the first time? It's no fun, so that looks pretty cool. There may even dial the layer opacity down. It's a little bit, but yet again you can see how simple brush effects all these elements we created from scratch. We've got flares and brushes and all these particle effectively, like at the only photos, and you're the subject and the background texture That looks really cool. All right, so now what I want to do, we're gonna venture into dangerous territory. We talked about how I like to keep all the elements on their own layers, but for to achieve this next effect, I'm gonna have to paint directly on the subject layer, because I want to do is given a position. These flare elements. You'd expect the light and we did illuminator. Hair does look like there's a glow coming from the blue light onto her hair, but when it would hit the edge here, we would see a lot of intensity right on the edge of the subject. Here for that line effect, we'll add that in just a moment what I would do want to do is create a new layer. I want enhance the red glow here in the center because it's just not glowing enough. But what I want I'm gonna do here, let me do this quick. Now the elements are a look. Fine. But if these elements in her hand are glowing as a sui are interpreting to be, then you would see the red glow on her Castaic under on her face. Perhaps, and even on her clothes is that we're gonna achieve that with just a simple Grady in on a layer of take that red color I was gonna sample it. She's my eyedropper tools, Like a little bit brighter here. There we go. And just before, I'm gonna use my radio. Grady int It started out from the center here radio not linear hate sticky features and lets his changes to overlay. Maybe not over allows to screen. No, but you know why I didn't do it on its own layer. There we go. OK, it had a layer style applied to it. There Were you OK? Now I've just a simple Grady int in overlay mode. Maybe even dial back the capacity is a little bit there, but that puts a glow around the elements, making it blend a little bit better. Be Dalit leader. Opacity, dune. All right, so I'm gonna just a little bit. Let's actually do that same thing while we're on that layer. Let's just do the same thing up here with hand. A little of a glow there and another cool trick I want to show you. And I'm just noticing it because of the way the element here. It's a little too intense up here when you're doing these wave effects of such what? The with the tools. One thing you can do is if it's too intense, go to the layer itself and command click on the layer and loads it as an act of selection you can see is the margins are there. Then go to the select menu and do in verse and then just hit delete once or twice, and thats going in this case it did it too extreme, but ah, it will actually lessen the effect. It won't lose your original effect, but it actually makes a little less dense in there that works. All right, so back to this edge thing. As I said, we're gonna go in here and do work directly on the Civic, some to go to the layer that contains the extracted subject. This is where it comes into play that the extractive subject or extracted subject is important. We're going here, get my brush tool is gonna use a regular brush here. Let's just get a standard round, soft edged brush. It would dio no settings. I am in an ad, a transfer setting because I want to use pressure sensitivity. It's not critical music of tablet. There's rare occasions. I actually use pressure sensitivity. I've had a lot of people say I don't use a tablet cause I don't use pressure. You don't always have to get fresher. It's not the point. Good thing is, you could turn those things on and off. In this case, however, I do want to use pen pressure on the opacity so it will respond how hard I press and how much pixels are laid down. Set my four run color too. A bright blue. Maybe use that same bright blue I used earlier, perhaps maybe make it a little bit brighter. There we go now, As I said, we're going painting directly on the subject To get this effect, we're gonna change the blend mode of the brush, not the layer of this time. So here, in the options of arms, to simply changes to overlay and it's gonna have that overly effect where I paint on the subject, I'm gonna go right on the edge here where this flare is getting running the edge of the subject. And if I just have a few times that overlay effect is going to be, Oh, let's undo that. I've been doing it because I want to isolate the effect to just the subject. It was also adding it to the background just in. So we're gonna go up here in the layers panel and luck the transparency. So now we'll Onley affect the visible pixels on the layer. So if I go in here, Dad, Now I'm getting that more intense light effect on the edge of my subject, and it's not affecting the background here. So if I go here and the reason why you have to do this on the layer itself is that is interacting with the original pixels, this overlay effect and by building it on the dabbing and I'm jamming and jamming its building it up and basically altering the looks of those pixels. If you'd like to have more and more and more, see how the edges air or the details coming a little bit more on the subject there and even on the hair. If I want to get more intensity on the hair in the areas that are closest, that's a little too much, huh? In the areas that are closest to the flair, you can once again intensify that a little bit more than here. We go get a little bit like low there. Here we go. So it's It's one of those things that it's not gonna hurt it if it's not there. But it's just one of those things that adds a little bit more. You're wanting these elements to look like they're around the subject, not just slapped on top of the image. So just doing these little bit of enhancements just helped sell that effect a little bit more
Class Materials
Bonus Materials with Purchase
Ratings and Reviews
kasmath
So happy to find this class by Corey Barker and loved it! It definitely helps if you are familiar with Photoshop but he teaches you so many fun, new things in regards to poster development. I love this is in video because you can watch and re-watch if you don't understand something the first time. You can see how much Corey loves his work and he shares his passion with you! Thanks for another great class!! I look forward to owning more of his classes and they are so affordable!! Thanks Corey!!
a Creativelive Student
One of the best classes I've taken with Creative Live! Like another reviewer said, I too was yelling at my computer in excitement and taking pages of notes along the way. I learned so many valuable techniques in this short but sweet class. Thank you Corey!! You rock!
a Creativelive Student
I was literally screaming at my computer while watching this... like it was a football game or something!! YES! OMG!! SO much information - was taking notes every 2mins, and laughing along with the studio audience. Best CreativeLIVE course I have seen. Watched in it all in one go, and will re-watch many times I am sure. Very happy with my purchase. Thank you, Corey!!