Lesson Info
3. Use Channel Masks to Clean Up Backgrounds
Lessons
Class Introduction
03:54 2Use Channel Masks to Create a Black & White Image
09:35 3Use Channel Masks to Clean Up Backgrounds
10:27 4Use Channel Masks to Highlight Skin Tones
04:54 5Use Luminance Masks to Alter Shadows & Highlights
13:25 6Use Luminance Masks to Color Grade
08:38 7Target Tonal Ranges with Blend If
13:25Lesson Info
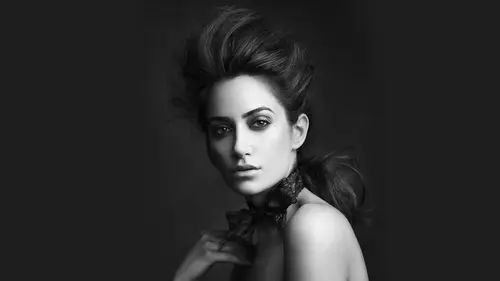
Use Channel Masks to Clean Up Backgrounds
So let's say you have a subject on a relatively clean background and you want to clean up this back. Maybe you want to cut it out completely. Maybe the one that you have This one in particular was a dirty wall. So it just I could go through and clean everything up, but there's gonna be a better way for channels can come in. So I'm gonna go into channels and I'm gonna look for I mean, the channel that's gonna give me the greatest contrast off my subject to the background. So look at my red and I look at my green and I look at my blue. And as I look through this, you may at first glance they will. The red gives me the greatest contrast what does on the skin. But the idea is we need the hair and the skin to be on a different tonal plane than the background. Okay, so that means that as I'm looking through this, the reddit's bright. But this is brighter in the background and this is darker than the backgrounds. That's really not gonna help me out. A whole lot greens better blue is best. Oka...
y, so I'm gonna use This is my starting point, all right? And so I'm gonna do is I'm gonna duplicate it because you don't really ever want toe work on the channel. It's gonna mess things up for you in a big way, so I'm going to duplicate it. There are other ways you can load it in and bring it somewhere else and manipulate it later. But this is this is gonna be a nice, easy way to do it. Now what we've created is something called an Alfa Channel or an Alfa mask that's just basically a mass that sits in the ether. It's not attached to anything. We can go back and loaded at any point in time. It just by itself. It's not doing anything. You'll notice. When I click on RGB, it's off. It's not selected. It's alone. No. Okay, so we have This is our starting point. If I were to load this in, it's actually not going to really select everything that I need because the total ranges aren't there. I need to isolate this down to two colors, Okay. And unfortunately, like this hair, it's broken and stringing right. It's difficult to mask out. So what we're gonna do is we're going to let Photoshopped do a lot of the work for us, so I need to replace this background. Okay, So what I'm gonna do is I'm gonna start by bringing up contrast and contrast is the key way to manipulate these. These masks were doing the luminous mass when you in the channel. Masks used contrast very quickly to manipulate these masks. You can use curves. Obviously I find that levels is just a little bit quicker. Hit a commando. This is not an adjustment layer. Very, very important. Not an adjustment layer. You're actually bringing up levels. It's like going to image adjustments and levels. Shortcut is command out. Okay. And what we're gonna do is we're gonna increase contrast as much as we can without destroying eliminating the edge between her in the background. So I'm gonna bring up my black point Now, around here, I start to lose that edge. See that right about there? I'm losing the edge, so I bring him back before I lose the edge. This isn't an exact science. Get it close. It's fine. Okay. I'm gonna bring this in a little bit And now I know what you're saying. You're saying, Well, we're back to square one with the red. It was super bright, but my skin down here is on the darker side. This has a clean edge, all right? All the way around, it's pretty clean. That's really what I'm worried about. So this has gotten me to a much closer place. Now I still have to paint black. And here I gotta paint white in here, right paint blackened on the inside, paint white over here. But I'm going to show you some nice little short cuts to help out with that. So what? I'm basically gonna dio I'm gonna make a big selection all around the outside, avoiding any part of the hair, okay? And what I'm doing is I'm using ah, Phil background, which in this case is is white. I'm using command elite hopes, and then I'm gonna do the inside again, avoiding the edge. Just get it close. Like it doesn't have to be super crazy, accurate, and I'm gonna use option delete, which fills it with black. And you can also brush this and I just find the last one. The Phil is nice and quick. Okay? And that gets me relatively close. You'll see. It's not perfect over here, which is fine. Still not finished up here. Fine. So what I'm gonna do is I'm now going to zoom in, and you may have to brush some of this stuff totally normal. All right? I'm not even going to do a great job. I'm just gonna get it close. I'm only actually brushing the extra bright stuff. The super bright highlights. And that's because of what I'm about to do. Next. We have to paint. In contrast, there's gotta be a good, easy way to paint. In contrast, so we're gonna use is the Dodge and Burn Tool. We're gonna use the Dodge and burn tool to help us craft a mask. But instead of using it traditionally, usually when I dodge and burn, I'm basically on a mid tone and I'm using it very softly. I'm gonna be dodging highlights, and I'm gonna be burning shadows. And what that's going to do is it's gonna kind of leave alone all of the highlight information. So most of my dark information is heavy shadow. All of this is heavy highlight by burning shadows it's not going to touch this right. And by vice versa, it's not gonna hurt the other side. So I'm gonna crank this up pretty high, Usually put around 30 to kind of work through there. I'm sloppy. Just get real sloppy, just kind of scribble over it, right? And then I go to dodge highlights. Crank that up a little bit. Oops. Now, you may find that you've got a few little areas you've got to come in and tweak. For example, if you get really aggressive in this, you may find that there's some little gaps around the edge of your image. Like, for example, up in here and that maybe some you know, a way in which you may have to come in and just fine tune it a little bit. But the idea is to do this aggressively and fine tune once, and you don't really have to do it again. That's why we have Alfa masks and Alfa channels. That looks pretty good. Okay. And so now what I have is this very complex mask while the hairs cut out. Okay? And so what I'm gonna do is I'm gonna load this now as a selection. And you can either click this little Marquis circular marquis button down in the bottom here, or you can command click on it will load it in. And what that load selection is going to do is it's going to select the white part of the image or the right part of the image, not select the other parts. At the moment, I have the background selected. If I wanted to select the subject, I invert my selection. White invert the channel first, and I could do it that way. Now what I'm gonna do is I'm gonna go back into it, and I'm just gonna create a solid color fill their and it's obviously not right. I have these weird little hair issues. So what I'm gonna do is I'm gonna sample right near the hair. I dropped right near the hair it Okay, turn it on. Clean background and what it did. It has even got rid of some of these unruly hairs. Aziz. Well, but this background goes completely clean without a whole lot of effort. When you do this at full pace, it generally takes, you know, a couple of minutes. It's not a tremendously. Long time now you can, because I know some of you are like, Well, how do I fix that? That's a little bit harder and basically what you have to do as you have to come in here and manually paint over this stuff using blending modes like color and soft light and curve adjustment layers to really tweak it and fine tune it. And it really depends image to image. But this will least get you close. If you just want ah, background to be a little bit cleaner. Just sample a nearby color and you won't miss. It becomes a nice, easy way to clean something up or even it out works great for all white backgrounds, all black backgrounds. If that's what you meant to shoot on initially, it just gonna make the whole experience a lot cleaner and a lot better to use. How would you use a mass technique like the channels mask? Working on a more complex background? I probably wouldn't wouldn't Yeah, I think, uh, is is great. In an instance like this, where you have a pretty clean background, but in truth, one of the best tools you can master for selections is the pen tool. It's not something that people like to hear because the pen tool is a little bit cumbersome at first, and it's a little bit frustrating to use because there's a lot of different nuances to it. But there is, honestly probably no better way to cut some complex object out. Now we're gonna You can easily use this in conjunction with the pen to when you have things like hair and everything else. But But in truth, if you got a busy background, there's not really a particularly great shortcut. Nothing's nothing's really there, but that does as good of a job is the pen tool.
Ratings and Reviews
Rob Giersch
I think this is a great example of a class that would benefit from a star versus a thumbs up or down rating. Chris is obviously a master at these concepts but not necessarily the best at walking students through exactly what he does. There are many moments when he moves through 3-4 steps so fast that the Creative Live team can't keep up with the steps on screen, so you have to go back and somewhat de-construct the words and visuals to piece together what actually happened in photoshop. Bottom line, fantastic resource and process for learning the finer art of masking, but not the easiest instructor to follow,
Joseph Parry
Chris is a superbly accomplished photographer. If you're not familiar with masking, this is a great class to add some excellent options to your toolkit for everything from grading to cleaning. For $19, a total gem.
a Creativelive Student
This is an amazing course. lodes of useful information presented in an easy to understand way. Really like the tutors style and enthusiasm. Thank You Chris Knight.