Lesson Info
3. Scanning & Creating a Breyer Brush
Lessons
Lesson Info
Scanning & Creating a Breyer Brush
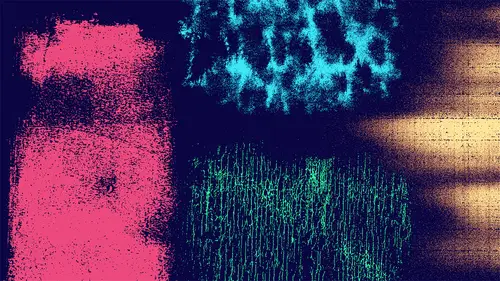
So here are some that I did last night. This is the Breyer. Just kind of got riel, uh, you know, loose and light on their more from the Breyer watercolor. Pretty similar. What I did today, then another cool one from the Breyer. So what I want to do is show you how I scan these in. So we're going to scan these in. You know, you've learned where you can get textures from you've learned why it's valuable, have these textures why it's valuable to have your own toolbox. So let's now get into the technical stuff of actually getting these things on turning these things into usable tools. And it's hard for me to deal with a big mess. So that's, That's his orderly is I get it. So we're going to scan these in. Let's find these will not destroy quite yet. You dry and look. My scanner just kind of made some awesome texture by itself because I had the lid open for your brand of online is we're scanning those. Do you ever print out a nearly finished design and create textures with specific areas of ...
the T shirt and minds? Uh, yes, I um well, I print things out in another way that I you I do things. I'll distress this in my other class, I'll teach vintage and distressed effects. One of the fun things I do is just destroy stuff on a Xerox machine. So I'll print out the finished thing, and then I'll run it through a Xerox machine. Oh, uh, shouldn't get shrink and shrink it. And I take that in large, getting larger and larger, and then I scan that back in. So again, I just start accumulating all this paper. But I do recycle everything. Yeah, I have one more question. Do we have to look for textures that have contrast or dark areas? Is that it doesn't? It doesn't matter because, um, you're gonna if you know, if something has relatively low contrast, you're gonna be able to pull that contrasts out photo shop. So you're never dictated by what it is. Like I said, I could scan this wall or take a picture of this wall and scan it. And if you can't see the texture of the paint roller that the paint roller made when it painted the wall, I'll be able to pull that outside photo shop With Photoshopped levels adjusting levels, you can pull out all those light areas and all those dark areas and all the in between. So you start realizing that you can pull it. I mean, this mouse pad. I can probably get textures out of that. We're just going to scan everything. Okay, So this thing or in Collis Breyer one. So I'm gonna for this 1st 1 I'm gonna show you every little step of making the brush and all the things to think about. Um, and then we're gonna put them all together on were I'm just going to scan and a whole bunch of brushes. We're gonna make a bunch of brushes on, make some brushes out of these, and I probably take some of your guys brushes and steal them and use them for my work. And then people like that not your stuff. Okay, so we have Breyer one. Um, let's bring this in the photo shop now. Okay? So, like I said, I want to work with a square to the first thing I'm doing. Which one of these blobs is better? Um, they're both okay. Use the, uh, polygon lasso tool. Pull out those areas and I have a white I have a straight line on the right side. Now, this is one thing you gotta know. Maximum size for Photoshopped brushes Now it used to be 2500 pixel by 2500 pixel. In the newer versions of photo shop, it's now 5000 pixels, which is actually pretty huge. I think it's ends up being like 15 ish inches or something like that. Um, so you can actually make these pretty huge like when I'm working in a 16 by 20 canvas for T shirt graphics I can make a Photoshopped brush is pretty much the size of the hole T shirt graphic. So, um, you might as well make as big a brushes you can cause you can always shrink the size of it, just like you can't any brush. But obviously it's raster you can't enlarge, it reminds we'll just start 5000. The only drawback to having a bunch of 5000 pixel brushes is that it's gonna bog down the system, want you if you get too many. So 5000 by 5000. Um, well working rgb. But in that being it will be blocking. Why? Eventually? So here's our 5000 by 5000 canvas. I really don't like rulers. Let's take the rulers out. Well, pace what we just did. Okay, so the first thing I want to do is make all those whites all the way white. So this is the nuts and bolts of the whole thing is where we pull out the darks and lights and get how we want it. So we're gonna use levels command l. So the whites will get wider. And obviously the campus that I'm on is all the white white, and we'll make the blacks a little blacker. Well, sort of like find out where we want to be. And some of this stuff has got to be in context. So, you know, you may not know exactly how you want it until you finish it. So let's just use this now. I'm gonna go ahead and leave this straight line here, and just so you can see why you don't want the straight line. So also, I want to get a little bit more sharpness for all these little things. So filter sharpen. Smart sharpen is usually what I use and photo shop. You have about five different things that can do this relatively same thing. You see how God, all those blacks a little bit blacker and it kind of sharp and all that stuff up. Nothing I don't like is that it also created these little outlines around each little thing, so I don't want quite that much. Let's go down here. It's a little bit too dusty again. I'm always thinking about screen printing, so I'm always thinking about the fact that this is gonna be one color on a shirt and I don't want to many Grady INTs in there. I pretty much want to deal with all black and all white. Want to take things away? Um, so that's that. But when I turn it black and white, I do that with brightness contrast, and I use legacy again. I enjoy being destructive, and I tear this stuff up and I do that on purpose. Okay, so that's good. Now it almost looks to Harry like there's almost too much detail in it. So easy way to kind of undo. What I've done is, um, image adjustments. Wait, where's filter noise? Doesn't Yes, filter noise, dust and scratches. So that'll sort of like take all that detail out of it, Obviously, like it's named, it will take out the dust and scratches. That's cool. I'll stick with that. Okay, so from here, I've got this 5000 by 5000 square. Define so at it. Define brush preset. So let's call this Well, say Creativelive. Pray er brush one. And it may seem silly to have to name it now, But once you build up your toolbox, it will be nice to have it all their on and to know you know what each thing is from now. OK, so we got a 5000 by 5000 pixel canvas, right? That number there says 3867. So that means that it found the brush at 303,806 7 pixels wide. So it's not going to use the full 5000. It's smart enoughto only pick out the black areas to make the brush with. So if you make all these 5000 brushes, they're not going to be in 5000. They're gonna be whatever the black area is. So we'll call that Breyer brush one. Okay, so now we need something to apply it to my other course on lettering. We created lettering for a word rave in. So I figured we would just use Raven. So if you want to know how we created rave in, check out the custom lettering course and we can show you every little nook and cranny on how we made this word. Ravens again. I work in predominantly 16 by 20. There's a popular retail store with graphic peas all over the wall, and that's the size that they prefer. It's a store for goths, if you know what I'm talking about. It used to be a store for Goths. Now it's a store for everybody. Brandon Diane from online is asking if you're gonna teach us how to create and save a set of brushes and photo shop. So, for example, 10 different brush shuts. Yes, ma'am. Definitely. So that this brush preset this box you get toe, save your you know, like Jenna's totally rad brushes from April 2015 or whenever you made these brushes and you get to save that toolbox of that represents or, you know I need his brushes from San Francisco, you know. So she saved all these different things from different things she saw around the city or whatever. So whatever you want the you know, if you can categorize these brushes into something, then you make these toolboxes for yourself, and then you can save them is a BR files, and you get to use them for whatever. And if you're really generous, you can give them to somebody and say, Use my brushes. Don't let anybody use your brushes. Okay? So the other thing here, the best way to apply brushes isn't by just putting them on our own layer. Um, we have this word rave in, and it's all by itself on its own layer. There's no background to it. And we want to. We want to take away from that word. So you have rave in. We want to take away from it. So all the pigment that's there, all the orange that you see or yellow, or however it appears we want to take away. So we apply a layer mask, add layer mask. So in this layer mask, it's black and white. So right now it's white, and this is hard to explain with white covers, and the black goes through. So the black is the whole and the white is the solid. So since everything solid, it's completely showing, and you don't have to understand the black and white thing that much, you'll get it. It's it's I'm over complicating it by by explaining all that, but you'll get the gist here. So when you're in the layer mask, you're not here. You're not on the actual layer. You're on the mask, You're gonna hit the letter B and there's our brush. So this is the thing we just made. So when I added that brush, it added it to my set here so that brush is right there. This is how I use a large thumb. Now, I think you could do a large list, and then you can CCL Breyer brush one. That's the one we made. If this is a better organization method for you, I like the large thumbnail because I just like to visually see, I see it as big as it could be. So this is the brush. And again, um, when you're on the layer mask, you have a black and a white. So you're in by pressing, actually switch the to. So if I have black, I'm gonna take away. So that's the Breyer brush that we used. Now, taking away isn't enough. You have to put back. So take away at first and then put back. So that's one method of doing your This is what this little Breyer thing that we did ended up making. And if we want to continue destroying, we can totally destroy. If we want to keep putting back, you can keep putting back. So what I tend to do is take a take away as much as I can and and start putting back because you don't overdo it on and you want to add a little bit, uh, just something subtle. Um, in my course on applying vintage in distress effects will go into more detail on how to do all that. So this is what this Breyer did, and let's scan in some of these others. And just for the record, just so you can see what this brushes, let's move Ravens up and will use the same color. There's the brush, so you could also kind of create a cool little background you'll see on some of the creative life course graphics. There's a very similar look to this. We put this back here. You just see some of subtle texture that we can get out of these brushes, so they become very usable. Now, the other thing I want you to know about the straight line now, just like any other brush, I can hold down the bracket bar here. I got the left bracket. If you don't know that shortcut yet, um, and keep doing this, But what I don't want to happen is for you to be able to pick out the repetition. I wanted to try to look inconsistent. The repetition is just gonna make it kind of looked kind of lame, but I don't know if this straight line here is really bothering me as much as I thought it would. And then, if you want, you are, rotate your canvas supply in different ways. Or, of course, you just make the brush again and rotate the brush. I've been having a bunch of different ways, so that's the Breyer brush. Let me see if there's any from my toolbox that I really want. I am going to use this. Remember this little roar shack looking thing that we did overview? Okay, I'm just gonna make this one quick. You guys are getting the gist Now how I do this I'll do. Breyer ain't too Scan this end. Now, this is old news. By now, you guys know this like the back your hand. How many pixels? Thanks. I forgot what it waas. It's now we got that. Now, how do I get these whites to get whiter in the black skip blacker levels. I think the contrast. Actually, I don't leave it alone. I'm not gonna sharpen it. So at this point in your contrast, smart sharpen. Those are the things I usually dio, but I just really like something about the way this thing turned out. So image and the thing that's cool about making brushes to I have these two let layers separated. What? It's whatever they just see what is on. Photoshopped just sees what's in that square and makes brush out of it. So edit defined brush preset will call the CEO, um, Breyer brush to. So let's go back to venom are raving some reason made me think of the word venom. Okay, so doing you on Black Player mask. Here's my brushes I have made so far. So you're gonna find over time you're just gonna keep accumulating all these And you have this huge library of this stuff. So here's Breyer brush to and what's cool about this long rashes There's all these different parts of it that I can use, So the bottom has a different texture than the top. Now I'm putting back. Okay, so that's that. And then, just so you can see what the brush looks like by itself, let's do a little bit darker red, That's the brush. So you keep putting it everywhere and then uses a layer mask on top of the brushes. Now we're taking away from that brush layer. So then there's this whole other texture that starts happening inside there, and at the end of it, you're gonna find that you kind of just created this texture that you couldn't have predicted. And, um, I'm put a drop under that guy. We're making some evil stuff here. Creativelive grave
Class Materials
Bonus Materials with Purchase
Ratings and Reviews
Jo Sparrow
Great class. Easy to follow and eye opening! I made about 30 brushes during this workshop! I followed along with the texture making and easily uploaded them and converted them into usable Photoshop brushes.
Gunay Tariverdiyeva
Student Work
Related Classes
Design Projects