Lessons
Class Introduction
01:22 2Why Use Manual Mode?
07:52 3Shoot: Manual Model with Gels
05:36 4Importance of Details Shooting with Color Gels
03:02 5Different Between CTO & CTB Gels
03:45 6Shoot: CTO & CTB Gels
07:06 7How to Use Gels to Create Impact
05:21 8Shoot: Creatively Use Gels
19:56Lesson Info
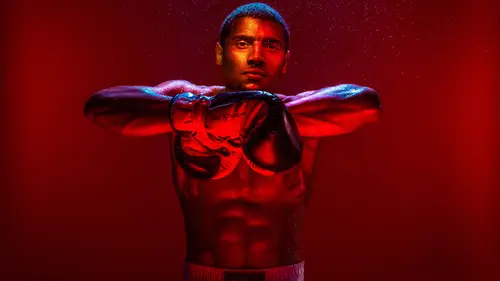
Shoot: Creatively Use Gels
Now we're gonna do, I know you asked earlier if we're gonna do that red set up; we're gonna do that now. So this is gonna be, I think, like, a six-light setup or seven light job? Somewhere in there. Somewhere in there; so it's gonna be a lot. So it's gonna take us a little bit to set up. For this set up that we're doing, it's gonna be; let's see, one, two, three, four, five, six-light setup's what we're gonna do. So the first, kind of, easiest thing to light kind of right here is the background. This right here, there's just two umbrellas with no gels or anything like that to evenly light the background. Technically, depending on how picky you want to be, you could light your background with four lights to kind of evenly light it. I generally tend to like to feather the lights. So we still have the Kino up here? So if you look, the background of these lights, it's not evenly lit; but I kind of like the fall off here because you could see the little umbrella here, and then you can s...
ee it fall to darkness. And I personally like that because I love seeing the light fall off on my images; but if you really wanna be, like, really, like the heckler first and make it all pure red, you could do it with, depending on how big your scene is, with four lights. But on this one we're just using two. I like using two lights over there because I don't mind that fall off if I get it. So that's what these two lights are doing; they're just lighting the background red because we're going to make it match our subject in red. And then this one, the light on the rim right here is just a blue gel; so this is a CTB gel we have right here, and it's just on the magnum reflector. And the reason why it has a grid, it has a grid in here to control the light spill and make sure it just hits him, kind of, over the top of the head. And what we're gonna do here on the front is I'm gonna light him how I generally like to light, which is this has a 20-degree grid on it; and that's gonna be paramount lighting him from the top. And I usually use a snoot on this, or a 20-degree grid is the same thing; and it has a red gel. And then, so that one is being used, again, to kind of throw the shadows and doing that; and then I'm going to fill him from underneath. I love photographing athletes and boxers from underneath. I like to up-light them, and that's gonna be done with a soft box with a red gel to it as well. And then this one right here, that has a little bit of yellow, I'm gonna kind of; let me turn this on and show you. So, I don't know, let me turn this right here; if you could see it right here. You can see, like, the little, like, sliver of light right there? So that's gonna be, kind of, I'm gonna put it on the model's face and then get it to where I want it and kinda throw it in focus or out of focus to throw a little bit of yellow in his face. And that's kind of like the run-through of what we're gonna do shortly, so. Yeah, it's simple enough, guys. You'll see, I promise. Let's see, Ron, do you have your hand wraps all ready, all good to go? All right, cool. Just leave this a second. So we'll do this here. And if you could just get that light, kind of, I'm gonna get Ron. Can you come here, Ron, and stand in place? You want him standing or sitting? I'm gonna have him standing. So, yeah, so come here a little bit, in the center. There you go; that's great. Go a little bit more this way. There you go, and a little bit more. There you go, and then come up this way. There you go, cool. And could that light go further back a little bit? Yeah. That's gonna kind of probably end up being more of a rim light because I don't think we have an overhead boom; but if you could just put it high, and get it to hit him here in the side. Keep it right here. And then it always helps to have like an athletic model, which is great when you do this lighting because we're gonna make him look like a badass so. Like, and again, this lighting is straight to make him look, obviously, this is not, this is not a picture his mom would probably love, right? It's to make him look, you know, kind of look dramatic like athletic portraiture. That's something that you also gotta keep in mind, too. Like when I light athletes and I do the stuff with them; I, for example, like this is a perfect example. This is not with color, but this is just with creative lighting. Like, right, this is lit just to make him look dynamic and have, like, nice visual impact. Like I wouldn't necessarily light, like, someone's mom like this, right? Because I wouldn't want to remember, like, with dramatic lighting, right. I would wanna use more kind of, like, more softer lights; it's a lot more flattering. So that's something you gotta keep in mind too as well. And light with intent, a light with purpose. That's on, right? Yeah. Keep it right here. I'm gonna do a quick test just with those lights on to see where that's at. Keep it right here, let's see that we go off. That might be a little close to him. Keep it right here. Yeah, hold it right there, Ron. Let's see where I'm at at my exposure. That is actually looking pretty good. John, the only thing, could we turn the background lights by a whole stop? Up or down? Down, down a stop. Yeah. Could we go; there you go. So, you could tell right here, that's way overexposed, at least by a stop. So let me make sure my setting is right, ISO 200. So the, what number are they at, John? 6/9. Yeah, no, that's still, that's still too bright, I think. That should be more red. Because even on the screen right here, it's looking more magenta and that's a red. I'm gonna come down two stops instead. Yeah, keep right here. Try right there. Ah, that's actually looking really nice; it's a little dark, but go up half a stop on them and I think we should be good. Hold on one second, John, actually. You know what, I think why we (mumbles); I'm at 2500 Kelvin; so just kidding, hold on. Let me go to 55. Keep it right there; there you go. Okay, now, okay, now it's looking nice and red. So check it out right here. So that was my mistake because, see, actually, if you look at that; now the, now it's looking red because those strobes don't have any gels on them. A 5500 and now it's looking properly red because when it wasn't, it kind of throws a tint on there, and it kind of makes it look magenta. So now we're good on that one. And could that light go up half a stop? And if you can't. Wanna get on my shoulders? Yeah, if you could bring it down a little bit. I wanna make it a little bit more blue. So if you could add an extra CTB gel on that one, that'd be great. Keep it right here, John. But I wanna make that one more blue now that I'm regularly to exaggerate the color on it. And that is looking good right here. Move this out of the way. So one of the things, too, that I do on all the lights, so the monitor lights; I turn them on, and I always put them at max. Because like I said, with the grid and the gel, you lose a lot of power; but, literally, a lot of photographers like to shoot and see where the light is because that's kind of what you have to do when you shoot with strobes, with battery powered strobes, when you don't have the monitor light. But when you have the monitor lights, you could little, that's showing you where the light's gonna hit; so you could literally dial it down before even taking any pictures. So you want me to go brighter also? Yeah, half a stop. Plus the gel, so maybe a full stop up. Yep, so we'll bring this one up. So we have this one up here. So, literally, when I'm moving the light, I am getting it to get the shadow underneath his nose and get in there right to where I want. And this cord should hopefully be back here. And we'll just go with this one. We'll build it up right here, so we can see a nice, and that one went up, right? Yeah. And we go a little up. So we'll see how this looks. So he should look all red right here with a little bit of blue. That is looking good. So the light in the front's a little, a little hot for my taste; so I'm gonna turn it down a little bit. Keep it right here. So I'm gonna go down, when I say a little bit; I'm gonna turn it down half a stop, which I think should be good. You got it right there. There you go; that's looking good, and we'll do one more test shot. That's actually looking really good over here like that. Keep right here. Let's see what the half a stop did. Oh, there you go; now we're getting it nice more and dramatic right here. A lot darker, you could see the difference there. Did it, did it change? There you go, there you go. Yeah, this is what's contrasty for the cameras. What's that? This is less contrasty for the cameras to go by your. I got it; okay, I got it. So that's actually looking good. So now if you look right here, that's kinda just like overhead kinda paramount lighting; and then the next light, how I like to light him is from underneath since I like to fill. And since I want that to be neutral, I'm gonna light it with the soft box underneath him; and that also has a red gel. Alexis, can you just explain how you, how you attach the gel within the soft box? There were people asking about how you, how you do this. Yeah, I'll show you; I do it with gaff tape. Okay. So, there's two ways to do it. The soft box is not that big as this one, like a beauty dish. I put it in the front and I attach it with bungee cords, but if it's too big like something like this; this is three foot by four foot. I think John's gonna, I don't know if the camera could see it right there. I just tape the front of the strobe, and you kind of tape it to the back right here so it gels really the strobe going into the soft box. Cool, thank you. Could we turn the monitor light on this? Yeah. And make it full power? There you go. Was that full? So on this one we're just gonna add two more lights to here. If you see over there, that one is gonna just create a nice; I'm using, the reason why I up-light with a light and not a reflector is because I used a soft box and this is a two, is a two-fold. I use it to fill the shadows and quiet them down; but also when you have a strobe, you control it. And to like throw in highlights where you usually see shadows. So when you're creating an image and you want it to have like nice, like if you look at it and it draws your attention. I'll go back to this one. Right here, all right; he's lit from underneath. Like, right, if you like this image and if it catches your attention, right, it's because he's being lit from underneath and on the top too as well. When you light from underneath, it throws highlights generally where there's shadows, right. And if you do that selectively with intent and carefully, you'll throw, you'll get highlights under the eye sockets; and you usually get shadows there. You'll get a highlight here on the chin. You get highlights where you normally don't see them. So when your eye sees that, it kind of tricks your brain a little bit and goes wait a minute, there's something wrong there; and it kind of messes with your mind a little bit and grabs your attention. So, again, that works depending when you're doing it with athletes and if you do it right. If you do it, in my opinion, that's very, it looks really nice and very beautiful. If you do it wrong, if you do it too intently, it could look very nasty and ugly. So you kinda gotta be very careful when you're doing it and but that's why I use a light instead of a reflector. Because a reflector is only gonna kick back and, if you use a silver one, it'll fill it a little bit; but you can't selectively control it on how you can with a strobe. I mean with the (mumbles) strobe, you can control it a tenth of a stop and really be selective with your power and your settings and everything. So that's the main reason I love lighting from underneath with the strobe and not a reflector. Also, another reason, why I don't use a reflector is because if you look, I'm using really spotty lighting, like a 10 degree grid. A reflector, if you look at this light, this is red; if I put a reflector underneath here, there's no light for the reflector to kick back up because this light, this is a 20 degree grid; so it's really intense on his face and there's nothing for the reflector if I put it here to bounce back. So photographers that tend to use reflectors are use that, you know, giant, like there's like a one that's like a half circle. They're generally lighting over the top with a soft box or with a beauty dish; and that spread, beauty spread is a lot bigger than this and it spills lights and it could bounce back light up in there, and I can't do that with this because this is not gonna bounce what I want back. And then too it might bounce back some of that blue, which if you want that, great; but I don't want that. I want that to be red, so; and that's why I use the soft box for that. And let's do the next one right here. And, yeah, this is looking good; keep it right here. And let's see what settings this is at, 6/5. It's all right; we can stay like that. Keep it right there; we'll see how it looks. There we go; that's looking better right here. Did that one show up already? There it is. There you go; so that's kind of, if you see right here the difference. It's just on this one quiet in the shadows a little bit. So that's without it, and then that's with it right here. So that is looking great. We're getting, actually we're good. We're getting the little spill on the background. If you look the soft, because it's a nice soft, big light source; so it's going through him and hitting the background a little bit. Just a tiny bit actually. You could kind of see it here, but you could see the difference from here to here. So that is looking actually really good. I'm gonna turn this down a little bit, half a stop, keep it right here; and we'll just see how it looks. Let me just do one pop. Excellent, keep it like that; and we'll see how it looks. And there you go; I really like how this is looking right here. So we got rid of, the only difference between this setup, I'm gonna add the final light within this setup and the one that I showed in the boxer is that that light with the blue gel is on the boom. So the light on the boxer is literally evenly over his head, and since this one we kind of have it more on the side, it's more on the side right here if that makes sense. So that's the main difference. I have a love hate relationship with booms. I love them because I love booming a lot of lights. I like lighting from under over the head with a beauty dish with a back rim light and with a light right here. That's why I love them. I hate them because they're a pain to travel with. Because they're big like that, you need a counterweight; and it sucks to travel with them. And so now we're just gonna add the final light here, which is the little splash of yellow; and we'll set you right here. Yeah, let me adjust it right here. And let me see if that even shows up. Oh, yeah, you could kind of, I don't know if you could see it here. Could we turn off the front lights right here in the studio and just leave the monitor lights? Would that be possible? Damn, you guys are quick; (mumbles) that's awesome. And let's see, I should be able to turn off (mumbles) it might go really dark right now if I turn these off. Would that work, hold on. There you go; so let me turn them, just leave this one on. There you go. So I don't know if that's how well that's showing up on camera; but you could see a little like sliver of light on his face. And then me see if you could, you could either focus it like this. I don't know; is that showing up on camera if you guys can see it? But like here that's in focus right here; you could throw it out of focus. When you throw it out of focus, you see it a little bit less; but that's just throwing a little bit of yellow. Let me turn on; that's at 7 or 6/9. Let me turn the other monitor lights on. So we could just kinda gotta play with the exposure on this one until it shows up. And look right here. Keep right here, Ron; that's perfect. And that should show up a little bit right there. I might have to turn it up a little bit more, one stop there. It's showing up; I don't know if you could see it up on the screen (mumbles). It's showing up with a little bit of the kiss of the yellow right there. I turn it up an entire stop, that might be too much. Because there you go. There you go, and you can see it there; actually you could see it on the screen really good. I don't know if you guys can see that right there, but there you go. Now you have, that's the same exact, literally the same exact setup that I had, same idea actually because not exact same setup because the only difference that I did is instead of using this, I had a beauty dish with a sock (mumbles). But it's the same exact principle, and you could see the same similar results; and, again, the only difference too was that that arm was in the boom and it was overhead over here like that instead of a little bit of a side light. So now we have this, so now let's actually do some nice portraits here with you man. So let's just do; we have spray bottles, too? We'll see how this works because normally the reason why I have that on the boom is because to see mists, you have to backlight it or cross-light it. So since we have that light here only on that side, Yeah, most of it's gonna come from this side. Yeah, most of it's gonna come from this side. So, you know what I think what, no, I'm gonna change the angle here slightly; and you'll see the mist. The only problem is he'll be off the red seamless. Do you want me to try to slide this arm a little bit? Yeah, could you move it a little bit more? That'd be great, if you could. Because if you don't have like the backlight or a harsh light hitting the mist, it's not gonna show up at all. But if you get it right and you do it like this, you get a really nice visual contrast because it'll make that blue light, it's what's lighting the mist, it'll make the water blue versus a red background and you'll get a nice contrast on there like that. And you're still glistening, man; that's great. I was gonna say I know you guys can spray him down; but he's still good, so keep it like that. So for stuff like this, actually I was gonna take a picture; but I don't think it's a good idea to make that pop when John's there. Oh, it's okay. Yeah, wait John's still there. So for stuff like this when I photograph athletes, one of the things I really love doing is go ahead, cross your arms again like this. There you go, and give me your left shoulder more. What I love doing, which you're not supposed to do in portraiture is go really wide; and let's see. And turn, give me your left shoulder a lot more. Keep it, there you go, like that. And go like this, and for something like this, I would have a bigger background. Keep, keep turning a little bit more. And if you go, there you go; that's perfect. Keep it like that and like that. And I actually use the distortion to kind of just give it more of a mood, a feel to it. I totally am cool with how this looks. The background's a little bit sloppy obviously because it's, I'm going wide and it compresses everything. But if you have like a gym or like a bigger seamless on there or you have him closer to the seamless, you could get all in the same place, so. Let's get that light in a little more. Oh, you're gonna boom it a little bit more? Yeah. You're gonna go tighter again, right? Yeah. Let's see how that goes. Keep like that. Let's do a quick test. Are you good there, John? Does it look like it's pointing at you? Can you look, just look up at the light here? Let me just. All set? Are you gonna move it? Try that. So look right here. There you go. So you actually see, this is more probably; okay, this should work with the mist.
Class Materials
Bonus Materials with RSVP
Ratings and Reviews
Barrie
This is a great class on the use of gels although I don't like the abrupt editing between segments as it always leaves the impression something valuable has been missed. The photographer has a simple approach to gels that produces outstanding images (although he could use imprecise language like 'this' etc a little less). As a teacher, I have viewed many of the CC Live classes and almost all are well produced with great information. (It is admirable and worthy of support that many of these are presented for free.) This class is one of the best and is a great investment if you want to give your photography extra impact. By way of coincidence, I was watching the movie Marshall the other day (the story of the great Supreme Court jurist Thurgood Marshall) and was struck by the use of color in almost every scene. A great inspiration for using it in still photographs. Get this class, it is outstanding.
JennMercille
Alexis Cuarezma is hilarious, very talented, and a creatively energetic instructor and artist! If I hadn't been attending Photo Week, I wouldn't have chosen this course, but boy am I glad I was in it! Gels have been an enigma to me for years (in the way that studio strobes used to be), and I was surprised at how easy and useful they were when Cuarezma explained and demonstrated them. His creative process is a joy to watch and learn from. I highly recommend this course to ALL photographers!
Xavier Finch
This class is still super impactful 1 1/2 years later!! I really hope to see more of Alexis at CreativeLive. He has so much insight and is an excellent teacher. His explanations are clear and concise with ample context.
Student Work
Related Classes
Lighting