Using Smart Objects and Warp Tool in Photoshop
Lesson 5 from: Creating Stylized, Artistic Portraits with Adobe PhotoshopKhara Plicanic
Using Smart Objects and Warp Tool in Photoshop
Lesson 5 from: Creating Stylized, Artistic Portraits with Adobe PhotoshopKhara Plicanic
Lesson Info
5. Using Smart Objects and Warp Tool in Photoshop
Lessons
Class Introduction
02:34 2Working With Brushes & Pattern Overlay in Photoshop
23:12 3Using Pattern Overlay and Pattern Fill in Photoshop
19:14 4Creating a Painted Backgrounds in Photoshop
15:33 5Using Smart Objects and Warp Tool in Photoshop
06:40 6Creating Balloons Using Shape Tool & Pattern Overlay
15:53Lesson Info
Using Smart Objects and Warp Tool in Photoshop
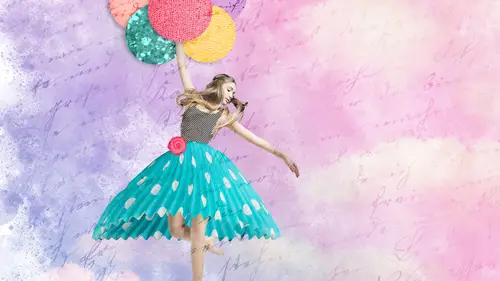
Next, we're ready to add our dancer. So, we'll go grab our dancer. Here she is. Now, I made a selection of her just using the Quick Selection tool. You can do that, just like we've done earlier, or, just for time, for now, I'm gonna use the selection that I saved in this file, so you can also do that. Select, Load Selection, and choose dancer and click okay. I'll just copy again, Command or Control + C, and Command or Control + W will get rid of that file, just clean up our workspace, and move back here, and command or Control + V to paste her in. Now, it's always a good idea when you paste in stuff like this to convert it to a Smart Object before you transform it all over the place, just in case. Maybe we shrink her down and we want her to be big again later? So, to convert her to a Smart Object, I'm gonna right click and choose Convert to Smart Object, right here on the layer. So, right click and Convert to Smart Object. Now we can shrink her down a little bit, Command or Control + T...
, and Shift + drag from a corner. The reason that we made her a Smart Object is because when we're done with this whole thing, if we decide we want her to be bigger, we would have lost all that information if we didn't save it in a Smart Object. Otherwise, when you scale things you forever lose the original information. So, that's gonna be handy. Maybe about that size, we'll click to commit that. That's Command or Control + T to Transform, scaling from a corner while you hold the Shift key. Alright, she's looking pretty good but I feel like her skirt could be a lot more fun. So, we are gonna give her a skirt made from this cupcake wrapper, and that's really fun, easy to do. We'll use our Quick Selection brush. I don't remember that I saved this one for whatever reason. I left you on your own here (giggles) to make the selection of the cupcake, so grab that with your Quick Selection brush, and then we'll Copy, Command or Control + C, Command or Control + W, close that out, and I'll paste it in here, Command or Control + V. Okay, so we have this cupcake wrapper, and we can make this a Smart Object too if I right click and choose Convert to Smart Object. And we need to flip this, so I'll press Command or Control + T to bring up the Transform box. While we're in Transform we can take advantage of a number of different things we can do to this. I'm just gonna right click and choose Flip Vertical. We're looking like a dress here a little bit. I'm gonna hold down Shift and scale this to a more appropriate size for her. I wanna at least make sure I'm covering up her underneath skirt. We'll zoom in, I'm pressing Command or Control + Plus to zoom in a little bit, and now I want to Warp this, really, so I'm gonna right click and choose Warp. And now I get this mesh grid on here, so while I'm in this Transform box I can now warp it, and I'm just gonna wrap it, this kind of melts it around her, so I can bring it into her waist. That actually looks pretty good. I don't really have to warp too much other than here at the top. That looks pretty good, I'll go ahead and commit that. Next, we have to create the backside of her skirt, so we're going to duplicate this layer by pressing Command or Control + J. We see two of it here in the layers panel, and I'm gonna grab the Move tool, and then scoot it down a little bit. We need to move it to the back, so we'll grab this in the layers panel, this copy of her cupcake skirt, and drag it below her. She's layer three right here, let's rename that while we're at it. Double click and we'll call her Dancer. So, she has one cupcake skirt on top in the layers panel, and one cupcake skirt layer below her. She's sort of sandwiched in between there. I want to target the bottom cupcake skirt, and I'm gonna press Command or Control + T again, and right click, or Control click again, and choose Warp 'cause now I need this to come down in the back. I should've left it probably where it was on this side. Something-ish, like that. There we go, hmmm. Alright, so about like that, and then we'll click to apply that. And for one little bit of realism in this whole fantasy portrait, we should put a little bit of a shadow inside this skirt a little bit. So, on this background, the backside on her skirt, we want to target that and click Effects, and choose Gradient Overlay, and hopefully this is still set to our black to white gradient. If not, you can go back to your Reset Gradients, and if you need to, you can also choose your black and white over here, but hopefully it remembers. Gradient Overlay, and this time we want a linear gradient, and we'll keep the blend mode, and we'll change it to Multiply, and we need to inverse this, I think. There we go. I can actually drag within the image to move this gradient around, which is pretty cool. Whoops, did I just lose it? There it is. If you drag the gradient off somewhere and you lose it, just hit Reset Alignment. With this layer style dialogue open, I can actually click in the image, I just think that's so cool. So, I don't have to know the exact angle, or settings, and all of that. I can just visually drag it to where I like it.
Class Materials
Creating Stylized, Artistic Portraits with Adobe Photoshop - Adobe Stock Contributor Tutorials
Creating Stylized, Artistic Portraits with Adobe Photoshop - Course Files
Ratings and Reviews
Bess Palmer
I really liked this. I learned a few new tricks and got to practice others. I liked learning about the Kyle brushes, making a pattern preset and using it in pattern overlay. I was thrilled, really!, to see the eraser in clear mode. How great that will be. I am an intermediate user, lots of tutorials, but not a lot of practice. I watch them like soap operas. The pace was perfect for me.
MJ
Loved this class due to Khara explaining the steps so thoroughly. Pace is nice and easy and understandable for all levels. Great little course on creating a wonderful piece of multimedia in no time at all.
Karen Keegan
I learned so much in this class - so many tips and tricks. It's great to see different ways to do various tasks, including shortcuts I wasn't aware of. Khara is a great teacher - her pace is perfect, and it's easy to follow her steps. I really enjoyed this class!