Lesson Info
1. Creative Compositing with Aaron Nace
Lessons
Creative Compositing with Aaron Nace
1:14:45Lesson Info
Creative Compositing with Aaron Nace
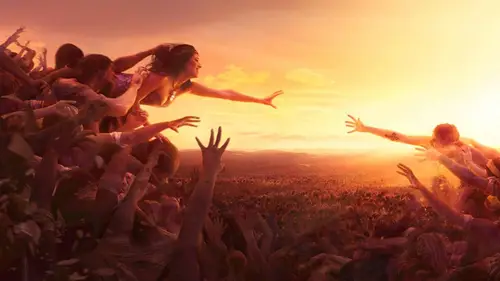
We just show you guys a little bit about compositing, and I'm gonna show you guys some of the things that maybe you can do with compositing and compositing is basically there we go, let's, just make this a little bit bigger. Compositing is basically combining multiple files together so it can be done, you know, very simply in just like what we did in alaska's, where we took a little bit of hair and edit it to the person. Or it can be done quite a bit more complexly. And here we have an example of something that's quite a bit more complex. This is an image that I shot over a few days. We shot thirty different people in a set that we built in our studio, buried everyone this deep in sand and built this entire image, which is probably over one hundred fifty mega pixels. It's absolutely huge. But the entire background, every single piece of this image is there's no actual landscape in it all the way from as far back as you can see. It's actually all made up of people, you know. So we have ...
our main character, it's, a story about a woman who loses her husband, and she goes to the underworld to save him, so we came up with the story and I had to figure out a way to pull it off. How do you build an entire sea of undead thousands upon thousands upon thousands will resume in so you can see thousands upon thousands of people so these people were all cut out of their backgrounds individually and then place together? I mean, you can see even down here, you know, these are all people there's no dirt or sand or anything it's thousands of people. So this is kind of I would call an extreme example of something that can be done with compositing cutting out many, many different people and then coloring them and building a complete background out of them tow what is going to make an entire scene so again, this is kind of like an extreme example of what you can do with compositing, but it's one of the reasons that I love compositing because it allows me to kind of push the boundaries to do something like this, where you you just couldn't do this really any other way. So yeah, that's one of the reasons why I love compositing so that's an incredibly complex image, we're going to do something amazing today, but it's not going to be it's not going to be as a cz complex, all right? So the image that we're going to be doing today is actually same techniques so I just wanted to talk about I'm gonna bring up the images real quick it's basically the same techniques that you would do in any type of composite and that is, you know, cutting one object out from one image and combining it with another image and whether you guys are doing this you know, a thousand times a million times like we do but that lost souls image where it was just on over and over and over on the the base like the core ideas always stay the same it's just like you know, to what degree are you doing it if you want to turn a a person to make them look huge look like they're standing over a whole city that's the same that's the same idea is if you wanted to make them look like they're super small in like a shoebox it's just the same principle's the same techniques in photo shop just a little bit of a different idea in this case we actually are doing kind of like the shoebox idea I'll tell you guys a little bit about this image and then we're gonna go ahead and get into a positive. So this image photographed in the basement of the art institute in chicago I live in chicago and there's a collection of these miniature rooms in the art institute of chicago they're absolutely amazing into one of these rooms is maybe like eight inches to a foot toll. You will just zoom in. So you guys can see that the amount of detail in these, you know, everything is handmade in in these rooms. This is how we're getting this extremely shallow depth of field in what's an entire room. So these are complete miniature rooms again, these air, like literally this big. So I found these in the theater when you found the collection has been there for some time. And it's it's very well known in the basement of the art institute of chicago. And I was just like, I have to do something with these. I have to I have to make something out of these s so what we did is my team and I came up with basically the idea is to create a series about based on the novel doll's house. A play on how women were kind of made a fuel small in the world and made to feel like a dull and not really that important by by men. And you know what kinds of social the agenda is going on here, but basically the idea that we wanted to make it seem like these women were kind of stuck in these small cages waiting for the lover the life, so that's the concept behind the shop and to actually pull it off. What we did is we photographed thes miniature room so that's the ministry room and then what we did is photographed models in our studio matching the lighting of the manager rooms, so we'll show you guys thie image we're going to use today, and this is out one of our model she's amazing let's just use our move to bring this in, and we're gonna talk about matching lighting, matching, posing, angles and things like that, building out a concept, and then we're going to actually get to doing the deposit. So most important thing when you guys were doing composite, if you possibly can, you want control every piece of the puzzle, the first thing you want to start off with is your background, because that's, you're going to have the less amount of control over your background with your photographic a subject for things like that you can move lighting around, you can change the pose. There's a lot of things you can, too, but this background is pretty much like this. It was behind a sheet of glass I'm like, like reaching their moved the chair around, like, get arrested, I think this was in a museum, so I didn't have a whole lot of control over this, so this is always what you want to start with. You want to start on for the thing that you can't really control that much. And in this case it's the background, most of the cases it's your back, so then you take your background and you kind of analyze it a little bit and that's, when you build out what's going to be your composite. So we knew the chair here is in focus that's where our subject is going to be so there's a lot of key things that we can kind of look at in this image until what's necessary in photographing a person to go into this image and some things that are going to help it be a little bit more realistic. First of all, can anyone see where the big light sources are in this image? Everyone can see, right? Yeah, this is a giant windows right over here and that's the most important thing when you're going to do do a composite. So if you're photographing for composites, the most important thing you can do is lighting pay attention to the lighting. We've got two giant window lights here and so we know the location with lights. We know the size of the lights. Thankfully, they're there. We know the rest of the room is relatively dark. So our fill light the lights not going to come in here and bounce off the white wall and fill in all of our shadows. So our shadows is going to be a little bit darker and also the color of the light, the colors like a little bit warmer, right? It's a little bit of that yellow color. So what we basically do is kind of analyze all this, see if we can figure out a relative angle that we're looking at this chair at and that's just mostly guesswork, and then we duplicate that here in the studio. So what we have here is our subject and she's on this is basically just a white seamless paper right behind her to help us. We're going to be cutting her out from her background. That's gonna help us cut her out and then to the right of her, you can see it's, you know, just look on the floor that area's and highlight that areas in shadow. So we have a lot of what's called, like a b flat it's, basically just a giant white piece of cardboard that you shine a light in we put cto gels on there just teo color temperature orange to warm the color up to make it look like it's that you know, same warm color that's kind of coming in from the side and let basically lighting from the same way. So we have our subject she's being lit from the same direction as our as our background she's being colored the same direction we have things like the floor she's standing on his relatively dark and the floor she's going to be sitting on it's not standing but sitting is also relatively dark. So these things as many of those things is you can match in the actual photograph the easier your job is going to be compositing you guys can probably see without me doing anything that this is probably gonna be easier to composited into the background. Then you know, cem image of a kid sitting on a beach that I stole off the internet, right like that in that image there would be nothing that will be similar to the original. And this we were able to sculpt all these all these details around matching them to the background. So that's kind of lesson in compositing and how to do it a cz faras photography ghost and I'll show you guys how to do it in photo shop and again, all these techniques that we're going to use today they're relatively the same across the board just depends on, you know, using him for that image or that image and we have a quick question. S so why use a white screen behind? Wouldn't a green screen be easier to remove her? That is a great question oftentimes green screens can cast like a color cast were probably talked a lot about selections this week and, you know, selecting out someone's arm sometimes you'll get a little what's called fringing and if they have a little bit of an area around their arm, you might have like a little bit of a green line around their arms you can take care of that in photo shop just like you can take care of a white in this case we use white often when we're going to be cutting people out it just makes the selection process a little bit easier, but if they if they like green if that's something that are a little more more comfortable with that totally works. Another thing to pay attention to in this case is I can see what is quote unquote white that has been applied a color cast from my cto gels, and I can compare that to a relative white in this image as well there's no green in this image, so having that be green wouldn't really help me in comparing color casts so kind of to several reasons good. Good question. I love that question. All right, so let's, get into it. Now we're gonna be using some really advanced techniques today. This's an advanced class, by the way, we're gonna get doing some advanced stuff, but it's going to be a lot of fun, and I hope to explain it. Well, so everyone likes doing the event stuff. First of all, we're going to start by lowering the opacity of our layer. And we did this earlier. Basically, you could just see, you know, a little bit of what's going on this layer and a little bit of what's going on beneath it minute command tea and that's gonna bring up our transformed dialogue and then I'm gonna hold down the shift key and just kind of bring this in holding down the altar. The option key will size from all directions at the same time. So our subject in this case is making up a relatively small area of the image. She's just gonna be sitting on this chair here on dh to get her toe look about, right? We had her sit on a chair's well, and keep in mind what you photographed, a lot of this is going to be cut out, so a lot of these things are really not that important, you know, the chair that she's sitting on in the photograph doesn't have to match the chair from background it's just the fact that she's sitting on a chair, you take the pose, you delete the chair out and you've got the other chair there, so most of the things that you can't see in the photograph really don't matter. I mean, you know, like there's a light stand here and stuff like that, but that's that's not important, the only important part is their subject right here. I'm gonna just do a very quick job cutting our subject out, so I'm gonna grab my lasso to hell for the last two. This is not, by the way final at all. This is just a very, very quick job, and what I'm gonna do is I'm going to use this very quick selection tto help me position our subject, so we want to get our subject in the right place, looking like she's scaled correctly and everything, and then we're going to go ahead and start accurately cutting her out. So if you have a selection around someone just like that, just click on your layer mask icon so square with circle in it and that's just going to cut them out and again, I'm gonna lower the opacity there and just basically looking, you know, by eye. Is, you know, issue two largest to shoot you small, maybe she's a little bit large in this case, so we're just going to do the same technique earlier, holding downshift and alter option based on the seat of the chair. I can now make this either larger, smaller and we can figure out a back about exactly how told she needs to be and I want her feet to look like they're hitting the ground and you know, right about there works pretty well, maybe just a little bit larger if you change your mind later on it's not really a big deal. You khun you could just make it a little bit larger and smaller if you do small adjustments. It's not going to degrade image quality that much. If you make a tiny in the maker large again, I would recommend making a small object a smart object first, because that will help with that will help with your not degrading your image quality. Okay, so we have to cut our subject out from the background and that's just the first trial of difficult things that we have to do with this image. Now there are depending on how you photograph things. There are either easy ways to do things, or there are hard ways to do things. The easiest way to cut someone out is to photograph of on a white background then you can just use like the lasso tool or the magnetic one tool and just click there and it's very easy so we're going to start off with that in the areas that we actually can't do it I'm a huge proponent of things like the pen tool and you know, cutting people out with great precision but if you don't need the tool that takes a long time don't use the tool that takes a long time if you can use a magic one tool for half of your subject, then why not use a magic wand tool for half your subject? So that is let's just click all that sample all theirs that's I think a big lesson in compositing it's you know, using the tools that actually allow you to be a little bit faster I mean, you guys are going to be doing this sort of stuff if you're doing it a lot, you don't want to spend twice as much time as you need to I don't anywhere I don't think that you do as well, so incoming someone out for the background like let's say we have ah white area all around our subject I can just get my magic wand tool and that's going to make a relatively nice selection outside of our subject hold down the shift key and click there, which is going to then select this area and we're gonna click around their chair and as long as wherever I'm clicking doesn't appear to be the same as our subject's skin it's going to do a great job cutting it out, it's going to select basically based on you know, what is where I'm looking now you can see I'm just gonna hit undo if I click here where it's relatively dark, it is pretty close to her skin color. So if I'm clicking right there, there's a good chance you can see that it's selected too much if that's case just hit option quincy and step back in time a little bit. So I do want to show you guys how to use a pencil, mostly because I think it's a really great tool that everyone should be happy with in their lives. So I'm going to do that with the legs, so we're going to start off and I'm going to use this election tool on the top part of the image. So that's, another thing to keep in mind is you don't have to use the same selection tool to cut on entire person out if, eh? Magic wand tool works for the top part of part of a person cool use it there if the penta works for the bottom part use it there if you have a different technique that works somewhere else color range you can use it there there's really no rules and you can do it you know, using any combination you'd like so we have cut out I'm gonna click on this refined edge dialogue which is going to help me to kind of see what I'm doing just a little bit better it's going to help me to see what we're actually selecting and what we're not selecting but you can see because we selected out the background, the background that's what I see I actually want to invert that s o I want to see the detail of our subject, not the background so before I go to refine edge I'm just going to go to select and then down to inverse and now click on refined ej and I should see the detail of our subject okay, we have a couple different views here that we can see we couldn't have it say like you know, viewing how how would it look like if it were cut out on black? How were how would it look like if it were cut out on white? How would it look like if it were cut out on the actual layers that were our beneath it and that's what? This that's the setting that we're going to choose so we can see this is how this's how our subjects actually going to look on the layers beneath it and we can see we have a little bit of a halo now this is the big thing with compositing the halo is something that is going to just like, you know, it's going to get in the way of doing basically any kind of puzzling but there are a couple really cool tools right here in the re fine edge that are just going to help you out quite a bit. The first one I would do I would suggest is can you guys see it's pretty jaggi? Right? Like nothing looks that jagged e everything behind his smooth, eh? So we're going to turn up are feathering just a little bit and that's going to take away that thing that's you know, it's going to take away the jagged edge. Now when you do feathering it's going to make it the edge is very soft. So you have a jagged edge that you want to soft in, but then we're going hard in it again, and we're going to do that with contrast now I know that seems a little bit counterintuitive, but a combination of feathering which softens it and then you add the contrast which hardens your edge it takes away the jagged nous so you have like, you know it's basically like using sandpaper on it on a jagged edge so make itself and then make it back already get so we haven't feathered and then contrast but we can still see a little bit of halo now we can shift this edge either inside of our subject or outside of our subject so if I go out words were going to say we're gonna have a little bit more of a halo if I go inside a little bit we're going to basically completely eliminate our halo let's just bring up our edge are contrast a little bit and there we can see let's just show the original we went from you know, having that jagged edge that just looks like it's you know, completely cut out to something that actually looks really nice it looks like it was done you know it's actually in the place she looks like she's sitting on a tiny little chair and you can kind of change these settings too you wanted to get it just about where it starts to clip there we go you don't want to go too far or else it's just going to you know, start to degrade some details and things like that so we'll go right to about there and I think that works so I'm gonna hit okay and keep in mind that's again it's just our selection so we have a layer mask already how do we apply what we just did to our selection to our lame ask so white on a layer mask makes things visible black makes things invisible so we have this election right now that's that's our subject just over here and what I want to do is honor later mask either wanna fill that with white or black so what we're gonna do I'm gonna hit shift elite is going to bring up our fill dialogue and weaken quick to choose it to fill it with black now keep in mind remember wee inverse our selection earlier so I have to redo that I've gotto select down here to inverse again and then hit shift delete and then fill that with black on our layer mask so what we've done is anywhere there was a white background now we have a really well cut out subject and that, you know, going to the question we talked about earlier why did we put that white sheet behind your if there were, you know, light stands and someone walking by and things like that we wouldn't have been able to make that selection nearly is easily so that worked really well for the top part of our subject and you could see it really didn't take that long um on the bottom part of our subject, we're really not gonna be able to use, like the magic wand to will, because we have so much of this detail in all these places with books and with the chair and everything like that it's going to be quite a bit harder to use the magic one tool so again, use the tool that's the easiest for the certain area you're going to be doing, and then if you need to use a little bit more advanced tool, you can do that, too. So that's, what we're going to do now, we're going to cut out the bottom part of our subject with a little bit more of the advance school and the two were going to be using is the pen tool it's raise your hand if you like the pencil, one of those defenses? Okay, well, my job today is to change that because the pencil is really great, it just takes a little bit of time to get used to, but you'll find that it's incredibly useful, and there are things that you could do with a pencil that you cannot do with any other tool, then that's cutting things out for the most part, so I'll show you guys how to use a pencil in a really quick, easy way with a nice white background. All right, hit p for the pencil and we're going to a pen paths now there's nothing to be afraid of pan past basically just make selections and you can make selections in a number of ways. The easiest thing you can do is just click a couple times let's goto window and down here two paths and I'm gonna load those up right near my layers okay? So I'm going to start by clicking here and creating a couple points and nothing new here we've clicked a couple times and it makes the line between each of these points. Now, as we're clicking, we get something called our work path that's basically the path that you're working on if you want to turn that into a selection it's really easy just right click inside of it and say make selection you can feather your radius or not in this case we can choose not to and it's just gonna make wherever I clicked into a selection so super easy click on our work path again and we have our work half now you can see our little control points went away the great thing about path sees you can change them anytime you want right now there's you know the control points aren't there, but if I hold down the command key you're the control key they're going to come back so holding down controller command I'm gonna click on these points and now I'm going to move these around and it's going to change the shape of my pen pass so I'm not adding or subtracting any points right now I'm just moving these points around if I want to add a new point I just go right over here and click on the actual path itself and then I can hold down control and move that around as well so adding points click on anywhere on your line to subtract point away just clear on your line again there are really only two keyboard keys you need to keep your fingers on the control the control of the command key and the altar the option keep alter or option takes hard edges just like this and it will make it into a smooth it's so hold on walt or option click on one of these points and it's going to turn it into a curve so now you have a curve that's defined by this arm right here is basically pulling that part of the curve up and this arm is pulling that part of the curve out so we'll do the same thing here click alter option click and drag there and this is pulling that part of curve up and pulling that car part of the curve out so that's basically all we need to know about the pen path it's it's really that that's all you need to know now if I want to let's say, I want to, like, do something that's relatively similar this I want to create a something that follows the same line. What we can do is kind of like predict the future a little bit of what's going to go on with our pencil, so I know that this curves like that curves around this way, so I'm going to start a new pen path by clicking here now I want this kind of follow along this path, so what I'm gonna do is I'm gonna click I'm going to find about where the curve stops, where it starts to change directions. So if we've got one curve in one direction it's going to change directions in another place so I can see it's kind of going up here and right about here it's kind of changing directions and now it's going down so I'm gonna click writer boy sorry, I'm just click and drag right over here and that's going to allow me to kind of follow that curve around so this is pulling that way. Now I know the next place I'm gonna click is going to be pulled down because this arm is kind of pulling down in that matter, so I'm gonna find where this curve kind of ends, so it starts here and it kind of comes around and then it changes direction right about here and starts pulling down that way I'm gonna click here and then pull out in this way so you can see based on how far I pulled on things like that, where I'm actually clicking is going to be, you know, how it actually follows this curve now I've got another curve that's gonna pull way down this way I'm gonna click over here and we can pull on out that way and that's going to follow that around so you can see these curves both kind of defined that any of these things I can move in any time again holding the control key or the command key, I can move these, I can move these control arms, and basically that just means you don't have to be good at the pencil it's awesome like you, khun suck at it and you could just change your mind over and over again. You can grab all these little points and you can you can just keep doing it over and over again so that's a pencil on dh again, right quick and you can just say, makes election and it's going to select whatever's inside of your current path. Cool so it's elite that path and I'll show you guys a little bit more of a practical example we're going to cut out our subjects legs using using the pento so we're going to start off right over here because this is where you know the background is becomes visible we want to cut out our subjects like so I want to pretend like you know you were doing a drawing and you want to like kind of come in smooth into the leg I don't want to start right inside here because it might be like a little bit jacket so we're going to start in with like a smooth transition into into her leg just like that in the same like we were trying to do earlier like find the point where the curve starts to like curve the other way so we have a nice smooth curve here and then it starts to like come down right about there so we're going to click and drag here up to about there now I can continue clicking and dragging if I'd like to do that and now we can see this curve is now following the line of her leg all right? So it kind of goes down now and this in fact will go down as well so we're gonna click here and again it's going to curve down and we're going to click teo just ignore that part of her shoe because it will be easier if she wasn't wearing a shirt that looked like that way could just kind of click and drag these around and bring this right around there so you can see just by clicking you know you just have these big natural curves and that's the best way to use the pen tool don't try to click a lot of little time because you're going to get something looks a little bit more jagged and not his fluid so just these little clicks now again we said alter option are the two keys you want to keep your fingers on so any time you want to make an angle hold down the altar the option key anytime you want to make something smooth that's like the control of command key so in this case I need to make an angle so we're gonna hold alter our option and I'm gonna click on this old guy and bring that up which means you know the leading part the part that went into the curve is going up this way and now the part that's leading out of the curve it's going to go up that way so they're no longer tangent but if I click there now we can see I could just hold down control any time you want to you can hold on patrol move these things around I can then fit to exactly what's going on there with the shoe so we'll just kind of click and drag that out again we need to angle here so alter option is your angle we're going click and drag that out in this direction it's going to pull it out that way click there and I kind of just that if you lose it I just I just lost it if you lose control here all you have to do is hold down the control key if you lose control with the control key is getting control hold it down and then this it'll bring all your control points back and you can kind of continue on your path now what the other thing is going to do is if you click off your path is going to think that you want to create a new path so just bring your cursor to the end the path who'll you get it looks like a square with two sides to a rose sticking out from either side click on that it'll know you want to continue along with the same path you're currently on all right so I'm just gonna keep going on this and you guys can see if I've used the pen tool a number of times but it really doesn't take you know if you guys are using the pen tool it shouldn't take more than a couple weeks you don't have to do this every day or anything like that but you said you know like, try using on and on your next project and where you might be extremely slow with the pencil now it's just doing the same thing over and over again I need to angle there so hold alter option, click that down and then click here I'm kind of predicting that this is going to go up in that direction so we're going to click and drag up in that direction and, you know, after using this for a couple of weeks you guys will probably find that you can cut in an entire person out in less than five minutes, so again we have like a curve there and click and drag out and we have a curve alter option you guys are snickering not five minutes fifteen minutes. The biggest key though is if you have like a large area here like that's a huge area and I can cover all that with like two or three klicks of the pen. So this is really come out and then come back in right? So I can kind of dictate that by it's going to come out coming back in and now like this is just one big long curve I'm not going to click again until we get like, you know, basically to right about there and then we can kind of, you know, click that so it goes up there and then again up in my leg so if you don't have a time tunnel lot detail like you do here it goes really, really quickly you know click and drag up there and right up there and we've basically you know, we spent time teaching and we just got a whole leg out so you could see it really doesn't take that incredibly long do you have questions while I'm going I got a whole lot cathy j would like to know what music you're listening to you clip in my head what just music e I mean your brother that listening to music usually that's a good question daft punk did a killer soundtrack to the movie tron and if you guys know what I'm talking about pretty much every time we needed to like get into into the group I listen to that punk album it's pretty sick you're just techno something with a lot of noise and no words when you have another photo shop question okay fun question a self serving host question huh? What what's anti alien scene d'oh what is anti air leasing dude that's a great question what that does is basically take something that would look jagged and make it look a little bit more smooth and in reference to the pencil you khun basically anything that is selected by the pentacle creates a path and passed the really cool because they're actually created by like mathematical formulas so they have nothing to do with the actual pixels on the screen there completely different they're called factors so they can scale infinitely you can make them as big as a billboard or is you know tiny is a most fuel molecule and they won't they won't pixelated you know they won't get that like nasty looking where you see all the pixels so like fonts for instance all the fonts you guys use those air actually vectors eso those air made with like pin paths or you know, in a fun making program or I don't know I don't make phones for a living, but they're vectors so the cool thing about using vectors is that you won't get you won't get pixelated edges ever basically you could make something as large as you want as small as you want and it will in a sense be anti earliest I said answer that question I think so I think that's a good question anti only thing is keeping things from looking like a pixellated so here's another great example let's back to the shoot it's a very nice sweeping curve all the way up and it doesn't change direction it doesn't like it's coming up this way it doesn't come out the other way until it ends so I've got a point here at the very bottom of the chute and I can click all the way up to the very top issue and drag out and I'm able to match that curve exactly so any time you have one sweeping curve one way click a point at the beginning in the end and that curve is just gonna get you there it's when you change directions you need to create another point and just go again so and this will freak a lot of people out like okay now I need a praying over here but it's you know it's bringing that way up there just member that's when you want to hit the altar the option key you won't change this directions get that under control and there we go do you have an opinion one way or another aaron on the rubber band feature I've never heard of the rubber band feature so my opinion is what is it if you go you're top bar next year pencil right up there there's a little check box and that you can click on to the last go more to the left a little click click that yeah that give you so it's not there move a little bit more to your right path pixels there's a little arrow right along there somewhere uh hard for me to see apologize no words maybe just tow in the rubber band yes so quick that on okay oh thrown for a loop here alright was this do it just it just hold that line for your next power my opinion is I really like this yeah you will you will it's making it really easy yeah wow jesus get over here. What am I doing teaching photo do you know about the rubber band tool yeah sick I really like it okay, so it kind of gives you a preview of what's gonna happen next and it will also build into found building to account the like a control point right? So if I bring this out it'll kind of guess where my next one is going to be pulled in unless I hold ultra option pull that down it's going no guess you know what I really like that and I think the folks at home are gonna like that here were community that's awesome thank you. I really did not know about that I don't know what this is sticking out of her bum right there that they use a strap from regard or something like that so we'll keep that point out and with a rubber band tool we're going to see that if I went over here it would not create a straight line so I'll hold that author option and kind of bring that back in there we go that is a nice feature man to think ofthe mental and I couldn't do without that all right and so that's pretty much it guys does anyone have any more questions about the pen tool so we have a question this is a general question when clipping many parts how do you join them all together when finished and prevent little slicing lines that's a great question okay when clipping many parts minutes on the rubber band tool off real quick what I tend to do is I'm going to finish out this spath okay? So we're going to finish out this path and I'm going to do that by clicking up all the way over here so I know that my selection area is now you know, on the bottom here, you know, between the legs and things like that and over here now back on her path I'm gonna click over here double click on it and we're gonna call this legs okay now it's important to name your layer sorry name your past because if you don't the next time you created path it's going to save over your quote unquote work path okay, so enjoining them what I tend to do is create a separate pen paths so let's say this area here where we just kind of ignored that shoe earlier what let's create the new pen path and not ignored this time so if all create a path that goes up like that and we'll just kind of cut this out relatively quickly there we go put a little curve in there okay, so we have two paths now and I hope that didn't just undo that because it didn't go on a new path you have to hit the new path icon turns out if you want to create a new beth you can't just do whatever you want and expect photoshopped to read your mind unfortunately I think that's a c s seven feature e did you know I wanted to do that all right, there we go. So that's a new path andi we'll just call this strap now what I would do is combine everything on a layer mask so let's say we have our legs already defined which we do so you can either click sorry, right click here on your leg or you could just write click here in say make selection right there in your path so what we're gonna do is here on her later mask now what I want to do is invert my selection sorry. No, this is good. We have the selected, which is the outside of her legs and then you guys remember how to make something invisible mask black. Exactly. So we just fill this with black so I'm gonna hit shift delete and we're gonna say use black and there we go it cut out of gut out her legs completely and there's a little bit of a hailing I'm gonna show us how to take care of that not a big deal so filled with black but now we have that strap. So if it's multiple different parts that were trying to combine together, I would do this with different pen paths, so we'll go back to our paths. Now I can command, click on her strap and then here in our lame ask, how do we make something visible in a mask? Exactly? So shift elite and we'll just say, use white and within that pen path now, it's just going to make it visible on the layer mass. So I do all my compiling right there on the same layer mask that's a really good question, and I can hold alter option now, and you can see how nice and clean my selection is. And if you guys have ever used like a lasso tool or even the magnetic lasso tool, you'll probably well, this is a little bit funky because that's actually left over from that's left over from what we were using the quick selection we're sorry that this tool I forgot the name of it, but we'll fix that so you can see how how much cleaner this is then basically, any other tool you can use in photo shop, you have a very, very clean edge, so if you are doing compositing, I would really recommend getting familiar with the with the pencil because it's going to make your edges of a very much more clean and it's going to make a composite of the whole look quite a bit more believable. Okay, that's a good thing to take care of right there. So we have a path here, a leg classless, just command click on that and this was left over from when we were using the mad magic wand, but we can still go right on our path, which were already clicked on. I can use a brush tool I can use a phil tool on dh I'm just going to paint with white in this case right back over there and it's going to fill it back in. So if you don't want those little marching ants there's a quick tip you can hit command h, which is just gonna hide them and now I can paint that songs I invert my later mask so select sorry, inverse my selection inverse hide those little marching ants and then paint white there and it's now going to paint it's not going to take into account. You know that stuff that I had going on from my from my magic one selection, so we have a very, very nice selection of our subject, and then we just have a couple areas that are a little bit we didn't bother cutting those out like that I'll just paint black over um this is a nice area we'll just grab a lasso tool there we go shift delete and fill this with black there we go and we'll do the same thing with this area here is well, so we used the last two in the very beginning to get a rough a general idea of how our subject's going to get out and look at that guys, I mean, you you really just can't get much more perfect in that, right? The legs are perfect. All the little details even, you know, the straps and everything like that. So that's a huge reason why I would really recommend using the path tool because on the top we were able to use the what is this? If you don't know what in tools called, just click over here don't you think it's called magic ones who owe another cool tip if you want if you guys wanna cycle so let's say you're using lasso tool and you want to cycle through their different last so tools right you could hold down shift and the letter of the tools so lasso tool is l if you want to cycle through those hit shift and hold down l you go from the last one tool magnetic lasted two police in the last tool and that's cool way to ship through them so now that our subject is more cut out from her background she's looking better we're ready to place her a little bit better in the scene let's say she could sit on the chair maybe she's a little bit she needs to be a little bit bigger right guys I don't want to grab the control point someone hit command tea just make her a little bit bigger I'm gonna click right up here on the chain link between my wit and my wife hit the wrong button my chain link between my with my height and I can just click here and I can drag and make her a little bit larger or a little bit smaller and I don't have to control any you know I don't have to click and drag any points or anything like that all right and I think that looks like it's a pretty good match based on based on height yeah maybe she could even get a little bit larger with that it's pretty cool right what you can do you know, just matching color and lighting we haven't even done anything with shadow but you know just right off the bat we can see and I think without having really much skill in compositing really much expertise I really think just about anyone could get here all we did was matched the lighting in the camera and cut her out using the pencil, and we're already so much closer than we would have been before, so you don't need to be a super artist. You don't need to be incredibly, you know, you don't need to have used photo shopped for many years were already there. Now the next thing I want to show you guys about and this is really what makes the difference between a decent composite in someone being cut out, you know, kind of well, too someone that looks like they're cut out really well and that is clipping masks do you guys know about clipping masks? Yeah, some here and there we're talking about a little bit last you guys a little bit masks because we'll do this in front of in front of mental, I think it's romantic, all right for the fireplace clipping masks are really, really cool, I use them all the time and hopefully you guys will after this, basically, what a clipping mass does is it keeps one layer visible on lee, where another layer is visible, so let's say, I've got my brush and I'm just gonna paint white something nasty like that let's just bring my flow up there we go, so I've just painted white in in that area and you know, it really doesn't it doesn't mean anything right now. Just showing for example, now I'm gonna paint another layer on top of that and let's just grab like a bright red color and I'm gonna paint this bright red everywhere. So if I want to make this bright red on ly visible where the white is there's a number of things we could do we could try to make a layer mask out of the white by selecting it, turning it into a mask. We can try all kinds of crazy selections, but for a shop has built in what's called a clipping mask, which basically is a command that says, you know, make the layer that's here visible on lee, where the underlying layer is visible and that's what's called a clipping mask so teo get a clipping mass active there's a couple things you could do right click on your layer and go to create clipping mask is probably the easiest thing to do so to create clipping mask. All of a sudden the layer moves over. We have a down arrow that goes right down to this hero. And now just like any layer it's just only gonna be visible where this layer is. So it points to the layer where it's visible is that amazing? Like so quick and easy now the coolest thing is it continues to go until you tell it to stop so let's just grab another layer and on this layer I'm gonna paint with blue okay and then option command g by the way is the keyboard shortcut to create a clipping mask you'll probably use them a bunch and you can see this is now slipping all the way back down to that layer as well so you can just do it you know again and again option command g you can create, you know pink and then either before or after and you can unclip the option to mandy clipping unclip you can also use adjustment layers let's say you want to use a curves adjustment layer and darken everything down option command g it's going to clip that down as well so you guys are probably seeing this is relatively useful. I mean, even though it's on something it looks like you know papa smurf was murdered. It's a pretty useful technique, eh? So how do you get it from looking like looking like a murdered smirk says something that you can actually use. Well, if you have someone that selected out of their background really well, this is the best time to use clipping mess so I'm gonna show you guys some things that are going going toe hopefully blow your minds so these air areas that you're going to get no matter what you do, you're going to get these little white areas you know, these halos if you had someone on green for instance, you get a little green area, you're just not gonna be perfect. Perfect, perfect with pencil it's not really important that you are because you can use clipping mass to hide your errors. You can use clipping mask and they're going to make this way easier. So let's just say for fun's sake, we wanted to paint that you know, this nice magenta color purple, whatever it is and we're going to clip that option command g will clip and now that's going to only be visible where her leg is, right? Well, magenta color really doesn't help out that's you know of no use to us but what if I just paint that with the color that her leg is on? Dh that's what we're gonna do let's make a relatively soft edge brush cool keyboard shortcut if you guys were used to mac, you gonna hold down control and option, click and drag up and down we'll bring your hardness harder or softer and left and right we'll make your brush larger and smaller if you're on a pc and you guys don't have to tell me about this, someone just told me I think it's control in right click so I have someone last night and they told me I just don't I don't use a pc much, so maybe someone in the chapter for chat rooms don't think you give a shot it's just a very cool way to change that. All right? So let's set option command you and let's take care of this halo so we're gonna use our brush tool I'm gonna paint it a flow about forty percent. I want a decent bit of going down holding down the altar the option key. I'm gonna sample this color remember, like we did in the retouching tutorial just sample I'm a sample this dark color and then I'm just gonna paint right there and it's only gonna be visible where our subject invisible so I don't really have to make my selections that good because I can just paint away anything that doesn't look like it belongs, sample the dark color and then paint there and because this is on ly visible where my person is visible where the underlying layer is, I don't have to be neat. When I do this I don't even really have to sample the right color just something relatively dark. We'll take care of it and this is very, very cool so if I unclipped that we can see options man g that's what it looks like it's just a giant blobby massive brown but clipped on it looks very clean and very good cool he has have any questions about that was that it's pretty cool right? You probably see the same thing with hair really easy if you guys don't want to select out here just do a rough job and then just grab the color that's the hair and then just painted in and then you just like okay, cool good I don't have to select hair out well ever again just do a bad job and now it looks good awesome so just save like hours and hours of your guys is life um in this case, if this was a tutorial where I was going to be working on this for hours and hours and hours, I'd probably go in and try to do a little bit better of a selection of the hair or go into with my brush tool paint some stray hairs and things like that in there but in this case it works totally fine so we're going to get into our next couple of steps and those have to do with like color matching and we're going to do those using clipping masks well, because again I don't need a color match anything except for our subject, so we're going to do that by you living masks on our subject as well, all right, so to do that I prefer curves and you can use levels you can use curves you can use really anything you want, you could use a q saturation we're going to use a couple different techniques but let's grab a curve adjustment layer and I'm gonna hit option command ji and we're going to clip that to our subject. Can anyone tell me anything that you noticed about our subject like about her not fitting in but it's um, some adjectives or like, why doesn't she look perfect? Is basically my question. Is she to lyon issue to dark? Is she two yellow she to read issue too saturated? Maybe the focus at the very bottom of her feet that's a great one and that is super advanced and we're gonna get to that at the end of the tutorial, but that is definitely good point most of time when compositing, you don't have to do that because you probably won't be shooting in a room that's this big, but in this case we will have to change focus and we have some feedback from the chat so so shadows to sharpen the leg area to orange saturated that's pretty much all right, those are all great suggestions, and they're all correct, so remember, you know, we said the shadows should be relatively dark it's a little bit too saturated, it's a little bit too orange so let's see if we can take care of some of those things using curves adjustments we can start by making our area just a little bit darker so we'll make our shadows just a little bit darker and remember this doesn't even have to be visible everywhere, so I'm gonna hit command I which is going to invert my leather mask and then we can just paint with our brush tool there we go I'm just gonna paint white on her layer here and that's just going to make our shadows a little bit darker remember this room is relatively dark on the left side so the shadow should be relatively dark in which to matt to match the room. So now we have a little bit more directionality of the light and we can see that because we're using clipping mass it's only gonna be visible on our subject I don't have to be neat here I don't have to be fancy this is what the layer mess looks like it just grabbed a big brush it just painted relatively, you know, sloppily that's word so we just took care of, you know the shadow area now let's see if we can do something with the general color let's grab a huge saturation adjustment layer option bangi again is going to clip that and I'm just going to take that down in saturation a little bit you can see she was like, if I crank up the saturation, she looks like way out of place, right? Can you see that? And if I bring this down, she starts to look a little bit more like she's in place. I can also adjust my hugh just a little bit, just in case I didn't nail it with my original exposure, so we can see these things were relatively subtle differences, but getting your saturation right and getting your getting your color right is definitely one that's going toe play a lot in having someone look like they're actually in that environment. So all these things can be done with clipping masks now, there's another really cool trick. We're going to use clipping masks, but we're also going to use something called blending have you guys ever use blended? All right, it's one of my favorite things in photo shop and it's extremely, extremely powerful. What we're gonna do is I'm gonna take the actual riel color of the window the highlight color from the window and apply that actual color to the highlights of my subjects. So I'm gonna make it basically looked like the light of the window is actually lighting our subject because we're going to take the same color and apply it, but only to the highlights. So that's the idea of thiss technique we're going to use and now we'll get into it was a little complex, so a new layer again, I'm gonna clip that because I only want that to be visible where my subject is I'm gonna use my brush tool and holding down or option I'm gonna grab this color here noticed this is not white it's, a very light yellow it's, not white, so now I'm gonna take that, and with a large brush, I'm gonna paint it directly over top of our subject, so you can imagine that's totally what would have right? If a sunlight was coming in, it would light all the things in the room, it's lighting our subject here thie only problem is it looks incredibly flat right now because this one I just painted with a brush will it doesn't know what's light and dark it doesn't know what's in shadow it doesn't know what's in highlight, so we have to figure out a way to make this layer on ly visible where the highlights are, because this is supposed to be like so we can do that by using the blend if technique, which is very cold, so to get to blend if you can either right click and go to blending options, or you could just simply doubleclick anywhere in the blue okay, and you have your layers thought you probably have seen everything. You guys have seen this dialogue like a million times and you're like, you tell this stuff on the bottom and you're like, I don't know what that is I'm not gonna mess with it. This is probably the most powerful thing in photo shop right here, it's amazing and it's going to change your life and I'm really excited about it. Basically, what you can do is you can limit anything on any layer to the underlying layers, whether they're either lighter or their darker you can also do it for this current layer. So earlier we said we just basically painted on a highlight on our subject and we want to now make this only visible in the highlights we wanted to look like it's lighting our subject we don't want it visible in the shadows, so what I'm gonna do is I'm gonna hold down the old for the option key, and I'm gonna click right here where it says the underlying layer layer this is our shadow area that's our highlight, they're so old corruption and I'm gonna click here and I'm gonna start separating these out, and what you're going to see is what's on this layer is going to slowly start to disappear from the shadow area it's just saying anything that's under this layer if it's dark, don't make this layer visible. So as I clicked from the left of the right, it's going to continue to make it disappear, and somewhere right about there, it's completely faded into the image I can continue from the left or the right and faded in even more, but I'm not going to because I think that's about how it should look, so we're going to hit okay? And now we have the color from the window is actually becoming the color of the highlight on our subject skin, so that takes that way any kind of guess work we don't have to like think, oh, I think he's a little bit too much red or take away some green or things like that. Now we're actually using the actual colors from the room to color oh, subject now, let's, just lower the capacity a little bit there, but you can start to see how much more she starts to blend in with their background is not amazing, she goes from, you know, looking like she's cut out to actually looking like she's lit by the window, which is very, very cool. Yeah, go ahead, would you add shadows? Because if the light was coming in, she would have some shadows on the floor, would you add that also that's a great question and we are gonna have some shadows in just a little bit yep she's gonna have from shadows under the chair she's gonna have some shadows under her feet as well you could do that either before you do your coloring or after in this case I'm just choosing to do the coloring before and then when we get done with that we'll do we'll do the shadows could you add light rays from the windows? Yes, that can be done I would like to do that in fact ok because I think it would be fun can't wait to the end yeah okay the way I've got some cool techniques on how to do that so it's fun now the same thing what I did with the shadows sorry with the highlights I'm going to do the shadows so I'm just gonna grab a color that's here in the wall and just painted over because it's a general it's a dark color that already exists in the room so I'm taking colors that already exist in my background and superimposing them over top of my subject now just like what I did by telling the highlights to only be visible where the highlights are on our subject we're going to say the same thing with their shadows so this time instead of grabbing from the left weirded out from the right hold down all our option and grab this from the right and we're going to drag that over to the left. We can change our opacity here just a little bit and you can see she's gonna blend into environment even more so this could be done. Obviously it's works pretty well in this case, but it really could be done in any kind of compositing that you guys do. If you're taking someone in putting out a different background let's say they were taken indoors and you want to put them outdoors. Take the color of the sky you know the color of the light in the outdoor picture, put it over top of your subject make that only visible when the highlights grab a darker color put that visible in the shadows and it's going to really create you can see just like pretty quickly pretty easily it's going to draw the colors of the actual environment and put them over top of our subject. All right, let's, go ahead and get into shadows they're extremely hard to do and they're fun so but we could see she's got out from her background really well. So there are a couple of other options we have with our shadows, the first of which let's start off right down here is actually using the shadows from the original photograph on the bottom of this image and that's something that it's not incredibly hard to do if you photographed your subject in a way that you can use their shadows so I would suggest putting maybe like a gray piece of seamless on your subjects you khun then extract those shadows out using a number of excuse me using a number of methods, and I'll show you guys that now so what I'm gonna do is hold down the shift key and click on my leather mask real quick, and you can see there are shadows visible here, right? So all I have to do is figure out how to wait, how to get these shadows from the backdrop and put him on top of everything and a great way to do that is with channels, channels a really good way to make selections, and there were a way to make selections when you have something that is lighter and something that's darker. So we have a little bit of a lighter area here and a little bit of darker area. So let's goto window and then I'm gonna go down two channels, okay? And with our channels, what we're gonna do is I'm gonna look at our three color channels. So we have a red channel green channel in blue channel, and they just kind of show you the color information like information based on each of the channels in this case, it really doesn't matter a whole lot you want to choose the channel in general, that has the most amount of contrast. So there's a good amount of contrast between the ground and the shadow. So what we're gonna do is I'm going to duplicate the red channel. There we go, and I'm going to command l because I want to increase that amount of contrast a little bit more. So I want to make my lights even lighter, and I want to make my darks a little bit darker, alright? So lights a little bit lighter and darks a little bit darker. There we go, and what we're seeing now is a bit more contrast. You can see the shadows kind of stand out from the back stand out from the ground a little bit more, right? That's the whole point is what we're going to do is now use this as a selection to then just select out our shadows, and then we can just paint those in with a brush cool or use curves or anything like that. So just like with layer masks where white things are visible and black things were not the same thing with the channels. So if I make a selection out of my channels by holding down control or command and clicking on their every thing that's light becomes a selection. Now in this case I want the darks to be selected I want the shadows to be selection so I'm gonna go to select down here to inverse and now my shadows are selected all right everyone with me so far cool so my shadows are selected and channels really don't have anything to do with your layers so now we're going click back on our layers and well just shift click on our later mask here to reactivate it and what we're going to do now is on a layer that's underneath my group we can see we have shadows selected looks like a complete mess right now but in a second all makes sense what I'm gonna do is I'm gonna hit command h to just hide that selection and then I'm going to choose the color that's already that already exist these air already shadow colors in my environment and because I have this election like we can see there's a little area selected under there under the foot things like that I'm gonna grab my brush tool and I'm gonna start painting and because I did a good job selecting those shadows out it's using the actual shadows from my original photograph over top of this image isn't that awesome completely transparent and they're mean even down to the detail here with you know the little bit of the of the hell so very very cool way to add shadows let's just d select this and I'll put a lame ass like this area we don't need this for instance so we'll just take that away so we've added shadows there now we want a lot more shadows because obviously they're not done just they're not completely done so again what we're going to use is the shadow colors that are in our environment I'm gonna choose a relatively dark color here or option with our brush and I'm just gonna paint you know back right behind our chair there that's goingto create that shadow right behind her neck now I have a little bit of a light area which is looking weird but remember we have that clipping mask right? We have this really cool clipping mouths technique a new layer grab this dark color from her hair I don't have to cut it out any better I just have to use a clipping mask and then painted dark and there we go we've eliminated that and now we have a nice shadow area right under her now I'm doing this relatively quickly by describing a brush cool if you did want to do it a little bit obviously there's no detail in here and you still had to have detail in the chateau so what you should do is you should lower your pass it easter you still have detail and then kind of layer this sorry keyboard shark it's a little different on this computer and then later the shadow a little bit more so we had a little bit of a shadow there let's just make these invisible a little bit of a shadow there and then a little bit darker as it gets closer your subject so you can layer those shadows on top of each other and then you're going to get something that looks quite a bit more real. All right? And now we have something that's going to be, you know, relatively difficult underneath her legs, we'll just paint there and then on a new layer, I'm gonna grab a darker color and because this is underneath our subject, it's going toe, you know, I don't have to worry about cutting out or anything like that. We already did that, okay? And then the most difficult part of all is going to be is going to be directly under our subject, and you want to take cues from both your subject and the environment. So this is a relatively light colored chair and our subject is relatively dark. So what I'm to do just to make this a little bit easier is I'm gonna darken the chair just a bit, all right? And we're gonna do so with curves, so I'm gonna grab a purpose just when they're cooked my lightest point and just bring this down a little bit the reason why I'm darkening my chair is because if you have, you know, a light area in a dark area that I'm just kind of making the blending a little bit easier and it doesn't degrade the overall image like someone's not gonna be like, hey, man, that chair wasn't that dark originally, what do you doing but it's just going to make my job when I'm actually creating a shadow much, much easier because I'm going from dark to dark here and still, like extremely light to dark and that's just gonna be quite a bit easier, all right? An area like this is going to be the hardest thing you do when creating shadow because it's, based on is it too high up? Is it too high down? Is it? Is it too light isn't too dark some tips that I can give our whenever two objects touched, they exchange colors so some of the color that's on her leg is actually going to get reflected in the color of the chair, and some of the color that's on the chair is going to get reflected in her legs. Well, you can see it like, you know, if you touch, I don't know, maybe you can you see this? There's my face get darker as it gets closer this just a little bit so they actually exchange colors so in compositing you'll want to do that to just grab a little bit of the color of the chair this, you know, like a little bit of a green and kind of highlighted there a little bit in the leg and that transference is just gonna make it look a little bit more real because that's, what happens in the real life in the real life? All right, there we go and we can see that looks quite a bit better than thin it's it before so those air our shadow layers all right typically and we can see that he really does sell quite a bit better typically when I'm doing this, I would probably spend about thirty minutes on the shadow alone, so keep in mind, guys, I know this is not a perfect shadow it's just it's very hard to get something it's hard to get a very good shadow quickly unless you can extract the entire thing from a file like we did with our curves. All right, in this case I'm just going to make all this area a little bit darker there we go she's blocking all that light and then we're going to use that same blend of technique to make this not visible where the underlying layers are lighter it's going to take the darker areas and really apply the shadows so holding down alter option we're going to bring that in there and then it's going to just it's going to fade it in a little bit better change this from darkened so we didn't want that to really light many areas there we go. So adding that like dark shadow area there, it still looks relatively natural because we told us to not be visible in the highlights and we got it. Light rays are really cool, and I'm gonna show you guys are amazing technique to make them easily. Okay, what we're gonna do is I'm gonna grab a carb adjustment later, and I'm just gonna click and drag it way up something like that. Okay, then I'm gonna get command I and invert that we're gonna do is I'm gonna choose the very hard edge brush, okay? And something that's not very large, and then we're just gonna kind of paint around just little spots, something like this. I know this looks weird, but it's it's going to work? Trust me. Okay? We're painting around just like little spots and painted more spots where you want your light rays to be more concentrated, like closer the light source and less spots farther from these um the reason why we're painting the spots is because light rays tend to be relatively very you know when they shined through objects they get quite a bit of variance they're not all the same exact ray and things like that so these crazy little spots that we're creating we're now going to ply a blur to these which is going to make them look like they're actually raised to do that there are a couple different ways if you're looking into the sun your blower is going to come out radio if you're looking something like this your blower is going to be a lot more linear so keep in mind kind of the source in other words like all the raise for the son are going to come in like that they're not really going to come in like an angle like that and do something like that does that make sense because the sun isn't like right next to the window shining in it's like way far away so in this case will want all of our race to come about from the same angle so we're going to go to filter blur and we're going to go down to blur no, we're not forgetting the emotion blur made a long time all right filter blur and then motion blur and what we're gonna do is we're going to choose an angle that we like and we're going to increase our distance there we go and let's just choose an angle that works a little bit better and hit okay, cool now all we have to do is do the same thing again and I'm just painting with white and black I'm gonna paint a little bit more here there we go maybe a little bit larger this time and then to apply the same filter over again just hit command f and that applies the same filter now if you want more variance like maura, these just pay more of them command f a couple times and you got some blur if you want to paint some black in there like it's too light just paint with some black or their command f will blurt out so you know painted black over there don't like it as much black over here I don't want any there which one looks like it's coming in from the window and then command f and there we go so we can see really pretty easy just paints thoughts and apply a big blur to him and that was pretty well if you want to do even more just hit command j which will duplicate that curve adjustment there I'm going to shrink it down just like that and then you can just add these like right over top you know, so you have like double, you know it's a double stack for you it depends on how obnoxious you want to be with your light race you could just keep on going all day long with these there's a big window here so maybe you want to bring that in and maybe really make that quite large and bring that over there as well. So very good question let raise our yeah they're fun to make it relatively easy you guys get to just paint some spots like that the other great thing about using these clipping masks are the highlights on her a bit too strong now so what we're going to do I'm just going to go down to this area where we made the highlights because none of this is destructive it's just added right over top you know, here we're a couple minutes in I'm just going to say you know what let's lower that opacity should we get some light rays going on now? I think she could, you know stand to be a little bit darker on her left and a little bit less light on the right and there we go we're just going to change those a little bit and it's gonna look much more natural and you know, look like she's actually in a place so we have our base image we have our shadows that we've created on the bottom we stole those from the original image we have our subject with all of the you know with all those adjustment layers that we put on using our clipping mess and then we have some really cool libraries so if you'll hold on all corruption that's what the actual blur looks like and the secret is just painting those little dots and things like that have varied varied sizes and very places because you get something that doesn't look like it was done in photo shop really I mean depending on how strong you are or I'll let you decide to make this fact another really cool thing is because we're using curves adjustment there's I can lower the intensity of my light rays by just dragging our curves down a little bit lower so you know, a little bit of light rays crazy mental light rays you could even change the color like if you wanted to raise to be a little bit on the on the red side let's say you're doing like a morning light you could do that as well and then we've just added some color into those light rays as well so they're not just adding light they're adding some color as well and making arm is just a little bit more interesting we can see there's a little bit of reds in there as well now so that's pretty fun let's do light rays number two because it seems like everyone really likes white race the next time I come back to creative life my class is just called light rays like let's do the same thing I'm going to make this a little bit brighter okay? And again very similar technique we're just going to make some spots here and this would be more applicable if you were looking more into the actual light source so not as applicable here but still a cool method we're going to be using a different type of blur here the blur were going to use here is a radio blur so we're going to go to our filter blur and down here to a radio blur okay and then we're going to want to do is change your blur center toe over here and you have a couple options you can spin it around the center or you can zoom zoom is just going to you can almost see their it even looks like light rays okay? And we'll play around with our blur there there's no preview unfortunately so you just kind of have to see what settings work best for you and lets it okay, there we go so you can see they kind of like display out like that now if you want to change it again let's just go to a filter blur radio blur let's just bring this up a little bit more and bring our amount a little bit farther so now they're not all coming there we go and I just paint a couple more and then again we'll just hit that command f overnight again to do the same area same technique so now they're not all coming from the same exact erection these air going down lower these air coming in or from there so if if your son was a little bit lower in the sky or you were looking directly at the sun this would be a little bit more of an implacable way to do the light race different type it has been an amazing class aaron, thank you so much for showing us sort of the starting ins and outs on advanced creative compositing. It's incredible to see your steps I've seen your images on your site before and I had no idea that was a double house I thought, where did you find that incredible mansion? The basement of the chicago art museum pretty amazing. So as we wrap it up once we did have one question from the internet, where do you find your sources of inspiration? That's a great question for this in particular it was it was really about just seeing the location itself. I mean, just seeing these dollhouses I I was down there, I would like my fifty millimeter one for, you know, without a tripod or wasn't allowed, I was just like taking pictures and I was just like these air so amazing, you know, there's something about the room's I thought was amazing, and I just like, I have to do something with these images, and then I was like, man, what? You know, if these were life size, like, what would be going on in here, so that's kind of where the entire story evolved and this is actually part of a siri's it's, I think seven or eight images that we did total and you guys should check him out on my website, they're on their way here, nice dot com, but the whole idea of I really enjoy when something has a little bit more of a meeting. So this is why and every one of these images, all the women are looking out the window because they're waiting on a life that they never had. Basically they're they're all waiting on. They married into wealth, the love of their life, they thought was going to bring them happiness and joy, and instead they became part of the pretty things collection in the house. So just kind of I really enjoy storytelling, and I think being able to tell a story like that through a series of photographs and a lot of fun, and it adds a little bit more meeting than you is like to me, you know, like pretty girl standing in a place so we still have a pretty girl sitting in a place. But there is that story behind it. And that's, that's. Just something that I really like story telling.
Class Materials
bonus material with purchase
Ratings and Reviews
Janick
This is an amazing class. Aaron is generous in given worthfull advices. I have learned so many things in this short class.
Fotomaker
Even though the class is based around a fairly old version of Photoshop, there are still a bunch of useful tips & techniques that work with the latest version of Ps CC. Aaron is very clear at explaining & demonstrating how to's. Kind of a Goldilocks... not too fast, not too slow - just right! And, I got a kick out of how different his hair looked when this was recorded vs how it looks now!).
Student Work
Related Classes
Commercial