Lessons
Class Introduction: Crochet Hats
01:45 2Toboggan: Getting Started & Working Crown
23:45 3Hat Body
09:32 4Ear Flaps
10:34 5Braided Ties
05:19 6Pompoms: Finger Method
06:27 7Granny Hat: Crochet Small Granny Squares
10:54 8Sew Granny Squares Together
06:15Lesson Info
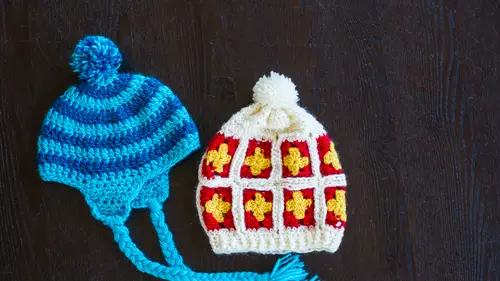
Braided Ties
All right, Now we're ready to add the braid detail ing for this hat. This could technically be a tie. But since you're an adult, you're probably not gonna wear it like that because it will look like a we bomb it. But who my toe oppress you. Knock yourself out. What I like is like just to let it hang, so it looks like braids. And that's exactly what we're gonna be doing is creating braids. But first, what we need to dio is we need Teoh create the length of it, right? And so we're gonna grab. Are you earn in a measuring tape or ruler or whatever, and we need to cut 30 inch bigger Biggles view of it. 9 30 inch lengths of the yarn. Nine strands. So you're no longer double stranding. You could just take a single strand, but then we're going. Teoh cut nine of them that length. So what I usually do is all measure one out. So there's 30 inches, right? And then I ditched the measuring tape and I just folded over to create each time. So there's one to Well, I guess we're at three now. And you'r...
e just gonna keep dealing. That's just creating the folds, using the length as your general guide. And it doesn't have to be perfect. You know, nobody's going to notice if you're half a niche offer. Whatever. So where we at now? eight, nine. Okay, so we've got nine. Cut the urn. And then what I'll do is I'll just take my scissors and all snip the folds so that I've got individuals strands. Okay, so from here, I want a full these in half, and I'm gonna take a crash, a take a crush, a hook, And I'm gonna find the center ish edge of the ear flap, which I think is right around here. I'm gonna insert my hook from back to front. It actually doesn't matter whichever way you want, Teoh. And you're gonna grab all of the strands that are folded in half and pull them through. And honestly, the hook may not be quite big enough to do it. You might have to have set it aside and just kind of use your fingers. This is the bottom line. Is this is what you want you want that little loop created by the fold, and then you're going to take your tails and you're just going to pull them through, And now your yarn is attached. And this is, incidentally exactly how you would make fringe if you're adding fringe to the edge of a scarf. So what? All we need to do now is we need to braid. It's so you're gonna separate into three groups of even amounts of Strand's should be about six strands each again, If you accidentally got a few more here or there, I tend to not worry about that stuff, and then you're just gonna braid it, just like you would hair when you were a child. And once you get towards the end fish, you're going to take the braid and just do it, tie a little, not and then give it a little bit of a time. And that is your little cyber. Somebody may or may not be into the braids hanging you could skip. It would still be a great hat. It would still keep your ears warm. So you just repeat that for the opposite side, and that is all there is for brains. So now we're gonna work on our very last step of this hat
Class Materials
Bonus Materials with Purchase
Ratings and Reviews
Student Work
Related Classes
Crochet