Lesson Info
3. Create Masthead & Photo
Lessons
Lesson Info
Create Masthead & Photo
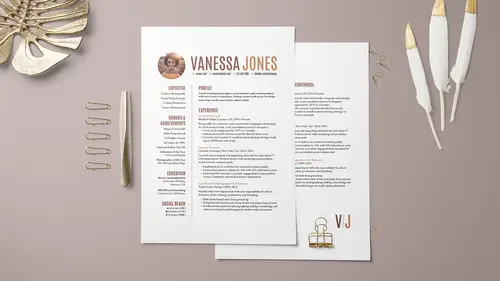
Let's talk about adding images. So, we're gonna put a photo on this resume 'cause I think it's a nice touch and we have a beautiful photo to use. So, there's some questions, and I guess debate, about do you wanna put a photo on a resume or do you not? Because you could make arguments on either side. So, I think definitely it would depend on a number of things including do you have a good photo to use on your resume, because if you don't, then maybe just don't. Make sure you're choosing a photo that's appropriate, that's professional, but it depends too. I think you would use a different photo if you're applying to be a banker than you would if you're applying to be the director of social strategy. Then you want a photo that sort of has that vibe. So, this is more art than science, this part. But, for me, I like to use photos when it makes sense, and in this case, that's what we're gonna do. But if time allows, I will show you some options of how you might format this slightly different...
if you are not gonna have a graphic there. And that is included as well in those bonus materials. You get a photo version and a non-photo version. So, things to think about, but we're gonna add it. So, to put a photo in here, I'm gonna grab this tool right here. This is the rectangle frame tool. The keyboard shortcut's just the letter f for frame. Just like you put a photo in a frame at home, you do that in InDesign too. So, we'll grab this, and I'm actually gonna click and hold on this because we are not gonna put a rectangular frame, we are gonna go for a round frame. So, that's called the ellipse frame tool, and I'm just gonna click and drag with it. You'll notice I get an ellipse. But if I hold shift, I get a circle, and I'm dragging in the imaginary top left corner of the circle, if it had corners, it would be here, and I'm gonna drag to the bottom right while holding shift and I'll get a circle. And then when I let go, we see that we have this blue frame and we have an x through it. The x is just InDesign's way of visually indicating that that's a photo frame or an image or a graphic frame. So now we can go ahead and drop our image into it. There's a number of ways to do that. The most just direct way is by coming up to file and choosing place. The keyboard shortcut is command or control d for dropping your photo. So, if you are following along at home with all the bonus materials, you also have this headshot image right here. So, navigate to that and then click open. And it should, if you've tweaked the preferences that we did earlier, it should just snap right in there and fit pretty much perfectly. That's what we did... When we set up our preferences for object fitting, what we were doing was telling InDesign that when we put an object, in this case a graphic, into that frame, that we want it to automatically scale it down and fill the frame. If you don't do that, you will get... Let's see, I don't even know if I can easily and quickly recreate it, but you would get something like this. So, you would drop in your frame and you would be, your image, and you would be like 'what is this?' 'Where is my photo?' 'Cause the photo's huge, so I don't know if you can see this here, but if I zoom out and I select the content, we'll talk about this, the frame is this blue line of the circle, that's the graphic frame, but the graphic itself actually has a different frame that's this kinda rusty color. And so the photo's actually this big, but the frame is only this big. So, that's what we mean when talk about fitting. So, InDesign is different... If you've tried working with images in a word processor, for example, or in Photoshop, you just place it in and it's pixel for pixel, it is what it is. But in InDesign, it's different, and you have a frame and then you have the photo that goes in the frame. So, you can actually work with them in different ways. So, if this happens to you, if you drop it in and it's huge for some reason, there is... There are simple things you can do to fix it. You can come up to object, fitting, and you just say fill frame proportionally. You'll notice there's this massive keyboard shortcut to do that, and I like to remember it this way. So, it's command, on a Mac it's command, option, shift. So, a PC would be control, alt, shift, and then c because this is clearly very convenient, this... C for convenience. So, when you do that, then it will snap in place, okay? When you have it in place, you may want to adjust the way that it fits. So, the tool that we've been using, the quote move tool here, selection tool, when you click with that, you're gonna get this blue... the frame itself. And you might also get something called, where is it? Extras, content grabber. You also, if you've never turned it off, you'll see this circle here. This is called the content grabber. Some people love it, some people do not. What that does is it lets you switch between grabbing the frame with the content in it, or if you click on the content grabber, it lets you grab the content. So I could take Vanessa and I could offset her a little bit, like maybe I want her kind of on the left a little bit or maybe I want to shift drag from a corner and just make her a little larger within the frame. So, you can finesse all of these things, you just want to make sure, visually, do you have the frame selected or do you have the content? And they are different colors. So, it can be kind of frustrating 'cause you think you've grabbed one and you've grabbed the other. So, you just be a little careful. That's what the content grabber lets you do. I usually prefer to use the appropriate tool because I tend to, I guess, get grabby, and then I move the content when I don't want to. So, I turn off my content grabber. So, to do that, I go back to view and choose extras, hide content grabber. It's on by default, so that's your choice. So, I'm gonna turn that off, and to switch between the two, then I would just use this tool, the direct selection tool, to grab the content, okay? So, the selection tool here for the frame, the keyboard shortcut's v, and the keyboard shortcut for the content selection right here is a, and I like to think of that for adjust. So, if you wanna adjust the content, you press a for adjust or v to move the whole thing, right? And then that big convenient keyboard shortcut. I like to have this little piece of sun flare in her hair right here, it's so pretty. So, I'm gonna keep that. But there we are. We'll bring that down about here. I switch on and off between wonderful mode just all the time to see how things are looking 'cause you end up with a lot of garbly-gok on your screen, and sometimes you need that breath of fresh air as well. Okay, so there is our header (exhales). At home, of course, and probably here, we should save this as we go. So, I'm just gonna come up to file and click save as or save, and we'll just call it in progress so I don't get mess up. But you can name it whatever you want and we'll hit save. We'll talk about formats and such later, but for right now we'll just save our work so we don't lose any of it.
Class Materials
Bonus Materials with Purchase
Ratings and Reviews
Yasha Shantha
Fantastic class! I just happened to need my resume updated and I wanted to learn a bit about Adobe InDesign. This was perfect! Khara explains everything clearly and concisely. An absolute beginner could pick these skills up easily. Highly recommend this course.....and you get a fantastic looking resume out of it :)
Tomas Verver
It's a nice beginner course, pacing is for a complete beginner! For me personaly it had not new information available. I don't think the course is a complete resumé design course. Because you need many more examples and types of resumés for different markets/styles. For people who just migrate from a program like word and just bought InDesign its a nice intro with a nice teacher. The projectfiles are included.
Céline
That was a great course. It went peachy until the very end, when I attempted to create the hyperlink to LinkedIn, and InDesign kept telling me that the link was not good. But I still created a pdf and asked someone to test the link, and there we go, it DID work. Stress and research for nothing haha! What is great is that on Word my CV took two full pages and I couldn't work around that. I managed to fit everything in one thanks to this course.
Student Work
Related Classes
Adobe InDesign