Lessons
Lesson Info
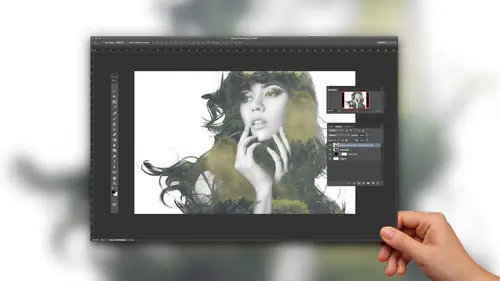
Creating a Matte Effect
we're gonna start by taking a look at a mat effect, adding a mapped like a film effect to our images. And it's really pretty simple. There's, of course, like I'm sure we were discovering and Photoshopped. There's a 1,000,000 ways to do about everything. So I'm just showing you one way. But you know, if if it's new to you, then that is great. And if you make Matt affect all the time, maybe this will be a new techniques for achieving something that you already are fan of. So I have this image right here, and I'm going to be creating this effect with curves. So to keep creditability of this, we're gonna work with adjustment layers. So at the bottom of our layers panel, we have this little union button. I call it the Union Button because it looks like a union. But it's our adjustment layers icon, and when we click on that, we get all the different options for adjustment layers that we can make, and one of them you'll notice, is called curves. So I'm going to click on this curves. I like to...
think of it as a three d version of our level dialogue box. So it's a way that we can interact with the tones in our image, and we can adjust color using curves and toned brightness everything. So it's actually pretty simple adjustment we're going to make here. This this corner right here represents our shadows in our image. Our highlights are over on the right hand side and what we're going to do to sort to flatten out the the tones is we're gonna take our shadows and basically make them more shallow. I guess we're going to reduce them. So we're not gonna have the rich black shadows that we might normally want. We're gonna basically fade them so they won't be as deep as they currently are. So to do that, I'm just going to take the little spot right here. I'm gonna click and hold and just drag upwards, and you see that the image is basically it's lightning. If I drag this all the way up, it's going to fade away. So there went everything. So I'm basically fading it, um, and we're gonna be reducing the contrast to create a flatter look so we can do that by raising up those shadows and We could also take the highlights and drag them down if we wanted, So it's kind of odd to you, but I like to leave it, leave it at the top or maybe just pull it down a little bit. But we've flattened it out a bit. And if we want to compare before and after because we did this on an adjustment layer, we can easily just toggle this on and off to see effect. So pretty nice, pretty simple, just kind of flattening it out. And it's funny. I went through a phase where I wanted everything really high contrast. I still do that a lot. I mean, I my stuff that I shoot is often very high contrast, very high color, and I like all that within every now and then. I really want a flatter look, and it can be hard to figure out how to achieve that. But it's actually pretty simple. So, um, I like to flatten things out this way. And if you decided after the fact that you want to make an adjustment to year adjustment, all you have to do is double click this little icon right here, and that will pull your properties panel back open and you'll see everything's just as you left it, so you can continue to tweak it more. Maybe you decide that you overdid it a little bit, and you want to drag this back down. Or maybe you want to move this or however you want to do it. You can just tweak it right there. And it's living over here hasn't been applied yet, so it's a very simple thing. You can also, of course, record that in an action and play it back, so it makes it really easy to batch. If you need to do a bunch of images at once and you want them to have all the same, treatment can record it as an action and then batch your images and you're done. You only have to do it once, so it could be a huge time saver as well. In the bonus materials for this class, I included four different versions of this, so as action. So we have one like this that's just straightforward. I call it a basic are called it straight up, Matt, I guess, and then I have a couple others where I also mixed in some color shifting. So in the curves adjustment, I went into the different channels. I did this in the Composite Channel, but if we want to start tweaking the color to maybe warm it up a little bit or something, we can grab the Red Channel. And if I pull up now, we're adding some read into this. So it's it's Matt. But now it's a little bit read, too, so created a few different effects, so you can try the without and tweak them. And I think if my sometimes you can learn a lot by reverse engineering those things, so kind of a handy thing. But that's the mad effect. Really simple, pretty straightforward, and you can apply it to anything. I think it works really nicely with Portrait, Um, and some I guess I'm still life stuff to would be good
Class Materials
Bonus Materials with Purchase
Ratings and Reviews
Janaina de Assis
I loooooooove Khara, all her courses are so much fun and energetic.
Dianna Gonzalez
Khara's teaching style is one of the most superior styles, in terms of Creative Live Classes I've taken. She is clear about what she is saying, without being overly wordy, and her lessons were well organized. Two thumbs up for Khara Plicanic... very informative!
Flavianny Menezes
Amazing class. Khara makes everything easier.