Making a Watercolor Paint Splatter Image
Lesson 4 from: Design Trends & Elements in PhotoshopKhara Plicanic
Making a Watercolor Paint Splatter Image
Lesson 4 from: Design Trends & Elements in PhotoshopKhara Plicanic
Lessons
Lesson Info
Making a Watercolor Paint Splatter Image
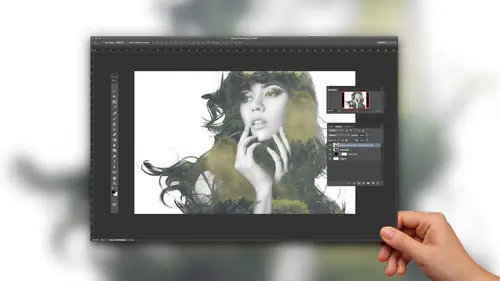
Let's move on to this water color image that we're going to make. It's not there yet. Obviously, Um, So I'm debating if I should give you a preview of what it will look like, or we should just if I should keep them in suspense. I don't know. I always like to see you like, going, you know, nothing. Yeah, that is true. Okay, so let's let me find it here. Where are we? We are in design elements, Ono done. We're going to make this basically something like that. I mean, it won't turn out exactly like this. Is that the one of a kind? And what we week today will be a one of a kind, but this is what we're going for. Okay, so I guess if we talk through this, we see that there's a lot of paint splatter on its messy, but yet still contained enough that we can see that this is the, um, image. It's not just random bladder. So that's what we're going to make. And we're gonna be using brushes and adjustments. Uh, layer masks excusing. Ah, yeah, pretty, pretty straightforward. OK, so we'll go back ove...
r here first thing Of course, we need to select our guy and get him separated from the background. So this time, will you the difference tool Instead of the magic wand, I'm gonna grab the quick selection tool. And it works similarly, but different in the sense that the magic wand is one that you click with. And the quick selection brush, like the name implies, is a brush. So you can just paint with it. Really? So I'm going to just paint along here, and I'm gonna be really careful towards the top. A little pick either. Oh, and it went too far. That's okay. So I painted all around here, and we got too much of his hair. So to fix that, I'm gonna hold down the altar or option key and then just paint back to remove it from his hair. That is some big hair. How awesome is that? Right. Okay, so again, we have the background selected, not him. So we're gonna inverse it again from the select menu. I'll just choose inverse or command shift or control shipped. I I end up using this a lot, so it's a very handy keyboard shortcut. All right, so we have him selected again. We're going to refine the edge because we wanted herto look like hair and not like I cut it out with others. So we'll go back to the select menu and we'll choose Refine edge and again we'll just drag this radius. You can see it gets. So now we have to decide. Like, how how fuzzy do we want to get with it? That looks good. Fall click. Okay. All right. So now we've done a good selection and I'm going to go ahead. And just like we did with the double exposure, I'm going to jump it up into its own layer by pressing commander Control J the longhand wages. So you understand what's happening there is from the layer menu. It's the same as choosing layer new layer via copy because we can see that it is copied up. But it's only the selection that was copied, not the whole thing. So we're done with the background. I'm gonna go ahead and hide that now what we need to do in order to make this really clean and make it look like an image, but not a photographic images we need to get rid of all the tonal variations. So right now we can tell this is a photograph because it's got a lot of tonal variety on. Do you want to get rid of all of that? So we basically want just black or white. That's it. So we're going to do with called, Ah, threshold adjustment will come up to the image menu will choose adjustments threshold, and you'll notice that forces every pixel to choose black or white. And we can adjust here. We want more this way or more this way. So somewhere in the middle, ultimately what's gonna happen is any area that's black, that's where the water color for the painter, the double exposure. Whatever you're gonna put in there, whatever we're putting in there in this case, watercolor splatters, that's where it's gonna show up is in that black area. So what I'm looking for when I'm playing with this is I want to, you know, see that like his mouth is defined. But if I you know if I go too much, then it's like Well, now there's sort of too much information here because he had, like, a five oclock shadow or something going on and his neck looks just a little too, too dark there. I like that This is just a shadow and the rest is left open except for his collar a little bit. So there's no right or wrong. It's just whatever you know you you like. But I think that's gonna work. Well, we'll go ahead and click, OK, And we'll just kind of park that for right now. Now we're ready to start painting when we paint. We always want to be in a new blank layer. I don't wanna paint right on him. We need him. We're gonna reference this information later. But first, let's paint. So I'm gonna click at the bottom of the layers panel to make a new blank layer, and I'm gonna grab my brush. Now I'm gonna show you some free. Their free watercolor brush shapes on by their from brush. Easy. If you've ever been to brush easy dot com They have so much cool free stuff. You have to read the license to make sure you know it's available commercially or not, whatever. But the there on brush easy and I have links to all of it in the bonus material, but you can also make your own. So I'm going to show you here the brush, easy ones. And then I'll show you someone that I made, which are also included in the bonus materials for you as well. So here we go. So how do we do this? All right, so the brush let me get back. So I've selected my brush over here. The keyboard shortcut is be for brush, and then at the top of this drop down, I can see the different brushes that I have. So if I reset this, we come up here, I'll just reset. Saying you can really see what the This is what it looks like by default. These air, your default brushes, your view might be a little bit. You may have small thumbnails so you can change your view by clicking this little gear icon. So when I'm doing this kind of stuff, I really like to have this large thumbnail because, as you'll see when we get the watercolor brushes loaded is easier to see what they look like. So we're gonna load those. So again, I've downloaded these from online, and I'm put their actually three different sets that I downloaded. And then I blended them into one set so I could just load them is one set. So I'm gonna click load brushes and then I have to find where did I put it? It's this. So when you download brushes, they're going to be a dot a B R file. So that's what I'm looking for. So I just navigate to that wherever you download your brushes and then you click open and it's going to just add them in right here. Now we see all these crazy, spunky, like pattern blotch things. Some of them are blotches like this, and some of them are splatters. So we're gonna have a lot of fun with this. In the interest of time, I am gonna lay down sort of a rough base coat that's just to fill it in quickly, and then we'll get into it and try toe, finesse it a little more. If you're doing this on your own time, you can take a long as you want to do this, but I'm gonna try to speed it up a little bit and teach you some bonus stuff in the process. So I'm gonna grab maybe like this brush, so I'm going to double click to select it. And now I have this, uh, blob here, and I want to start by picking a bright color. So I'm gonna go to my swatches panel and pick something. Oh, and I just realized this images in grayscale mode for some reason. So I'm going to switch that toe RGB part in me not merged. There we go. That ever ever happens to you. You can't put color into a grayscale image. So I just went to image mode and changed it to RGB. So now we're all good. I thought I did that already. My apologies. So now I have this bright color here, this gold. But if I pay with it now, So if I bring my capacity back to 100% and I click like this, I get gold. And if I click here, I get gold, and I'm getting the same, um, exact same watch over and over, which is not very exciting. Of course. Not very exciting. Um, and I could ideally, I guess if I wasn't, you know, in a time sensitive situation, I would get a brush I would make a splotch, I would come back, get a different shaped splotch, maybe change my color, make another splotch so I could go through and layer these things all on top, and that would look great. But then I couldn't teach you about the brush properties and how you can change them so you can do this. But in the interest of time, I'm gonna take one brush and sort of make it do extra work. So we'll grab this brush and I'm gonna open my brush properties here. So I've got the brush selected, and this button right here is gonna open my brush panel and look at all these different settings. Okay, I'm not I don't want to overload you cause Oh, my gosh, There's so many here. But I'm also going to click preset, so I want my brushes here so I can see the brush that I am using. I'll just drag that out of the way a little bit, and now I'm going to change the way that this brush behaves so that I can take one brush and one color, and I can get multiple different swatches in multiple different colors without having to go do it myself because that takes too much time. Okay, so here's how we do that. First of all, I want to adjust the shape dynamics. So I'm gonna click on the words shape dynamics to pull up the shape, dynamic options over here. You'll notice it. Also put the check mark, meaning that I've now activated them. So not only are they active, but now I'm looking at those options and what I want to do the just the size jitter a little bit. This is gonna mean that photo shops gonna randomly adjust the size of my brush So my swatches will not be all exactly the thing. I don't want to give it free rein of 100% toe. Let it just do anything at once. Because then I might end up with a little brush like that. And that's a waste of my time. So I'll just let it dinner a little bit for variety sake, then the big thing is, I want to come down to angle jitter. So I want it to rotate this brush as much as it wants Teoh. So it has free rein to spin the brush in any direction that it wants. Um, and then the only other thing I'm going to do is click to activate color dynamics because I don't wanna have toe pick a new color every time I click with the brush. So I'm going to tell it to take the huge Inter 2 100%. Now I like to pick a color first because you'll notice that this is a huge inter. It's not brightness dinner that's down here. It's not saturation dinner that's separate. It's just Hugh, so I want all bright hues in my image. So I chew the bright hue. Then I tell it, You can change the hue however you want, and now it'll all just be bright as you'll see time. So it's gonna change the Q. It's gonna change the angle, and it's gonna a little bit change the five and that's it. So now I can come over here, and every time I click see what it's doing, it's randomly. I mean, I can just do that pretty in a press f to change my view so I can slide it around here. Or I can press tab to get rid of all that junk. So I can just do this, I guess, and click around time happy with it. So that's a quick way to just lay down sort of a base. Now we can get more picky and add some cool splatters and stuff. Pretend like where those guys with throwing paint on the canvas that always looks like so much fun. So now we'll get some splatter happening. But, like not too much, you have just the rate splattered tricky balance. I'll get this guy, So I'm gonna gonna double click Now look at this. This is huge. This brush, some of them are really high red, like thes splatters, air pixels. That's with number here means the diameter in terms of pixels. So I can see like that's a big brush. These other ones down here are much smaller. They have a maximum size of 6 75 That doesn't mean you can't enlarge it. You can, but it won't be a Chris time. Eso just f y I Let's go back to our I don't know what I had this guy, I guess. All right, so I've got this. It's too big. So left bracket key is gonna bring that down. So maybe I want something, like my kind of big like that. Okay. And then I want, like, a really fun color. So I'm done with all this. I can get rid of that. We can get rid of this. So I want a fund like, I think it needs a dash of yellow. So I'm gonna put this someplace like here, and then we'll go back and get me. They should have kept that brush open. Get, like, maybe a lot of splatter. Something like this. Whoa. And maybe, like a hot pink. Yes. Maybe I'll do this one even again when you think different part of it. And another, just one more. Mm. Oh, it's so tough to choose this guy, I guess. Okay, though, that's like one good big one. And maybe that can be like a Turk wastes and we'll put it. Okay, So something like that, right? And you can play with You'll also notice some of these are a little blended, their translucent a little bit, and some of them are flat. So that depends on how the brush was created. So when we look over here, you can see the flat ones versus like, these ones are all blend e, and these ones are all flat. So it just depends what brushes you're using. Unless, of course, you create your own. So I have a mixed going on. You may not choose that for yourself, but that's what we've got today. Okay, now, temporarily, I'm gonna hide this layer on. Let's go back to our guy and I'm gonna select the whole layer Everything on it, not the layer in the layers panel, but like the image. So I'm gonna press commander control a and it puts marching ants around the whole frame. And then I'm gonna just like in Microsoft Word Commander Control, see for copy. And then we can hide this. We'll get rid of my marching ants by pressing commander Control D for D Select. Or you can come up here and choose de select. And now I'm going to turn on our paint layer. Here is where the magic come. I'm gonna select it to make it active. I'm going, Teoh Adam, ask. But it's going to be a blank mask at first, so I'm gonna click, and it's just white, but nothing happened because the white mask is like, not a mask, Really. It's like you're wearing a mask made of cellophane. You could be right through it. So it's not doing anything yet. But what I want to do is, um, view the mask itself just like we did earlier. I want toe command. Excuse me. Alter option. Click on the mask. Now the image appears white, but that's just because I'm not viewing the image. I'm viewing the mask okay with me. And the mask is white. Now we're gonna paste this thing that we copied the guy we're gonna paste him into the mask and I want to make sure it lands in the same position that it was before. So I'm going to choose pace and we're gonna paste special the night of paste. Don't get all cocky and be like I know command be No, you don't were pacing special. We're gonna paste into place. So that's command shift V or Control shift B. And we pasted him. And you're like, OK, but we already had that. Yeah, but look where he is now. He's in the mask, But we're not done yet. Now laugh. Have we did when we had our question from our fewer, um, about immersing the mask. Now we're gonna inverse the mask. So, uh, the key word shortcut for that Again, with Commander Control, I write. Or you can come up to remove aware that image adjustments invert. Yeah, Same thing. Now, remember, this is all just happening on the mask. Not the image the images just like on pause over here while we do all this stuff to mask. Okay, You ready for the magic? Ready. Here we go now to to put our mask back to normal and get back to our image. We again all or option, click on the mask and tood Uh, so cool. But we're not done. We're going to finesse it a little more. We're gonna finesse it a little more, because if there's splatter and stuff, I feel like it should be splattered, right? I mean, it's kind of weird to have flatter that's so perfectly ends on his hair and all that. So basically, I want to mess up the mask a little bit now. So what I'm going to do is keep this mask active, so it's selected, and now I'm gonna use this paint brush, and I'm gonna make it smaller. And maybe I'll use a different brush. Doesn't really matter which one. Maybe I want, like a really messy one. I don't know something this Whoa! Okay, but I'm going to make it small because I don't want I don't want to affect the whole, like, a whole area. I just want little, but I want it messy. So I'm going, Teoh, make it little like this. And then what I'm going to dio is paint with white, so we'll press X to get white on top. So we are revealing more of the messy paint layer. They were not adding new paint. We're not adding additional splatter were basically splatter izing the mask because right now, the mask is all clean and nice like this, right? So we're basically gonna splatter the mask like this, this kind of thing, But we're going to do it not in mask view, because I can't see what I'm doing really to the paint so we'll get back out of there. But that's what we're gonna do with White. So I can do this. And I'm basically messing up the edge, but with the existing paint. How cool is that? So it's like a happy medium on. I don't want to probably repeat the same if I click around his hair like this is going to be the same little splatters over and over, so I could change my brush every time. But that gets time consuming. Or I can go back into my brush panel and turn on the shape dynamics and crank that angle dinner up. Um, and that way, as I click around, you can see the brush rotating. So I'm not getting like, the same splatter every time. And maybe I want to get really big and sloppy and be like, Oh, his coat needs to be like bursting out or whatever. That looks pretty good. And if you make a mistake or if you look at this and you're like, I really you know, I don't like that I can see this line on his chin or whatever. Then you can just switch to black and painted out with whatever brush. Although now I can kind of like it well under that. But you could like when I was experimenting with this and I was just making a big, old, massive, all my paint I had splatter there was somehow I don't know what I was doing, but somehow I got it on his face, and so I just went back in and masked it out, so give you a lot of flexibility on and then that's looking pretty rad. The next thing I want to do is put a background in here. We could do White like we did with the double exposure, or I'm gonna go and get Oh, my gosh, I have so many gonna get this. So this is another brush. Easy. Find It's a textured paper. So you could This could be anything. I mean, you could take a picture of this desktop and use that you could take a picture. You know, it would be good. Is like a grocery bag would be a good texture. You just, you know, photograph that on your phone and then transferred over. Um, but in this case, I have this brush easy texture. So I'm going to get my move tool by pressing the for the move tool. And I'm going to do the little dance again where I click drag up to the tab that I want gonna pause, drag and shift dropped down little press tab to bring all my panel's back. And of course, now we just covered him up, so that's not ideal. But all we have to do is drag it underneath our fund layer, and it's looking better, but it can get one step even better. And that is I'm gonna take this layer that is, all this paint and change the blend mode from normal to multiply. And just like that, it's pretty rad. And I'm realizing this texture is like way coarser than I want, cause it's so big. So I'm pressing command or control tea and for three transform, And I'm just going to scale it down because I don't want it that texturally like the grain is too big for this. I think for this image. So I'm gonna press commander Control T to bring up free transform because that's how big the paper is. And then I'm gonna hold shift and all tor option to scale from the corners as I drag inwards and then all press enter or you can click the check mark up here. Look at that and it's done so there's your watercolor splatter questions. So cool. I mean, I can totally see that used as, ah, movie poster as, Ah, you know, Brad and had anything supercool album cover. Exactly. Quick question for crash. How those different big graphic brushes that you're using. How do you rotate them? Yeah, so you can rotate them from your brushes panel. So you want to get you have to have your brush tool. You know, you've selected your brush, then next up here, next to the brush in your options are there's this button right here. The folder This is gonna open your brushes panel, which is also accessible from the window menu. You can go to window brush, but, um, I always do it this way because it's just here. It's a little shortcut for you on Been to change the angle. It's under shape dynamics, so you can adjust the jitter here, which will let Photoshopped randomize it. But if you want to specify an angle, then it's not under dynamics. Right? Dynamics is changing. I think so. If you just are like, um, here's my brash and make it big you can see, but I want to rotate the brush, then you're going to click brush tip shape and then you can come down. Um, and actually grab this. You can set an angle here, but who knows what angle you want, So I would come over here and then you can actually bin it on, and it shows you a little preview down below. But you can also. Then when you mouth back over your image, you'll see it's hard to tell with this because this brush is just Let's do like a directional one like this right now. This is a vertical oriented a lot, but maybe I wanna spin that like this way. Now it's horizontal, and now it will just be horizontally won't jitter. The jitter is when it's sort of automatically changing. That's under dynamic. So, yeah, I have a new favorite word in photo shots. Jitter Geter
Class Materials
Bonus Materials with Purchase
Ratings and Reviews
Janaina de Assis
I loooooooove Khara, all her courses are so much fun and energetic.
Dianna Gonzalez
Khara's teaching style is one of the most superior styles, in terms of Creative Live Classes I've taken. She is clear about what she is saying, without being overly wordy, and her lessons were well organized. Two thumbs up for Khara Plicanic... very informative!
Flavianny Menezes
Amazing class. Khara makes everything easier.