Lessons
Day 1
19:00 am - Yervant's Background in Photography
1:19:57 211:00 am - Gear and Methodology
1:05:20 31:00 pm - Posing a Bride and Groom
1:11:20 42:30 pm - Shooting: Capturing the Emotion
1:15:29Day 2
59:00 am - Photography Industry
36:20 69:30 am - Studio and Sales
35:5710:00 am - Reinvent Yourself
08:18 810:45 am - Branding
28:47 911:15 am - Editing and Finshing Photos
40:33 101:00 pm - Workflow
26:39 111:30 pm - Sale
52:56 122:30 pm - Editing Step by Step
46:31 133:00 pm - Editing Continued
29:50Day 3
149:00 am - Creating an Album
22:24 159:30 am - Q and A
31:06 1610:30 am - Capturing Images from Video
28:33 1711:00 am - Editing Album in Photoshop
50:07 18Graphi Studio
28:35 19Techniques
41:22 202:00 pm - Techniques Continued
21:44 21Build an Album with Page Gallery
48:44 22Creating a Slide Show of the Album
08:43Lesson Info
Techniques
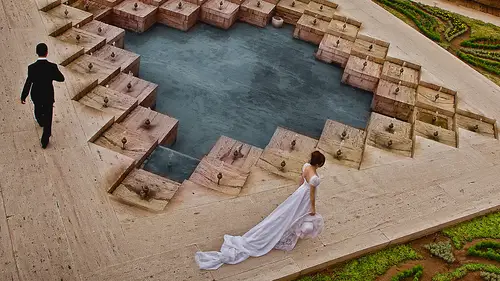
A few more adjustments just let's go quickly because I'm not going to be able to push them all but let me show you most off my technique so you know basically what I'm doing color adjustment a little bit run the filter image gnomic portraiture soften it a little bit click okay um and that it basically that's done just make I should have done a layer so I'm making lists after but it doesn't matter it's all in the demo at a bit of noise so I get a bit off texture on the skin and done simple is that thiss one doesn't need any vinay vinay getting or anything just let's go to the next picture I'm going to show you I'm going to select some pictures that I can show you I'm not gonna have time to do all of them so usually texted me I wass very confident that I can do it another hour but usually takes me three days to do it so let me select something that I could show some tactics for example let me go further up let's see all those pictures there let me find the right one okay let's pick this ...
one up okay let's imagine I'm going to create this with a picture photo album thiss customer wants a square album a square album so square album let's create a square page which is let's work with inches twenty eight white so I'm going to have a fourteen by fourteen book twenty eight five five fourteen at two hundred fifty de pe I two hundred fifty dp I so this is a spread often album so the center would be somewhere here okay, so if if I'm gonna use that picture there which one wass let me close this one so I don't have okay, I'm going to use this picture on the spread like that and let's see if I dropped it on the page I don't want to crop anything because I crop inside the camera so I don't want to crop anything out off the picture because that's the look I want if I crop it it's going to be quite tight and it's not going to give me the same feeling, so I need to cheat a little bit here, okay? That's that's my picture there click okay adjust levels and just do they do correct it a little bit that it now what I'm going to do it this empty space I want to fill it with a picture, but if I cropped this picture I'm going to lose it so I'm going to push the pictures blindly toward the center somewhere around here I'm going on, I'm going, I'm going, I like to say I'm going, I know it's not right but it's a habit my boy say you can't say that I'm going to daddy. Oh, sorry, ricky, I won't say it again by the occupants think okay, I'm selecting one part off the peter command j control tea and I'm going to stretched it. Look, this is what's going to happen? Did you see I did anything? He wants it because it's it's not that obvious there'll be a little bit off curling it it doesn't matter it get a little bit to the effect and I go slightly here, make another command j control t and stretched that part there and there you go. I have a full spread often album without cropping the picture I want to do this on the faces or anything like that, then they're going to look distorted. But when it's the background it's perfect now to make this picture more interesting, I need toe work on sections what I'm going to do select the background first, just approximately I never so because its production and I don't want to make a small, small detail selection, I don't need to feather two hundred this is where feathering will help me feather two hundred command j so I have a selection off dead just levels, and I'm going to make it quite contrasting, quite detailed, nearly like h d m r you see, this is what people are talking about. How to you chief those effects what software to use photo shop it is only photo shop. Nothing else. Okay, you see, I have the details in that part off the rock I'm going to go on the other side now it's not merge it yet. Let me see how I go. I'm going to select this are feather fifteen are just levels and I'm going to introduce command effects their charities if you made me a bit more contrasting god there's a bit of distortion there are being more careful when I do it in the real one. Okay, let's and I didn't do layer there so it doesn't matter. Just demo. Okay, let's, pick this one up feather fifty command j just levels and bring details in the door you see, I'm working around the bright with end groom without touching them without touching them. Okay and there's a few more areas to work on but let's flatten this up. I'm happy now with the whole effect and I'm going to go and select the surrounding so I select the bride and groom feder two hundred inverse my selection it's better to do it this way so the selection the feathering will work better adjust levels and I'm goingto dark and dozy those surroundings that can end I'm going to change the color also adjust color I'm going to bring a bit of rate into it in magenta sze okay that's dead no there's a rubbish bin there I'm going to remove that it's just a small retouching will fix it okay you don't need to work in details those places because they're not fish well they're not that important I'm doing tio feathering again feather one hundred but just just levels and he's quite a nice dark look to that area and you see section by section it's so important to drive your picture it's like a painting I'm working on the picture feder one hundred I just liver so I'm goingto make it softer there you see I used this art to output level also to bring a bit off gray and adjust color I'm going to make it more red tell me darling how did you create that line for the binding earlier when you it was the green line that you put right toe that's a guideline that's a guideline okay let me show you that it's always there what to do is fill all you do is go to the edge off the ruler and stretch the line wherever you wanted to be that's the guidelines so you it automatic click clicks in the centers or you can position it wherever you want horizontal or vertical so that's the guideline which which which is helpful okay now this this area are sorry holt I don't want it to be moved let me grab the last two going to that window in the window every other and bring more detail feather two hundred just levels I'm going to bring the whites into it just a bit off details you see make it quite contrasting again parities I want this the woods put papa and show that there's a window there the top area needs a bit more so I was selected area separately feather two hundred just levels and bring it out being those details that you see I'm working section by section into the picture and I can see what's happening to it I still haven't done anything to the bride and groom to fix this distortion a little bit if I pick up the liquefied too I have a selection sorry let me to date liquefy toe we're clear liquefied charities oh I still have a selection okay just in case fixed fight making adjustments I shouldn't have gone did much destruction there but just clean it up it's fine it's worse now but okay that that's all right it's not the important part of the picture and then I'm going to select the door again feather two hundred hide my selection are just levels and I'm going to darken it a bit but I want to keep those details in that area so it's it okay that actually did white line is a distraction for me my chips always going on that point I really want to get rid off because when you get the destruction that means it's not good so what I'm going to do simply is select this rock area here feather let's say ten ten pixels command j so create a new layer off control t and stretch it over there stretch it over day now I need to distort it so it matches with original so let's go they start terry nearly there and stretch it a little bit more nearly direct can I can do it perfect but let's not waste time on that let me now go back make a selection off the world there and the bride in the groom's hand feather one feather one let's get that selection there the lead so it's it's okay their dairy gold even I can do more there but don't worry merge down flatter okay you see that destruction is gone it's an ugly eating they've put on a beautiful wall and then they destroyed it thiss area is the same you see there's something white in the window there my eye keeps on going there so again make a selection feder ten command jae in control t because it's on an angle it's harder to do than on a straight line so be instead ofthe stretching it I'm just going to move that up and just plain didn't you see it's only a black background you don't know it's going to be there today I covered that area which was not pleasant there's a little daughter just get rid ofthe dead maybe just be there if you need to get rid autograph it ese are clean it clean it up. Okay, I done the surrounding now I'm goingto work on the bride and groom, so select the bride and groom just a bit. I want select his black suit because I don't want to lose too much details in their feather two hundred I'm going to bring a little bit off contrasts are just brightness contrast side matches to the background but not too much I don't want them, toby two contrasting, but when you do that, the white starts to be losing details so let's go back to my selection, I'm going to select the whites out of it and just go for their faces feather one hundred again, I just brightness contrast it's it bring a little bit off world to that area color balance and now I'm going to work on the bill so so select the ville c section by section don't do it as a one group thing it's never going to give you what you want feather fifty hide my selection to hide the selection is command age adjust levels so I'm going to dark and developed as much as I can without it going toe to dark just being goalie to beat more whites into its or those textures are visual they did but because I adjusted the veil it's gonna beat off kray adjust the color to make it warmer without losing the selection I still have a selection so I warm it up so that's that's nearly there lady asked me how I put the softness into develop s o I make a new layer on top of it command jay and I going to filter blur motion blur and with this one I'm going to demo it this is only for demonstration I wouldn't do it with this felt because it has beautiful textures on it but this is a demonstration that where I can reach you see I'm putting a motion blur in the direction off the floor off the off the veil okay that's quite a nice motion blur but it's off off course it's heavy I'm going to blend it with the back front I'm going to blend in with the background charities so you see it just become soft and angelique merge done the the guy because his italian slightly darker skin select his fairy's feather one hundred but just levels lighten up his skin just a bit hurt there you go and at noise five percent is fine if you want to soften everything you can run image gnomic game for it for one more time but I'm quite happy I liketo brain I like to have hard hard ages and that's a nice my finnish picture if we see before and after okay before in after you see I I draw the eyes to the to the couple I made the basic background into more interesting and it's a powerful spread on a page that's that's what it is and no one is going to ask me why did you stretch case? Because the original is already distorted so so I created a spread easily without cropping out anything when you are choosing your feather is there a rule that you have in your head that you think oh I know I have to do fifty or hundred or two hundred what do you like what's your process for the feathering it there's no solution there you have to experiment on the sides off the campus on the sides off campus it's very important how much feathering you need? How much less feathering unit so so that's it that's the experiment you will learn by experimenting that's the only way to do it all right now listen so we're saved it before I save it I might aid in effect I like on on nick software what I'm going to do is create a new layer laywer command j, I'm going to go filter nick collection color if explore, can I ask a quick question? Actually get going because I have a selection. Joe ar fi o says, I see your aunt works in his own style and photoshopped as he does in his photography man asked, how long did it take you to find your style in photo shop? Most probably, I was one of the first using photo shopped there was no education, so I started to create my way. So I've been using photoshopped nearly eighteen years now. The first version was my first photo shop, and I have all of them, so I had to teach myself and I use darkroom techniques to convert it to this way. So eventually I decided I know it quite a lot. I don't need to learn from anyone else. I'll use my techniques so that's how I went and you would say so your techniques are basically just based on film photography for what it is that's what we're supposed to be doing in a photo shop. Yes, I that's why I don't use the curves and, like a liquors might be going because occurs it distort the picture too much. I used the contrast I use in the old days when you printed black and white, we had five six box off paper, one iwas solved one was the contrast is so depending from the negative we used to see in the dark room high contrast, he was the negative put the corresponding paper or what I wanted to achieve. So that's my contrast, the first thing I did in the lab was adjust the density, which was the exposure at the f stop, then the next thing wass the speed the timer and if you if you did color color came last color correction came you needed to do the correction first they're not just colored last I basically is their technique. Ok, let me go back to nick the one I like the way we straightaway went on this which one was that colorized color? No it's not colorized me off of automated old thiss my actions, it's in the notes, tragic charities, the top on and I just keep it default because I don't want to pay play with it it's just a negation a ll effect for the picture, the effect runs and then I'm going to blend it with the original, so I'm not going to keep that effect a lot on the picture, just it will give me that look then what all these are will reduce the effect just a bit there so it gives me that softness off that magenta look but that's all it does you can do this also manually in photo shop if you need to which I can and I have actions for those okay so let's save this so we can bring it to page color later say vis I'm going to show you the white black and white technique that I do let's like just any picture lex electricity on its acute picture you see I made a comment there and I was ready to shoot and they say oh you can't say they're not took the picture and they maybe I said come on guys make love or something you have to be careful who you say or how you say if you say come on guys make love so I can watch it's it's wrong when you say come on guys make love and I'm going to take a picture and then did you say that a click so always be careful how you saved I'm going to show you the back black and white technique and this action is coming free for the people who buy the show okay uh what I'm going to make here I showed you this yesterday also for the people who haven't been here yes they have a look I go into image mode the rgb will convert it to lab color to love color so what happens in your channel? The rgb changes to lab color select all delete so by deleting you feel black or white doesn't matter select all delete but don't delete the layers just elite with the keyboard so don't drag the layer into the trash it's not gonna work that way you delete the keyboard so it's automatically fills up with white or blake then go to lightness clicked lightness image mort grayscale and this is the best black and white anything that is on photo shop or any other software I haven't seen any better than this so now I'm going to be the density into the picture the focus is on the girl that's it and that's my beautiful breaking what then you can convert it to mode toe rgb when I converted backto rgb now I can go adjust his saturation click on colorized and I can add a color for example sepia and that's it so and if you want it soft black and white with a lot of details got to level and being the the graze a little bit and just go soft and it will look quite soft and beautiful okay so the question from zion drea your aunt when do you stop correcting an image? What is the kind of image aspect that says to you stop it's finished it's finished and that's what sometime you can go over the boat I do it also because you still don't get what you want what you want in many ways stop come back to it after if it's dragging too long so that's why most off my my effects happened with actions so I don't take too much time for example let me open this beautiful shoe she wants details let's get darken it a little bit so tissues is cute a bit off color because it looks called radio get rid ofthe unneeded destructions bit off bean eating around the ages feather to hunt three hundred in verse just level there it is and now if I go back to the history and come back to the state I did the vigna ting automated all this I have actions but I've got this product here so if I want to convert it black and white it's going to do that without your working if I want to diffuse glow it automatically is going to do the effect as much as I want eso if I want to flatten the image I'm going to go there flatten image it's all my functions all my work that I need to do is on this pallet the soft the image nor makes its here click on it and it's done you see it and it creates always the layers it created in soft focus once I'm happy flatten and there's more off those pallets which for example it's in my actions you will start creating everything very fast and that's how our production naples let me open some of this for example the effected I applied with unique software I will goto allah paris this's this's a combination ofthe many actions that have created instead of running all the actions in the independently I will write run in action so create actions as much as you can the more actions you have, the easier the post production will happen you can't even run the same action on many, many pictures you see this while I'm talking to you the there's so many actions being run on on a single picture to achieve what I want and there it is you see this this one gave me a nice sepia tone look with a bit off color into it so this is what happens this's what I also run when when I'm goingto when I'm going to create the album pages okay let's save this one also that's done now for example, if I wantto make another black and white because it's it's there I have an action I would creak on dead there's no action for the states all right, I I will come here and just a bit off vignette ing around can do vignette in here also so before I do anything I have to do a selection it's good to the selection so make a selection around it and then all I do is click on the vineyard think it will ask me how many percent and just through the darkness and it's done so I simply find most my post production I simplify my post production if I need the liquefied tool because I need it it's there already s o it was saved me so much time in my stuff by creating actions okay click and it's ready so it's very important toe incorporate those actions in many ways ok stew just guys do need any to see any style ofthe effect that I do so I can show you on the internet a specific style yeah any any finish I do that you see most of the time this is it but if there's anything else you want or if not continue so let us know internet let teo it'll take them a second that's right in the meantime I'm going to open another image and tell you why I should liked it and what I was trying to achieve either this one or this one that's open this one okay this is the original I didn't want to lose any details but look what I'm going to do my idea off creating shed on their face from with the veil wass to achieve this and I knew what I was going to do you can never achieve that in the camera so this is from the rock falls any the clarity just brings up those sharpened out okay a bit off charities okay this is good enough to light rum or a preacher or okay there's my picture let's bring this one done how do we do it close so I have a bigger picture okay now I'm going toe again work section by section the first thing I'm going to start is we developed we develop on the outside I'm showing you another pictures same technique different way off treatment because every picture is different feather one hundred hide my selection adjust levels and I'm going to bring the valiant but a lot of contrast in there I'm going to make it strong details but also dark it's becoming quite a strong the blacks are black the whites are white and we know there's a veil there so what I'm going to do just color with a bit of red in a bit of white yellow so I'm going to warm it up somewhere they're not tow adjust the levels again make it even darker make it even darker create a new layer command j off that selection blur motion blur in the direction ofthe the ville somewhere there so those lines are strong and detailed bit off motion blur then change the capacity because I still want to strong us off the it develops merge down our before I met down let me do a bit more levels in a bit more color I want to get rid off the blue little bit ok and now merged done now thiss hair here is gone yellow but but that's where I'm going to go anyway now to make the girl a little bit skinnier command jake um control t and straight you're just a little bit just a bit that it because don't worry you don't need the less distorts them also so don't forget that I'm doing her what she looks like I'm not overdoing it ok feather two hundred and I'm going to not play with her texture just levels and again go heavy there careful not to lose any details at bring the black scene and usually when I saw that picture I imagine this anyway I wanted this but I had to do it after her lips just being a bit more color into it it's a very contrasting picture five just levels and think a bit off shining to it with with the whites and blacks that's that's good enough for her eyes select her eyes feder ten hide the selection adjust levers and gonna bring those blue eyes adjust hugh saturation and make them more blue so if you like increase there hugh we got to move too much because the skin will go funny you see that's what happens so just do a little bit there then select her inside off her eyes did see just tear feather to adjust levels again bring more whites into it and more here into it a beautiful great now you start to see the picture where it's going the bottom part off the picture needs to be darkened so not include the hair not include the hair this area here fedder two hundred just levels and darkened there see when I dark and a little bit it's going to go read earlier because off the contrast but it doesn't matter because I will adjust it in a minute okay, adjust color they're sorry adjust to saturation I still have the selection he saturate a little bit so his skin tone is not going to dark. Okay, now now that looks good also, I keep the selection in what I'm gonna do is command j off that selection at the bottom and blur go simpler I'm going to soften their quite heavily and I'm going to blend it into the background again s o just a capacity just landed in so I don't want to much details they're just enough just I wanted soft looking in the bottom emerged istan all this picture was taken with available light between the light very coming to the in between and that's it no flash netting from a room light select her hair I could model selected sorry feather one hundred hide selection so I can see what I'm doing just levels bring highlights into the hair being a nice shine into the hair and just levels sorry just colors red and yellows bring her her cold and hair out okay this this area has gone toe gold to read so a select feather fifty or fifty nine it's fine adjust hugh saturation so I d saturate the area there so it goes backto what it wass there it is now I'm going to go and select inside the picture there feather three hundred three hundred adjust levels and are gonna door darkened a hurricane with a bit of contrast we don't adjust your saturation again so get rid oft it strong colors I'm going to select the outside their feather two hundred fifty in verse just levels and darkened the ages okay this is a layer don't forget so what I'm going to do not because it's layer that's if the beko I had distorted a little bit off them try I have to read you a funny comment from the chat rooms europe says your von is a very inspiring person really just secretly wish he was my papa to teach me everything his couple hey said he secretly wishes that you were his papa to teach him everything I don't think he meant that in a hip hop sort of okay uh just soft needle a little bit not the contrast and let's go to our friends image gnomic let's create a new layer command j where is it image nomics portraiture and let's try a bit off the contrast default you can do so many things here but I hardly touch it they've done quite a default nice could afford let's tow the glamour won soft glamorous it it is the beautiful highlight into the picture and now let's blend it and there she's you can't see anything their bills come over if you can't see anything there and you're fun really quick when you're done with this image the chat rooms had requested we had a few people through and bob and a few others request that you go back and go through the black and white process maybe one more just like that okay yeah I can do excellence that's that's gorgeous isn't this's not a model it's a real bright she's not skinny she's not fetches she's the perfect woman and and bring the best out of her if you give this to this woman she's going to cry she's going to say thank you I look like the best looking woman on earth and that's what I deliver I deliver a dream a wedding is a dream and when I've delivered this on paper a dream come true this is when the girl says ho I just love it this's my best investment better than a plastic surgeon I guarantee you look much better with me than a plastic surgeon because I dont distort your face. I enhance it, okay the black and what we can do it on these let's go on the same image. Let me save this first before we go to anything else and we see the before and after of this ofcourse you can see you're going to be shocked. You see, I have a look and the way I directed it, her face came alive, I can't face came alive and this is what going inspires customer this is why they're going to pay you not because you click it's because you finish you create a narc out ofthe image and like I said to your, if you do, you're finishing to the style you like and that will attract the right clientele. My images are very contrasting, very harsh, very beautiful but it's also soft it's also solved. I don't have those words start for pictures so many a lot because that's my style. But if your picture at the worst, worst odd look then give the strength to date and present it to the bright, don't mix everything together.
Class Materials
bonus material with purchase
Ratings and Reviews
David Medina
This Creative Live course is worth its weight in gold. Yervant is a true master that inspires and empower his students to excel and not to settle for just good enough. He empower us to go for art. He is the embodiment of wedding photographic art.
Olesya Savlenko
Thank you very much for the wonderful lessons. I learned a lot of interesting despite the fact that there is strong in English. Please tell us how to do touch-3 band. Many thanks
user-b38b59
Yervant shares his knowledge with a passion. If you are a wedding photographer and even if you're not, you will love this course. Thank you Creative Live for sourcing the very best in creativity and making it available to us. Frank Jun 24, 2016
Student Work
Related Classes
Wedding Photography