Creating Rhythm and Continuity Between Scenes or Pages
Lesson 10 from: Developing Characters, Environments, and Story BoardsMary Jane Begin
Creating Rhythm and Continuity Between Scenes or Pages
Lesson 10 from: Developing Characters, Environments, and Story BoardsMary Jane Begin
Lesson Info
10. Creating Rhythm and Continuity Between Scenes or Pages
Lessons
Class Introduction
01:21 2Start with Words and Ideas
10:58 3Drawing it Out: Creating Character Shape and Gesture
09:28 4Exploring Movement, Facial Expression and Costume Design
24:50 5Developing a Cast of Characters with Style
11:26 6Color Scripts
10:17 7Developing a Style
09:49 8Creating Compositions with Perspective and Dramatic POV
16:15Lesson Info
Creating Rhythm and Continuity Between Scenes or Pages
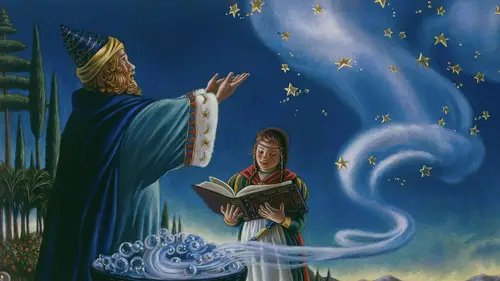
Now, the next stage that I wanna talk about, which I hope we have time to do that now, is I wanna walk through books and layouts tied to books. Because as much as there's connectivity to the things that I showed you for animation and for gaming, there are differences, and I think it's really important to know what those differences are, because there're a lot of people interested in comics, graphic novels, picture books, and all of that ilk. So what I wanna do is just walk through the materials that I have for when I'm constructing my books, and so, I'm gonna start with where basically where I start, which is, the text. Now, if you remember back to one of the first images that I showed you, it is the Emperor's New Clothes, the Emperor. And so, from that image, I felt very strongly about illustrating the Empror's New Clothes. So I took that original text, revised it, and retold it, and did what's called pagination. I broke that text down into the pages it would land on, for the picture ...
book. And so paginating the text is helpful because you can quite literally see how much text will land on each page. And sometimes I would have to edit the text so there wouldn't be, you know, too much text on a particular page. But I change things around, I moved it, because the Emperor's New Clothes is a classic tale, anybody has access to something that's called out of print, or it's call public domain, or copyright, that's out of copyright. They're no longer protected by copyright so anybody can retell these stories, and this is one of them. So once I've paginated text, re-told it, revised it, and figured out what I'm doing, I create a kind of framework for how layout the book. And when deciding on a book, I don't know the shape initially but I start to think about what is the shape of the book. And by creating this framework that I can throw piece of trace on top of, it really helps me know, where my pictures will begin and end. And so this framework, was used, to create this storyboard for the Emperor's New Clothes. And I'll show you this in minute, but you can see, I'll just put this right on top, you know that's basically the same shape and size, I made my drawings a little bit smaller, but basically the same shape and size as the storyboard that I created, and this paper was underneath my sketches, so I could always know where my picture is ending. And before I start the story board. The very, very, very first thing that I do, and trust me when I tell you, I never show this to anyone because it's uber messy. It's just my first thoughts, literally on paper with a rough ebony pencil, to start to think about, what would the composion look like? Who's in the scene, what's happening, where would the text go? And so as you can see, you know, these thumbnails, and thumbnail just means small, the size of the thumb, but tiny, is this is actually this scene. You can see the relationship. This is this scene. This is this scene. So what I did, was I took these rough beginings, I did the whole book this way, I lay the entire thing out, in this rough thumbnail form, and then, once I completed that, I was like, "Okay, I have a sense of this book." I then took this little sketch, and I wanted to show you, you know, I just took the sketch and would blow up the sketches with a copy machine. And the reason why I do that is because I'm trying to make sure these sketches are different sizes. I'm not focused on the exact perfect size, but I'll blow this up to make sure that it's the same size as all the pictures on the more final story board. So I blew them up to be just about this size, to make sure we'd fit the frame of the composition that I wanted. And again, the publisher, would never see this, this is purely for me. This is that rough sketch stage that I talk about, when I talk about characters, and when I talk about environments, that thinking through. The next stage, and again, this is the Emperor's New Clothes, with my interpretation of who the Emperor would be. And this is the more formalized layout that I would show a publisher. And what I'd do is I'd start to go, I go back to the text that I paginated, or broke down into pages, and I figure out how much text would land on a particular page, and I kinda rough that out in this format, with this using lines. And if there's a lot of text, I would say, "Well, this has to be, you know, a single page, "it can't be a full page." I has to be, I have to leave room for that text. And what I'm trying to do with this storyboard or the layout they call it a book layout, is that I want to figure out how all of the pictures will flow, and this is the entire storyboard, from the beginning to the end. And really what I'm trying to do is create a rythmn and a pattern, there's a series of single pages, there's a series of double pages, and I'll explain that more in a bit. There's kind of links visually, from one scene to the next, in terms of characters, in terms of the environments, the stylization, and also, the format. Single page spot, little image, how am I pulling all these things together visually? And I thin of it like pearls on a string. I wanna make sure they're connected as a whole. So, this is sorta the final stage, of a storyboard for me, but this happened from putting my roughs, underneath a piece of trace paper, and redrawing them, and doing my research to figure out how my characters might look. And much more would happen, for a finished sketch after this, but this is just the early stage, which is my layout or my storyboard, that I would show the publisher. Now, the same thing is true for My Little Pony. And this is a book, this is for the Dragons on Dazzle Island. For this particular book, I was working with Hasbro, which Ken and I talked about, and working with Little Brown, and basically what I needed to do was first come up with a story, I wrote the story. And then figure out how this would break down into a 32 page picture book. And picture books are usually signatures of eights. They're 24 pages, 32, 40 pages, etc. So the first thing I did was paginate. Broke this down into how much text is landing on each of my pages, am I fitting it all into 32 pages? And will it get approved by Hasbro and Little Brown, the publisher. Once it's proved, I move to again, that rough, stage of first thoughts. I've got my text, I'm trying to interpret it, I'm trying to extrapolate what's happening from scene to scene. And this is what it looks like. I mean, to me, I look at it and I understand it, but to somebody else, it might look like a hot mess, you know, it's rough. It's not for everybody's eyes. I don't worry about< you know, how tidy it is, I've got tape everywhere, I'm making changes. This probably takes four weeks for me to do, before I land on the more final version. Maybe three weeks, for the rough stage, but it's a lot of thinking that goes on here. Now, this is related to this page. It's the same it's the same thing. If you look at this, it's actually, translated here. But what I try to do, I lay this piece of trace paper, partly, and I lay it on top of this one, and refile all of my elements, so that the publisher and myself, will understand who are the characters, what do they look like more formally, it's almost like a finished sketch at this point because I'm really refining all those kinds of thoughts and ideas. But that helps guide me. So this is a translation that comes after this, and very much like the Emperor's New Clothes, I'm trying to figure out the organization of the scene. But the harder part for this particular story, is I'm following the guideline of My Little Pony, in terms of the pony design, and there's a huge cast of characters. So when you're organizing that many characters, it's much more complex, you really have to try to figure out, who's where in space. And then perspective, like who's in front, who's behind, and where will I put all these characters? So this book, you know, created that kind of a sort of more complex translation for storytelling. But what's exciting is that I'm working with My Little Pony characters, and I get to invent, Dragon character, and characters of my own. So this was a really fun project. Now, the next one I wanna talk about, oh wait, before I do that. After this sketch stage, the storyboard stage is completed. The publisher approves, then I'd go to what's called a finish sketch. And the finish sketch is just a refined, final stage, before I start painting. And what I do is I take sketch, and I print it onto watercolor paper. I let that sort of cure, or dry for 24 hours, and then I can paint my painting on top of it. Now, some people will actually retrace their drawing, I find it faster just to print it, because I've done a lot of work at this stage. Again, I'd work on trace. And it's a nice, vellum trace, it's really thick, because you can see my hand through there. If I wanna make a change, just like in PhotoShop, you can change the size of things, I do it traditionally. I'll change the size of the head, throw it underneath here, redraw it. So it's an effective tool, and it functions very much like the layers of Photoshop, but I'm a tactile person, I like to work with trace.
Class Materials
Bonus Materials with Purchase
Ratings and Reviews
MikeD
I have to say, this class and the companion class were very humbling. I assume I am not like most people who would watch this class in that I have no such artistic talent. I cannot draw at all (limited to "Spike" from TED Talks), but I had no idea such thought, imagination or ideology went into creating these designs. Professor Begin has an amazing presentation style, she is clear, concise and thoughtful. The subject matter was amazing and I can only see it helping me in evaluating my own work and taking a whole new perspective on art, light and evaluation. I highly recommend this class whatever no matter your creative bent. Thank you Creative Live for hosting this wonderful speaker.
a Creativelive Student
This course is well organized, very informative and goes into great detail regarding the best way to develop character(s) and how they should relate to their environment. Mary Jane articulates her points through art fundamentals, color theory and the power of strong research - as well as her extensive experience in the creative industry. I highly recommend this course for anyone interested in advancing their career or pursuing a career in animation, game design, or children's book publishing.
Nancy Morrison
Excellent!! This is a course that I will review over and over for there are so many great bits of information extremely well explained embedded in the broad concepts of composition and detailed illustration both in her own pieces and that of constructive critiquing her student's work. MJ is an excellent teacher! I am looking forward to her other classes! Nancy
Student Work
Related Classes
Design Inspiration