Post Processing: Darken Lashes and White Skin
Lesson 29 from: DIY Fashion and Editorial PhotographyAmanda Diaz
Post Processing: Darken Lashes and White Skin
Lesson 29 from: DIY Fashion and Editorial PhotographyAmanda Diaz
Lessons
Day 1
1Class Introduction & Styles of Photography
29:07 2Finding Inspiration
24:33 3Natural vs Studio Lighting
24:41 4Mood Boards
14:12 5Your Creative Team
17:43 6Finding and Working with Models
19:36 7Do It Yourself
14:16Shoot: Ethereal Part 1
39:20 9Shoot: Ethereal Part 2
34:16 10Shoot: Conceptual - Butterflies
36:08 11Shoot: Conceptual - Feathers
32:02 12Sourcing DIY Fashion Materials
11:05 13Negativity & Criticism
21:49 14How To Deal With Negativity
22:53 15Prepping a DIY Shoot
26:31 16Shoot: DIY Shoot
30:36 17Shoot - DIY Shoot Continued
16:33 18Shoot: Painterly Portrait - Flowers
24:51 19Shoot: Painterly Portrait - Sequins
37:07 20Getting Your Work Noticed
30:16 21Submitting Your Work
38:19 22Shoot: Leather and Spikes Beauty
37:42 23Prep for the Victorian Beauty Shoot
29:39 24Shoot: Victorian Beauty
13:49 25Post Processing: Skin Retouching
28:31 26Post Processing: Details
28:08 27Post Processing: Ethereal Shoot Image
31:51 28Post Processing: Beauty Shot
20:03 29Post Processing: Darken Lashes and White Skin
23:28 30Post Processing: Fashion
31:25 31Consistency In Your Images
27:48Day 2
Day 3
Lesson Info
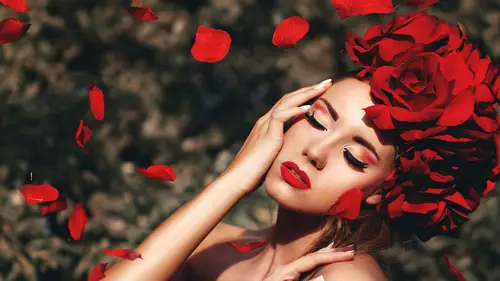
Post Processing: Darken Lashes and White Skin
So here is here with the same thing again I would circle that little area of the eye or wherever it is that I'm wanting to change color and we go to player come on new adjustment layer hugh saturation again and I will call it I and now it's created my mask and I can see here if you look right where I circled it let's bring the saturation off so you can see it a little easier the eye is changing right? So maybe I will um make it like a heavy green if you see that little pinch of green in there and I will erase it out by painting over top putting a packed black switch you back over when I bring the opacity up strong and see how it looks see like that looks like an alien like I don't like that but I'm going to do it to the other eye anyways I'll bring this um opacity excuse me down after so her eyes are like green but just way way too green so I'm gonna bring the opacity down here and it's just added a little bit of green color in her eye and you know what? Even if you say you don't like ...
that like maybe I'm changing my mind now I can still play around you're not stuck on green you can change it around and make it even a different color that way maybe I'll put it to a more of a blue another easy way to do this is let's say we got rid of the salty other delete that oh off snow late that holier out this's a super easy way to do it if you don't want to go through all those steps you can actually go to your brush and you go to your blending more appear and you choose soft light and you could do it this way so you can go to your color picker pick I don't know maybe I want her eyes to be like a really pretty blue light light blue horizon more green maybe that's why it wasn't really showing up this much and when you're choosing a color like this make sure you don't go to into this remember the natural colors of of everyone's eyes so just make sure and choose something that uh well look natural and you can actually paint over it this way because this is a super fast if you just want to read it fast I will bring it down to like fifty percent and you see it's like that just like that easy and it's a soft light blending mort so bring the opacity down even lower well I'm just going to make her I blew so I find when I do the eyes rather than using you saturation mosque I like to do it this way instead it's it's just easier and quicker and a lot more simple so now we later eyes blue and we'll leave it at that and I will um okay so there's two ways of creating sharper eyes glassy eyes with this image there's no real catch late in here and so it's a little hard to show you this way but there's two things you could do for this too and I'll show you so you can get your lasso tool I select around the eye this way and then I will ops with this one which one is it when I have to do it this way here come on, stop. Um I just wanted time here so we goto filter other oh no I'm sorry. Wait a second um her is my sari just sack her I have to modify it by and a feather it maybe it like seven you don't want it too much because it's a very small area on the photo we're zoomed in but you zoom out it's like really small area so I'm just going to do it on the one eye here and then once I'd selected I had control j now it's creating just that I on its own layer for me you would've filter other and high pass and kind of get it over there so I can see what I'm doing so what hi past does is like it creates it works almost the same his frequency separation it just creates sharpening in a in an area that you really want to sharpen and so I will do this sometimes over top the eye on dh I play with it until it seems like it's a good level for me if you go up too high it just starts to blur itself right out so you need to stay within you know between two point four to like three usual that's the right um you know from one to the one except to the other and then I had okay and then in your blending mode you can go to hard light or you go to soft light and what that does is just sharpen the eye right out if you see a big difference in the eye there without having to do anything to the whole entire image so there it is without and there it is with and if I did go out of the eye ball a little bit I went right into the lashes and there's no big difference there but if you don't want it, all you need to do is erase it out and if you can't see what you've done, you just couldn't do select the other two layers and hurry sit out this way and then the other way you would do that yes, I'm gonna flatten these two together so what's it's only here again and here you can select these thes tools blur sharpened and smudge I don't really like doing it this way because I feel like I have to do a lot of backtracking when I'm sharpening on top one say like over this spot her I was a little bit out of focus I can go over that to just fix that little bit but when I want it when it comes to sharpening the eye um I'll do it in this way instead so it's hard for me to make it I'll try to find a picture after with some catch lights because that will help with the glass I think but this is a lot of uh when I talked about lee jeffries the other day like I said he creates that glassy eye effect and after I watched his work I started really applying that to my pictures and um yeah so that's just something I picked up and I tried to figure out like how you make a nice super sharpened anyway that's that so here's an it here's what I do for k what of my okay sweded the eye color the veins and the lashes is what somebody was wanting right? Yes it was the glassy eye the eyelashes and the white skin the white skin right okay so I will create a new layer again on dh we'll go on new and it's just an empty layer will call this lashes and now this is just a blank lier and what happens here is I will zoom right into the eye take my color picker just by clicking on it and I try to find a lash that has the darkest part on it so this is pretty dark you don't want it completely black it's not going with the same color tones so right around here this is a pretty thick lash and right here is a really thick piece of lash so I will select right in there and I see that it's all within the same color range it's staying pretty close together I just will click around just to make sure that it's so similar to the rest of these guys and what I do here is brush is normal capacity is a hundred percent hardness you khun go way up and brush will go way down so it's a super small brush that's at one right now it might need to be bigger I don't know I have to see how it's gonna look first when I draw on top of it so how this works is um I'm just going to draw the lashes on one by one yeah well big secret I guess so we'll goto like ah put it around three let's see if that's too thick not to think so the way you bring out your lashes first is you go over the lashes that you've already got this strength strengthens lashes that air there now this is used very commonly in beauty work just like we're doing now when it's images like I had worked on previous you can still do it on there if you want but when you zoom out you don't really see that but because this is such a close cropped an image it's nice to bring that out so I'm going over each lash real quick and it seems time consuming but once you start to get used to it it um it becomes easier to work on it with lashes and remember to follow along so the lashes over here are all going this way I'm going into the middle, I'm going straight up and now it's going that way so you make sure you're following along the same strokes so it's like looking natural and not fake gonna zoom out whoops and you see a little bit of difference it's done, I've strengthened all the eyelashes we will add more after I go over these helps you see like the color that I have chosen it's blending in well, I don't need to keep changing my color because I just went to kind of the darkest part that I could find and this way it's not a lot of changing and so there's really fine lashes in here now I'm just gonna go and create some new ones and I have this set to the pressure so I'm I'm going to press a little bit harder because now I have nothing to go over I'm creating new lashes so I'm just going to that fast you could bring your brush size down I'll bring it to one I'm working down here put some more little thin ones up here I'll de select the layer below it after and you can see the difference so with beauty editing there's a lot of things you need to come clean up like now that I'm looking at the ice so long I'm noticing little white spots here I don't want that so I'm going to get rid of that real quick after and we're gonna go over to this eye which is a little bit blurry I'm just going to bring in some of the lashes here it's probably just sharpen this pot a little bit that looks too much people definitely noticing how much uh how useful it is to have a tablet for this sort of behavior you can do it with a mouse but it's just a lot harder for a lot harder yet it's a lot of work um so here's the last layer is de selected on dumb I'll get rid of these guys and you can see can you see on the screen that's where the lashes are oh my goodness I'm losing my lashes or are they so there that's that's it that's really easy and you just make sure that the color you've selected is the darkest point of the last it's the easiest thing to do out of the keep sampling different color tones throughout the lashes you could make it even more dramatic and go over it even more and more and more but for time's sake, I won't bother I will just murder this with this guy. We love it. Thank you. Yeah, um okay, um, just before I do that you're asking somebody was asking about the hairs on the face or something like that and I was saying, it's, a lot of that is done through dodging and burning soy um hold on her when you go really close up, actually, nowadays, ah, lot of editing is done. They really want to keep all that skin texture, even hairs on the face like peach fuzz and stuff like that so you wouldn't clean it up to too much. Um, you're a passing vehicle right down probably to eleven and you would just go over each little hair with the burnt tool. This is like some serious, like work. A lot of times um photo retouch is like people who work for high end retouching, you know, like for magazines and stuff they will sit and do that but I'll just like over like a little same maybe just over here it's hard to show you on her skin because their skin is actually really good um you know I'll skip that right now maybe I'll find another another shot after whether skin isn't todd has an hour you've been touched up so for skin whitening skin I just I do the same exact thing again it's hugh saturation but when I change color so you go to um my goodness losing my train of thought here let's see here new adjustment layer I'm not going to trace anything here I just want to well maybe I'll trace it just to make it easier so player you adjustment layer you saturation and we're gonna call this skin this is a very like particular thing to dio you have to practice out of a lot and I will now go into the options here and if you see here I'm bringing a lightness way up and not looks ridiculous I can't really go over that too much um saturation I would bring it down this I can't give you exact numbers it just depends on the skin tone and how I'm doing it right it how how how light she is to begin with that the this will stay hopes right in the middle zero and um the lightness is a little too too much so I'm just going to bring it down a little bit to eighteen sorry guys I have to like see what I'm doing here and then looks a little bit grey bring it back up a little bit okay, so now I've seen like that's like pure white over top of her skin so I will just fill it back in and start fresh so I'm just gonna paint over on it with black my black brush hardness is down and the prostate is one hundred percent get rid of that all right and now we will just paid back over with white and this is super simple and just remember as long as you make if you make a mistake you can simply to school back over it with your mask I'm not just gonna paint over a skin and it's really strong so that's okay, you can either bring the opacity down later or you could bring it down now so I will I'll bring it down now just so I could see what I'm doing right from the beginning not guessing so I brought the opacity down to about sixty let's go seventy five percent no softer brush here. Okay let's it simple what and thought tio use that you know, human saturation adjustment layer just to take out some of the color but yeah, you know, I was just thought it would be just you crazy love the white skin thing I don't know I just I use it a lot when I'm doing like my vampire e little coffee I was actually planning to do this on the fashion at it we're out of time for that right? So we'll just that's okay? That's okay? And you guys just realize that um he's like hear her air looks all weird but I could go back over that after fixit everything I've showed you I'm just doing the same thing over and over so you're not really missing anything it's just how your it's just different ways of applying the effect so I'm going to bring the opacity down now because this is a darker part of the skin um sometimes it looks wrong and usually I don't really have to deal with these kind of areas, but we're going to go over that anyway and it's sloppy and that's ok, it doesn't matter do it real fast, okay? And then I will paint back on the black to get rid of some of the spots that I went over I don't want wait, I just got a call back to my white brush for a second fill that in all right? So I will now go back with my black brush and I'm just going to get rid of some of that white bring the opacity right down this is where it gets a little tricky it's a lot of playing around here so you don't want it looking tio have to fix that part of her ear but it's okay you don't want it looking like a complete like a layer painted over top so you just kind of make sure and get rid of the spots oops went too fast I'm going too fast now back over on top of the ribbon that I paint on I keep going just kind of fix up can you? I see this little you see right here can you see that it's like almost like another painting of her I can't show you because if I had the selected it would just disappear what to show you anything but and then right here I kind of lost was going a little too fast. Okay, go back and forth so this is what happens when I'm painting on colored masks I kind of have to go back and forth look over her iro and bring it back in her lashes her lids because I want the eye shadow color to stay there our lips nostrils you don't want mast right over the face because it does look really fake the shadows behind her eyes too much brain capacity and then that's that and that's the white skin and then the last thing you do is probably just probably running one of my actions get uh there's this little phil this little area here I don't like it so I'm just going to quickly this is what I was talking about when I was shooting these little things here they drive me a little crazy so I'm just gonna clone that in some hair just cause I don't want to see it pops and you know what I'm doing this fast and super sloppy if it was like I said if it was something that like for an editorial that have to be way more careful but for time's sake I'm just filling it in that way and um that's that and then I will I don't know like I could have just ran snow white snow white is a little bit different than doing this way this way is a lot more work and it doesn't give you those grady and feels that you might I I forgot to clean this up but oh well I see it they're so anyway um yeah so I'll probably be now I don't know just pick something else real quick maybe matt action that's just kind of um creates a overtop layer over top of it to kind of give it that vintage feel without changing colors of anything so it's the same coloring tones but it's created like a film effect over top of it and then I'm good flatten it play with the curves again just for the final touch ups and that's about as faras that will go
Class Materials
bonus material with purchase
Ratings and Reviews
Dan ilicak
Amanda diaz has given me inspiration and purpose. I wake up everyday inspired to create a beautiful image, atleast enough to hold your "aww" for a few seconds. I can relate to Amanda on so many levels as I also found myself in photography and never planned for it. Just like Amanda, I also started from scratch with nobody to help or assist me. If I had found this tutorial a few years ago, it would have speeded up the process of learning. Even today I call myself a professional photographer, this course still had a lot to offer me. I can blab on and on about how much I love and support Amanda diaz, however I will make it short and sweet by saying three simple words, "Thank you, thank you, thank you!" www.snipershotsphotography.com https://www.facebook.com/danssnipershots
a Creativelive Student
This was the best creative and most prolific 3 days of a tutorial. Amanda covered the entire spectrum of what every photographer who's trying to become better and bigger go through. I loved the part where she spoke about how to shoot in any lighting situation outdoors and a few indoors. She not only spoke about them, she went into full detail to help the novice or advanced level photog. Despite the tethering issues CL had with Lightroom, Amanda poetically commanded every day of her 3 days. Another point is that she did everything "her way", and not the traditional textbook style of teaching and editing. One prolific point is that NONE of the previous CL instructors touched the issue of drama, unwanted criticisms, or unprofessional things that happen in the industry, however with a brilliant stroke of quiet humility, and courage, Amanda did. I believe it helped everyone realize that no matter what level of photography you're on that it happens and you have to oftentimes "bite your tongue", or "turn the other cheek". It also pointed out that as photographers we should be doing everything to help one another to build our industry, vice tear it down by hurting one another because of the mindset of "competition". Amanda Diaz, and CL I salute and thank you dearly! Semper Fi! Mike www.mikeconphoto.com www.facebook.com/mikeconphotography
Student Work
Related Classes
Commercial