Post Processing: Ethereal Shoot Image
Lesson 27 from: DIY Fashion and Editorial PhotographyAmanda Diaz
Post Processing: Ethereal Shoot Image
Lesson 27 from: DIY Fashion and Editorial PhotographyAmanda Diaz
Lessons
Day 1
1Class Introduction & Styles of Photography
29:07 2Finding Inspiration
24:33 3Natural vs Studio Lighting
24:41 4Mood Boards
14:12 5Your Creative Team
17:43 6Finding and Working with Models
19:36 7Do It Yourself
14:16Shoot: Ethereal Part 1
39:20 9Shoot: Ethereal Part 2
34:16 10Shoot: Conceptual - Butterflies
36:08 11Shoot: Conceptual - Feathers
32:02 12Sourcing DIY Fashion Materials
11:05 13Negativity & Criticism
21:49 14How To Deal With Negativity
22:53 15Prepping a DIY Shoot
26:31 16Shoot: DIY Shoot
30:36 17Shoot - DIY Shoot Continued
16:33 18Shoot: Painterly Portrait - Flowers
24:51 19Shoot: Painterly Portrait - Sequins
37:07 20Getting Your Work Noticed
30:16 21Submitting Your Work
38:19 22Shoot: Leather and Spikes Beauty
37:42 23Prep for the Victorian Beauty Shoot
29:39 24Shoot: Victorian Beauty
13:49 25Post Processing: Skin Retouching
28:31 26Post Processing: Details
28:08 27Post Processing: Ethereal Shoot Image
31:51 28Post Processing: Beauty Shot
20:03 29Post Processing: Darken Lashes and White Skin
23:28 30Post Processing: Fashion
31:25 31Consistency In Your Images
27:48Day 2
Day 3
Lesson Info
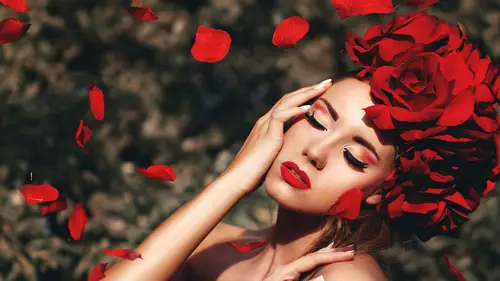
Post Processing: Ethereal Shoot Image
All right, so I will wantto go on with another edit. This is another kind of editorial. I mean, sorry. Like goodness uh, material image. I'm going to go through that real fast, but it's more of a portrait shot, and so I will open that guy up right here. I'm not going to open a pre sent for this one. I'll use a action instead, and so this will be really quick at it. I'm not, um too concerned about too much details here. I just I'm just going to go through the steps that I had done previous on dh go from there to slit me from you on second year. I want that one for sure. Well, try this one. Maybe instead. Okay. All right, so same thing again. I just do all the same steps again. I'm going, teo first start with rotating image so I can look at it with proper orientation, sometimes my steps very it's not always the same thing, but I will start with a little bit of skin retouching this time I won't do frequency separation I'm going to use imagine amit portraiture this's, another software plug...
in it's really it's really good for when you're you just want to get the skin editing done and not be doing little, you know too much details you just want to finish up with the skin it's actually a really good software to get your editing done a lot faster especially if you don't have a lot of experience cleaning up skin this software helps a lot on dh it's really really easy to use so first I will clean up a little bit of the blemishes real fast here with a spot healing rush tool just over top sorry she created another layer quick so I can compare and after I use the software to you guys will you'll see there's actually a special discount for people who who have gotten the course but ross will talk about that later I guess yeah sure well yeah okay so this girl has really good skin there's not much I need to be doing to her and that's probably good enough for me I'm pretty happy with that sword skipping frequency separation on when I just get past that flattened that and we go to filter and so it's a plug in imagine all make portraiture and so what this does here I have it set there's different settings you can have it as the original and check it out close up that way I usually have it in the comparison window instead side by side because it's showing you now the original and what it's done already my settings have already been set from the previous photo that I had worked on so excuse me free said here is always usually on normal I don't really mess with any of these guys too much it's just my preference now the dials here there's details smoothing so the detail will very depending on the crop of the image. So if it's like a closeup beauty shot like that, you may want to work in more detail and play with the sliders here and it also will depend on the amount of work that needs to be done on the skin so her skin is really nice as it is so there's not a lot of things that need to be done if you see hopefully you can see in there when I use my little hand tool here it shows me its just compared to that I even though I have the comparison, wendell decided I will still do this I just need to kind of see it d selected so I pressed on shows me it doesn't really seem like I need teo do too much sliding with this here because I I'm actually pretty happy with the settings that I've gotten um I don't know when a zoom in just a little bit more so I can see the skin a little better on the zoom in and out too with this is well so I can kind of see the overall image threshold is just basically the overall it's it's just it's controlling the overall settings that you've already done and how much you want of it so I could bring it way up to forty and then this way too soft it looks kind of silly but in another photo you might need to actually do that depending on the person's skin so I'm going to bring it back down I'm pretty happy with it in between sold twenty m good down here is the skin tone masking so this is where you will be creating a mask on the skin so that when it opens back up in photoshopped it will it's only affecting mainly the skin area rather than the whole photo. So it's not like softening up the hair and softening up the clothing and everything else so how we do that is we select the dropper tool here and if you look over here as I'm moving it around it's kind of changing as I'm going so the way you do this here is the feathering you know, just like when you feather in photo shop it'll depend on how far out it'll spread out when you're selecting that so I'll bring the feathering usually maybe between like seventy, seventy five capacity it will show you if you look on the mask here it'll show how strong of unopened see it's showing up in there and fuzziness same thing it's just how much you want to have that mask showing and so you just play with it. It's all kind of threw preference. Now I've selected this and the first thing you do is you would select just a second here. Sorry you would select, um, three tones on the skinny with select dark a darker part of the skin, medium tone and then light. So this way it's hitting all three tones of the skin. So here of select all start with medium maybe a medium tone of the skin iss say around here just in between the eyes and then I will add in a light tone on the skin which would be sort of probably just under the cheek it's pretty light there and that will add more to the mask and then just bring this stuff out of it. And I know the darker tone so right here and so if you see here the mask it's creating it's a now it's it's finding those parts of the skin, all the different skin tones that I needed to do and then it will on my output here just before it. Okay, all story and let me go down here enhancements I actually just hide that it's dropped down, but the's air all things that you would use in photoshopped anyways, I don't need to do it in here for some people, maybe they prefer that. But I like to just go into photo shop if I have to deal with the sharpening of the skin and that brightness contrast all that stuff so I usually just get that turned off and then on the output here I have it selected on new layer. Okay, so what? It's? Not affecting my original air it's putting it on the new layer biologists had okay. And now it's just doing its little thing. And now it's softened up the skin really nicely, but at the same time, I do want to make sure and clean up any little parts it's build off into the air onto the clothing just because of the feathering that I had chosen. So I will create the copy. I'm sorry. Select the copy layer and then just create a mask for it. And so I have to hit control. I I guess because I had white selected of hye mi go back, do this again control I may create a mask or what didn't do it. I don't know anyways, whatever control height so it'll just black out the mask. And now it's showing me theory jinnah ll image again without the, um what what imagine ah, mick had applied to it, so I'll now select a brush and go back over on ly the skin and so this way it's not hurting the any of the clothes and the hair and the flowers and what not that I don't want the effect to apply to and I'll go over the areas of the skin also, the opacity here you could bring the opacity way up and it will just be a super strong, but I don't I don't I prefer to kind of just like I do dodging and burning just a little bit of time, so I'm not overdoing it and I will bring the opacity may be toe like seventy five percent and now I'm just gonna go over the skin, so this is a quicker way and easier ways your way and especially easy when you have a lot of images to edit a lot of portrait shots like even say you're doing like a bridle, you know you've got a client that way or you have a client where it's, you know, they may have a little more blemishes and some acne or something like that on the skin this helps a lot, but beforehand if you use a little bit of the spot healing brush and clean up, you know, like things that are quite strong in the face, like get rid of those first and then this imagine all make is just amazing for creating an overall beautiful look and smooth skin without it looking faking over photo shop so I would just go out here down here because of my aperture it's pretty blurry I don't need to worry so much about that even the hand I don't need to worry about any of that it's all pretty soft so I'm just going to stay on the face and I'm pretty happy with the way that looks if you see the difference here so I've diesel ek didn't know that was before and then after that I'm happy with the way that looks so I'm going to flatten the sky out and then I will do a little bit of, um dodging and burning on her skin now same thing as I've done before and the same thing I'm I do over and over and over again, so those are the two different ways I um at it with skin and I will create a layer on I'm going to hope sorry I did that wrong so with dodging and burning it's the same thing so I go layer new layer and it's a blank layer and I always call it dajun burn okay and then edit phil the contents is fifty percent gray mode is normal, passy is a hundred percent and now it's disappeared so we don't see anything on I go back to my blending mode and she was soft light so it's just the same thing over and over and I will start with dodging I won't spend too much on this too much time on this image because we've got to get through the other guy's swell um if you guys have any questions for me while I'm doing this I'm can answer cause I'm just gonna be dodging real quick care huh? Do you have one from frozen photo who said you find that you have to soften the artificial flowers to get them toe look nice or is the texture of the flower something acceptable? Um I don't know I don't mind them this way sometimes I will saw for them if they look super fake I don't find they look super fake care so um I'm just good with them they're all actually blurt out because of the apple cherry shot at my focus was on her face um but yeah I will soften them if I have to and you don't need to go through and actually do it but what technique was used to soften them? Those are what usually okay so this is how we'll do that so organise often this guy super easy I will just there's two ways to do this case so I selected this way there there's a blur tool sharpened tools much tool you could go over with the blur tool and do this but when you do this the problem with that is that you conover blur and you have to kind of keep going backwards I don't really do that I do it this way I will select the area that I want to soften out I'll trace really sloppily around it and I will feather it um wait it's my feather maybe like ten radius and then I'll hit control j and now it's created um a duplicate of the order of just traced and I will go into filter blur it depends what blur all choose, but it depends on what I'm doing like you it's a butterfly and I want a butterfly looking like it's movement I'll hit motion blur or surface blur depends on what the blurred like what I'm doing anyway, I'll just choose gazi and blur it's way too strong on I'll soften it this way you know? I'm not sure if it's the right way but it's my way and then when you do selected it's sharp and soft and then I can play with your policy that way I like to do it this way rather than creating a whole new layer and then, you know, going back with the blur tool and whatnot and then yeah that's good all right? So I'm gonna get rid of that because I don't need to add I'm not worried about that flower being blurred out and the flowers really close to her face and it needs to stay in that same depth of field anyways if the flower was somewhere else it might change but it's in line with her face and so it's going to be sharp and I'm going to leave it there like that and yet so I'm gonna start doing my thing is you see where I did a little bit of her eyes I'm just going to skip doing some dodging and I'm again just going over the highlighted areas also you can go over the darker areas that's that's also what dodging burning is good for us to go over areas so again where their shadows casting if you're not doing frequency separation dodging bringing pretty versatile like it does it can do quite a lot once you learn how to like do it right just over here is well my exposure again is at fourteen percent just going over there evening out while the shadows on your face and I just want to create a little more light going down or knows so if you guys to see my brush is changing constantly and if you remember the contouring and highlighting image I showed you before um in my head like I'm I'm visually seeing those over exaggerated spots like in my head and so that's what's keeping me late and we know where to dodge in bern and even over her lips to springing out those highlights out a little too much there a little do it there maybe on our island because there's a lighter eye shadow there and again if you feel like you've overdone it, you can always disco back and burn over tops just trying to get rid of us little shadows and now all show you guys where I've done it then well, can you see good okay? And then I will not some burning I'm just going to roll fast now actually going to do something here that I don't always do, but sometimes I will she doesn't need it, but I'm just going to show you a little ah little trick I do with lashes how I create some lashes so she's got lashes here but maybe I want to make them a little more dramatic and even on the nostrils just to kind of make the I a little bit stronger so that's a little too much you see now I'm creating this painting looks kind of creepy and then again same thing if I just want to bring these details back out onto her clothing I'm just quickly going over all those spots and onto the tool just going over those areas will create some more contrast on the image you can go on through her hair even I do a lot of that when I'm working on hair I find the highlighted areas and it brings out the texture on the depth in the hair we'll see what we've done so far that's where I've dodged and burned and I'm pretty happy with that it's nothing too crazy I like to look at that I don't know why every time I just I want to see it I'm like that looks so weird okay because I love it it does, right? Yeah it's just so strange anyway um yeah, I could get way more complicated into this but you know, I think just for simple simplicity and tio make it easy um this is just the way it works for me and I like to do that and so I flatten the image and then I'm going to, um I think we'll just I don't know I'm pretty much done with this, but I'm gonna play with curves a little bit when I do the beauty image will show you guys more of the color masks actually, you know what? Mom may go here just wait um uh let's do this let's let's change the color of her dress? So I'm going to show you this now and then I'll go into it later again with make up this is what I do when I want to change colors or bring colors out or de saturate them a little more, I'll go to layer new adjustment layer and human saturation now this comes up and this will even if you hit okay it's going to call hugh saturation but say now I want to we'll start with her lips and I'll do the dress real quick after that so I want to make her lipstick uh, more stronger, so I'm just going to name this lips so I know what layer this is that I'm doing and I'm here, so if you see here I've put the saturation way up um, you could do it this way and some people do it this way and the dude over based off of the whole layer but said no easier way to do this is he call back, I will take my little lasso tool and I will trace around the area or select part of the area that I want to change. So I'm just gonna do a sloppy trace here around her lips and now that's traced and then I will call to again layer new adjustment layer hughes saturation then we'll call this lips again. And now that that's trace you don't see anything here happening. Um what I'll do is bring the saturation up this way and you see it's like, whoa, really too much right? But it's just staying right on the lips and it's letting me see what I need now her lips is like completely colorless, um I play with this sliders they're usually I don't change clothes too much, but I like to bring them out more especially I feel like I didn't catch enough of the color when I was editing are taking the photo this here preset is always said to custom master it's just on top of the slayer my hugh is where the color completely changed that could give her blue lips purple just change it's what I want but I don't want to change the color I just want to change saturation and strengthen and a little bit and you can bring it down dark you can lighten it towards almost disappeared maybe we'll do a nice soft pink now I will hit control I hope sorry that's not not inverting it I don't know what's going on there never mind we'll just okay, I'm gonna go I'm gonna do it this way so I'm gonna paint back over the mask black now it's back to where I wanted it and I want to just paint those lips back and instead this way so I'll choose the white uh white color here the paintbrushes selected hardness you can play with this because you don't want it feathering off until the skin right when you're doing a specific area like this so well bring my brush down my opacity usually sited about halfway because I don't I don't want it to strong from the start I wantto um play around with it after and I will try to just get it to go on top of her lips and if you even go off the lip it's okay you can paint it back out with the mask so now I'm just calling her lip to a different car and I will go over her lip too so you can see when you make a mistake it's not always perfect so I'm I went over here and now it looks all weird funny so now I'm happy with the lip color switch back to black and just paint it back in he's zoom out and now you can see she's got nice pretty pink lipstick and if it's too strong if it's just too much cooler like I feel like it's too much color I just could bring the opacity down that's where I want it to be so there's there it is without maybe half whereabout we'll save a half way fifty two percent and that to me is good that's brought the color out really nicely if I want that color to match her eyes instead of doing that all over again this mask is set all over the image so I can go all over the image it out this color enough I want where I can go and create some other different color but I'm going to apply that to the eyes a little bit so I wanna bring my hardness down because now I'm doing eye shadow right? And so we're going to bring the hardness down when the brush size depending again and I'm just gonna paint over the eye go back to my white brush paint over the eye there now it's bringing the color out on a re cup and that's that that's it without on there it is with and you could do that even on the clothing and I won't I'm not going to keep creating new mass for this I'm just going to bring the colors on the clothes and anytime anywhere I'm seeing like pink I'm just painting over that now if you wantto have the saturation way stronger you're going tohave to obviously create a new mosque to me I'm fine with this like I'm just bring out the color a little bit at a time you can even keep painting over top until you feel like that area's here I can bring my brush up I think even higher they get stronger that way way okay and then there's without the color on with the color and I will flatten this out and now I'm gonna put it back to where it wass I think it was the other way let me check our hopes is that way okay so go back to there and I will play with it one of my actions now I'll probably play maybe I'll do I don't know just something we'll try magic apple and see how that works and it's just again creating texture over there I mean sorry masks over there so this is pretty but it's a little too much I can take some of that out I don't I feel like there's just too much blue happening here that's the color balance layer there's a black and white layer you can play with that you could even play with the opacity and these and go right down I really like the blue so maybe I'll leave a little bit of that blue in there again this is taking away the cooling tones and putting more of the warmth on their help bring that down uh yeah, this is usually how I run my actions I just play around with each one to see what I like and soul this d selected has kind of made everything sort of flat I can select this and paint over it with on the mask again. I'll bring the brush up a little higher so if I see her I just paint a little bit has created that blue light if you're passing he's a little too strong so I'm going to go down fifty fifty two percent no wait one on the wrong layer okay so I'm gonna top layer here and I just wanted to ask uh add that little bit of blue in it just kind of as a little bit of ah magical feel like that's why it's called magic apple on dh yep andi I'm pretty happy with that and I will leave that is that it's created some grady ints overtop and last thing I'll do with this I feel like I don't you know I don't do the same thing every time but I'm going to go into the curves and I'll just play around with the contrast I usually don't go into brightness contrast and photo shop I do it through curves so you create these points this what happens here is easy to like the history rounds and like this will bring up your your darks and when it's this is the darker parts of the image so it's showing you if you selected within there you can bring it up way up high but that's a little too much and then down below here is usually where you would work on more of the light so you can create a point there and just drag it down and see where you wantto even some of that out so it creates like they call it an s curve is just to create like the contrast on the image and it's kind of in an s shape it has this this isn't really enough shape but we'll make it more of one there then with your curves you can go into other channels so there's red, green and blue are usual right into my blue child I always do I don't really touch the other guys and I just play around and I just drag thes around and see if I wantto change anything else here add maybe a little more blueness to it a little more warmth visually like for me I just play around with the image until I'm happy with that usually and this is just what I'm creating like a, um single shot portrait type of thing if I feel like this whole curves thing is a little too strong again, I could just go into my paintbrush and paint get rid of some of that so it may be the effects are on ly over top then I hope you know that's probably moving to another edit maybe I'll run you could this is hear what people are asking sometimes how I'm running when I when I pull something and it says cinderella plus snow white plus magic apple this is the way I do this so people will know I've ran magic apple and now cinderella, which is included in the bonus material I'm all play cinderella and so now that's just created a really pretty pink color tone over top on this is a grady it phil here um it's just adding that pink and with this it's not a mask it is just a layer on itself so you can go to the race tool a race some of that pink off from your face if you don't want it and this again is the grady and phil here I like it I'm happy with the way it looks I'll just bring these layers down the opacity a little bit and then I'm good I think I'm happy with while picture soul this is where we started and this is the end yeah so that's that and I will maybe move into like a may be the beauty and it now really quick at the end here as we've finished this one up a question from six six seven in a chat room was saying how do you crop for publication in magazines do you leave more space ball shooting so you have more flexibility later two magazines leave the cropping to the others or is that the photographer her job so if you were submitting this image somewhere would you consider the the composition for a magazine at all or would you just send it in and say if they're interested in it they khun change it as they will yeah usually I leave it up to the magazine to crop but when I'm cropping like this I haven't cropped but the previous image that I had worked on I did crop it to my what my I wanted. But had I been doing that for magazine there's a certain measurements that you have to follow. Usually if you really have to crop the photo and it's usually I think it's eight and a half by eleven because they have to leave it ends up being like eight and a half by ten. Pretty much the standard so that they have that extra room too, crop the bleed out, like because it is like a bleed edge. But and I imagine that's all listed on the submission pages that you told us that we need to read very carefully. Yeah, yes. It's all listed on the submission pages of the magazines. They usually say, like, we just have to be this in this and it's very specific. So, um yeah, right. Thank you. Yeah. All right, so you guys have any questions yet? Go in, teddy. Like how you get the skin like white, like dew on these? Yeah, I could do that way. Had a couple of theirs fashion tv, and he also wanted to see how you do white skin. All right. Okay, so I need to close this, but I also just want to share there's a ton of love for this image, like the finish images just okay, amazing.
Class Materials
bonus material with purchase
Ratings and Reviews
Dan ilicak
Amanda diaz has given me inspiration and purpose. I wake up everyday inspired to create a beautiful image, atleast enough to hold your "aww" for a few seconds. I can relate to Amanda on so many levels as I also found myself in photography and never planned for it. Just like Amanda, I also started from scratch with nobody to help or assist me. If I had found this tutorial a few years ago, it would have speeded up the process of learning. Even today I call myself a professional photographer, this course still had a lot to offer me. I can blab on and on about how much I love and support Amanda diaz, however I will make it short and sweet by saying three simple words, "Thank you, thank you, thank you!" www.snipershotsphotography.com https://www.facebook.com/danssnipershots
a Creativelive Student
This was the best creative and most prolific 3 days of a tutorial. Amanda covered the entire spectrum of what every photographer who's trying to become better and bigger go through. I loved the part where she spoke about how to shoot in any lighting situation outdoors and a few indoors. She not only spoke about them, she went into full detail to help the novice or advanced level photog. Despite the tethering issues CL had with Lightroom, Amanda poetically commanded every day of her 3 days. Another point is that she did everything "her way", and not the traditional textbook style of teaching and editing. One prolific point is that NONE of the previous CL instructors touched the issue of drama, unwanted criticisms, or unprofessional things that happen in the industry, however with a brilliant stroke of quiet humility, and courage, Amanda did. I believe it helped everyone realize that no matter what level of photography you're on that it happens and you have to oftentimes "bite your tongue", or "turn the other cheek". It also pointed out that as photographers we should be doing everything to help one another to build our industry, vice tear it down by hurting one another because of the mindset of "competition". Amanda Diaz, and CL I salute and thank you dearly! Semper Fi! Mike www.mikeconphoto.com www.facebook.com/mikeconphotography