Build & Shoot: Field Macro Light Box
Lesson 21 from: DIY Photography: Lens Attachments, Filters & Creative EffectsMike Hagen
Build & Shoot: Field Macro Light Box
Lesson 21 from: DIY Photography: Lens Attachments, Filters & Creative EffectsMike Hagen
Lesson Info
21. Build & Shoot: Field Macro Light Box
Lessons
Class Introduction
02:19 2Build & Shoot: Soft Filters
11:20 3Build & Shoot: Star Filters
14:56 4Build & Shoot: Ethereal Filters
21:53 5Build & Shoot: Sunglasses Filters
14:55 6Build & Shoot: Half Double Exposure Filters
12:04 7Build & Shoot: Heavy Stop ND Filters
18:14 8Build & Shoot: Tilt and Shift Lenses
09:19Build & Shoot: Bokeh Shapes
20:32 10Build & Shoot: Coffee Cup Sleeve Lens Hood
05:51 11Build & Shoot: Body Cap Pinhole
17:16 12Build & Shoot: Mirror Under Lens
05:17 13Build & Shoot: Reversible 50mm Lens Mount
17:04 14Build & Shoot: Free-Lensing
10:23 15Build & Shoot: Fisheye Lens
20:14 16Build & Shoot: Bellows
08:46 17Build & Shoot: Toilet Roll Macro Lens
05:23 18Build & Shoot: PVC Extension Tube
06:49 19Build & Shoot: Rail System
18:45 20Build & Shoot: Macro Flash Brackets
25:54 21Build & Shoot: Field Macro Light Box
15:47 22Build & Shoot: Chip Can Macro Diffuser
07:07 23Photo Review
10:45Lesson Info
Build & Shoot: Field Macro Light Box
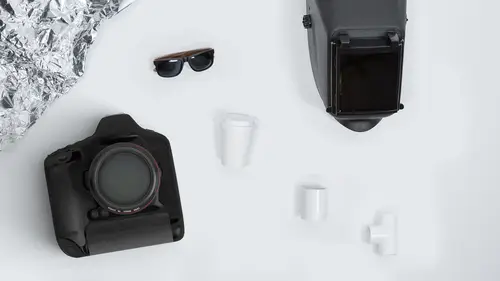
- [Mike] So this next one, is using basically, this setting...this setup. I want to show you how to soften the light. So what I just did there is I used these flashes, and because the thing we're photographing is pretty small, I didn't have to worry too much about the size of the lighting equipment. But the truth is, is that the size of that little flash produces a very harsh direct, I'll even call it abrasive light. It's not that nice, it's not…remember, that photo of the honey bee that I showed earlier? Remember how nice and soft that catch light was in it's eye, that's what I want to produce. So I'm going to show you how we produce that using a couple of tools. Actually, using a variety of tools here. So, this was a lunch meat box from our favorite big box store where you buy food, the one that starts with the letter C. And basically, we buy our turkey there and over the course of a few years, I had like 20 or 30 of these little boxes. You hate to throw them away because you can reu...
se them and, you know, they have the lid on there. So what I did, is I basically cut out the back so that it fits a very specific flash, you know, it fits one of my flashes. And the same thing for this one, this one is cut out so that it fits with my, you know, my SB-5000, okay? So then what did I do on the front? Well, in the front, I basically just used paper. This is printing paper. It's the same type of thing that you would use, you know, to print out a letter. And I just cut the paper, and then taped it on there with clear tape. Clear, basically, wrapping paper tape. Now, what that does, is it's designed to fit just right over the front of these flashes. Of course, the flashes that I currently have mounted on the brackets are slightly different than these so I'm going to do a little bit of…I'm going to do some flash swapping here in just a second but you get the idea? So that's a real sample idea, super cheap, in fact, it's basically free because these were going to go in the garbage anyways. And then I just label them based on the flashes that they're designed to fit, SB-5000, and SB-700, okay? So that's one option and we'll take pictures with this on just a second . The other option, are picnic bowls, okay? So this is literally a foam-bowl, that you buy for soup, or breakfast but it's, you know, styrofoam. And then I cut a hole in the back so that it fits my flash, and then I cover the front of it with tissue paper. And I guarantee you, this light is fantastic, it's beautiful light because when you're comparing it to the size of a bug, or even the size of our little friend here…look at that, it's like this giant softbox in comparison to the size of the thing that you're photographing. Yeah, so, there you have it. So, picnic bowls, will work great for light diffusion. So, what I'm going to do, is I'm going to get the appropriate flashes all set up here. Just bear with me a second. I need to go grab my SB-700 and I know it's right here in this camera bag. Here it is, my SB-700, great. Set this guy on the remote, and I have to set this one up to be… remember that SU-4 mode, so that's easy to do. So there's SU-4 mode, okay? I'm going to swap out this flash, and I was at 1/64th power, so I'm going to duplicate that. I'll show here to the camera. Oops. Hit the menu, and so I go to remote mode, manual, and I'm going to go to 1/64th power. Now, all these flashes have a different flash power basis. So this is just going to be approximate. We may need to change that again. Okay, so I'll put that on here, move this forward, put on my turkey, plastic box, slide it on like that. How cool is that? Sweet. All right, that's good. So, now, imagine that you're a little bug, and you get this huge Softbox, fantastic. That's going to be great. All right, I'm getting excited already. This one, this one actually I had designed for a smaller flash. This is for a little tiny dinky flash. So, I'm actually going to cut it out right here in real time to make it fit here. So I'll just use...I'll do it on this side. I'll just use my razor blade. Hopefully, I don't cut a finger or anything. It's easy to do. It's easy to cut this, hopefully not easy to cut my finger. And let's see. I'm just approximating. And it doesn't have to be perfect because tape solves a lot of problems. Okay, I'm trying to think what narration would be good along with this cut. Flowers are pretty. I can't wait to photograph more flowers, big softboxes. Okay, let's see if I got close on that. Okay, so there's a couple of ways you can mount it. You can mount it down low or up high like this. I generally like a little bit of the higher mount. And it looks like I have to cut just a little more out of it. - [Woman] Well, one question that had come in was, "Where do you get your ideas, Mike?" - Oh, yeah. So this question was asked at lunch too. It was like, "Where did you come up with all these stuff?" And I have to admit, I kind of stole some of it. I mean, that's what we do, right? You're trying to come up with a good idea and then you Google it and you're like, "Oh, does someone else have an idea better than what I had?" And so, some of these stuff, I came up with on my own, but a lot of it, you guys can all find on the internet too. You know, I spent a lot of time preparing this class. Literally, I would say two and a half months, two to two and a half months. I wasn't working on it nonstop for two and a half months. But, all of these stuff takes time to develop and time to figure out. So, you know, I came up with like macro, like all these macro stuff. I just start searching, "What are some DIY macro solutions?" And came up and found this stuff, and I started hacking some of it, some of it I like the idea, some of it I didn't. I'm a mechanical engineer, that's what I went to school to be. I went to Washington State University, and came out with my ME degree, and then I worked in a semi-conductor industry for a while. So I like engineering, I like creating, I like this manufacturing stuff. So, I'm just a hack by nature. Hacking is enjoyable to me. All right. So there we go. I'll just…for the sake of time, I'll just go with two of these and that's fine, you know, sometimes we do side lighting, sometimes we do surround lighting. In this case, I'll just use two. And let's go photograph something else. Okay, what do you guys think? Do you want to do a Lego or a shell? - Lego. - Lego, of course. Okay, so since we're going to do a Lego shot, I'm going to mix things up a little, you know, this macro setup that I currently have, I have to get in like super close to Lego. So I won't be able to actually illuminate or photograph the whole entire Lego. So, I'm going to swap this out. And just for the sake of this, I'm going to use a little bit of more of a traditional extension tube, one of those ones that I bought, you know, for like $100. So let me grab one. Let me grab my regular extension tubes. I know I'm cheating but hey, you do what you got to do to get the shot. Okay. So this extension tube is a 36 millimeter extension tube and that will give me a little more working space on the camera system. I think it will and if that's still too close, then I'll go to the shorter extension tubes. Okay, here we go. Everything else is pretty much the same. I'm at 1/64th power, I'm at 128th power. I might have to increase the brightness on that. I'm at f/8, I'm at 1/80th of a second, and I'm at ISO 100. So, here we go. Okay, that…I still have to get pretty close, okay? I'm way too close. Let me just show you. I'll just snap a shot. I'm so close that all I can get is like a propeller in there. Okay, I don't want to be that close. Macro photography literally, is this tedious. You see these amazing photographs in, you know, magazines and what other photographs have done with macro work, oh, it just takes forever in a day to get it to work out just right. So, I am working actually pretty fast here to create some of these shots. Macro photograhy just takes a lot of time, and a lot of patience. So give yourself a few hours rather than a few minutes to set this stuff up. Okay, I just saw my photo. That actually looks pretty good. It's a good look. Good lighting on that. Look how soft it is. All right, Lego man. Come in for your portrait. See, I talk to everybody. Oh, yeah. That's going to be good. Focus, go to manual focus. There we go. And I'm focusing just by moving forward and backward. Oops. Did I lose connection with Lightroom? I think I did. I'll try this one more time. Is it coming in, folks? - It does not appear to be, no. - Oh, there we go. Oh, cool. That looks great. That looks actually pretty good. Here, symmetry. It's important that everything is symmetrical. Not that I am an engineer or anything. Get those propellers lined up properly. Cool. Take the shot. So, you notice what I'm doing in order to get kind of a low view, I've just moved the thing forward and I actually have to have kind of the whole rig down low like that. Yeah, let's shoot a little bit different angle. That's looking great. I'm happy with those. Kind of fun. Pretty fun. - Super fun. - Let's shoot another one. I'll shoot one more from the top just to mix it up. Cool. All right. Right on. So, real quick I want to…I just want to be… I like looking at my photos and figuring out what I did well and what I didn't do well, you know, if I was to do this again, what should I improve? Well, what I'm realizing is, I actually forgot, I forgot to turn off my right hand flash, the one where I didn't have any diffusion on. I left that one turned on all by itself. See that hard shadow right there, that's from the one that didn't have the diffusion. So actually, this was a very good learning opportunity for us. You can see that the other, the sides over here, nice and soft and good lighting. But the one where it's hard and direct... So I'm going to go back in just a second and I'm going to take another picture. You know, that's a good learning, it's a good lesson for us all. Understand what your system looks like, and then translate that to the photo to understand the lighting. Here, you can see, again, the shadows are shooting off that way. So the shadows are very soft. Very hard over there, but soft over there. So, I don't know. It's not necessarily a bad look, it's just something that happened that I'd forgot to think through. So, I'll just…just grins and giggles, I'll just take one more. I'm going to turn this one off, the right hand one, and I know I want a little bit more power on this top one, that was 128th power. So, I'm going to increase that up to, maybe like around to a 32nd. Let's just see what happens. Now, this one is turned off, the one without diffusion. Cool. Here we go. Yeah, what's on the left side? Where do you think that's from? - Softbox. - Softbox. Yup. So I bumped it, it came a little bit forward. Now you see how, you just…everything is so fiddly. It's like you want to just there but it's now in the way so you have to move it back. Anyways, there you go. That's the DIY field. What do we call it? Field Photography Softbox or Field Lightbox maybe is what we call it. - Oh, let's see. It's Field Macro Lightbox. - Yup. Field Macro Lightbox. That's our technical term for it but… - Fantastic. - …really what they are is little softboxes applied to your flash. That looks really intimidating. Can you imagine being a little bug and seeing that thing come in towards you? All right. Okay. Actually, I'm going to go back towards the table, and we'll do our last build. - Great. And I just have another comment from Photomaker who said, "It would be cool to see you use the same softbox technique, but maybe with a bigger bowl like a salad, or a cake server to simulate a beauty dish. Another great idea." - Oh, yeah. Such a great… - They're endless. - Yeah, the ideas just keep coming. So, like I know at my house, we have this big plastic salad bowl, it's about this big and I didn't tell my wife this, but I'm like looking at that salad bowl as I'm preparing that class I'm thinking, razor blade, drill, hole, flash, you know, that would have been... Actually, that is a really great idea. Just get a big plastic bowl, the kind with the, you know, like the Tupperware top on it, put a hole in the back, and now you've got yourself a massive diffusion panel if you're doing bug photography and flower photography. The difficulty is how you're going to get that whole thing to mount without like dragging the whole flash down. But, you're going to, you'll figure something out, I'm sure.
Class Materials
Bonus Materials with Purchase
Ratings and Reviews
a Creativelive Student
It's a fun course, with a lot of interesting ideas presented in a way to help spark the creative juices in anyone wanting to branch out and experiment with different ideas. Mike's presentation style is fun and easygoing - perfect for this type of discussion. If you're not afraid to color outside the lines and see where the road takes you, this is a very enjoyable bit of inspiration.
user-ee46bd
Love it!! Very creative and full of inspiration. Mike Hagen explains the different effects in a great way, he is precise yet easy-going so he makes learning fun. I recommend this class to all who wants to take their creative photography to the next level without spending money on expensive accessories.
Fotomaker
Mike has an easy-going, pleasant & fun personality. He explains things clearly. Rolls with whatever happens. And, he's very good about answering audience questions in an understandable, positively reinforcing and non-judgemental way (which can be rare for some established pro photographers...).