Lesson Info
1. Shooting Technique
Lessons
Lesson Info
Shooting Technique
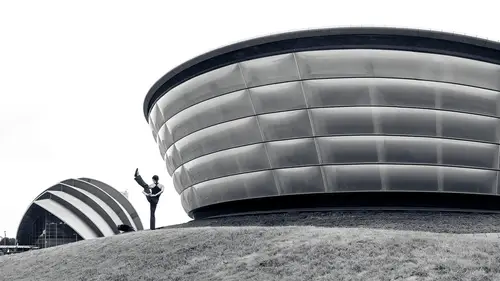
Hi, I'm Ben Wilmore and welcome to dynamic black and white architecture. This is where I'm going to show you how to both shoot and process architectural images to get really interesting looking black and white results and throughout the process I'll talk about what's going on in my head when I'm shooting and the general concepts as to what makes your I. V. Drawn to a particular area. What can I do to make it so you're not attracted to others. And just in general, if you're processing how can you make things look much more dramatic than a standard kind of processing with architectural images. So let's dive in and get started first. Let's look at a few examples and here I'm just going to scroll through a random selection of images noticing that they're all black and white architecture and they look rather dramatic. Part of what makes them look dramatic though is the use of contrast. If you look at how many areas are solid black or how many areas are solid white, that's one thing that con...
tributes to it. But there is a bunch more. So in here we're gonna be taking a look of exactly how it came about to do this. And let's start with the general concepts when I'm out shooting. Oftentimes you need to tilt your camera up in order to include the top of the building. But in doing so if it's a short building having these angled sides like we have here, just makes it feel like the building is about to fall over most architectural images. I attempt to keep verticals on the building perfectly straight in vertical if at all possible. But in doing so that makes the building feel rather formal in static, not very dramatic, but sometimes that's just what's necessary now in order to get that. Oftentimes what I need to do is walk really far away because if I'm close to this object, I need to tilt my camera up and in doing so, the top of the structure would be further away than the bottom and therefore it looks smaller. So capturing something like this, I might be this far away to capture it and then I either zoom my lens or if my lens won't go far enough, I'll do cropping later on in that way I can maintain verticals being nice and vertical and so like I said, if it's a short building tilting up to include the sky or the top of the building just makes it look like it's going to fall over. Another thing that will often do is shoot at an angle, shoot at an angle, maybe in a vertical shot in this case and try to make it so I'm not tilting my camera but by doing so we start to incorporate diagonal lines in the image and diagnose or one of the things that really make an image much more dramatic than having things perfectly straight. Sure. Often want the verticals on my buildings to be nice and straight. But then I'll shoot that building at an angle and by doing so I'm going to have many more diagonals and it's usually gonna look a little more interesting now with this, when it comes to shooting ideas, I'll show you a lot of color images just because I didn't have time to really convert every single one. It's the concept regardless of its color or black and white. But here I'm in Iceland and if I shoot this straight on, it feels rather formal and not very dramatic, but just moving over to a slight angle, puts a lot more diagonals in and it feels much more dynamic again here, keep my verticals nice and straight by not tilting the camera, but that doesn't mean I can't move a little closer to one part of the building than another to make one area larger than another, then I can choose what is going to be prominent in the scene. And I'm not always getting the verticals perfectly vertical. In this case I am tilting slightly as you can see. But if you look at what would be verticals on the building, especially near the edge of the frame. But I was careful about it and I got it. So I got nice little diagonals that make it more dramatic dramatic. Now you can sometimes shoot straight on when the subject matter has enough to warrant that. And sometimes with architecture that's got enough angles into it to begin with. Then trying to shoot at an angle, makes it so you're trying a little too hard. So oftentimes if a very angular architecture I'll shoot straight on. But then I have the choice. And one thing that I think about is always what's going on at the edge of the frame. If there are any straight lines near the edge of the frame, I'm either going to get them to align with the edge of the frame as they do here at the top or I'm going to get them to be quite different where it's obviously not just really close to lining, it's off quite a bit in this case this edge actually was angled on the architecture. Uh here is the same area. If I back up, you see the same area, I'm just shooting a little bit higher. But I decided to keep the straight lines on both edges of the image straight aligning them with the frame. Then it's this diagonal that sends me through the image. It makes things a little more interesting. So I will try to incorporate a lot of diagonals if you look at the top edge of this building, you see it's angle. Got another angle there. But then I try to if at all possible, also finds something to align with the edge of the frame and that gives it kind of a grounding. So we have a lot of dramatic stuff going on with those angles. But then that straight thing feels like it has more firmness, more, I don't know, just solidity. So here you notice this angle. This is a little hill going up. We got a nice diagonal there. But you see the edge of the street over here on the right where the curb would be aligns with the frame. And if I was able to do it in camera, I would have also gotten the vertical on the building to be perfectly vertical to a line because then I have that stability of straight lines lining with our frame as well as the diagonals to give it much more dramatic feeling. And so here take a look at this column that is here and notice that its edge, is that the same angle as the edge of the frame? Their parallel with each other. The same is true down here where we have this edge of the building, it aligns with the edge of the frame but then I also chose an angle that gave me a lot of diagonals. So there's a lot to pull me through this image. But then I'm not always trying to get things to align with the edge of the frame. The main thing is when they don't, I try to make it so it's not just the littlest bit off instead, it's rather dramatic and therefore it doesn't look like it was an accident. Instead it was by design so oftentimes I have to tilt up for tall thing, especially if I can't get far away from them. That does make them more dramatic in that the smaller top puts a diagonal line on the edges. But I try to do a little bit more with it and that is most of the time I will end up shooting it at an angle, get it so it's even more diagonals by shooting at that angle. So sure I'll get a straight shot, then I'll do it on an angle in most of the time. It's the angled one that I prefer and when it comes to tilting up on a building, especially for the building is not that tall, then I would prefer to get even closer to the building and make it so it looks like it's on purpose that you're trying to make it more dramatic. Here's the exact same building. If I back up one, you'll see, it's right over here that I was shooting and I just walked really close to the building and shot up. And now that thing of getting the diagonals by tilting the camera up with the top of the structure looks smaller than the bottom, is really helping to pull my image, my eye through the frame and just makes for a much more dramatic picture. Then those lines that I'm trying to get that are slightly diagonal, they're gonna send the I your eyes going to follow them and that's something that can pull you into a photograph. In this case I made sure that those lines are sending me to something you might want to see which is the city and the distance. And so I incorporated them here. This is my wife Karen. I take pictures of her doing yoga, often in front of architecture, but take a look at the lines in here, notice the lines of the structure in the background there perfectly vertical and perfectly horizontal. But I got close enough to this object that look at the angles that are formed by the edges on the left and right. If you were to continue this line, like put a ruler on it and continue it, it's sending you straight in here and so is the other side. And so you got to watch for where those lines are sending your eye to make sure it's sending you towards somewhere where there's a payoff when you get there. Then in this case my wife's odd position. I think it's an interesting payoff. There's also diagonal lines coming down in this direction uh which would also be sending you down through her. And uh here another example you see the railing. If you were to continue that railing and just imagine it continued in space, it would go right to where my wife's head is and therefore helps send you through an image. Now, another thing we'll talk about later on is using contrast, your eye is usually going to first be drawn to the brightest part of the photograph and look at where the brightest area is in this particular image. It's right where I want your eye to go. The second thing your eye is usually drawn to is the area of greatest contrast. That's where you have the greatest difference between bright and dark and where is it in this image? Well, it's right there where I want your eye to go. So in this case I have a bunch of elements going on. I have lines leading you into the subject. I've chosen the placement of the subject that how much contrast I was going to put in there. You'll also learn later on that I often frame things and you notice my wife feels like she's almost in a framed picture because of that border. Also here, I got close to the ground and there I found this element which gave me diagnosed lines that pushed me in towards the architecture. But notice how close I am to the ground. My camera is pretty much touching the ground and that's often an area I'm going to be shooting from. Not just for any picture, but I'm always going to consider the height of my camera, most people experience the world from standing height. And so the more you shoot from that exact height, the more it's what people expect, but if you get down to where their feet are, that is where they don't see the world or you get high and look down, you're going to present them with a view they're not used to and it will usually feel much more dramatic. So here, notice how much of the road is in here and that's because I'm really close to the ground. I decided to use that in part of my shot. I also try to make sure that objects don't merge. Noticed that when I did get down low here, I didn't just shoot it and be done with it. Instead, I looked at exactly how much space was there between this locomotive in the building and I made sure the two didn't merge together where they overlapped, made sure we have that gap. Also, this diagonal line that's in here sends you right down over here to this sign into the uh locomotive as well. Then when I'm out and I find something I want to capture, I don't always just include the building. I'll also look at my surroundings for accessories. That's something that'll go good with the building because if all I get is a picture of the building itself, then it's usually gonna feel rather formal. So here I found these statues and I decided to use those in the frame. So it's not just a picture of the architecture, it goes with something else and often times I'll do that and I'll also not always feel the need to capture the entire building, Leaving some mystery where your viewer has to fill in the details often makes for a much more interesting picture. Then I'll also look at my surroundings for any object I might be able to use to frame my subject. So here's the building I wanted to capture and sure I got a picture of just that. But then I looked at my surroundings for anything I could use. Oftentimes it is a doorway, uh, could be a gate in this case, it's almost like a little cave kind of area and I'm gonna frame it with that. And in this case it is just a fence and most people would totally ignore the fence or try to keep it out of their photo. But in this case I'm using it as a frame and you'll see me using that over and over again where I trade up to frame my subject and sometimes it's me shooting my wife and I'll use the architecture itself as the frame and a few other ideas. And that is I'm always careful with what's going on with the edges of my image already mentioned. If there is some straight lines near the edge I try to get them to perfectly align or get them to be radically different. So it's on purpose. It's not just a little bit off. But the other thing I look for is are there objects that are just partially cut off on the edge of the frame, like these boats on the right and left. Those are things I usually try to avoid and in this case all I need to do is afterwards in camera raw or Photoshop just crop If I had to crop this out or retouch it out. I could do so on both sides to end up with a clean edge. If the edges not clean, it's something that can pull my eye to the edge and if this picture is framed on a wall and there's something else competing with it on the same wall that could pull my eye to the edge and then I could just leave the image and go look at somebody else's picture on that wall. I want to keep your attention inside the frame. The other thing I think about is the son, what's going on with the sun And can I use it as an element in my photograph? If you compare this particular image, notice there are three people standing there and a dog and I don't know if you can see or not but one guy here has a shirt on with the number 80 on that shirt, Well here is the exact same three people and their dog I think is in between their legs. Their exact same scene taken minutes apart or seconds apart. And the only difference is I considered where is the sun? And what am I doing with it? Making an element within that image? In this case I align myself with it so that I got the glare. Also notice around the edge of the people. Do you see that the reflections have an odd shape, I'll show you how that's done in a few moments when I show you capturing the sun is a star bursts and I'm simply doing the same thing here. If you notice any little uh highlights here, the same thing would be true. If this was an evening shot in, these lights were turned on in the distance, you would get the same look around each one. If you use the technique, I'll show you. So I think about where is the sun in my image? And oftentimes I find if I want a dramatic shot with architecture, I'll get some angles going on in that scene and I'll place the sun right behind the subject where it's about to peak out of the edge. This is where it's not blowing up necessarily to solid white yet because the sun's edge is actually behind the building. Here's another one where I just placed the sun directly behind something solid again near the tip of that building. Same thing. And here is a reflection of the sun, I believe right there on something shiny, notice it has little raise on it and that's the technique I'll show you in a moment here is the idea if we want raise on our son, then we need the sun to actually be visible instead of being behind the building. So in this case I moved left and right until it just started to peek out from the edge where it was almost kinda halfway on the building and halfway sticking out. Uh and then if you close down your aperture setting To the highest number it'll go to most lenses probably have 22. Then you're going to find any extremely bright highlights, any reflections of the sun off of glass or water or the sun itself will turn into a star burst. If you don't want that then start opening your lenses the aperture go for lower and lower. F stop numbers and if you get it all the way down to the lowest it can go maybe that's F 2.8 or even lower depending on your lens, then you're not gonna get any star burst at all. Sometimes I need to shoot both because the client doesn't want the street lights in a scene to have the star burst but they do want it somewhere else. So I'll just capture two images, capture one where I'm close the aperture all the way down and another one where it's wide open and I'll put the two together. So here this would be shot at F22 whereas this would be shot wide open and you can see the sun barely uh different in position. But the total difference is my aperture setting. So then sometimes where the sun is falling becomes largely the subject of the photograph as it is here where I see that nice warm shade here. I got some diagonals in this shot to make it a little bit more dramatic and I looked across the edge to try to keep it clean and notice at the bottom of the frame, I did a line one of the lines within the image with that bottom to give it some solidity. And oftentimes it's not just the sun, it is the shadows in the scene that will determine what I'm going to capture because that can make things much more dramatic. And I think this would be a good candidate for a black and white because the color is not contributing that much to the image then when it comes to the sun, this is not an architectural image, but it will be a good example. Uh, sometimes you're going to get a quite a different image when you end up incorporating the sun into your shot. If you look at this image, notice how low contrast it is, it almost feels hazy or like there's some smoke going through the scene or something compared to this version which has dramatically more contrast. Well, the only difference between this shot in this shot is what's happening to the lens of my camera. If you allow the sun to directly fall on the front element of your lens, then you're going to get lens flare. Lens flare can be little shapes of different colors in your image and it can also just be an overall low contrast feeling to the image. And so sometimes I want that where I want a lens flare coming through my image. Find that that can be nice. You want to just make sure the sun itself is reflecting off the front element of your lens. But if you want to avoid it, I usually put my hand up and my hand will create a shadow and I move my hand around until that shadow is falling on the lens of my camera and I just need him have it high enough that my hand is not in the frame. So in this particular case, the difference between this shot and this one, the only difference is here. Here you notice my lens does not have a lens hood because it's a really wide angle lens that's actually a tilt shift lens and I'm creating a shadow on the lens of my camera using my hand. That's what gave me that high contrast look, If there was one concept that I would say separates experienced architectural shooters from those that are just getting started, it usually has to do with where you're standing relative to what you're shooting. It sounds like a simple concept than it is, but it makes such a dramatic difference in your results that I'm amazed. It's not incorporated. More often, let me show you what I'm talking about. Look at this shot and notice there's a city in the different distance. Well that city in the distance is going to be rendered completely differently depending on where I'm standing, even though I can't move all that far away from this area. Look at the difference between this shot. Look at how small that city looks compared to this shot. The only difference between these two shots, technically is where I'm standing. If I stand close to this red frame kind of object then compared to the city that's in the distance, that red frame is really close to me. If I back away, I walk as far away as I can without bumping into an object like a pole or something else that we can be incorporated into the scene as I step further away. Now, my distance to that red shape compared to the city below, it's becoming more similar to my distance to the city. Let me see if I can show you better than other photographs. Look at the difference here, look at how long this walkway feels compared to here. The only difference is how far away I'm standing here is what I'm standing close. When you stand close, you see a large difference between near and far objects as you back away. Near and far objects look more similar in size or here. Look at this bridge and look at how far away the back part of the bridge feels in this shot. Compared to this shot, the only difference is where I'm standing when the back feels similar in size to the front, I'm standing far away as far away as I can get most of the time when you see a dramatic difference between how far away the near and the far feel, that means I'm standing really close to whatever the near object is. If you look here, look at the Eiffel Tower in the distance and compare this shot to this shot, notice the near object is approximately the same size, but what makes it so I can suddenly make that far object feel so big. Well in this shot, I'm standing really close to the sculpture that's in the foreground and therefore it might only be arm's length away, but the Eiffel Tower might be miles away. But when I back to the other side of this bridge and I'm shooting across the lanes of traffic now that sculpture is quite a distance away from me and it's feeling similar in distance to the Eiffel Tower, it's not quite equivalent distance, but it's a lot more similar. So, it's like this, if you've got a person in a car and you want to capture them, the closer you are to the person then there's a big difference between you and the background and here it's about 2.5 times as far away. But if I were to walk 40 ft further away, a bus lengths away from that person, Then here would be the difference. Now, the difference between those two is not very great of a difference. If you compare these two numbers, this is 1.3 times as far away, it's like 30% further away, whereas over here it's 2.5 times as far away. And that's what it has to do with. As you back away from the near subject, the far subject is gonna feel more similar in size. It's gonna pull it in and compress that space. So I use that all the time.
Ratings and Reviews
ehab ghobara
Good content Ben. Thanks a lot
Chris Lonardo
Ben's course is concise, practical, and packed with useful info. I've already recommended it to several NYC photographer friends. Well done!
Tom Hackett
Thanks for stressing the position of the photographer (perspective) rather than the focal length of the lens.
Student Work
Related Classes
Architectural & Real Estate Photography