Lessons
Introduction
01:14 2Materials and Tools to Use when Drawing
14:27 3Preliminary Furniture Plans on a Floor Plan
07:45 4Using a Scale Ruler and Templates
05:36 5Rendering Furniture on Floor Plan to give Volume and Depth
06:06 6Line Weights and Adding Texture
04:24 7Architectural Lettering
08:11 8Complete House Floor Plan
03:23Isometric Perspective
03:42 10Why 3-Point Perspective Doesn't Work
04:05 11Benefits of Two-Point Perspective
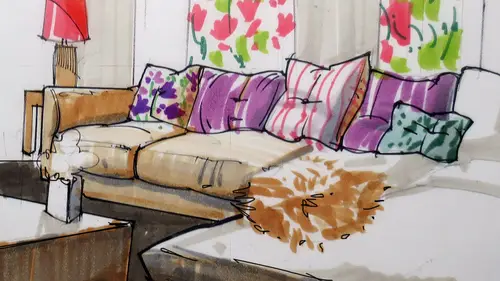
03:06 12Preliminary Sketches for a Living Room
11:29 13Using Different Textures of Materials in your Drawing
03:51 14Adding Color to the Couch to Create Shiny Leather
11:26 15Rendering Soft and Shiny Textures
09:09 16Starting Elevation for the Kitchen
07:54 17Full Rendering Elevation of the Kitchen
07:28 18Putting the Elevation at a Different Scale
10:33 19Two-Point Perspective for Kitchen
10:04 20Canson Paper with Pastels
05:35 21Transfer Line and Heights
08:27 22Finishing the Rendering Using Canson Paper
08:48 23Creating Chrome and Color Reflections
10:43Lesson Info
Isometric Perspective
Now let's let's start a new face over here talking about perspective now that we have cover a little bit of floor plans, how they work and how we can work with different scales. Let's take a look at perspective and all right, the EEC is want to use would be an isometric perspective isometric meaning equal. You work with three Axis three access like this. We have X, Y and Z, and the interesting thing about this is that each of these three access have 100 and 20 degrees. Okay, well, that means ISS. Let's use no some rulers. If I extend these lines, let's do an exercise here very simple, and you'll understand all the lines that I'm going to be marking in green would be parallel to each other. Well, that's a very juicy green. I don't want to use that one that's changed that too well. That's another juicy one. Let's pick one that would be less all right. This would be good. Okay, let's use red. All right, that's a better read, and I could go on all the lines that are parallel to each other ...
When we started drawing in, rendering when we start rendering. We need to figure out how the objects are situated in the scene. The lines are parallel to each other. Go to the same vanishing point. Or at least they are pilot to each other. It's kind of redundant, but all these lines are probably to each other. And that's exactly how I draw them. All right, that takes care of this angle. All right, so now let's work with the next one. Its biggest second colored sleep. This one here, pick this, uh, green. All these lines are parallel to each other. And again, we're still talking about isometric. Okay, isometric right there. All these lines are parallel to each other, and that takes care of this angle. Now, let's use blue. Hopefully, the camera can pick this color. Um, blue vertical lines are parallel to each other, and they are taking care on this ago. All right, so this is very easy to draw. We don't have objects that get smaller or bigger. That's why I put distressing paper on top. If I wanted to have, let's say I have these wall with different cabinets and if I wanted, but if I wanted to ADM or If I had a light table, I can put it on top and then kind of just draw this one right next to it and then another one and then another one, just tracing the shape. The nice thing about isometric is that I can just duplicate my pieces. We've had worrying that they would get smaller in the, uh in the drawing. Very. He said to take care off.
Class Materials
Bonus Materials with Purchase
Ratings and Reviews
user-d2a6ef
Creative LIve Why don't you re-do this class! Its a great subject.....get a new camera operator, who knows the concept of learning from watching.