Lessons
Lesson Info
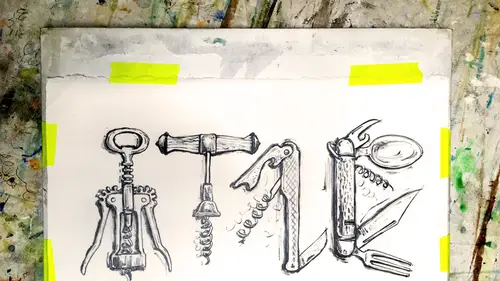
Line Quality
Now, let's talk about line quality here. What do we have here? Something kind of messy. And we know how to sort of clean it up. We've done that before, but we'll start over, put your object down right there next to it and look at it and saying, OK, this looks a little thick. Gonna make that a little thinner. Get your racer. Come back in race. Anything that looks kind of puffy. Hey, anything that has a cut out or a circle is gonna end up too wide. So I make it narrower. Do that to both of us and with my one line quality. Now, I'm really just doing a very steady kind of a medium, something that's just a little bit darker than the original tracing that I did. But I'm not trying to do anything special to it yet. This is just to clean it up, to make it look more the proportions that I wanted to be goes up there and clear when we're just starting out in just learning to draw. Why is learning line quality important? Um, it really gives your drawing a lot of variety, and that's when you can ki...
nd of express more of the feeling in it. Like if I wanted to make the scissors like, really violent and cutting, I could do sharp and jagged lines. If I wanted to make these look like really soft and pretty sisters, I could do softer fuzz. Your lines, Um, you can put it an atmosphere, you know, depending on where you want it to be, you really get to make up what you want your objects doing by the kind of line quality and shading and light you put into them. So it's kind of making it your own if you want to. Just dio, um, you know, a technical drawing that would be just making it look as perfect and clean as you could as But we're doing these sketchy drawings. I think it's good to put a little bit more feeling into it and decide what you want to make the objects doing. Okay, so there is one cleaned up, so that's pretty basic. And then I'm going to the next one. These ones are very skinny, so I'm really gonna cut out a lot of stuff. My favorite part is when I get to come in and do the sections that aren't there like anything that overlap that they didn't trace around. I think that's when I really feel like I'm drawing instead of just tracing. Tracing kind of has a bit of a bad rap because people think you're copying something. But what we're doing is really for position on Lee. It's helping us get a head start on our composition and are sizing. And we could hold it up and draw it like as if it were a model take a lot longer. And then we probably would get it in the wrong place on the page, and we have to erase it and start over. That's what happens to me. Okay, so I think you kind of get the idea. If you can see what I'm doing of just carefully looking at your object filling it in, I think I'm going to do this one because it has a little more interest and clear while you're working on that, I'm gonna pass along a question from one of our online students. Okay, They're curious about what tips you might have for left handed. Skechers. This particular person says they always smudge their work. This is Elizabeth asking? Yes, whenever she draws left handed. Elizabeth, thank you for asking because I really want to tell you something about that. You need to get out some tracing paper. It could be just another piece of the same paper that you're using. Tracing Baber works really well, though, because you can see what you're doing. And it's very slippery. So get a piece of tracing paper. I usually cut it down a little. Um, I have to shoot her way. Go and always keep that over your drawing. So see how slippery it is. So if you're drawing left handed, I've actually had to draw left handed a pharaoh amount because I used to paint murals and you don't have to climb down and move that ladder every time. So you just stretch right over here when you stretch way over on, then you climb down and with the letter, a fair amount of love town handed painting, even though it doesn't come normal naturally, to me. So this is what you dio you're not. You're gonna turn your no book upside down because you probably have a big spiral by binder thing here. If you're left handed, and then you're going to keep this over it all the time. So you should all students in class to you should all be doing that to just get out of a piece of tracing paper and move it around So you don't, Samir. You drawing Once we get to the shading, that's really important. Okay, I think I'm gonna change this out now, because I Here we go. And so I've drawn around most of these. Just clean up the line. See, Hye made all these a lot skinnier, and I went into the centers and I drew all these screws. Now I'm going to start looking at my line quality. Okay, Mark, where does okay all of these? I made on a piece of arches. Hot press, watercolor paper. So you're going to get a little different quality on your, um, printer paper that we're using because this is a little softer, but you can come really close. So let's look at all the different things you can do with just this pencil. If you want to draw a really sharp line, sharpen your pencil. I'm a stickler for sharp pencils. Once your pencil starts getting dole just sharpen it. Don't be lazy, okay? Or if you have really dull pencil, You know, sometimes when you're in the really dark spots drawing, that's fine, too. I'll keep that going. But sometimes I just like you're a little market the top of your page. Just so you know what you could do with your sharp pencil and then, you know, 10 minutes later, go try drawing that mark in and see if you can get the same line and that'll remind you Oh, sharpen my, um So we have that sharp one, and then if you have a really dull pencil, this one's kind of doll come in, you get less controlled, Mark, you could do a very light pressure and you can hardly see it or you do a very heavy pressure. I'm calling this kind of a doodle line because you see a lot of people drawing so one of the most fun ways to draw where you don't do your sketch first and you just start out just like I'm a draw flower just kind of like Here we go. Be bold, Draw a circle, draw your pedals You don't care if it looks three dimensional or how it turns out. Just do it. And that's kind of this heavy pressure doodle. It's all very uniform, kind of. Then there's this waited pressure line, and this really comes from, like calligraphy or brush lettering, anything that using a brush. But I do it with a pencil all the time and you start out doing really have light line, and then you press really hard in the same stroke clips. I always break my pencil. Then you do. You know, as you go around a curve, you're going to get like, a light spot and then you're going to get a heavy, dark shadow, and then you're going to come back again. And that's light. Just kind of like You can't even do a spiral start and it started. Looks three d already if you keep going around and around like that. Okay, so now another one is this. Chicken scratches one. You see a lot of people sketching this way. They'll start out sketching and kind of you kind of carving out a form, and you're doing these chicken scratches and it's really good if you're trying to find your place. But if you keep it the whole thing this way, and you don't like erase these lines that weren't perfect. Then you end up having this kind of like furry Paris eaters, which is good. If you want for Exeter's, that could be neat, but so that's kind of the chicken scratch drawing. So I would say, you know, do some smooth lines and then in certain spots, if you're having a hard time finding, really where that goes to your chicken scratches, another one is the scribbling gesture thing. Just your drawings are when you just like there's a great famous one of a dog that I see all the time. And you're like, OK, there are some dog ears and there's this dog body. Now he's got a tail and he's got a few feet and it kind of starts looking like a dog. Okay? And they really find a deal. They go really fast and good for, especially if the dog is moving. Get it down really fast. So if there's certain spots like if you want it to look like your scissors are opening or closing really fast, you can. You know this Paris scissors has these wiggly marks in it, so I would probably just do a gesture. And there I wouldn't really worry about trying to get all that straight, because I think it looks a lot more alive and has some movement. When you're doing that, another one lying quality you could do is a dotted line. There's a lot of pictures that are completely made up of dots. I used to have a cookbook that every single illustration, all the shading was done in dot and it if you have the patience for that, it looks really good. I don't know Ideo, um, works great for shading or or you just do it in certain little sections, like if there's a spot right here, erase this lines. You can see what I'm doing, you know, say, there's a spot that's in bright sunlight and backgrounds light, and you can barely tell what's going on there. You do that. But then over here in the shadow, maybe it's a lot darker, so I'm gonna really make it that darker on outside, Um, the side of the pencil. Okay, this one I use all the time. It's one of my favorites, and the reason I'm going through all the techniques is I want you to practice all of them and figure out which ones feel the most natural to you. Which ones you like the best. Practice those first and just do those winds a lot and then add some more of the challenging ones in because chances are you'll end up liking those challenging ones. But this one, the side of the pencil. You you have your pencil on the side, hold it like this and then poke the pointy spot in. And this is how you get a good shadow coming behind something or, you know, this sisters, I know it's it's rolling up and around this way, so this edge is very sharp right there. But it's going to rule in, so I'm gonna put the pointy ist edge on. The point is part of the scissor, and I'm gonna dragon in like this hopes that broke my pencil again. That shows how hard I press I keep breaking my friends, but do you should do that a lot, Okay. And then I also I turned my paper around all the time because now this other side of the scissors it's gonna have some rolling over on it, too. So I'm gonna come back in this way. I'm always turning my paper around. Okay? Also, in between these little loops, I'm gonna do that. They're they're always in the shade. Okay, I feel that in then the last flying quality I have, I'm gonna call scrubbing. Also one of my favorites. So you're coming in here, and you're like, this part in here. It's, like, really dark in there. There's some rust. There's some shadow. There's just all kinds of stuff going on in there. I don't really know what it is, but it's all, like, super dark and dingy in there. I'm just gonna, like, fill it all in and just, like, scrub it out. And then it really makes us really makes this thing on top pop out if you leave one side simple and really struggle way. Okay. So keep going on your lines and just the line quality. We're going to call this like, the messy first draft stage. I'm gonna do the scrubbing on this one too. It's really dark. Okay. Practicing all of the variety of line qualities that you've been going over. Do you tend to incorporate multiple ones in a single sketch. Or do you go side by side and draw the same object over and over again, using the sharp, the dull pencil, that sort of thing? Um, yes. Excuse me. Here we go. Within one drawing, I will do several different types of line quality. But you're going to hear me recommend to this class make a chart. So what? We're actually going to do this later to, um with the shading. But if you want to really learn how to do each of these line qualities, draw one pair of scissors just with the sharp type of drawing, draw another pair of scissors just with a really dropped dull pencil. Draw the next pair with very light pressure. And once you've drawn this thing, however many times I have one too. 89 There's 10 times here, and I'm sure you can make up five more. Once you've drawn this Paris's, there's 15 times we're going to start getting a handle on, like all the different right is a line quality, and you're also gonna have some that you 11 some that you hate, and so that will really help you develop your style. is when you find the things you love and hate. Okay. Um, so, yeah, let's see. I'm gonna maybe just go in, finished one of these about sample. Just keep sticking together. Okay? So I'm gonna finish this one here. You also to do a line drawing. You don't have to draw the whole thing all over super carefully. You can. I will probably leave half this drawing, just as is and just clean up certain areas that I like. So don't ever think that you have to be really uniform. And if you do one technique in one area, you should do it at in the other area. Okay. Um, you know, maybe a little shading thes air red? No, these air silver. Okay. Just clean that up a little. How are you doing on your drawings over there? Looking good. Okay. And then I'm gonna really focus on this. I'm gonna leave a lot of those areas Plane and I really like that. So I'm gonna take all my detail in this one spot. I have all these little ruffles that come around it kind of using like a This is this waited pressure. So I'm doing really dark on the tops and light as I go around
Class Materials
Bonus Materials with Purchase
Ratings and Reviews
Rhonda Bender
This class is about two hours long. Overall it is a friendly and accessible approach to introducing some basic drawing techniques and tools that is appropriate for those who are nervous about or just novice to drawing. It lets the student jump in by tracing a basic outline which is then detailed. Towards the end the instructor demonstrates a more advanced type of tracing using a tablet as a lightpad, and there is also helpful information on how to trace one's own work to transfer it to better paper or slightly alter the drawing to be larger/wider/etc. The middle portion has overview information on types of lines and methods of shading. These aren't super thorough examinations of those topics, but should be ample to complete the exercises and drawings included and recommended in the class. Likewise, the overview of drawing tools and papers is an overview, but strikes a good balance between overwhelming with too much information, and giving students enough info to know what tools they need for basic drawing and how to use them. There is a brief overview of how to use the sight size method to draw freehand more accurately. This is a subject that could easily be an entire class topic on its own. Some will find this enough info to get going, others might prefer expanded information and more details on this. The more complex subject of ellipses in perspective is touched on only briefly. (Perspective is also a complex subject that needs a whole class of its own, so this is understandable.) In contrast to some other reviewers, I did not have a lot of issues with the filming and camera angles. A lot of time was spent on the angle of looking at the drawing in action. However, it is clear that material was edited out from the live version. The edited version doesn't follow the drawing of every exercise through to its conclusion, and sometimes segments end or start abruptly.
Kelsy
I like it. it's not very in-depth but it gave me the courage to start drawing, and I had so much fun. Great for beginners.
a Creativelive Student
There was a lot of good information in this course: types of shading; analogue versions of digital tools like guidelines and centring. I had an ah-ha moment when Cleo talked about ellipses. That alone was worth the price of the course. I also loved the part about using a lightbox, as well as tracing and graphite papers as tools - but in a way that doesn't impinge on copyrights.