Choosing Your Wire and Link Size
Lesson 7 from: Explorations in Metalsmithing: Creative Chain MakingMegan Auman
Choosing Your Wire and Link Size
Lesson 7 from: Explorations in Metalsmithing: Creative Chain MakingMegan Auman
Lessons
Prerequisite #1: Basic Metalsmithing Tools
18:10 2Prerequisite #2: Tools for Soldering
14:23 3Prerequisite #3: Soldering Basics
21:16 4Class Overview: Creative Explorations in Chain Making
06:42 5The 10 Variables of Chain Making
04:24 6Finding Your Aesthetic
08:17 7Choosing Your Wire and Link Size
18:21 8How to Make Jump Rings
19:09Assembling and Soldering a Basic Chain
05:10 10Soldering Demo: Soldering Links Closed
50:24 11Hot Seat: Soldering Links
11:55 12Making Different Shaped Links by Wrapping and Bending
30:20 13Making Different Shaped Links by Joining
07:19 14Changing the Shape of Links After Soldering
12:26 15Creating More Variation With Multiple Links
13:46 16Soldering Demo: Soldering Complex Chains
05:18 17Making an S-Hook Clasp
08:14 18Making and Soldering a Toggle Clasp
10:55 19Pickling, Cleaning, and Polishing Your Chain
34:37 20Adding Hammer Texture and Flattening Links
08:35 21Making Ear Wires
08:03 22Turning Your Chain Explorations into a Cohesive Jewelry Line
10:35Lesson Info
Choosing Your Wire and Link Size
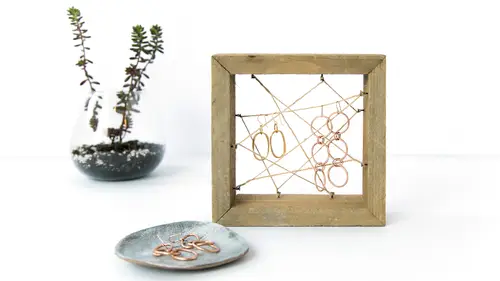
So, now that we've kind of talked a little bit about your aesthetic and what we're gonna cover in this class, let's actually start to get down to making some decisions as we work towards making your chains. So the first thing that we're gonna talk about is choosing your wire and your link size, because again, for me it's really important that I'm not giving you this really prescriptive class, like "Use this gage wire and this gage dowel rod," everything is really a choice for you in chain making. So I wanna introduce you to different kinds of wire, talk about different link sizes that you can start to make some choices. So let's dive right into our first variable, which is our type of metal. I wanna talk about what type of metal you should use in your chains. First off, we're gonna be focusing on primarily wire in this class, so you can actually make chain out of sheet metal, and you can see I actually... Pulled an example here where I ended up making some links out of a strip of metal...
. That's certainly an option, but for the most part we're gonna be talking about wire in this class. But within our wires, we have a lot of different choices. Now if you were in my previous class you heard me talk about this idea but we're gonna talk about it again for anyone who's new. In jewelry making most of what you work with is non-ferrous metal, and "non-ferrous" is just a fancy way of saying it doesn't contain iron, so it's not iron, and it's not steel. This is traditionally what's used in jewelry making, and it's what works best for soldering, which is what we're gonna be using here. Some common non-ferrous metals for jewelry are brass, bronze, and copper, so copper, I didn't bring a copper sample here but if you guys can picture a penny, that's copper, and then brass and bronze are actually both alloys of copper and another metal. "Alloy" is just a fancy way of saying it's a blend of two metals. So brass and bronze are both alloys of copper, what you'll find is that brass is much yellower, so if you're looking for something like gold, but is not the cost of gold, brass is gonna be your closest match, and bronze is going to be a little bit warmer. If we had a copper here for comparison, bronze would sort of fall in the middle of those two metals, and as I mentioned in my previous class, bronze is one of my absolute favorite metals to work with and it is also the most frustrating because the alloy is very different. Sometimes I'll buy bronze that looks kinda much more of a warm gold, and sometimes you get it and it practically looks copper. Just be warned that if you are ordering bronze, you may not get exactly what you thought it would be, and that's even within the same supplier, so I've ordered from the same supplier at different times and been like "Oh I love this color!" "Oh I hate this color," and unfortunately, that just has to do with the batch of the wire. And just a reminder, when you guys RSVP for this class, you get a PDF with all of the supplies and materials, including links, so if you're wondering, "Megan, where do I buy brass wire or bronze wire?" that's on that PDF, so you guys can use that to order those as well. Beyond brass, bronze, and copper, another really common metal for chain making is going to be sterling silver. Now of course sterling silver is a little bit pricier than those materials, so I really recommend that you guys practice on either brass, bronze, or copper, because they're gonna be a little bit easier to work with and they're definitely gonna be more inexpensive, but silver is a great option for chain making. You can get sterling silver, or now, a lot people are getting an alloy called "argentium silver", you may see that start to be thrown around, it's basically a type of sterling silver that has a little bit of a different blend to it, so it doesn't tarnish as much, so it stays kinda nice and white. If you really like the look of silver, especially if you're trying to go for something that's really modern, like if you're going to oxidize your silver, sterling silver is probably fine, it's a little less expensive than argentinium, but if you like that kind of bright, white finish on your silver, argentium is definitely worth a couple extra bucks. Also, argentium tends to be 100% recycled, so if you're looking for an eco-friendly option when you're doing your chain making, a lot of people like argentium for that as well. And then of course you can work with gold, all of the techniques that I'm going to show you guys definitely applicable to all the types of gold, though obviously, gold is pretty expensive. You can also work with wire that's called "golf filled", and so what that is, is it's a core of brass, with gold coating over top, and you can get 14-karat gold filled, which is yellow gold, and now you can also get rose gold filled, so if you like the look of rose gold, which is obviously very popular right now, I also find that the bronze wire, if you're trying to replicate that look of rose gold, a lot of the bronze alloys tend to look like that. So those are the main metals that you can work with. In terms of things to avoid, I would avoid nickel, even though nickel is actually a metal that technically works in all of these processes, when I used to teach at the university level, students would try to use nickel because it looked like silver, but it was much cheaper, but it's actually a pain to work with. It's a really hard metal, it doesn't bend nicely, it doesn't solder nicely, you can do all of these things we're doing, but it feels like a fight, and then on top of that a lot of people have nickel allergies. So I'd generally suggest avoiding nickel, if you really want that silver color, just bite the bullet and work with silver. If you're unsure and you're still developing your skills, make a practice one in brass or copper first, and then move on to silver, but I would avoid nickel. Aluminum we also want to avoid because it is actually a contaminant for all of our other metals. Aluminum melts at a much lower melting temperature than any of the other non-ferrous metals in jewelry and so what that means is that if we get a tiny little bit of aluminum dust on anything we're about to solder, we're basically just going to (whooshing) melt the whole, which is really sad when you're doing it with silver, and then all your silver disappears. Aluminum actually requires a whole other set of tools, so it's best to just avoid that. Now in terms of choosing your metal, really, there's a lot of different reasons to choose different metals, and the first ones are really just color and aesthetics. If you like the color of brass, work with brass. If you like the way that silver looks, work with silver. There's really no reason, in terms of color, to say like, this one is significantly better to work with than another. Go with the color that you like. Of course cost is a consideration too, if you're trying to keep things inexpensive in the beginning, I highly recommend starting with brass, bronze, or copper, because they're gonna be much less expensive than silver. The other thing to think about is everything that I have here, I bought in one pound coil, because I tend to go through a lot of wire, but you can also buy your wire in quarter pound coils, you can get little coils of wire, so if you're trying to try out a lot of different gages and you're not really sure what you're gonna end up using, start just by buying the quarter pound for each of those, just buy little bits, experiment with them, and then if you know you're going to use a lot of a particular metal in gage, you can always buy bigger amounts. The more you buy of a wire, the cheaper it's gonna get. The next thing is malleability. "Malleability" is a fancy word for saying how soft something is or how easy it is to bend, and this is something to think about when you're chain making because some metals are softer than others. Copper is much softer than brass and bronze, now there are pros and cons to this, so when you're first learning, when we're trying to wrap our jump rings around the wire, if you're having a hard time getting things tight, you're gonna find that it's easier to work with copper than brass in that regard. But the flip side is, copper is gonna wanna bend easier out in the world, so if you're not soldering your links, copper is really not a great choice, because there is a potential that it's going to be really easy for someone to just catch it, twist a jump ring, and have the whole chain fall apart. So in that case, brass and bronze, which are much harder, are better. With silver, sterling silver, you can buy as half hard, so you can get it a little bit harder to begin with, same thing with argentium, if you know you're not going to solder, it's probably worth buying the half hard, just know that it's gonna be a little bit trickier to wrap your jump rings that way. If you're planning on soldering your silver links, always buy dead soft, but just know that silver is definitely a softer metal. Finally, upkeep. If you're making this chain and you're putting all this time into it, you should know that some metals tarnish. Copper is going to tarnish over time, brass and bronze can tarnish over time, so there are ways that you can seal that, but you may decide, you know what, I wanna work in silver, especially, this is something you want to think about if you're selling, because if you're selling pieces and putting them out into the world, you don't wanna always have to be taking things back because it needs clean, or it got dirty, or something like that. So that's something to think about as well. So then our next variable is gage of wire, and "gage" is just a fancy way of saying metal thickness, and you might see this abbreviated as GA, or, on your wire here, if I'm looking at the wire that I have, this is 16 gage wire, and it's actually written on here as 16 AWG, and I cannot remember what all that stands for at the moment, but you'll know that if you see that AWG that's the gage. Below that, this one says 16 ounce, because it's a pound. So if you're not sure, look for that 16 AWG. Most wire comes labeled, but if it doesn't for some reason, I would go ahead and stick a little tag on it or something, when you buy silver it doesn't come by the pound, it comes by however much you tell them you want and so I always try to keep my little tags on here so that I know, "Okay, great, this is 18 gage," this one is abbreviated GA, this one is 18 gage argentium. So try to keep these tags on here whenever you can. If for some reason you have a lot of wire that is not marked, you may wanna invest in this sheet and wire gage, 'cause this is something that will tell you what thickness you're dealing with. Now, even though we're sizing wire, these circles have nothing to do with wire. The first time I was like, "Wait, these are..." Nope, nope, has nothing to do with that. So really what we're gonna do is we're gonna slide it into the edge here, so it just slides into this little slit, so ignore the circles, and you can see here, slides right into our 18 gage. So this is a good tool to have if you have a lot of things, forget, it's not super cheap, I wouldn't buy one right away, but if you're gonna be doing a lot of this it's really helpful to have this. If you're like, "Wait, what gage was that?" or if you've made your samples later and you want to recreate something and you're going, "Oh, what was this? Okay, perfect, this was 14 gage, now I know I can recreate this because I know what gage it is." Metal gages are a little bit counterintuitive. The smaller the number, the thicker the gage, and then obviously the larger the number, the thinner the gage, so, if we look here, I've got some 20 gage, which is pretty thin, and I've got some 12 gage here, which you can see is significantly thicker. So I recommend playing with a couple different gages, but usually staying within the 10-22 gage range for your chains, and again, thinking about where you fall on that aesthetic scale. So I, personally, tend to work with about 16-12 gage, and occasionally 10 gage for what I'm doing, but if you know you're kind of thinner, maybe you wanna start with some 20, some 18, or some 16. If you are not soldering, I would not go any thinner than 18, I would probably stick to the 16, 14, 12 gage range, if you're not planning on soldering links, you could go 18 if you're planning on making pretty teeny-tiny links that you're not gonna solder, but in general I would say 16, 14, 12, if you're not planning on soldering, because we do need to make sure there's enough structural integrity that the links stay closed during normal wear. You may have actually even heard somewhere at some point, a rule about, like, "If I'm using this gage dowel rod, or this size link, I should be using this gage wire," and there are definitely charts and things like that out there, and some of that is a kind of decent guideline if you're using unsoldered jump rings, but I personally am a fan of, "Do what makes sense for you and your chainmaking." so if you love big links and thin wire, that's fine, you can absolutely do that, just know that those will definitely need to be soldered. Again this example here, you can see, I think this is either 18 or 20 gage on a fairly big-sized jump ring, that you can absolutely do, but you should know that that's not a chain you could send out into the world without soldering. It would need to be soldered, and then probably work hardened on top of that, and we'll talk about work hardening later, it's just a fancy way to get our chains to be a little less squishy so that they don't get crushed in people's bags. So then our next choice is shape of wire. Pretty standard for chainmaking is our round wire, and that's pretty self-explanatory if you were to look a cross section of it, it's round. But wire comes in a lot more than just round. One example that I brought here, you can get pretty much everything, 'til it comes down to it, you can get half round, you can get patterns, you can get flat wire, pretty much the sky's the limit, so if this is something that's interesting to you, go to the suppliers, Rio Grande, that I mention in our supply list, they have a lot of different kinds of wire. What I see is that there tends to be a lot more different wire shapes in silver than there are in some of the other materials. Silver has a lot, copper has a pretty decent amount, and then brass and bronze tend to have less options in terms of wire shape, but one of the ones that I do have here, if you can find the end of our wire, is I brought some... Let's see if we can see that in there, some square bronze wire, so this is really cool because then depending on how we wrap it, it actually gives us really different jump rings, so you can see here, this one sort of ended up getting wrapped around the wire where the point of the corner was facing out - does that make sense, can you guys see that - whereas this one is basically wrapped flat around the dowel rod. So right here, just by using this square wire, I was able to create two different types of links, so that really gives you a lot of variation as well. These kind of pattern wires are definitely trickier to work with, 'cause you really have to pay attention as you're wrapping. The round, it's all the same cross section no matter what, but these square and half round, you have to pay a little more attention, but it's another interesting way to add some personality to your chain. And then our last variable that we can think about before we actually start to make some jump rings, is the size of links. As I mentioned, you have a lot of options here in terms of what size you wanna work with, and so, just depending on... If you're using soldering, you're using work hardening, you can pretty much use any size of link. I've got some ovals here, I was having a lot of fun making oval jump rings for our samples, so you can see I've got this little guy here, and then we went up a bit in size, and then we did an even bigger size, which is also, I think, the size length that I'm wearing, so you can see same gage wire in all of these, just playing with different link size to really get a different feel in the chain, and so that's something you can do as well. You can also vary the size of the links within a single piece, so, let's see, I think I have a sample of that somewhere. This little guy here has, I think, there's all kinds of crazy stuff happening in this guy, I was just stickin stuff together, so, it's got some small ovals, a big oval, there's a round one, some of them are hammered, but you can see that you can use different sizes in the same chain as well, there's no law that says you always have to use the same size throughout. Alright, so our size of our links is really determined by the mandrels that we're using to make our jump rings, and so when I say "mandrel", I really very loosely mean anything you can wrap your wire around to make the shape that you want. So the standard thing for chain making is really to get wooden dowel rods, and I like wooden dowel rods because they come in a ton of sizes so we can get that variation, you can also cut into them with your jewler's saw, you can see some of mine are starting to get kind of notched here because I cut into them with my jewler's saw which makes it easy, but pretty much any round thing you can find, and we'll talk about non-round things a little later, but any round thing you find can be a mandrel. A lot of people really like to use knitting needles, because again, they're lightweight, they're small, they come in a lot of sizes, it's just important to know that knitting needles are aluminum, so if we're gonna cut into them know that that dust is gonna contaminate. But knitting needles, I've used different gages of wire, if I had some thicker steel wire laying around, I've used metal tubing to wrap jump rings, pretty much if I'm looking for a size, anything in my studio that's round is fair game, when I'm making really big links, I will actually wrap around PVC pipe, so I've got a couple of 2 inch and 3 inch diameter PVC pipe I'll wrap around that as well, I'm pretty much all about anything that's cheap and round and I could wrap stuff around. So that's what you can use for your mandrels, and that's gonna help you determine the size of your links.
Class Materials
Bonus Materials
Bonus Materials
Ratings and Reviews
Liz
Megan' an excellent instructor and lays things out very clearly, with a lot of good tips based on her extensive experience. I've experience making wire wrapped chain and have taken a beginning metalsmithing class before, and this class had some good refresher information. I particularly appreciated seeing her techniques and process for streamlining production.
a Creativelive Student
Megan is an awesome teacher! She is genuinely enthusiastic about sharing her metalsmithing skills with us. I am really looking forward to trying my hand at designing and making a chained necklace on my own soon.
Vernell Bevelander
Another excellent class! Thank you Megan!