Lessons
Class Introduction
12:53 2What Is Low-Key Lighting?
11:11 3Bringing in the Subject
05:01 4Lighting Patterns
19:21 5Lighting Patterns: Broad vs. Short
09:25 6Giving Your Light a Job
12:07 7How to Create Separation
06:58 8Shoot: Putting it All Together
08:34Developing the Raw for Low-Key
12:40 10Enhance with Local Adjustments in Lightroom
12:31 11Creating Different Interpretations in Lightroom
16:19 12Clean Up Image in Photoshop
09:11 13Dodge and Burn in Photoshop
11:00 14Liquify in Photoshop
09:40 15Adjust Color and Contrast in Photoshop
11:17Lesson Info
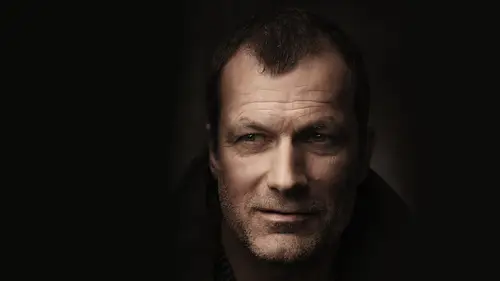
Giving Your Light a Job
we are now going to talk about the jobs of light, and this helps facilitate, I think, organization in terms of light, often times people which want to get up. And they want to throw a bunch of lights at something because they think that's what you got to do. It's not quite like that. You can get great results out of a single light. You can also get very finally controlled, tightly controlled light out of 10 lights. It's all about what you do with it and giving your light a purpose, giving your light a job. And so there are four main jobs that I think four main jobs I like to give my lights and a single light can have multiple jobs and multiple lights. Gonna have one job, for example. You may have three fill lights. You may have one light that works as a background light, and I feel like right lights can have multiple jobs, but if you think about what those jobs are, it will help you when you're putting up a light. What is this, like do what is this light do? Right, So we're gonna addre...
ss the four main lights 1st 1 is the key light. That's what we've been using so far. Key lights, the main light. The key light dictates the overall look and feel of your image. That's usually what exposure is based on. So what we're gonna do, let's just go ahead and grab that oct up. We're gonna bring it in pretty close. And if you could bring it up a little bit and angle it down for me, please, I generally speaking like a like, uh, yeah, expensive. Pretty good. I like a light that angles down. It carves the jaw line a little bit more than just putting it flat up against the subject. So typically angle it down and coming from above, it helps toe carve out features and create a little bit more shadow right under here. So let's go ahead and and we go. Oh, no. Great. Cool. Okay. And then in a little bit closer for me, please. Great. And also, what I'm doing is you'll notice that or what? What John has done is you'll notice that the light isn't directly pointed at his face. I'm using this edge over here is called feathering the light. When you use the edge of the light. It's gonna give you a little bit more of a prettier, even light versus this real bright thing that's coming out of here. So I don't usually use it straight on at the middle. Let's go and get a meter on that, please, knowing. Great. Okay, so and if you return your face a little bit more of the light, Great. And so what I have is this very, very soft light coming across the face. This is going to be dictating my overall look and feel, and it's very, very moody and soft and pretty. Now, if I wanted to make something a little bit more dramatic a little bit more sorry in your face, I'm gonna move in a little bit closer. You know, I know the tripods awkward, but I like to use it. All right, turn your face a little bit more this way for me, They That's great, right there. A good guy. And so now what I have is this very, very soft, beautiful, painterly light light across the face. Okay. Very, very nice. Nothing. Nothing's been done to this. I mean, this is this is zeroed out, right? through camera. We have a nice, soft, great Asian nice loop light. If he were to turn a little bit more to camera, could get into a Rembrandt just to show you what that would look like. Just turn a little bit more to me than the benefit of using that modeling light, which usually I'll use us in a pretty dark space. Um, is you can see exactly what's happening with the light. I always like that to be brightest, possibly. You see it just kind of dark. It's that little bit. Makes it nice and nice and moody and dramatics that's gonna be my key. The second light is gonna be my fill in the fill light. I had a question regarding the section before about the feathering off the light. Why you're opting to move the life forward like I had understood it more in the sense of not getting light into the background. That's that's definitely a use of uttering, like also. Okay, yeah, no, that's That's one use. Absolutely. You're right. And so what we have is because that lights not pointed the background. We don't have much light on the back and probably a little bit, but not a whole lot. The reason why I'm using it on the faces. Because when you have that light that comes out the middle is always the brightest part. And I like to use Not that, because it's more even that edge of the lights. Always a little bit more even than what's happening here. And so I know if I point the bright spot it here, I'm gonna have a huge fall off. And it's not going to give me as consistent of a light over my subject. Whereas if I just used the edge, it's going to give me a more consistent light across the area that I'm lighting. All right, so the next thing we're gonna do is we're gonna bring in the Phil, and there are different ways in which we can bring in the film. I'm going to show you two rather briefly. Okay, that's great. If you could just grab me the of the white Board or something, Okay. Okay. Now we could bring it around a little bit for me, please. We're gonna bounce it from the front when a bounce it from there. Everyone has different ways. They like to use Phil. Okay. I like to create fill. That doesn't feel like a secondary light. I like to use it as a way to control contrast in the image. Which is why I have my fill light behind me. Because it's not gonna create a shadow that goes on the other side. It's not gonna light him from one side versus the other. It's going to light it evenly. Based on me. It's just gonna brighten up the dark tones very evenly with this. If I put this way over to the side, physics balances off, and then it creates almost like a rim light. Whereas here it's gonna light it a little bit. Mawr at the front were angle, and so this is just gonna bring in a little bit of bounce to the front. I'm just gonna show you what this looks like. Okay, if I bring it in real close, pardon me. Because this is an analog system, right? I'll move that in just a second. I'll show you. Don't worry. And then this actually know what can you grab? Grab the flag for me real quick and then just hold that up? I'm gonna show you all these in just a second. Just real close. There you go. And then I'm gonna turn this on. I have been on, you know? Yeah, with, like, No, Here we go. Okay. So I'm going to show you It was very, very low in the first shots. It wasn't really doing very much the thing. The thing about these these large umbrellas is they need a lot of power to put putting the impact on the image, especially thes deeps with the diffusion on so you can kind of see where we started. This is bringing in the white in different intervals. This is here. This is a bit closer. This is the black, and you can kind of see how we brought that dark edge back to it. And then here is with a bright Phil here. It's not actually changing the exposure of the image. It's just changing how much fillets. It's much brighter, but it actually doesn't you still have that little loop shadow? It's just filled it. I'm taking to these a little bit bigger. Here's where we started. This is adding in the foam core. The little piece of white reflector here. It is a little bit closer. Shave before and after a little bit brighter. See it on that jaw. Then we bring in the black flag to absorb light at in contrast. Oh, here we go. Right. And then finally we brightened up from the front, and the idea was this didn't actually create its own shadow. We just used it. And you can control the power to decide how much brightness or darkness that you want. Okay, so we have that we're gonna add in the rim light here really quickly, and then we're gonna add in a background light. And basically, a rim light helps create separation of your subject. The background and a background light also helps create separation of your subject to the background. One lights the subject, one lights the background. So let's let's get a power power test on that real quick. I'm just gonna meet her that rim. So it's the same as the front. So I'm I'm at nine right now, 2.5 its way again to let's crank that all the way up. That's six. Let's crank it up as much as we think it goes. 10. Right again. 10 right turn it down. 1/3 of a stop, please. Good. You have to dump these. I think my battery has died on your remote. That city. Great. That's fine. Now, if we want to make this less noticed, we turn the power down. We want to make it more notice what? We have to turn the power up or we bring it in a little bit closer. And then lastly, we have the background like so this isn't timely. But can you explain? Need oring really quickly? Because I'm not sure what you are doing. Sure. Thanks. So, basically what a meter does is it evaluates the flash at a particular point in space. So you tell the meter what shutter speed you want to use What I s So you want to use and it tells you the aperture tells you the f stop. And so what I'm doing is I'm using Is it a way to visualize the light without actually looking in the back of the camera? And so when I said I wanted that to read, the same is this. I know that they're both exposed the same. Or if I want the shadow to be a little bit darker. I can I know how many stops above or below. Right. So the background light, I'm just basically gonna point behind him. I'm using grids to do so. Grids come in all different kinds of degrees. The smaller the number, the tighter the focus, the larger the degree number, the bigger the spread. And so you're going to swap these out based on how close the object is. Thank you to the background. All right, give me. Give me another with six Turned eight for me, please. You go. And it's right behind his head. I usually generally put it like Right right back there. There we go. And then you can see that as a little bit interest. Some people like a really strong background light. Some people don't. Some people like a really strong rim. Some people don't. It's totally a matter of personal taste. Now
Ratings and Reviews
Brenda Pollock Smith
Thank you Chris Knight and Creative Live for another excellent class. I appreciate both the actual shooting and post instruction. Right before your eyes you will see how simple applications of light, shadow combined with post production can create gorgeous, dark images. Chris has a great relaxed manner, easy to follow while offering a ton of tips and tricks. I can hardly wait to try my hand at producing some hauntingly beautiful images like Chris.
a Creativelive Student
I don't have a ton of time to spare and largely catch segments of courses on short breaks. One of the things i like best about this course Chris's ability to communicate so effectively and efficiently. He covers a lot of ground in not a lot of time, but the course doesn't feel at all rushed. He's just a good speaker/instructor. One of the other reviewers mentioned that this instructor brings no ego to the stage, and I have to agree. He's a confident and competent instructor without being obnoxious. Rock solid course with terrific instruction. I will definitely check out more of Knight's classes.
a Creativelive Student
Truly amazing class. Chris taught me a few things, as well as providing a structure to organize (previously) disparate facts I already knew. Background is important: I have 40+ years of experience in photography, and I love (and shoot) Low Key Portraiture. I took Chris' class to keep current. Most of the information wasn't new to me, but I enjoyed Chris' tight, concise presentation and his organized approach to this subject. There is value to this. But I also learned a couple of really useful tricks from this class; things that I'll use. What's the value of that? Hard to know, but easily many, many times the cost of this exciting class. Well done, Chris! CL, please: more Chris Knight!!!
Student Work
Related Classes
Portrait Photography