Creating A Masterpiece
Lesson 10 from: FAST CLASS: Creative Composites Using Your Own Photo StockKaren Alsop
Creating A Masterpiece
Lesson 10 from: FAST CLASS: Creative Composites Using Your Own Photo StockKaren Alsop
Lesson Info
10. Creating A Masterpiece
Lessons
Creative Ways To Photograph Elements
08:48 2Capture Usable Stock Anywhere You Go
04:14 3Storing And Organising Your Stock Collection
12:01 4Focus Stacking Small Elements To Make Them Look Large
04:25 5Focus Stacking In Adobe Photoshop
10:34 6Photograph Atmosphere
07:49 7Create Photoshop Libraries, Brushes And Overlays From Your Photographs
11:58 8Create Continuous Photoshop Patterns And Pattern Brushes
19:51Lesson Info
Creating A Masterpiece
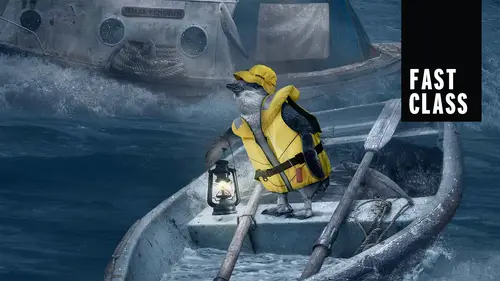
this is a speed edit of the creation of it. And I'll just start with the basis. Like I started with an ocean picture that I had this boat and this boy, this life boy. I really thought everything was going to work together. The boat itself was something that I photographed on a trip. The waves and the sea all of that was photographed on my various adventures. And I loved, I loved the sea and the way the waves were cascading over the boat. The sunshine was quite harsh. I knew I'd need to dial that down now. The boy itself, I really thought I was going to have a penguin sticking its head out of this. That was my original vision and sometimes things change now. I ended up borrowing this boy. I put a call out on facebook in the local facebook group to say, does anyone have an old life boy and someone donated this to the cause. And yeah, we started with this and I photographed it. And then as I was working through it, I just realized it just really wasn't fitting. As I started creating this ...
piece and I didn't have anyone around me. I was sitting in my studio and just kind of pulling it together. I sent it to a few people and I found out and realized that the penguins that I started with featuring we're not actually penguins that were in danger down at Phillip Island in Melbourne where I was focusing this image on. So I found out that in fact the little blue penguins are the ones that I needed to feature. And I went back to my collection and found that I had quite a number of photographs of these little blue penguins that I'd photographed at Auckland and then I knew I had the pieces to really put this together. So you'll see me changing those penguins over as I'm creating through this little speed edit here. I wanted to add another element of ropes and tying the rope to the boys. That's what I'm doing here. This piece here. I mean I love collecting these elements that I can use again on a trip to new Zealand. That steering wheel was in a museum and just fantastic to add to the feel of the piece you can see. There's a lot of small elements that I'm pulling from. A lot of different images in my collection. These lights. Bye At some point was able to come out and photograph at the local op shop and you call it a thrift store. It's a second hand store and it's got a collection of amazing pieces. So here you see the boat and the supersizing that I did and placing this in the front and it became the replacement to the life buoy and it really fit a whole lot more. I found the Life Boy was pulling that attention away. It was too bright to orange and I really wanted to tone the colors specifically for this one. So I put this boat in and I'm using the same technique with the splash brushes that I have shown you throughout this class on how to create brushes. So I've created splash brushes from pictures that I photographed of waves so that I can then add that up and around the boat. So lots and lots of additional layers. Again, this is the wrong penguin. So I'm here cutting it out, placing it in later defined. This is not the penguin that I should be including more waves, more splash, more movement, more storm, lots and lots of additional layers. One of the things that I really want to highlight at this point is that when people get into Photoshop and when they get into compositing, they often think it's sort of gonna be one adjustment layer is going to turn day to night or one adjustment layer or one brush is going to solve all the problems of the waves when in fact it's a multitude, it's a multitude of layers of adjustments of lots of little fixes. Now we're getting to this point where I needed to add water in the boat. So again, I'm grabbing images that I've got of all of their water that I can then merge into the boat and then using blending modes to bring it into the boat. So you can sort of see a little bit into the bottom of the boat. So those blending modes are so powerful for so many things, not just for overlays, but to really blend your elements together. So I'm asking this in working around the different parts of the waves to make it look like that. Water is really, really in there. A bit of splashing involved in that bit on the side of the boat there and masking back with wave brushes. So using the water masking in and out with actual water. Now, at this point you can see that I'm adding droplets on all of the areas of the boat that have windows and the droplets. The water droplets are also photographed on black and I created patterns from them. So exactly the same way that I've just shown you how to create patterns from grass. I created patterns from the water droplets that I used actually quite a lot in this piece. So you've got the water droplets showing up with using overlay modes and screen mode in this case and placing that on the windows so it looks like they're wet. And then later throughout the process, do the same thing with the life jackets and the clothing that the penguins are wearing. So it sort of works with the netting there. But you'll see later in the process. I ended up buying frozen fish that had heads. They're only about that big and placed them into the place where I had the headless fish as well, bringing in these little blue penguins and working out how I want to place them and often I will cut up animals to make them look more human like and I know that sounds bad but it's just in Photoshop and for this, you know, I wanted to have the wing of the penguin out so that it could be holding the lantern. I move and adjust feet and arms and things because you really want to be able to control like a puppet control your pieces and then dress them later on. So a bit of masking bit of shadowing just as I go, I try and place these elements in and shadow them and highlight them and do what I need to do so that I'm not backtracking. So with this the lanterns, I didn't have the luxury of focus stacking them, but I knew they'd be so small that it wouldn't matter. So we we talked about focus stacking and in this case I didn't do it but I knew that these elements are going to be small if I wanted this element as a big piece in another scene, I'd need to go back and re photograph that. Now here we see, I'm going to cut that foot off and move this penguin and put another foot on. So that's what I'm talking about with changing the shapes of the animals and cutting out the bits that you want, you saw then the when the wing bent a little bit, I use puppet warp a lot and you saw me use puppet warp when we were addressing the animals earlier on in the class. So you can do the same thing obviously with limbs and with the parts of the body that you want to bend and shape because we want that wing to be touching the steering wheel so that it looks like it's really connected, lighting shading, doing all that I can as I go some images of fish to try and add those heads on. I already had that in my collection, adding this penguin in. And you saw with that particular penguin, it is actually a combination of two penguins. So the bottom of the penguin and the top, because I had that really cute shot of this penguin, the head, but it was behind something. So I didn't have the base of it that I wanted to, I needed to blend it together. Found a fishing rod photographs that mastered out another fish that it's fishing with and then the life jacket. So the idea is that you really do need to photograph it on as close of the right angle as possible. He's a red hat that I changed to yellow so it really is not an issue changing colors dodging and burning. Here's a purple jacket that I had in my cupboard and I'm changing it to yellow again and blending it and shaping it and lighting it. I'm doing everything that I need to to blend everything together. These gators were fantastic. Um some people lent me these and they said, oh they're not yellow, but I knew that that just the look of this and being able to scrunch them up and have the little boots on and make it look like they were fitting a penguin would just be brilliant, but I had to scrunch them up first because if I photographed like a full sized person and it didn't have the scrunched part of the legs, then it wouldn't really look right on the penguins. So you've got to do as much as you can in the camera and then finish it off in Photoshop. So again, changing the color using a few different methods there because it was a darker shade and then puppet warping and masking it onto the penguin in the shape that I wanted shading and shadowing it to fit. So just blending that in and lighting it, the lights coming from above from that lantern. So I needed to really highlight that, putting a few more in the boat and making it look like their half in the water, half out of the water. This little dude, I was determined to try and get him to work because I have a teddy in every other of these pieces. It's just I needed to have a teddy. So shading shadowing, doing everything I need to then the flippers. So I borrowed those flippers as well, use the hat and change the shape. So I had a different shaped hat for this penguin. We went through this on adding water and droplets. So I re photographed the life jacket and added the water. And then I also did the droplets as an overlay and added more of that as well and looking at it small, looking at it small and screen, you can't really see it, but definitely when you print it and people are looking at it in person, all of these tiny, tiny, tiny little elements are very important. So I'm using the pattern overlay for a lot of the clothing right here to create that wet look without needing to re photograph the clothing. Now the umbrella, I purchased this umbrella with the specific reason that I wanted to include it in this piece. I sprayed it with water and I changed the color yellow and I got some feedback, feedback is important, the feedback that I got, a couple of people liked it and my husband thought it was just overkill. It didn't really work. And then I started thinking it would make more sense if it was inside out because of the wind. But then again, I maybe they wouldn't be carrying an umbrella on a ship. So you sort of go through this process of thinking through the consistency of the story and making sure that everything makes sense as well. So you watch as I put this umbrella in and then it decides, no, it's not going to stay so you can watch as this umbrella goes into the image, but then it gets taken out. So another rain jacket that I decided to replace the hat that I put in there and put this rain jacket on. So we had a variety of different outfits for all of the penguins, so much that went into a homeless penguin and this was a fast version of sharing that with you. You can probably see that I could talk on this for hours and hours and hours. But what I hope is that you've been able to pick up those nuggets and those little tips that will help you in your own compositing in those things that you're trying to achieve in thinking outside of the box, in ways that you can photograph things, ways that you can get out your workflow.
Class Materials
Bonus Materials with Purchase