Lessons
Fine Art Compositing: Class Introduction
07:36 2Why Composite ?
14:51 3Logic Checklist
24:10 4Shooting for Composite
08:12 5Changing Backgrounds and Light
04:18 6Practical Ways of Lighting for Composite
13:29 7Compositing Simple Swaps and Group Shots in Photoshop
09:16 8Lighting in Photoshop
17:26Lesson Info
Shooting for Composite
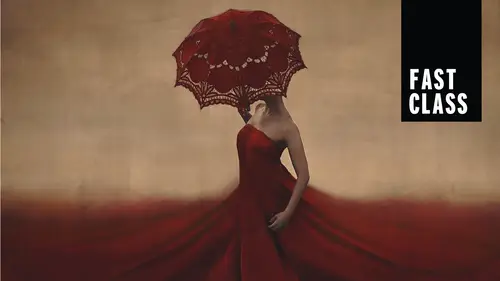
No, this is shooting for the composite. So this is taking images that that I wanted to create, that I went through those steps of what needs to happen to create these images. And so for this one, I did something very important to be able to create this image. What I did to create this image is something that I would not have thought of two years ago. It was something that I've only recently started thinking about. And that's the detail of how the angle of objects look in the camera. So what I mean by that is, if you see you back here, where the neck is, if I had just photographed myself in a dress and then put some flowers coming up and out, what's going to happen? The camera is seeing an angle of that dress where my neck is blocking the back of the dress. Therefore, if I try to erase it, I would just have to erase the whole back of the dress out. And then you just have nothing this back there. I'll show you what I mean in a second. That's my picture. So that was That was the before pi...
cture here and there's a black dot on my face. In case you think I have some sort of like ailment, Ill may face just a black dot I took this picture and you can see that you can't see the back of that neck. It it's not there at the moment, And as I was shooting, I realized I would have to photograph the dress, and so that's what I ended up doing. So that's how it would have looked if I had erased my neck without the dress. I could have put a whole bunch of flowers in there, so you didn't see the back of the dress or something like that. But it looked a little bit too one dimensional to me like that. So then I pop the back of a dress on, and I just held the dress up and then photographed the back rim of that dress. It was pretty simple to do, except it kept flopping. But that's another story. And then I started adding in the roses. So I had this one dried rose. I thought it was beautiful. Photographed it right there, right where everything else was photographed. I started Teoh throw them on the ground. And then I noticed that one of them had some motion blur. So I went in and Photoshopped and really enhanced the motion blur a little bit toe adds a motion to it, and then that was it. And so for me, what makes this picture is the back of that dress. I don't even look at it anymore. And I'm like no roses. That's cool. I'm like home. So glad I remember to do the back of that dress. Okay, so now we have this image, which was really one of the more fun images that I did this year. It was a really great experience of I went to the Sand Dunes. I was not intending on shooting, really. I was with my husband, and I was just meant to have a really nice, relaxing evening. But of course, no photographer could do that in the world's oh, Instead, I started saying, Well, I do have this photo idea that I want to dio, and that's when we started creating this image. My husband helped me a lot on this picture. I said to him I need to have a waterfall of sand and Of course, we both kind of were like, How does that happen? How does somebody create a waterfall of sand? So I'm gonna tell you what I think works about this picture and what I think might not work so well. What I think works is that the sand is moving and that it was shot at the same angle as the subject. So therefore it matches up really nicely so it can fall. What doesn't work as well is that I had to shoot the sand very close up. Therefore, the grains of sand are very, very large in this image. Now I did something to counter act that which was Teoh soften that picture of the sand. That way the grain isn't so, so much. It didn't stand out so much. Therefore, it blended into a little bit of a smoother edge. However, that's something that I don't really know how to get around unless you want to create a giant waterfall of sand. Call me when you dio So I shot that Technically my husband did. I told him squat. Here, take the picture. So he did. And then we have this step and this was created from a footstep in the sand. We were walking and we stepped, pulled foot out and then all of a sudden we noticed that it was a straight wall, and so I got down really, really low to shoot that. So then I was level with the upper rim, and then I had my husband just push the sand lightly over the edge that it was falling and that ended up coming together really well in Photoshopped just popped right on there. So that was a really nice surprise. I ended up blurring this a little bit in the foreground because the stand in the foreground of the picture of me was out of focus just naturally out of the sky in and the sky was a little bit different because I inverted the sky and did that for a number of reasons. One being that who likes to blend a dark sky into a light piece of sand. Okay, No. So I didn't do that. So instead of doing that, I inverted. It's in the lightest part. Was a strip right along the white part of a sand much, much easier to blend. The other reason why did that though, is because this light strip of sky here that makes the I go to the subject because the lightest part is in the center of the frame. So these are things that I didn't have to think about when I was shooting. I wasn't thinking I'm going to invert a sky. I was just thinking. Got to find the right sky and I want to draw attention to the subject. So I started shaving it when started changing the light. Now this is an instance where changing the lighting dynamics actually works. So it works because I now have light coming from over here, and I can change that on my subject so I can just go ahead and sort of last. So my body here, right on this rim and then I can brighten that up, and that makes it look like the whites coming. And the reason why I think it's doable in this image is because everything was overcast lighting, really, even really neutral light. Okay, and then we get to the final step here where I've just added some texture. We'll talk about that during editing, so photographing the sand up the correct angle with motion was, I think the kicker here. What? That's what made it come together and everything else. Waas easy peasy for that one. So then we have some simple swaps and this is what we're gonna be talking about later. Now this image over here was created from this one over here again. You could argue that this was laziness in that I cut my foot often. Didn't really have to do that. Good. Just take another step. Um, but you have self portraiture is hard sometimes. So let's just cut me a break. So I went ahead and this is how I shot this image. So we have that. That's my frame I have. My body is going to stay pretty much in that spot. But then I'm going to add lots of darkness over here to the other side. There's my little foot that popped on there. I went and I checked this image when I shot it. So when it looked like that, I saw it in camera and I said, That's the best one that I have my foot cut off. So I just went like that took a picture of my foot. So I added that on. Then we've got 1/3 leg. There is You can see just coming right out of the crotch of the movement. But so got that. That's bad. Got to get rid of the other leg at some point. And then obviously, I have my remote in that hand, so that can't happen. So I'm going to fix that there. Yes, this is my favorite picture. Just like that. And at this point, I knew that I had the body shape that I needed. I knew that that was all well and good, but I had to get rid of my extra limbs. So I just painted because I'm not into fancy things. I'm into the paint brush tool South right here was painted it. Okay, Uh, that's my thinning technique there. That dress is way too big for me. So we had the tuck that in. And then I start to build the actual image. The reason why I took this picture, which was to add the flowers in so you can see all those flowers popping on. I shot them at the same location. Many, many different angles, just moving the flowers around all different positions and Then I added the shadows so you can see that step there. But if I go back and forth a couple times, it makes a really big difference. If you add shadowing or not, that's I think the main part of compositing is Do the shadows look right? If they don't, then somebody's gonna look at that image and say, No, I don't believe it at all. Okay, so I kept darkening and changing the color, making it really cohesive for myself and then finishing here, I believe.
Class Materials
Bonus Materials with Purchase