Outdoor Engagement Location Scouting
Lesson 15 from: FAST CLASS: Incredible Engagement PhotographyPye Jirsa
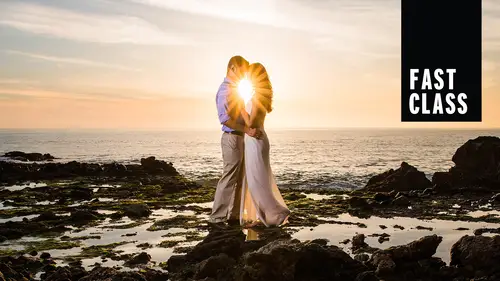
Outdoor Engagement Location Scouting
Lesson 15 from: FAST CLASS: Incredible Engagement PhotographyPye Jirsa
Lessons
FAST CLASS: Incredible Engagement Photography
08:03 2Posing Guidance for Him
08:08 3Posing Guidance for Her
08:50 4Foundational Posing
04:59 5Posing Touch Points
04:44 6Couples Body Language
05:19 7Posing Three Point Check
05:12 8Posing Tips with Demo
06:51Mood Board Tips
05:36 10Camera Settings Quick Overview
18:21 11Seeing the Light
17:22 12High Speed Sync vs ND
04:17 13Processing Black and White Images
05:09 14Editing Using Presets
11:37 15Outdoor Engagement Location Scouting
10:42 16Using Photo Mechanic to Cull
08:44 17Culled Edits in Lightroom
13:01 18Natural Flash/Bounce
03:52Lesson Info
Outdoor Engagement Location Scouting
Okay, so let's talk about location scouting the train station. Go ahead and bring this up on the computer. We go to locations all the time that are completely new, that we've never shot before. And we also go to locations that we've shot 100 times before. And either case, we are always pre scouting, and the whole reason why is well, depending on even if you've been to a location many times before. Oftentimes, if it's a hotel or even if it's an area just like this, things change. Sometimes they closed down certain areas. Sometimes you have other events and activities going on those areas, and what happens is during a shoot. It's kind of like that kind of moment when you take the client over to this area to get a shot and you can't do it because maybe it's roped off. Maybe it's no longer available. Maybe it's under construction. The other thing with pre scouting is that it kind of helps in being able to get a little more creative during your shoot a lot times with the shoot, especially i...
f the client is running late today and we actually set up a shoot today where our clients are running late, specifically just to demonstrate what to do when your client we didn't do that on purpose, it just That's the way it's happening, right? So when your clients are running late, how do you stay creative and in the moment when you still don't really understand the location itself? So if we're going to a completely new venue, we try and show up the day prior to scout it out. Or at least a few hours prior to that day, one of my favorite little APS four pre scouting find my phone. Here is some seeker, and there's actually a couple different versions of this app, so you can pick what everyone you like, but go to the APP store. Think it's also available on Android, and basically some seeker is gonna allow you to pull up on your phone a three d view of this entire place, and it demonstrates where the sun is gonna be during sunrise enduring sunset. So while you're scouting, you could actually look at Sunseeker and say OK, during this time, this place is gonna be great light. During this time, I probably wouldn't be in a different position. We're gonna talk about how yesterday when we were here, pre scouting, we said This is gonna be an amazing location in the morning because the way our sun coming through, I want to talk about this scene. This scene in particular is very unique because we have two options. This is a old railroad station that is no longer in use. So we have an option of you, the shooting, this direction down the hallway or if we flip around, we can shoot this direction from looking at it. It looks virtually identical. Okay, So going one way going the other way, How do you decide on which way is gonna be the best way? There's a few simple things that you can quickly identify in a scene like this and one of things that we want to talk about a lot in this class is identifying natural light that's existing and present in the scene. I love Flash. I love Flash. Don't get me wrong. I'll add Flash. All had constant lights. I'll put up four strobes if I need to, but I'm also kind of lazy if I don't have to. If I can use the existing lighting the scene. I will. And rather than trying to fight that existing light, I want to just position my couple in position in a place where I can work with that light. So from that direction, I actually see that on the walls. The sunlight is coming in basically from the back side, so the walls themselves has really good light on them. But then the background of that street in the cars behind it isn't really something that's very pleasing. And if I were to shoot this way, well, this side is very, very bright and so it's kind of more blown out on this side. But here's the cool thing is that when we look towards this side, we see that we have these strong highlights hitting the back walls and these columns. We also have light entering from this side. And so if I position my couple anywhere near this area, not only do I get a backlight, I also get to fill lights coming off of those columns right there. So I actually have light coming forward on their faces, and that's what creates this beautiful light that you see on us and the way that I kind of scout locations is I use my hand and I just walk around with my hand out. The cool thing about this is when people see you doing this, they're gonna naturally clear a path for you because they think you're a crazy person. And so not only do you get to see the light, everybody also leaves the location available to people. Do you think you're crazy, person? But the best way to kind of do this is to sit here and turn with the light and wait Canoas you can act. Okay, so I'm gonna close that. So here is Sunseeker. I want to show you guys even when you're inside, this will still work. So even when you are inside, like of a hotel, you can use Sunseeker to identify. Well, actually identify which windows are gonna have the light coming through as we walk through in the morning. Isn't that kind of cool like you're like, OK, it's five o'clock. We noted that at five oclock the lobby windows actually have backlighting and you're like, Oh, it's 4 50 We have 10 minutes. Take the couple. Where am I gonna go Let's go over the lobby where we have that backlighting coming through the windows. So it's one of the best tools that you're gonna have when it comes to pre scouting a location. And pre scouting does not take forever. Guys, if you pre scout like a hotel for a wedding, it takes 15 20 minutes to walk through from side to side and is gonna make a dramatic difference. So here the tips start with Sunseeker. It's nine bucks. I wish we got affiliate payment or something for that. But no, we don't. So and I think the raise the price on it. It was like we we started talking about it other for the ever start talking about it. And then they raised the price from, like, two bucks tonight. Those rascals. I didn't fire light sources. We're gonna talk about that and break it down a little bit. We're gonna look at the light direction quality. That's again kind of going back to what type of a look in effect we want to get based on the lighting patterns we need to modify doing to soften. Look at the backgrounds, your angles. Think of the focal length we want to use and what possible stuff that you could shooting that scene that might fit something on the mood board that they're kind of asking for. So for those that have the course, I broke down these video timelines just so that you guys have them in the pdf's. So rather than having to kind of scan through and see everything you guys actually have this in your pdf that that takes you through the video and guides you. So let's look at this scene and I want you guys to pause for a second. You guys, I would highly recommend that all of you go and taken these air. Just IPhone pictures. I just take IPhone pictures as I'm location scouting and you can. What I would recommend is that for right now, until you get used to this process, actually drawn it, put it into Photoshopped, put into whatever and actually drawn it and point to things so and and kind of described as you go. So for right now, let's look at this one. This is our primary light direction is coming from that Skylar. So basically, we're getting this bright open sky right off the left side. That's our primary light coming in from left to right going straight into this wall. So we know our flat light direction. If we want it is shooting against this background wall. Here we have a good philae direction. This fill light is just coming in from light. That's behind us. We're getting a good feel that goes forward. It looks nice. Great. Be aware of passing cars. So you know that. Okay, this is a busy street and I'm popping off shots. I promise to be aware that, you know, I want to shoot between the cars that are going by and you're gonna look and observe in your frame to make sure that you don't have those. We have nice, simple background framing elements, like in these doors where we have lines in the doors, we have squares. We have those kind of objects that we can use to frame our couple and create interesting images. We have this beautiful background. Highlight our eyes when you see a photograph. Are your eyes not drawn to the brightest place of a photograph? So is your scouting a scene should not be. What you're looking at is like, Oh, there's a nice little highlight right there. If I put the couple right over that spot, it's gonna naturally, it creates essentially a natural vignette in your frame. You're pulling your attention right into that center piece. We have a great background here, and this has lines air repeating lines with the architecture. So we know that with this scene and granted, not all of our scenes don't look like this, right? That's why that's why, for the foundation side, we're just shooting in that small little tight space against the red brick to show, like even in a bad place, you can make good images even against a simple wall. Simple background going against the light. We could still do anything you want to, but if we have a great background, well, this is good for telephoto shots. Shallot of the field. We could even boost the depth of field. We can increase the definite feels we have more and focus. We can also shoot tilt shift. That's what the TS is so would be great for a tilt shift effect in this look. So I'm thinking those things as we go into it, and then when I come back to shoot this. And by the way, we did. We didn't plan for that shoe to go late. It just went late. They they arrived, like, 30 minutes past when we were supposed to be starting. And we're trying to film for the whole classes. It was kind of stressful because, like, you know what? We know what shots We need to go. We'll just run with it. Okay. I was going to the other one. I want to show you this side. Why is this site so crappy? Will this parking lot actually fills up with cars once it's around 9 a.m. So we got there, like, eight. This is when the photo was taken. It fills up with cars around nine. So we know shooting that way, we're gonna get a parking lot in the background. We also have this weird tree right there. Let me actually go the next, like we're have this point out. Um, and who puts a tree, like, right? Like, wait. Why is there a tree like right there? It's the weirdest place for a tree like the end of the hallway. Just gonna put a tree right in the middle. They worried like people gonna run through and they need toe slow down or something like I do understand why they're there anyway. There's a tree, poor background elements. We have a store in a movie theater on that side. We have, like, this train kind of cargo stuff on this side. We have a tree. We have that. We know that that's not a very good direction of shoe. And if we want to shoot that direction, we need to be careful with what we're including in the frame. But we have this beautiful stuff. Look at this. The direct sun casting superstrong highlights off these sides. If you get him close enough to that light, it becomes a main. You pull him back, it becomes a Phil. But either way, we have great directional light that's gonna bounce off this and come towards our subjects. We also have a primary light direction going straight through. So this light that goes straight through your position on right, can't we get a hair light main? All that stuff we get, Phil, we can get all that. There's are feel like directions coming from both sides. The fill light is coming in from just the sky. So we're getting fill on each side from the sky, basically. Okay, so this is kind of the shots that I'll take to kind of, like, point out notable things like That's kind of a cool frame and, like, you know, thing that I can use later on. Oh, look, this feels with people. We need to be aware of that. Oh, this is a nice direction. That's like me showing the background where I probably want to shoot.
Class Materials
Bonus Materials with Purchase
Ratings and Reviews
user-975fc7
Man, Pye just covered EVERYTHING! I love the complete process explanation of Photo Mechanic to Lightroom.
Mal Brown
Student Work
Related Classes
Portrait Photography