Lessons
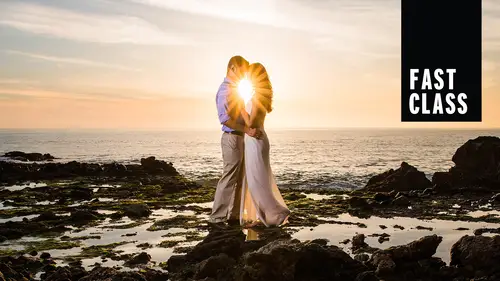
FAST CLASS: Incredible Engagement Photography
08:03 2Posing Guidance for Him
08:08 3Posing Guidance for Her
08:50 4Foundational Posing
04:59 5Posing Touch Points
04:44 6Couples Body Language
05:19 7Posing Three Point Check
05:12 8Posing Tips with Demo
06:51Mood Board Tips
05:36 10Camera Settings Quick Overview
18:21 11Seeing the Light
17:22 12High Speed Sync vs ND
04:17 13Processing Black and White Images
05:09 14Editing Using Presets
11:37 15Outdoor Engagement Location Scouting
10:42 16Using Photo Mechanic to Cull
08:44 17Culled Edits in Lightroom
13:01 18Natural Flash/Bounce
03:52Lesson Info
Seeing the Light
I want to talk about the five common key light patterns. So this is important. Understand? Because every one of these key patterns these key light patterns and by key light I just mean your main light, your main light that's falling under the person's face. Everyone, these creates a different effect on what this is. This is a very small or ah, hard light that's put on her so you can see the edge of the shadow on everything. Okay, this is directly in front. So when you're light comes directly over the camera, pointing straight to your subject's face, that's flat lighting. If we're to shoot this way in this room, that would be flat lighting. Okay, flat lighting is fantastic. People think that Oh, it's not very interesting, is not? Everybody does well. It's great because it's It's a beauty. Like if you'll notice that most beauty most like cosmetic type fashion, those kind of things, they use a lot of flat light Bill kind of mixed on balance between these two, basically, because the more f...
lat the light comes on to us, like if you imagine your skin right, as if you were to like kind of map it out. What it would be is a bunch of smooth places with a bunch of little dots and crevices and lines and that kind of stuff in our faces, right? If lights coming straight into that, it's filling it all, so it makes it look beautiful. We don't show off the lines, the wrinkles, the pores. We don't show those things. So it's a really great light. As soon as you start going more directional, you can actually see it right here. Look at this. We can't even see that dot on the corner of her face right here is barely visible. As soon as you bring that light and create a little bit of direction. This is just paramount lighting. So Paramount, the studio, the movie studio actually used this light to shoot their celebrities. It's actually a butterfly light, but it got the nickname Paramount Lighting. This is just slightly top down. So if this is my subject, it's This is flat. This is paramount. Okay, Coming from top down. Still a great, beautiful, flattering light. But now we can start to see a little more direction. We seal them or chiseling out of the cheekbones and the features, which is great because it actually makes like this is gonna make someone's face look a little larger than this one actually would. OK, because we're bringing in shadow, moving over to loop. Now we're just bring that same light. So if it was, it was top down like this. We're just moving into the right a little bit. We cast a shadow across and as we go across this edge, what you see is pushing towards this side We get drama the more you go to that side, the more drama you get coming back towards this side. The less drama that you get less shadow, less drama. So is that a flattering photograph? Not really. Right. This despite it being direct like it looks like direct flash. Despite that, I'll guarantee every single person, this person and every single one of us would rather have this over that on the inside, right? So know when to add drama. When we're creating engagement portrait, it's if it's okay to have drama, you just need to make sure that you pose for it. So I wanna make sure that the angles the faces are posing a flattering way toe work with that existing light and so in anything that you walk into, it doesn't matter what you're talking about natural light or whether you're talking about modified artificial light. The same thing applies. And the crazy part about it is that inside of a room from one side to the other outside, anywhere you go, it's gonna vary greatly from point to point. For example. I know that this is the strongest light in the room right now, and I know it. If I stand like this and face you directly on Steve that I'm split lip. So I have lighting right up to my nose. I know if I talk, turn my cheek. Just a little bit of this sign that it changes and I should have a highlight right here on the side of my face. I know if I turned away, I'm gonna have these different changes. I know if I move into this corner of the room, then I'm no longer illuminated by that light. And I know if I go to that side of the room and look directly over here, I have flat lighting on my face. If someone to shoot me going this way. How far to go this? I'm gonna be backlit. So these basic principles apply when you walk into a scene and looking. So when you walk in, I want you to analyze those things, okay? And just to show you the effect, um, I want to show you a beauty shop versus a dramatic shop. Look at how much less creepy he looks over here. This is Joe. He's one of my guys in our studio. Doesn't look less creepy than it is there The same expression, guys, Just different lighting. He looks creepy, but let's be honest. Practice your light. So the other thing I was gonna say is And when you are practicing, I do have a P s A for you all. Whenever photographers are in front of camera practicing lighting, you have a duty to keep it awkward. OK, when you kept those images, I want you to post them online and then tag us, put it in s or lamb so we can have them as well. So look at this. Look at this beautiful Rembrandt light on leers face right here. That's so gorgeous. And then this is this is a super advanced, like hand over hand pose that really draws attention to my eyes. It kind of, you know, frames it right there. It's beyond this course guys and Matt Roberts on the right. I don't know what he's doing. He's having a moment. So we talked about this for a brief second, the three subject positions in relation to the light. Right? I'm gonna talk this way. I know lights right here. So if I bring my chin over to this right side, I would be short lived. This means that from your angle, you see the short side of my face brighter than the other side. The shadows fall into this side, right? Is that what you're saying? If I switch to this angle, this is now broadly, the bronze side of my face is lit, The short size is in shadow. And if I look the only way to get flat. As for me to look this way, basically, those primary positions have a dramatic effect on the amount of shadow in the face. And guess what the more flattering one is. This guy. Okay? Short lighting is always gonna be more flattering, which is always why we have the light and every one of our shots you're gonna see. There's a few rare examples we have to break the rules for compositional purposes, but almost all the time we're gonna send the light into her face. We light into the girl's face. So that way the guys in the shadow. If we and guys look good in drama, like guys with drum on their face look great, we send a light into her face and we always light short light. So that way it's very flattering and so forth for your female civics. All right, five common secondary light patterns. I always see secondary lights used in times when they don't necessarily need to be used. Ah, fill light is just gonna open up the shadows. So all it's designed to do is just open up and reduce or bring out the shadows of it. You you, if you're trying to go for direction and you're trying to create depth and kind of that look, if you're trying to create drama with an image and you add two powerful of a fill light, it kills it. You end up flattening out the whole thing So when we add a Phil, we make sure that it's subtle that you still see shadow and so forth. But that's a fill. A kicker Raymond edges that light that kicks and hits the edge. It creates dimension the face. It's great for separation, a hair light that's always gets confused with hair and a backlight. A hairline is actually a light that hits your hair like the top of your head. Okay, this is used toe. Give shape and body to hair, especially when you're on set in a studio. In stuff like that, if there's no light there than it can kind of look like a lump of hair as opposed, like individual strands, if it really reveals everything, a backlight is what's placed actually behind you and going to the back. And this is a great light that's used for separation. This is probably one of the most misused lights in my mind. I mean, I say this because I want everybody to understand the principles and then understand when to break them. For example, if your subject is already backlit, you don't need added another backlight to it like if they're if you're shooting against a background that is white. You don't add another backlight or like wise. If the background is really necessarily like like I saw a recent head shot where it was a really tight shot on the person and the backlight. All it did was it just showed all the flyways in the hair. Back Lights are used to separate a person from a background. If you have good separation, naturally, you don't need to have that back light unless you're using it for effect or something. And then a background line is that light place towards the background, which we're going to do actually, in a little bit. Okay, this is the other last thing I want to talk about was these things get confused a lot. Soft versus hard and diffused versus speculator, These air actually completely different terms that are used there. There, miss I guess. A lot of times when we say a light is soft, we oftentimes say it's a diffused light. It can be, but they're two different terms. Soft light refers to just the size soft and hard. This is just size. A large light in relation to your face is soft. A small light in relation to your face or into the subject is hard, right? And all that means is the shadow definition. If you look at this, the shadow definition of a hard light is very defined. This is very soft, right? But a diffused versus speculum light. Those are different things. Diffused means that you're using a mat type quality device or modifier to change the light you could. Well, that's probably in between. But like a white scrim is diffused. Okay, the inside of a soft box, the white piece. Do you want to grab a piece of that clock? This is diffused material. Okay, So the way this works is that the light that passes through this is already getting dispersed, and it's already kind of opening up. So when it hits your face, you get a very soft sorry. You got a very Matt Look. See, I already confused myself. You get a very Matt look on the face, which means that we don't have a lot of strong highlights like what ends up happening is if you send like, directly to somebody. This is the example of a speculator modifier. It's still a large modifier that not like I bring this up to your body. This is a pretty big modifier in relation to his his person. So it's still gonna have a shadow graduation that relates to the size, but it sends, ah, harder light. So the light coming off this because it's pushed straight and directly at the person you get light that bounces back to the camera. Can you guess where that light bounces back on a person's body? Look at the example image or that actually want to hear this. So you get light bouncing back off of anything metallic or off of skin areas that have oil on them or that are facing directly the camera. So if you have shiny skin and you're using a silver, you're gonna get highlights on the forehead and so forth. Now if it's built into the effect, If you're going for a swim suit shot and you want it to look that way, that's great. But if it's not and you want this Matt soft, look the no there, not the right modifiers to be using. So I want to say that there's no right and wrong and lighting. I always tell people like there's there's not there's not a single. Maybe there is a single. But in general, the only thing that might be off is your lighting might not match the look that you're going for, but it's not wrong. It's just not maybe the right light for this situation, right? That all makes sense. So we can have a a large speculator modifier. We can also have a large Matt modifier. We can also have a small speculum modifier in a small, diffuse modifier. Cool. Okay, So, truth engine, what I want to say right now is that excuses and education of the only two things that will ever stand between you and the images that you want to create meaning. And this is why I want you guys to ask me wise, we're gonna use a certain set of gear here. But I want you guys to understand that you can use anything to get to the same kind of look. And if you have a question about it, ask us. You don't need an expensive camera. You don't need expensive lenses. You don't need expensive flashes. Nothing. Okay. You can get there with virtually anything. Now. The slight variations and quality might change, but we can still do it. And the only difference is I've seen so many people that refuse to go out and shoot because they can't get a certain Oh, I don't have that beauty dish that I can't go and do that or I don't have this. I really want to do it, But I can't cause I don't have this. It's simply the education that is missing. And if there's one area that I have, I've kind of set a rule for myself that when it comes to budgets, I have a budget for almost everything, with the exception of education. If I want a book, if I want. Of course, if I want to classify, want whatever I want in terms of education, I spend that because that has always been stuff. The returns might my car maybe not so much so case in point, How much does a look at this photograph? So this is natural light and they love that bohemian look. But I also wanted to get a cool shot just for like, kind of our purpose is a little more of a dramatic shot, and I know a lot of people would be like, Oh, you know, I don't have an ice light or I don't have I don't have, like a geo one. That's like some 100 bucks, man like like, things are expensive. They know that we shoot with those things, but it could be done without any of that. This is the shot hand held at 1/4 of a second. I call myself the pipe Odd just F way the pipe hod. So you put two elbows in and you kind of get down like this, like this, and I can hold pretty still. So this is 1/4 of a second hand held, and it's still enough to actually use at, like, F 14 and I so 3200. Okay, this is 1/20 of a second at the same settings F 1.4 eso let with an IPhone. So my my lights were back in my car and we're losing light. And this was like one of the last kind of shots that I want to get in that scene. And I was like, Just grab my IPhone and light him up on. So I show that because I want you all to take away the cannot stand the excuses and everything. And when you see these two shots now, you might see them a little bit differently. As this is actually able to do, we're actually able to work with a small. That light source was small. It was speculator. It's probably the worst light source you could find right in terms of color. In terms of everything, it is the worst light source. Yeah, if we pose for it. Notice how I lit into her face into her face posed so that the shadow side is on the broad side of the face. He's posed for drama. This is a Rembrandt shot. This is a split lip split shot and do the guy's not look cool when they have drama. It looks pretty freaking cool, right? So all we did was we just worked our pose. Let's do this. I love when you you guys are just trying to make me look down threat. So this is kind of what we're talking about in terms of what I want you guys to take away from this course is that if you're in a situation where you don't have the gear that you wanna have. Think of how you can use what you have already, and yeah, a crappy light like that isn't good if you're trying to shoot candid shots and their movement and stuff. But if I compose them, I can use that light to my advantage. I'm OK with you. I'll do a whole series of shots of the night phone line. Okay? I have a couple of this slide before we get in a shooting. This is just to demonstrate the fact that you can have I do a lot of commercial and fitness stuff. Um, this is a diffused, a large, diffused light that's used for her because we wanted to have a softer look on a fitness portrait, right? The funny thing was, actually never did commercial, infinite stuff. I took all my experience from weddings, and I just applied it to it. So all this light technology gets can apply to whatever area that you want. If you're shooting a girl and you're like, Hey, you know what? I want her to have a slightly softer look. Even though this is an athletic kind of look, we wanted to be a little bit softer and more feminine versus this shot, which is the same size light source, basically are. Sorry, it's Ah, it's a silver light source That's roughly the same size now, and you can see how much more speculate. You see how much reflection we're pulling off the skin, like off all the oil off of the forehead, off of everywhere off the wall. So those are the two differences. I found those that image illustrated at the best in terms of like seeing a speculator versus diffused light set up. Okay, we're getting there. We're getting there. All right, so seeing the light, I like to use my crazy hand. You see me walking around doing this? It's what I'm doing. I call it my crazy because it makes you what Crazy doesn't know give you side dude like, yeah, I do this like that makes, but it works. So put your hand in from your face and just watch how the light changes shape as you move with it. It's the easiest gauge because and the reason is that you have. There's there's actual bumps and stuff on your hand, right? It kind of simulates like the ridges and everything on your face. And so you can see between the fingers, like where the light is going and you can see how hard, so forth. So I know exactly where I would go if I want to use this light. If I wanted to go flat, I could go right here if I want to go to this side. If I wanted to go into this corner, we'll have a little bit of work over here because there's not I'm actually like backlit right here and that Lights not carrying over. So use your hand as you walk into the space, find the directions of light that naturally exist. Then we're going to his place. Our subjects then we're gonna say, Is the light right? For the look that we're going for? If it's not, we need to modify. So, Adam, modify that light and we're gonna look at our history. Ram, look at our highlight alert. Look at everything we're gonna analyze and adjust and watch where the highlights everything are falling under the face
Class Materials
Bonus Materials with Purchase
Ratings and Reviews
user-975fc7
Man, Pye just covered EVERYTHING! I love the complete process explanation of Photo Mechanic to Lightroom.
Mal Brown
Student Work
Related Classes
Portrait Photography