Lessons
Class Introduction: What is Light Painting?
03:45 2Camera Considerations
16:18 3Camera Settings and Initial Exposures
09:26 4Light Painting Accessories
04:05 5The Color of Light
05:21 6Focusing in the Dark
03:13 7Light Painting Techniques
08:30 8Lightroom: Basic Panel
14:14Lightroom: Presence Panel Adjustments
06:05 10Lightroom: Hue, Saturation, Luminance
05:17 11Lightroom: Local Adjustments
16:46 12From Lightroom to Photoshop
11:55 13Photoshop: Lighten Blending Mode
04:31 14Photoshop: Star Stacking
03:17 15Photoshop: Layer Opacity
03:25 16Photoshop: Selection and Masks
05:55 17Photoshop: Mask Adjustments
05:46Lesson Info
Camera Settings and Initial Exposures
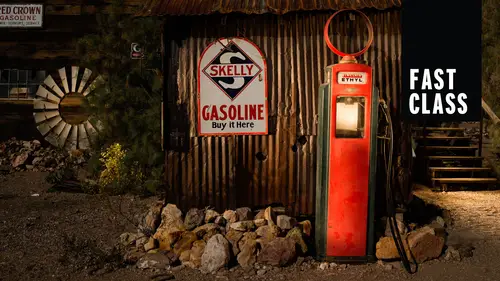
we've already done our basic camera considerations. Things like, What's our file gonna be raw or J. Peg? Um, you know, setting or LCD brightness and all these sort of housekeeping work. Now let's get into the nitty gritty. How are we going to set up our camera to actually shoot out in the field? Well, the first thing we want to think about is manual exposure mode. Um, that's actually the M on your camera. You guys, that's not the A or the P for program or even that little green square. None of those things we're talking about full on manual mode now, then what that's going to mean for us is that we're taking complete control over everything when leaving nothing left to the camera. All right, so let's take a look at huh? The settings that we are gonna control. Let's begin with shutter speeds. Now, the shutter speed is the time that the camera allows the sensor to receive light on, and it's generally thought of in fractions of seconds. But truly what we're gonna do is we're gonna take a ...
little bit deeper down into that into that realm. You guys, four seconds. Eight seconds. 15 30 seconds. It's dark at night. We need lots of time for the light to come through and impress upon our sensor. There's other tapes and a photography that may not may not take this long, but for light painting, we're usually looking at 30 seconds or bulb. And what happens is 30 seconds is the end of what we call timed exposures. After that, it goes to bulb and bulb. Simply means that you pressure cable release, and as long as you hold it down, you will make an exposure. That could be 10 seconds. It could be a minute. It could be minutes and give me 20 minutes however long you want. So, of course, using a cable release is gonna be really important. Okay, how about the aperture? Well, the aperture you guys is simply the size of the hole that lets in light. All right, so here you can see again the common apertures there is. Ah, you know, you go down to 1.8 and 1.2. Some cameras even go up to F 32 here. There is other apertures. But these air the common ones the aperture controls the amount of light that hits your sensor. So what are our common apertures for again? For light painting, I would say somewhere in the range of 56 to 16. I think if you looked at most of my photographs, you would probably find that I shoot it moat at F eight most often it's not too small, the whole It's not too big of a hole, Um, and it's also happens to be the sharpest part of your lens. That's not precisely where I'm using it, but it just ends up giving me just a great amount of depth of field that I need without being too excessive. All right, that just leaves us with I S O the common I ISOS are 102. I would say 100 to 1600. That used to be the common eyes does. But with modern cameras, it's it's gone nuts. It's going through the roof. So 327,237,006. These air these air ISOS unknown. So 102 104 100. I would say these are the most common eyes does that I use most of the time for my light painting. Um, and if I had to boil it down, I'd say probably 200. 400 are. They are certainly the most common. So we're shooting a manual mode. This gives us complete control. We set the shutter speed, we set the aperture, right, and we're going to set the I s. So we make all the decisions and we're gonna take complete control over a camera. And this is gonna allow us to create these beautiful, like painted images, initial exposures and test shots. Um, I gotta tell you, starting off is a little It's a little guesswork. Um, but that's okay again. Modern digital cameras allow us to guess we're not shooting film anymore. So we've got a lot more leeway, But don't be afraid to get started. I think that is the biggest thing I see with people that are shooting at night and shooting. Um uh, certainly with light painting is why don't I start? Where do I start? You know what? Just start anywhere. Just set your camera and press the button, see what happens and go from there. Don't let fear paralyze it. Um, so we know we're gonna start off a little guesswork, but I can give you guys some hints and helping helping him here. Um, our ISOS that were generally gonna wanna work in is 100 to 200 or 400. I usually start off at eso 200. Um, as far as our shutter speed goes again. seconds. One minute to minute thes air. General settings. You guys as Concetta, you could have four minutes or or maybe even eight minutes. But I find that those three settings are where I do the bulk of my work. And then the aperture F 8 11 16 kind of right in the center of the, uh the the lens dow there. But generally these settings. So if I really had to pare it down, You guys, here it is. If you need to set your cameras something, you have no idea what you're doing. Set your camera this I s 0 200 Say one minute and f eight. So the main thing here, you guys, is just to get out an experiment. I cannot emphasize that enough. I know. In my workshops and on the field and classes, people are always worried about getting that first initial exposure, so don't worry about it, said I. So 200 said it'd F eight started 30 seconds. Not bright enough, opening up to a minute. Not bright enough opening up to two minutes. If it's still not bright enough, opening up to four, just get out there and do it, all right. So, out of all of those considerations, the first thing I typically think about is depth of field. This is something we really can't alter afterwards. We can't change it with our eyes. So or are shutter speeds, and it's pretty important it's gonna determine a lot. So as we're looking across a scene like this, I need a lot of depth of field. I'm fairly close to my front subject, and of course I have infinity all the way in the background. That's going to suggest a very deep depth of field now. Right now, I'm currently set on 14 millimeters on my 14 and 24 millimeter lens, so that's a really wide angle lens, the wider angle lens you have, the more depth of field you have, so I could probably get away with setting this. It's a about F eight. Had this been a 70 millimeter lands that it needed to go down to 16. Of course, the smaller the aperture, the less light painting is gonna be effective. So I prefer to have an aperture around F eight at least to get started. That way, it gives me room to move 56 or 11 on either side. So let's go ahead and set that and come back here and tap my info button looking on the back of my camera here and I'm gonna set my aperture two f eight. All right. Next up is our I S O. And it's starting to get darker, so we're probably gonna need a crank r ia so up a little bit. I don't want to go too far. If I was doing, say, star trails or star points or something like that, then yes, I might need to raise my I s so significantly, but that's not the case here. I want longer exposures is gonna give me time that run around the scene and paint with my flashlight. So I'm gonna set my eyes. So for starters at I s 0 200 I believe that is currently where we are set. Let's just pull that up and see if we've got eso 200. So we're I s 0 200 f eight and I'm just gonna ball park it here. I really don't know how bright it is. My camera may or may not give me a good exposure under these conditions. I'm not sure. So I'm just gonna set my shutter speed initially to 30 seconds and see where it looks. So hit my info button again here, and I'm gonna start cranking down. We're now pushing down to the end of the scale here. We may not be able to go out and look at this at 30 seconds. It says I am right on. And it should give me Give me a good exposure. If I'm using a nice overall pattern like matrix metering or evaluative in Canon, This should be about right. So we've got 30 seconds. A pretty long exposure. We've got f eight. It's gonna give us a good amount of depth of field. We've got our eyes so set to 200 it's gonna get us really good grain structure to our image. The last real consideration would be white balance on going to start off on daylight just to see what that looks like. And we'll just do a quick test shot and see how this comes out. All right, So our exposures up and we'll pop it right into the history Ram and see what that's looking like straight away. And our history am looks pretty good. So as we start off here way began at F eight for depth of field, we went to the limit of our timed exposures, which is 30 seconds, and our eyes so is at 200. These are basic starting points, and we can see that we actually have a pretty good hissed a gram. Now the question is, is this going to give us enough time toe light paint? Maybe, Maybe not. In this particular scene here, there's an awful lot toe light pain. So 30 seconds may not be long enough. I may need to move to two minutes, which, of course, if I moved to two minutes or one minute, we're gonna have to do the math right, so one minute would be twice as long. So that would take me from F eight F 11 and then two minutes would take me two F 16 on that would give me plenty of time to shoot. Now, do bear in mind, though, when we do get down f 16 that's a smaller hole, so the flashlight is going to be less effective, So you're gonna want to move to your more powerful flashlight at this point.
Class Materials
Bonus Materials with Purchase