Skin Challenges: Pale and Dark
Lesson 10 from: FAST CLASS: Skin 101: Lighting, Retouching, and Understanding SkinLindsay Adler
Skin Challenges: Pale and Dark
Lesson 10 from: FAST CLASS: Skin 101: Lighting, Retouching, and Understanding SkinLindsay Adler
Lessons
Skin Essentials: White Balance
16:02 2Skin Essentials: Mixed Lighting, Color Contamination
15:42 3Camera Settings: Files
04:53 4Camera Settings: Color Spaces
15:10 5Color Management
11:03 6Exposure
06:21 7Shoot: Quality of Light
08:43 8Direction of Light
02:14Lesson Info
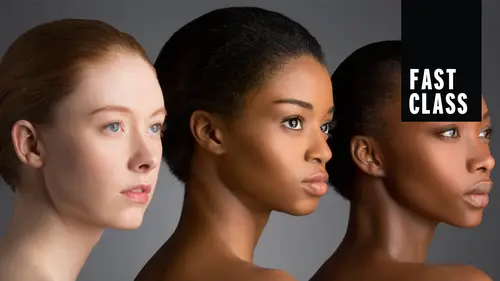
Skin Challenges: Pale and Dark
Okay, so the next kind of challenging light kind of the Kino Advanced one. The next challenging, like I believe that I had was very, very pale, very, very light skin. And we also are going to cover really, really dark skin and the two of them in one photograph. All right, very light skin. Okay, so the challenges with pale skin challenges if someone is really, really pale, sometimes they disappear. You know, there's not a lot of depth. And so when you're photographing somebody was very, very, very pale skin, the skin lacks vitality doesn't have that glow. Now, I will tell you a ton of times what in my personal and fashion photography, I love to make the skin like deathly pure white. Or if I have a dark skin subject, I like their skin to be extremely, extremely dark. But I'm going for more artistic purposes. Then if someone came to me and said, can you take a portrait? Um so that's a problem with really pale skin sometimes lacks, you know, that vibrance to it. The face can appear just re...
ally flat dimension is what makes someone look three dimensional. Um It's the shadows are what shapes their face makes it feel like it's not a flat image. Another problem makes sometimes run into are the veins being visible. I have a photo that I'll show you tomorrow, where you can see the veins and the person's chest and in their hands and you see this a lot more if someone's very, very pale and then the uneven skin that we just talked about uneven colored. These two are usually fixed in post. There's not much you can do unless of course you're doing it with makeup. So the solutions that we have is to remember that shadows give dimension. So you don't want to say, oh okay, Lindsay said that skin looks better, flat and low because if someone is very, very pale and you lap you light them very centered light a lot of times, the picture just looks really flat, like there's not much shape to it because they're so pale. So this would be one of those exceptions where you do want to raise the light up as you raise the light up, it carves out their features and you do want to raise the or move the light to the side because that's what starts giving you gradients of shadows and you're shaping with those shadows the shadows are giving is giving that image depth. Um You may need to consider slightly softer light sources if the person, if they're like really, really um really pale and there's a darker person in the photograph because otherwise they'll be really blown out. But most of the time you can pick it in between contrast that will work, avoid silver light sources because then those bright highlights go really overexposed. Um and we're going to use the color checker in a slightly different way. What I tend to do is I use the color checker and I actually warm up the skin instead of going with what it recommends as the neutral skin tone. We use one of those top um top swatches to add a little bit more warmth. And I'm going to talk about particularly just the studio right now. Studio lighting alright, here are the challenges you run into, first of all, auto white balance with very dark skin, has no idea what to do. It makes the skin look extremely blue or extremely dull, extremely cold. So that's a problem. We run into a very dark skin. The next one is the contrast because the skin is dark. If the skin is a little bit earlier, those bright highlights go extremely overexposed very quickly, especially if the skin is very dark. So you're trying to over expose a little bit right, you're trying to light enough so you can see some detail if there are bright highlights that go over exposed very quickly and they get very distracting. So that's a problem that we have. And then also in the studio problem that you have is if you're photographing on a darker background subject, skin tone blends into the background. And so then you're losing the side and shape and dimension of their face. So is the problems you have. And here's a couple of solutions for the color. This is one where you just, even if you're trying to tell yourself well sometimes I can get away without a color checker. This is one where I promise you can't because um it's also very hard to judge without some kind of reference what is actually the warmth of their skin. And then you're just guessing all over the board for the contrast. When I'm photographing darker skin tones, I tend not to go with really contrast the light sources. I use contrasting light sources and the whole time I'm saying I don't use contrasting light sources. I use contrast the light sources in a couple different situations. If I'm photographing someone really pale where I'm going to shoot black and white where the skin is pure white and the shadows are really dark and it's high contrast, then I will use a really sharp contrast to modifier or I'll use contrast the modifier as if I'm photographing people for fitness where I'm trying to carve out their features. I'll use it for beauty when I want to really defined jawline. So they're definitely instances when I want this, but usually it, you know, for more challenging skin, it's harder to wield, its a little harder to control. So for really dark skin, I might use a slightly more diffused light source. So those highlights don't go as bright and the shadows don't go as dark because the high contrast modifier is going to pull it any other direction highlights go brighter. Shadows go darker and try to pull everything into the middle. I'm also going to use reflectors and feel like to fill in the shadows. Those with darker skin tones. You can light the face and then the shadows might just go pure black so the chin runs directly into the neck and there's no separation and there's no definition. So I'm using a lot more reflectors regularly when photographing dark skin tones. I don't know if anyone's ever heard this saying before, but with pale skin, you add dimension and shape with the shadows because if it's really flat light then they just kind of washed out. So I'm raising the light up because I'm trying to introduce some shadows to shape their face. It's kind of the opposite with dark skin tones because the shadows are gonna be there. So what I need to do is introduce and control the highlights or the light. So the saying is, you're shaping with highlights, The skin already has darkness. So what you do is you place your light and then you use Phil and other light sources to control what the shadows look like. So you're actually introducing more light to control the look instead of introducing more shadow to control the dimension. You don't really have to think of them as drastically different. Just think pale skin. I'm using more shadows to try to shape the face. Dark skin. I'm using more fill to try to bring more detail to the shadows, trying to shape the face that way. So it just doesn't fall to complete darkness. One more note is I never use gold reflectors ever like ever. But a silver gold mix. Sometimes it's okay to fill in the shadows on someone with darker skin tones. The reason is, is a lot of times their skin is really, really red. It's very warm and the shadows look cool. So adding a little bit of a warmer tone looks okay. I am usually still using white, but silver gold or they have something called the Sunfire Saw, the one that's a white end gold mix that also looks a little a little bit warmer as well. I would say test it and see what it looks like for that individual because everybody's got a different skin tone. Everybody's gonna look different. Um, So it'll depend on which modifier you choose in which reflector.
Class Materials
Bonus Materials with Purchase
Ratings and Reviews
Student Work
Related Classes
Portrait Photography