Classic Poses for Nude Male (contains nudity)
Lesson 5 from: Fine Art Nude PhotographyLindsay Adler
Classic Poses for Nude Male (contains nudity)
Lesson 5 from: Fine Art Nude PhotographyLindsay Adler
Lesson Info
5. Classic Poses for Nude Male (contains nudity)
Lessons
Class Introduction
14:28 2Etiquette and Preparation
30:21 3Fine Art Nude Posing Essentials
24:44 4Posing to Accentuate Shape (contains nudity)
31:24 5Classic Poses for Nude Male (contains nudity)
15:35 6Classic Poses for Nude Female (contains nudity)
15:12 7Sculpting with Light and Shadow
18:05 8Lighting: Definition and Separation
20:54Lighting: Low Key Male And Female (contains nudity)
28:22 10Lighting: High Key Female (contains nudity)
14:45 11Patterns and Projection (contains nudity)
19:31 12Nude as Fine Art (contains nudity)
24:32 13Nude as Creative Canvas: Male Statue
17:23 14Nude as Creative Canvas: Female Statue
11:25 15Nude as Creative Canvas: Splatter Paint Torso
16:30Lesson Info
Classic Poses for Nude Male (contains nudity)
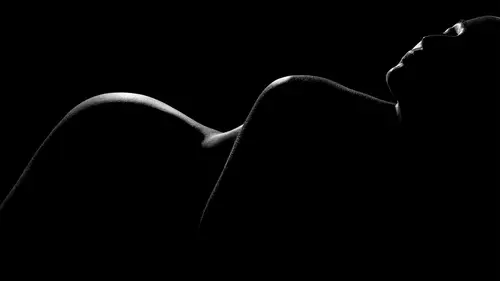
So now we're going to talk about some go-to, or classical, men's poses. Now the poses that you choose for your particular shoot may vary from these, because in a shoot, it's going to depend on a couple of things. The physique of your subject, like the build of their body. The lighting that you've chosen, and it's actually an interplay in between the light, the pose, and your concept. But I thought it would be useful to give you a couple of the poses that I use most often when photographing the male nude form. When I'm choosing these poses, one of the reasons I've selected them is, a lot of my inspiration has come from Greek sculpture. And as I look at the Greek sculpture, one of the things you'll see over and over again, is you see structures and you see triangles. Unlike what you'll see when you're photographing the female nude form, where you're focusing more on curves and line and arch. So most of these poses, as you look at them, you will see right angles to the arms, or more drama...
tic sharp angles to the legs. Triangles created by the positions of the arms. So those are the types of things you want to be thinking about when you're photographing the male nude form. So I'm going to cover five different poses that I use most often. Alright, so for this first pose, what I'm gonna have him do, is I'm gonna have him lean out and lunge. And so this will give me more dramatic, dynamic angles with the legs. If I just have him standing there, it's not quite as dramatic, it's that lunge that will give me that. Now one of the things I talked about when posing women, that any time there are two of anything, feet, legs, knees, arms, anything, if you put them at differing angles, one higher or one lower, it makes for a more dramatic shot. So just standing to the side, doesn't make for an interesting pose. However, raising one foot out, leaning out, puts the feet and the knees at different levels, and hence a more interesting photograph. So, I'm gonna give this to you first. And I'm gonna have you put your right knee up. I usually bend whatever leg is closest to the camera and that helps to center your subject. Alright, so. The first pose I'm gonna have you do, I'm gonna have you lean out a little bit, and the whole time I'm focusing on having good posture and elongation. If he kinda hunches in to something too much, it makes the subject look a little bit weaker. So I'm trying to keep that in mind as well. So for the first shot, I'm gonna have you turn your torso towards me. Great. And I'm gonna make triangles, or stronger lines, with the arms there. So first, can you try to lean out on your knee just little bit? Great. And then, put this hand there. And lean your torso back towards me just a little bit. Alright. So this is going to be something that you would see over and over again in a sculpture. I've got triangles created by his torso, and then also I've created the triangle from his knee. So let me grab this shot first for my essential pose #1. (camera clicking) (camera clicking) And I'm gonna have you lean back that way just a little bit and then lean your torso towards me. Now one of the reasons I'm having him lean his torso towards me, is whatever is closest to the camera appears largest. So by having him lean his torso towards the camera, it'll make him look a little bit broader, a little bit wider. It'll also have him narrow a little bit at the waist. The other reason I'm having him turn back towards camera, is if he turns totally to this side, I'll have you turn to your left more, just keep going right there. Good. It diminishes him. So if you look at the shoulders, he looks much narrower. In general, keep this in mind. You control the broadness or the dominance of the subject in the frame by their shoulders. So that's why I keep, generally, having him bring them back towards camera just a bit. Alright, so one more time. Same thing. Shoulders, turn a little bit more that way. Great. And relax 'em. Perfect. And bring your hands, just, this way just a little. Perfect, right there. (camera clicking) And then I'm gonna have you look your head this direction. Right there. (camera clicking) (camera clicking) Great. If this is the pose that you choose, remember, varying your light, changing the angles, is gonna draw attention to different parts of the body. So that's pose number one. Alright, so for this next pose, let's do the... Actually, let's do the same leg up, but I'm gonna have him turn away from camera more. So in this case, leg up, that lunge is going to be the same. I'm gonna have you put your hand on your thigh. Perfect. And then put that back hand out and give me some, give me a triangle. Great. Okay so what I've done here, is I've created triangles from the lower half of his body. Perfect. Then I wanna create structure with that front arm. Instead of having it tight up to his side, I have it out a little bit to create somewhat of a right angle so it looks nice and strong. And then, if I have his back arm kind of popped out to the side, it gives me another triangle. Triangles and structure. This pose is just giving a little bit more emphasis, if you're looking at the musculature in the back, for example, whereas in the first pose, it would be focused on the muscular of the chest and the stomach. So again, which part of the physique are you trying to show of your subject? Alright, looks good. And, turn your shoulders that way, away from me. Good, good, good. Right there. (camera clicking) And I'm gonna have you lean up, put your elbow up just a little more, right there. The reason I'm doing that, is I'm creating negative space. I wanna see just a little bit of separation between his elbow and his midsection. Otherwise it all kind of blends in, which is fine, but this is more impressive to show his physique. (camera clicking) Great. And changing my angle just a little bit. (camera clicking) (camera clicking) and I'm gonna do one more. Just put your hand straight out this way. Great. So when he did this, it makes even more of a strong line. Perfect, and we do more uncomfortable, can you put your back arm just a little lower? Nope, go a little higher and pop it this way just a little. One more uncomfortable, yeah, great, and look up. (camera clicking) (camera clicking) (camera clicking) Perfect. Okay. So, it'd be my second pose. Again, this one's more focused on the physique of the back. So those are two poses, and one of the things you want to notice is I used an Apple box. And the reason I've used an Apple box, is if I have him just lunge out, it's so hard for him to put his hand on his thigh, he's gonna have to lean down, and then you get into that curve instead of having a nice strong line. So by adding an Apple box, it elevates his knee so when he leans, it allows me to create nice strong triangles, right angles, instead of a curve to the back. In this case we've used a full Apple box. Apple boxes come in different sizes. Half Apples, full Apples, the full Apple is bigger so he can elevate his leg even more. Alright, next pose. For this shot, what we're gonna do is we're gonna focus on the musculature of his back and it's going to be a much more subtle pose. Typically, like I said, I may do shots that are the triangles and the strong lines, but this instead is going to be more, a little bit more subtle, just kind of a strong stance. So we're gonna be faced behind, and I'm gonna have you point your left foot towards the background and your right foot towards the right. Perfect, so it's kind of a dance pose with the feet. And the reason I'm going to do this is, there's a bunch of different shapes that you typically want to create with men. In the first and second shot, you saw more of a C shape. So what you'll see is from his head towards his torso and his arm, it creates a C. With men you create Cs, with women you create Ses. The other shape you can create with men is the shape of a V. So what that means is the shoulders will be broader but then it narrows towards the bottom of the body. So, by taking his feet and putting them in a stance where they narrow, that's going to give me more of that V shape. So, face one more time towards the back. Great. Can you move your left foot all the way to your toe? Great, even more, keep going, right there. So what it does is now, if I look, his knees meet at a narrowing point. So that's going to give me that V. Perfect. Now I'm going to do the whole thing where I'm going to have you take that exact pose and just rotate to your left a little. Right there, perfect. Great. Cross that left foot over to the toe even more. Great. And now turn your shoulders towards me a tiny bit. Perfect. Alright, so what it does, narrows at the lower part of his body but he's looking broader at the top of his body. Can you put your right arm and just bend it a little bit? A little less, little less. And so I'm looking for negative space and a little bit of structure. I want it to have a little bit of form there. So turn your shoulders back towards me a bit. Great. I don't need to do anything with that front arm. With women, it's the rule, if you can bend it, bend it, if you can curve it, curve it. Here, the straight line is actually kind of anchor to this shot. (camera clicking) So this is a very... (camera clicking) base pose. But again, it all depends on how you light it. And then again, you can vary different parts of the shot, expression, head placement, and so on. Alright, and do one more where you turn your torso way towards me. So keep turning, turning, turning, perfect. (camera clicking) Great. (camera clicking) (camera clicking) Okay. Wonderful. Alright, my next go to shot or essential shot is going to be a seated pose. And this is something I've taken directly from a Greek statue. So I'm gonna have you sit, and I'm gonna have you put your knee that's closest to camera down, back knee up, okay? And let me lower the light. Perfect. Alright, now I do want to create some structure with this so I'm going to do so with the arms. I could have the back arm close into the body or tucked over with the other arm tucked over. I'm just trying to find ways to not just have them loose or if they're too tight to the body it's not adding any structure, it's kind of creating more curves, so I want some of those intense shapes. Now he already knows, cause we tested this one out, that I'm gonna have him go down on his ankle and it's uncomfortable so what I'm gonna do, is I'm gonna say, okay, let's get the shot and then I'll relax and then we'll vary it. I'll see what I need to change. And then have him get back down on his ankle there. And so this is one of the things I know: a lot of times, really beautiful flattering poses are not comfortable. So I'm going to have the subject get the pose, relax, and repeat. I do that often. Okay, so, I'm gonna have you put your right arm kind of on your thigh. And then the back arm, you'll have it on your right thigh. Good, exactly. So, ready? Let's pop this shot in. Alright, here we go. Nice and low. Perfect. (camera clicking) And if you can get even lower, just briefly. Good, and lift your chest up nice and strong. Great, now. (camera clicking) Can you prop that back arm in? Yeah. And stick your elbow out more and then turn the arm in this way. Let me see that. Like this. Like that? Yeah. Good. (camera clicking) Great. (camera clicking) And now take your fist, and move it in toward your torso, a little less. Right there. Good. Really strong. (camera clicking) Good, yeah, relax whenever you need to. You can go back up, yeah. It's not comfortable, I can tell. Good. Perfect, one more, one more time. And just have that hand loose here. Good. Alright, ready. And put your hand on your thigh. (camera clicking) Good. And lift your head up that way. (camera clicking) Alright and relax. Yeah, that was good. I'm impressed. We're gonna do one last pose using a stool. A typical bar stool is totally fine and one of the reasons I like that is it allows my subject to put their legs at different heights. So based on the subject's height, or the pose, I can create the triangles that I need. So let me grab the high bar stool here. Perfect. And you can rotate it however you need to put your right knee up. So in the last instance I kind of broke a rule because I wanted to have the front knee down, I wanted to create structure with the back knee up. But I used his right arm in order to center the shot. Here, I'm going to still raise the leg closest to camera and that gives me the ability to center it. Alright, so. I'm going to have you, kind of put your hand on that thigh again, great, perfect. And I'm gonna have you lean way forward, like lean...yeah. And pop that elbow out just a little bit more, this front one, your right one. And lean out onto it. Good, right there. Perfect. Alright, now put your chest up just a little bit and rotate away from me, just a tiny bit. Okay, perfect. Alright, so, there's a lot of paintings that I've seen that are done something quite similar to this. They'll have a nude form and they'll have the subject where you can't see their face, it's kind of looking off into the distance. I've got some nice triangles, I've got some nice negative space. So I'm going to grab a couple of this pose, as well. Alright, great. (audio interruption) Hide your left arm for a moment. Great. Perfect. (camera clicking) Perfect. And now put that back arm out so I can see some negative space, perfect. Turn your body away from me even more. Perfect, just like that. (camera clicking) And now, turn your shoulders away from me a little bit and then head hard to your right. Good, perfect. (camera clicking) Great. So these are kind of my five more classic poses, the ones that I use over and over again, but of course, you're seeing right now, I'm just lighting them with a single three-foot Octobox. So it keeps the light very simple. It's not really drawing attention to any one part of the body, but then, as you make your lighting more complicated or as you add multiple lights, you control where the eye looks. One more thing to keep in mind. So these are kind of my base poses, but from there, every single one of those can be varied. So for example, in the first shot, when he lunged his leg out and he had his both hands to the side, well, I could have both hands to the side or I could have him lean out on one, or I could have him put both arms up and just focus on the shape of the torso, or I could have him put one arm here, hide the other, I could have him put one arm here and put... My point is, when you take a base, how I approach it to come up with endless variation, is you get the base and then you vary, what I call, the digits. So it would be varying the facial expression and angles, so straight on, away from the camera, looking towards the camera. And then also the placement of the arms. So although these are base poses, they're, you know, go to poses, from there there is a ton of variety. And then of course, add to that changing your lighting and your camera angle and your lens choice, really you can have 20 different poses from these base five.
Class Materials
Free Download
Bonus Materials with Purchase
Ratings and Reviews
ccPhotography
Amazing speaker, instructor and great photographer. The lighting and posing technique is imperative but she gives a lot of small tid bits and tricks that have already set me apart from other photographers. I love her work but I love her teaching style more. I recommend all her classes!
user 0256e5
It is a delight to watch someone who has so much passion for her art and Lindsay exudes passion and accompanies that with a great teaching style. She shares her knowledge and has a lot of great tips. I think this class makes a great intro to the subject. For me, this was time well spent.
Flavia
I love Lindsay's teaching style and all the insights she gives. I did my first fineartnude photoshooting applying everything I learned on this course! Thanks Lindsay you are a true inspiration and a great help during my photography journey.