Lesson Info
6. Food Styling Tips
Lessons
Day 1
1Introduction to Food Photography Class
11:54 2What Is Food Porn?
37:14 3Food Photography Lighting
21:14 4Food Photography Props
58:45 5Food Styling Props
16:39 6Food Styling Tips
37:49 7Food Styling Tools of the Trade
08:31Camera for Food Photography
30:26 9Food Styling Tutorial: Spaghetti and Pudding
20:06 10Food Styling Q&A
16:16 11Gear Q&A
16:56 12Food Photography Camera Settings: Do The Math
23:48 13Understanding Light Meters and Settings
29:08 14Shooting Demo: Dessert Photography
31:33 15Student Shoot: Bread Photography
15:54 16Student Shoot: Soup Photography
16:31 17Student Shoot: Pastry Photography
13:08 18Student Shoot: Sandwich and Soup Handheld
17:43 19Workflow Prep to Post
45:16 20Post Demo
27:07 21Food Blogging Tips with Shauna Ahern
36:59 22Q&A With Shauna Ahern
29:57 23The Top 10 Questions for Every Food Photographer
28:32 24Food Photography Business Q&A
33:43 25Photo Copyright
19:22 26Advertising Your Photography Business
36:57 27The Artist vs. the Business Person
36:21 28Tips and Tricks for a Budget Shoot
23:07 29Tips for Food Photography with Phone
38:59 30Student Critique
12:16 31Facebook Contest Winner Critique
16:11 32Q&A and Parting Wisdom
16:05Day 2
Day 3
Lesson Info
Food Styling Tips
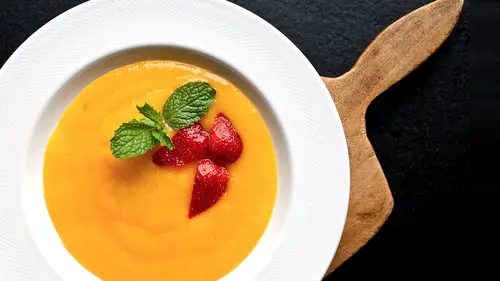
The next step is obviously the star of the show. And we need to build out now our plate. We're gonna go over some slides and talk about the basic elements of food styling. And then we're gonna give a little bit of a demo here right on here, and then I'm gonna show you kind of what I'm seeing in the camera. I'll be able to grab the camera, take a few frames, and you'll be able to see exactly what I'm seeing. So I think without any further ado, we'll talk about food styling. Now food styling really is about how you manipulate food to fit your camera set-up. Meaning not always is it as simple as, okay, I made dinner. Let's plate it and shoot it. Okay? Sometimes it's about creating exactly what you want for the camera. Now that doesn't mean it has to be fake. It doesn't mean it has to be anything weird. It just has to be carefully thought out and crafted. So when I talk about food styling, I really talk about building the plate. Now obviously, food styling can take other turns and twists l...
ike something like this where the food itself is being manipulated in a way to kinda create an image. The challenge here was to make Peeps. So it's a iconic kind of thing in America with these little marshmallow chickies. And trying to make them look, obviously, these were bunny Peeps, not the classic chick peeps, but (audience member laughs) trying to make them was really challenging. But using the process of the way we were gonna style the food was the better option for this particular shot. Plus I thought it was cute to start with, so why not? Okay. This, obviously, when we were making these cookies, and these were just published recently by Martha Rose Shulman, and the idea of this is to make chocolate chip cookies that were not exactly kind of traditional and with the chips or whatever. So they either used coins, the big chocolate coins that get to really big, or the other option was chopping the chocolate by hand. And that was the idea that, for me, was the more unique approach. And I think with food styling in general, particularly when you're doing classic dishes and things that people are really familiar with and that have been photographed over and over and over again like a chocolate chip cookie, doing something different was the goal here. And being able to hand-chop the chocolate, and then kinda pick and choose even the chunks that were going into the dough, that's how detailed it can become. But the idea is that your end result is something that is unique and different, and you can obviously be proud of something to be able to put your own twist on a classic dish. These kinda dishes, this dish was actually part of the same story. And I wrote a little article about it afterwards where I talked about the idea that something like this tart took three days to make, and to get it absolutely perfect. It was done in a French culinary classic style. The dough is made a very specific way. It had to be chilled a very specific way. Every element of this was so carefully thought out. Every one of those raspberries was soaked in ice water for probably an hour before I hand-picked each one to put in the bowl to put in there. The crafting of food for camera is so very different than what you do for just to eat. And the idea is selection is a really big part of that. Your food styling really begins at the market. If you're serious about making really beautiful images, you need to hand-pick everything you're gonna put in your photos. And that's where the shopping and the chopping comes in, because if you are allowing someone else to pick, or you're just ordering online, or whatever it might be, you might not get what you want. You may get raspberries that are smashed. Or you might get things that are wilted, or not as beautiful as you would like them. Or you wanna pick out exactly the right size artichoke. So being able to hand-select everything that you do with the food is a good beginning. And if you're gonna put the kinda time that say something like this takes, you're only gonna get one shot at it. I didn't wanna have to make this again. (audience member laughs) It took a really long time. And it was really worth it, and it came out exactly the way I wanted it to, but the idea is that the amount of preparation that goes into it to get just that one frame is really intense. The other thing about food styling here in this particular image is marrying together the colors and the shapes of everything that is already in the set. So we talked about the propping and putting this together. Chose the props with the idea of what the colors were gonna be like in the food, and then, again, it works inside and out. And then using even the powdered sugar and the extra hazelnut and whatever to kinda give a more natural kind of a feel, so it's not as contrived. I think that's one of the things that people make a lot of mistakes with when it comes to food styling. It sometimes becomes way too contrived. It becomes way outside the, the perfection element of it is just so precious. And I think that's a word that's come up a lot of times when I talk to people about food styling is it's too precious. It wouldn't wanna eat it. It looks like a gem. And I think that's important to note, because you wanna make it appetizing, but you also wanna keep it. So you walk tightrope between being contrived and being planned. Then, of course, there's the dishes that have absolutely no rules about them. Like this was a pie to start, (audience member chuckles) and it was really kinda more like, like a cobbler. It ended up being more like a cobbler. And it didn't come out of the pan, really, that well. But the idea is that any time you have the option of throwing ice cream on top of anything, (audience member laughs) I mean, you have a great opportunity, because ice cream in and of itself is something that we relate to. It's sometimes beautiful. Sometimes it's got that whole kind of emotional element attached to it. But the melting aspect of it is something that really nice. And this is more like we're in the process of eating it. So the styling of this was really more about, okay, this is a mess. I don't know how I'm gonna get this out of the pan, put it on the plate, and perfect a scoop to make it look right. So you wing it, and you go, okay, well, what would this look like if I was in the process of eating it? Or if it was more like a cobbler and I got it right on the plate? But if you notice, look at the edges of the plate. There's no mess. It's clean. There's no smudges. All of this is part of food styling. If you look at the way fine restaurants deliver food, there's an expeditor, right? And the expeditor is in charge of checking every single plate before it goes out on the floor. And what does he do? He checks the garnish, he wipes the plate, he makes sure everything looks the way it's supposed to look, that inner composition is perfect before it hits the floor, or the chef's head is gonna explode. (audience laughs) I've seen the explosion, too, it's actually. (audience laughs) So. Okay. This goes to a question I think we had earlier about dark foods, and we talked about lighting there. But I also wanna talk about the fact that dark foods, even something as great as a brownie, right, is pretty hard to shoot. And one of the things is when you have control over your recipe, which if you're doing a blog, or you're doing your own food photography, you do, having contrast available to you in the styling aspect of it by putting the nuts in there, or having some powdered sugar, or anything to break up all of that brown, that's the element of food styling that will be the difference between ordinary and an extraordinary image. Because the idea that it's just brown is really hard, both lighting-wise, propping, all of it. It's just really hard. There's no contrast. There's nothing to play off. And the one little crumb is always a really, you get your tweezers, and you put that one little crumb right where you want it. And that's, again, it's something that speaks to people. It's almost an indescribable why, but the idea is that it also kinda gives it less of a precious look. Right? Just that one crumb makes the difference between it being really contrived, because who serves it like that? And I think sometimes you gotta ask yourself that question. And then oftentimes, you gotta ignore it, ignore that voice in your head. Because again, this isn't reality. This is fantasy. It's hyper reality. That's what food photography is all about. Okay. This was really an exercise in art school where these are flat, white crackers. What am I doing with flat, white crackers? So the idea of using the food itself to create negative space, and using the overabundance of sesame seeds, which we did here, to kinda make something interesting-looking out of something that is very, very ordinary. This is crackers on a black table. This is the ultimate of food styling is that there is nothing else in this picture, but food. So understanding the shapes, and the colors, and the textures that are available to you in the food, making sure that you understand that you can use those things like an artist, this is your palette to create, that you have opportunities, because sometimes you're stuck with a dog, is just nothing you can do with it. Can we put jelly on it? No. Can you put butter on it? No. Can we do anything with it? No. Okay, what do we do with it? So you create. Same thing here is that this was also, again, you get the opportunity to experiment. So we had to shoot. And I did the classic shot with the tomato sauce and the dipping, and I did all that. And then I said, "I wanna do something different. "Let's see what happens." So I did this, and they published it. They ignored all the traditional stuff, and they published this one. So again, you gotta take risks, and take chances, and trust your artistic instinct. Sometimes somebody would look at that picture and go, (chuckles) what is he thinking? But the idea is that at least you're thinking. You know? You're not following the mold. You're not just falling in line and doing what every other photographer does and every other stylist does. You're creating something your own. Is it that interesting for some people? Maybe not, but I thought it was cool, so I went with it, and somebody else thought it was cool, and they happened to publish it. Okay, when we talked earlier about leaving room for text, Jim, this is one of those examples. This was specifically designed for a story where that negative space was gonna be used for text. And being able to use styling elements of the food, again, just food on a black surface, is something that gives you the opportunity to see texture, and shape, and form, and use it in an artistic way to continue to create art. So the shapes themselves are interesting, and then the shape of the shape, the thing I use them in, and how I create a palette with that. So looking at everything like what we talked about with props, looking at everything around you as potential fodder for your creative, CreativeLive. (audience laughs) You have creative instincts, right? You notice things. You see the shape and the form, and you understand them as things that are beautiful, and that can be used that way. Okay, we talk a little bit, and we've probably seen this shot now 500 times online and everywhere else, but this is a really good example of that whole idea of what do you do with monochromatic, and how do you not compete with the food when you talk about styling? But also the choices that you make. The soup wasn't gonna change, no matter what you did. It was gonna look the same. But plating it properly, no drips, you have an even, perfect circle sitting in the bowl, there's nothing leaping up or whatever, it's pretty round, but choosing those, choosing the garnish, and choosing the strawberries carefully by hand, inspecting every piece of it, because it's gonna live forever in that picture. And if it's not right, it's not gonna live forever. I'm gonna walk over for a second, and I'm gonna talk to you about one particular thing that I do at every photo shoot. So I keep a lot of these in the studio. (metal bowl clangs) And the first thing we do when we get back from the shopping, or if I've whatever, the assistants and myself, we fill metal bowls with ice, and then we fill them all with cold water. And all of the herbs and any of the kinda vegetables that are sensitive to cold will be thrown in there. And that, mint is the worst. Mint is so difficult to work with. The minute you cut into it, it bruises. The minute it sits out too long, it wilts. So everything goes right into ice baths, and it sits there until we're ready to use it. And it's one of those key things that is really important when it comes to the small elements of food styling, because if you don't take care of those small, little details, then the whole shot is kinda out. You've done a nice composition, you've picked a great plate, the soup looks good, it's in the bowl, you garnish it, and the mint leaf's got a bend in it. Right? Or you can't find a mint leaf, because you're plucking through them. You soak them in the water, they absorb a little water, they flatten out, they lose their creases, they stay fresh, that works for any of the sensitive herbs, and vegetables, and whatever. It's a great method. But yeah, that's one of those kinda key things that you remember to do as soon as you get back from the market, and if you're gonna shoot that day. And if you're not, the other one that's really good is you wash your vegetables, and then wrap them in paper towels, and stuff them in Ziplocs, because they stay fresh and moist, and then there's less air, so they don't go bad. That only lasts for a little while, though. You can't do that for very long. But the idea is that they will stay fresher that way if you're not gonna use them right away. Okay. So this is one of those kinda nice collaborations of food and props styling that all goes to the story that's being told. This was a story about dinner for one. So we stuck the magazine in there. We have all the other elements. But then the food itself, it's a tough one. I mean, the poached egg and tomato sauce is a pretty tough one. But the reality is that the key to this one was getting it in the bowl clean. 'Cause if it just kinda stays, and there's that bowl we talked about earlier, that white bowl. But if it just starts to like, you know how you get that oil ring around the edge with the tomato sauce and whatever, if you don't do that right, or you clean it badly, it's gonna be a disaster. It's just not gonna look right, 'cause then all you can look at, as the viewer, is the imperfection. The food is what it is. And I say that a lot, and people are like, when I'm working with other people, they're like, "You can't say that." No, it is. It is what it is. You gotta do your best you can with what it is. So this was, for me, that looks great, 'cause I would eat that every night of the week if you gave it to me. But the reality is you need to keep that plate clean. The bread is essential to this shot. Using the bread as props, but also knowing that that's big part of the recipe, that's how I was gonna eat it. We're grounded in reality here, right? We're really grounded in reality. This is dinner for one. Sittin' down, I got my magazine. I had a couple shots where my glasses were in it. (audience member laughs) And honestly, the whole set-up was an idea of one of my assistants who works with me, this was her idea. She's like, "Hey, let's put the magazine in it. "Throw your glasses in there. "Let's see how it goes." And that's the other thing about collaboration, where the food, and the propping, and all the people all around you all kinda collaborate to make a nice shot. And this has become one of my favorites, so. Andrew? Yes. Speaking of imperfections, Jen Wolf from Fort Riley, Kansas asked, do you recommend leaving some imperfections on the plate, or the surface board to add some character and realism in the picture you wanna take? Yes, as long as it's not distracting. I think that it's really good to show things like they would be in life as long as they're not really distracting. Even like crackle board like that, right? There's certain things about this that I can pick out that might be like, ah, that drives me crazy, but the reality is that there are certain things that kind of keep it real. Keep it real, y'all, you know? (audience laughs) It's a fine line, though, I imagine, right? It's a very fine line. Absolutely, yeah, because if it's something that's gonna draw your eye away, it's gonna be a pain. You gonna be like, oh, God, now I'm distracted by it. So as long as it's not like overtly distracting, then yeah, absolutely. Anybody else, while we're? Yeah. This kinda goes back to the propping with the spoon shot from above. Mm-hm. And not getting the reflection of the camera in it. Mm-hm. Any tips for that? Yeah, don't let 'em get too shiny. Really. I mean, that's why I don't use really highly-shined stuff like if you're using something that has that much shine on it, you're gonna see me in there. Right. You know? Sometimes when, depending on the depth of field, too, it may not be that distinct. Will distort it, yeah. And it can be a little distorted. But yeah, that's why I go with stuff that's kinda antiqued and has some patina on it, because the reality is it doesn't reflect back at you as badly. For sure. Okay. Architecture in food styling is really important. And when we talk about what inspires us about other art forms and other things that we draw from inspiration, I often talk about 3D art, architecture, sculpture. Because in essence, this is 3D art for me. It's not for you, when you're looking at it, it's 2D. But for me, at the table creating it, it's three-dimensional. So architecture is a big part of that. And things that have height, or have the ability to have height, shooting at table level, it gives you this kind of really beautiful idea of how to create something three-dimensional in art. And I like the idea of, of piling things on top, giving it this height, but it's a careful construction. That's the thing about this is that this is where these great guys come into hand. (utensils rattle) These are not just for Chinese food, folks. (chopsticks tap) Having chopsticks on your set, in your pocket when you're working, is one of the keys to really being able to manipulate your food carefully. And this particular shot is really about that big. It's really tiny. Maybe three by three, three inches by three inches, and every one of those little leek rings is really small. So if there's one that's out of place, or it's bothering me, or it's kind of distracting me from what I'm trying to focus on, chopsticks will help you in a lot of ways, because you don't disturb the whole. You can build carefully. You can place something exactly where you want it. Now obviously, tweezers will do the same thing when it's really fine and minute. And any food stylist carries probably both of those things, and scissors, and all the other little things. You have one little thing sticking out, one little branch or whatever, and you just snip it off and it's now we're good again. So all those little fine details that go into food styling really has to do with kinda micromanagement of everything in your frame. Really, really micromanage what's in your frame. Okay, the food itself, again, this goes to why we hand-select everything that we do. And this happens with this particular dish, happens before and after, 'cause now we hand-select what we're gonna cook, and then we pick it after it's cooked to make sure we get the best ones. And in the business, we call that the hero. So when you're in a setting where there's something that has to be photographed, there's everything else, and then there's the hero. The hero is the one that gets selected to be photographed. So if you hear that terminology when you're talking, especially in an advertising setting. I was doing a shoot where we had 5,000 pounds of cheese on set in refrigerators lining the walls of the studio, and there was one chest out of like 10, and it had hero printed on the front of it. (audience laughs) And no one could go near that thing. That's where the perfect cheese was. 'Cause they went through 5,000 pounds of cheese to find the best wheels, 'cause it was a thing about big wheels of cheese. And they put them in that cabinet, and it had a big sign on it, hero, do not open. But that's, essentially, that's the thing is that when you find the piece that you wanna photograph, if it's the piece of asparagus, or it's a wheel of cheese, or if it's a sandwich, or whatever that's been built to perfection, that's your hero. You protect it with your life. You box out like a basketball player. Keep it away from the table. Because that's the one that's gonna make your shot. For sure. You need to understand your heroes. Not Superman. Okay. Tough foods. (audience member chuckles) It's not an eye test. (audience laughs) What I mean by tough foods are things that are innately difficult to photograph. There's one thing in particular that I've always found really difficult is really dark, leafy greens. And I found a little bit of a trick, and that's, I think, the first slide here. Yeah, the first slide is using dark, leafy greens is really difficult to photograph. They just absorb light. There's really very little opportunity for things to reflect off them. They happen to be kinda dull. And even when they're kinda glistening with olive oil, they still are rather dark. When you are able to find the spines in the leafy greens, and construct the plate by twisting them and turning them to show the spines, it gives contrast and it gives shape to something that is normally flat and shapeless. So this happens to be baby greens, and I think sometimes baby greens end up being more easier to manipulate that way. Sort of like small children, you could just, you know. (audience laughs) But the idea is that you can move them, and twist them, and create architecture with them, and you still have contrast and color. And then obviously, when you can add things like garlic, or red pepper flake, or anything else that can be added to the dish to create contrast, all of that is about food styling. So again, with these leafy greens. And eggs are a blessing and a curse in photography, because you saw earlier, there were a couple egg shots that can be really beautiful, and then we had the poached egg shot that can be really hard, and we also had the brownie shot that can be really hard. But also anytime you have to combine dark and light on the same plate, it can be really difficult exposure-wise and also when it comes to styling, because you have all of this contrasting stuff on there. And the idea is to try to give them as much separation as possible between the darks, the lights, and the mid-tones. So having the opportunity, my hands again, by the way. (audience member laughs) I gotta give my hands props, you know? (chuckles) But again, the things that also have the ability for really high shine, and that's also why I picked this one is that there's a really hard shimmer on that one side. And if you don't manage that properly, it just kinda blows out the whole picture. So things that are really difficult to photograph, it's also hard in post-production, which is another thing is that when you have really, really high highlights and really dark shadows, there's a hard to find a balance in post-production as well. When you're looking at the photo, it's like, oh, God, it's all over the place. So those are particularly difficult. And by kinda balancing out the plate, and I think that's also a component of food styling is balance, finding the right color balance, the right garnish balance where it doesn't look too contrived. Or if I'm looking at a plate of spaghetti with peas, right? And all of the peas are on one side, well, then you gotta pluck a few over and move them. Because when you're looking at it, your eye is gonna go to the soldier line of peas along the edge of the plate. Take 'em out, place 'em. You don't have to be too contrived about it, but give it balance. When you have a lot of components in a dish, you wanna give it balance. Andrew, I have a quick question on that topic, please. Yeah. This actually came earlier from Sara Lynn. Have you ever done the same shot, probably in the studio, the same shot with two different lighting situations, and use post-production to combine them? No. For exposure for darks and lights? I know what you mean. I don't. I don't do kind of composite shots. First of all, I can't do it editorially. It's not really editorially honest to do that for a newspaper. A magazine, it's fine, and other publications where we're not talking about reality reality, not other reality. But no, I can't do that in my work, and I never got used to putting it in my workflow. You can make some spectacular-looking images doing that. But it's not something that I particularly do, because it doesn't fit my workflow. Any other questions coming out that way? Oh, yeah, there's always questions. One question came in about toothpicks. If you ever use toothpicks hidden away? Good question. And other non-food things to prop up built-up food for an architectural food shot? Yup. (audience laughs) Hold on, wait. Is the slide here? Where's the slide? Oh, it's in another part of the thing. Okay, we'll do it later. There's a slide for that. There is a slide, yeah, right, there's an app for that. There's a slide for that. (audience laughs) Yes, the answer is yes. Using toothpicks, and these things, skewers, and other things like this to kinda hold and prop food in a particular position, absolutely. I do that a lot. I think it really helps as long as it doesn't look too, again, too contrived. I think that you need to be mindful of the fact that sometimes food just doesn't wanna sit the way you want it to sit, and then by pinning it, or propping it, or putting it in a certain way, you can really achieve the look that you want, for sure. So all right. So I put this in the tough foods category because, not because it's hard to take a picture of it, but the idea of it is something that is disturbing for people. And I think as a food photographer, and as a food stylist, you need to be mindful of the fact that people are sensitive to certain things about food, both positively and negatively. And raw meat is definitely one of those things that some people can't wait to get at, and some people might be completely freaked out by. So what I try to do in those situations is create images that stand alone from the actual idea of food. This was something that ran in, I think it was La Cucina Italiana just recently. And it really excited me to take this picture, because it was a little like, well, what am I gonna do with raw meat? Oh, I know exactly what I wanna do with raw meat. I wanna flex a little muscle here, because they're giving me an opportunity to do a little bit of still life. And I forget that that's raw meat when I'm looking at it, 'cause I look at the lighting, and I look at the texture, and I look at the composition, and I almost forget it's raw meat. So I think kinda gives you something else to focus on rather than just the idea that it's a slab of porterhouse on a stone. So, I don't know, maybe. So let's talk a little bit more about what we got coming in from the internet, maybe. Okay. And then maybe if you guys have some questions, we can go there. I have a couple questions, and I wanted to, I'm not sure if you're gonna be covering this. Okay. So Cici in California said, I asked a prominent food photographer in LA about shooting food while hot. She said food always looks best cold. I disagree, but have no experience compared to her. What is your opinion? And then Tony Kaiway said, I take a long time to shoot and the food goes cold. Is this ideal? What do you think of steam as a prop to note the dish is hot? Okay, well, let's talk about room temperature food first. I would say the majority of food pictures you end up seeing in publication are not hot. (audience laughs) They're not. Because the reality is that things only stay hot for a very finite period of time. And quite honestly, it's a lot easier to work with room temperature food. I don't know about cold food, like stuff that comes out of the fridge, and it's been sittin' there overnight. 'Cause when I do have the opportunity to prepare food ahead of time, I take it out and I let it set at room temperature, might even warm it slightly. But it actually works to your advantage, because it keeps things fresher. If you try to reheat things or cook them too much, then everything kinda wilts and gets crummy-looking. But I would say room temperature. It's not ideal to eat that way, but it's definitely sometimes ideal to shoot that way. And a lot of the times, you have no choice. The food's gonna get cold. And the other question, the follow-up was? I keep throwing many questions at you at once, don't I, Andrew? (Jim laughs) No, I know there is one, I just can't. So I think the question was that it takes a long time, and the food goes cold, and that's ideal. And then the follow-up was what do you think of steam as a prop to note that it is a hot dish? Which we kind of touched on already. I don't necessarily think it needs to be noted that it's hot. Like, oh, it's hot. We kind of assume those things about food, that it's hot, if it's a dish that looks like it should be hot. I think steam is more about emotion. And I think it's a great prop, but I don't know that I need to tell, be that literal to say, the steam is coming off because it's hot. I think the steam is coming off it 'cause it's, that's an emotional response we have to steam. But I mean, yes, if it's an important thing in the context of what you're working on, then sure. And one more follow-up from Sam555. Do you ever use fake steam, or sprays, or smoke? I have in the past. I've been able to kinda manipulate steam where I'll put something on a really hot plate and then give it a little squirt of water, and then it creates a little steam. As long as it's editorially honest. I'm not creating steam with like-- Dry ice. Well, they're used to be, no, yeah, you're right, dry ice and things like that. But there used to be this, and I've seen a food stylist use it. It was an older person who had been in the business for a really long time. It was this little bulb, and it had this chemical in it, and if you put it behind the dish and gave it a couple of squeezes, it gave this beautiful kinda puff of smoke. Turns out it was highly toxic, and really, really dangerous, so they outlawed it. There's actually quite a few things about food styling that have become outlawed, like things you can't do. That's one of them. And the other one is that people used to take the heating elements out of electric barbecues. You ever see what these things look like? It's like a horseshoe. And it would be right in the side of underneath the thing, and it would heat up the food. Well, people, food stylists, were taking them out of barbecues. This was like a standard issue kinda food stylist trick. And they would plug it in, and this thing would get to be like 500 or 600 degrees, and they would sear meat with it, put the grill marks. It's a great trick. But the reality is that people were freaking out, because it was a 500-degree wand people were waving around in the studio. (audience laughs) And most commercial studios are union shops. And the guys who run the thing were like, no, we're not gonna have any of that in here, 'cause if this place goes up in flames, it's on us. So they outlawed it. But I still know a few of them who have their old barbecue elements in their bag somewhere hidden. (Jim laughs) They wouldn't give them up that easily. Do you use a propane torch? Yes, I use a propane torch a lot. I think it's a really essential tool in food styling in that you can either help it along a little bit when it needs a little browning, or you can even rather than put it in the broiler, you can do it that way. I think it's a great tool. Yes. I have one question. Only one? Only one. Well, for right now. (laughs) Oh, okay. A lot of the images I'm seeing, I kinda feel like you're getting probably 90% or 95% of your image in camera and doing little post-production. Could you speak about that real quick, or? Later. Is that accurate? Okay, we're gonna do that later? (Andrew laughs) Okay, that's fine. No, I mean I can absolutely address that quickly. I don't do a lot of post-production. I do the equivalent of developing film in the computer. I do touch-up. I do light correction and balance. I'll do a little bit of saturation and other things that you basically could do if you were a really good developer. But I don't do color replacements, or what you were talking about, composite images, or anything like that. So I would say my photos are appropriately processed. I mean, there are some people in the business where I feel it's way over processed. And I think that there's a lot of times you can tell when a photo is way over processed. But I try not to. I don't think, it's not really, and you'll see, 'cause I'm gonna go through my work flow on day three, and you'll see exactly how I go from taking it out of the camera to getting it close to where I wanna send it off to the client. Great. Well, cool. And yup, go ahead. So salad dressings and dressing a salad. Yup. Do you have any suggestions on that? Lightly dressing it, and how long longevity do you really have with a shoot once it's dressed? And are there other foods similar to that that just wilt right away, or? Yeah, I think with salads, what I try to do is when... We could talk a lot right here about ignoring the rules when it comes to cooking rules versus, or recipes versus what we're actually doing in reality. Salads is a great example of that, because, okay, the salad says, chop a bowl of your ingredients, throw it in a bowl, put your dressing on it, and toss it. Okay, great. That's not the way we do it. Everything, and we'll do it in the demo, too, 'cause this is just one. The demo is really just one example of my process, and the process that I've watched other food stylists, and when I've worked, do is it's construction. Plating food, in a lot of ways, is construction. And with a salad in particular, I put all the ingredients together, put it on the plate the way I want it, arrange it with my chopsticks and whatever, and get the right composition, and then teaspoon by teaspoon just glistening. Just glisten what's there. Because the amount of dressing that you wanna eat versus the amount you wanna see on your salad when you're photographing it are very dramatically different for the very reason that you said. (clears throat) The idea is it's gonna get soggy really quick. (clears throat) And anything that has a high liquid content where it's time-sensitive like that is you need to act fast and get it quickly, or else it's just gonna droop out and not be good anymore. But salads are definitely, and all kinds of salads are pretty much the same way, unless it's really, really hardy lettuce where it'll hold up for a little while. But for the most part, that's pretty much the way it goes.
Ratings and Reviews
Brendan McGuigan
This was one of the best workshops I've ever taken in my life – in person or digital. Andrew is a fantastic teacher – if I hadn't known his first career was as a professor, I would have guessed it based on the quality of teaching. He had a casual attitude, sense of fun, and easy-going manner of speech that made him immediately accessible, and a joy to watch for the entire sixteen hours (which I completed in just under three days). For me, the main value of the workshop was to be found in the first day. Andrew went through his artistic process, dropped tips along the way, and gave a real sense of how his brain works when thinking about a scene – everything from creating the food, to styling, to composing the shot. I happen to love his use of light, and getting an insight into how he crafts his backlighting and bounce was very useful. Day two had some nuggets of wisdom – and some great hands-on – but much of the tool tutorials and post-production workflow aspects will be less useful to those who are already professional photographers looking to branch out into a new discipline. Still, one of the standouts to me was seeing just how little he does in technical post – a good reminder that incredible shots can be captured 90% in camera. The segment with a food blogger, although not relevant to me, was captivating and insightful, and the rapport between Andrew and Shauna James Ahern was delightful. Day three was great for anyone needing a refresher on the business aspects, and some of specifics of the food photography business were good to hear in detail. For those already selling their work, who are familiar with licensing agreements, copyright, stock, etc., this may be redundant, but it's always good to be reminded of these things by an expert at the top of their game. Andrew's conclusion nearly had me in tears. He is obviously an incredibly passionate, giving, and humble artist, who not only feels blessed in his own life, but feels compelled to pass on some of his good fortune. That's a wonderful thing to see, and honestly gave me a nice boost of motivation to up my personal game. Throughout the workshop I found Andrew's lesson plan spot on. His in-studio students asked great questions, and the questions selected from the online audience filled in a lot of the blanks. While I may have liked to have seen a bit more hands-on from Andrew – just to get more of a feel for his process – all in all I felt like this covered everything I was hoping to gain from it. I would highly recommend this to anyone looking to get into food photography – whether you're a complete novice or a seasoned professional photographer who wants to explore food. Whether it's for advertising, editorial, stock, or blogging, he really covers it all, exploring both broad concepts and very specific practical applications. I can't rave enough about this. If you're at all on the fence, buy it. You'll be glad you did.
a Creativelive Student
Day one was a good investment for me. After that... not so much. Not sure this is really about photography. For sure, Andrew is an artist, he's great at communicating the art of the food, the art of proping, but explanations about how to make images is very simplistic. For instance he makes a pretty big blunder explaining the "math" of photography. He says his favorite setting is f4/125th, at iso 100. His grasp of lighting beyond window light and reflectors left me a little flat. He does a good job of explaining his style -- which in spite of it all -- I like. And to be fair, Andrew is an editorial food photographer. If you're interested in opening a food photography studio and doing product work -- this may not be the class for you. I think this is a good class for cooks and bloggers who want to make images of their food. If you're a beginning food shooter, you will find the information about styling and proping useful. Having watched some of Pennhy de Los Santos and Andrew, the editorial people seem to over simplify lighting and camera and lens work. At the same time, there seems to be a theme emerging in photography and that is that it's really almost better to be highly versed in another discipline and come to photography through the back door... (e.g. a rock climber who picks up a camera, a conservationist who decides to document the changing landscape and wildlife, a cook who just so happens to like taking images). Photography, for its own sake, seems to be a thing of the past. At the end of the day the class is $129 -- so... not like you have to take out student loans to get something out of it. This guy is likable, and sincere, and makes a huge effort o be helpful to anyone interested in shooting food -- and it's hard to ignore his personal success.
Ben Adams
Andrew's class is excellent, through-and-through. The mere handful of negative reviews focus on the underwhelming results of his test shots in the class -- they're kind of missing the point. The instructor's test shots aren't about the final product, they're used to tell about the process, and boy does he do that. This course is comprehensive and concise. Scrivani talks about the ins-and-outs of the job itself (how much is styling, how much is buying the food or preparing it yourself, how much is just pure photography) and furthermore gives insight as to the nature of the business and pricing. He is clearly a strong teacher with an ear for student input, and it shows. He explains things in stages so that he doesn't 'lose' a novice student, but doesn't dumb it down so much that he's wasting the time of veteran photographers. Within each lesson (let's say he's describing the function of aperture, something most photogs already know) he's keen to pepper in little details about equipment, styling, or lighting so that there's useful information for a broad scope of the audience. The other courses, taught by Penny De Los Santos, are a joke compared to this one. De Los Santos I'm sure is a nice person, and she produces wonderful work, but her course provides little practical information and she effectively ignores her audience saying only "yeah this isn't good", making some unnamed adjustment, then "yeah okay this works" while the audience just sits there wondering what's even going on. Andrew Scrivani is very different. In one student-photographed shot, he recognizes that a more experienced pupil can easily snap his 'handheld' photo challenge, and so he throws them a curveball -- take an additional shot with a different background or styling -- and communicates clearly to the audience why he's changing the task and what the significance is. For a novice pupil, he assists her with the camera and explains to the audience the importance of getting settings right. All told, I had been unimpressed with CreativeLive's tutorial offerings until I stumbled upon this fantastic instructor. Yes, some of the information is dates (iPhone photography has taken giant leaps forward since 2013) but the practical information (lighting, budget options, business advice) is all salient and relevant. Andrew, if you by chance read these reviews, I'll say once more what was true the moment I started watching -- this course is excellent.