Lesson Info
29. Tips for Food Photography with Phone
Lessons
Day 1
1Introduction to Food Photography Class
11:54 2What Is Food Porn?
37:14 3Food Photography Lighting
21:14 4Food Photography Props
58:45 5Food Styling Props
16:39 6Food Styling Tips
37:49 7Food Styling Tools of the Trade
08:31Camera for Food Photography
30:26 9Food Styling Tutorial: Spaghetti and Pudding
20:06 10Food Styling Q&A
16:16 11Gear Q&A
16:56 12Food Photography Camera Settings: Do The Math
23:48 13Understanding Light Meters and Settings
29:08 14Shooting Demo: Dessert Photography
31:33 15Student Shoot: Bread Photography
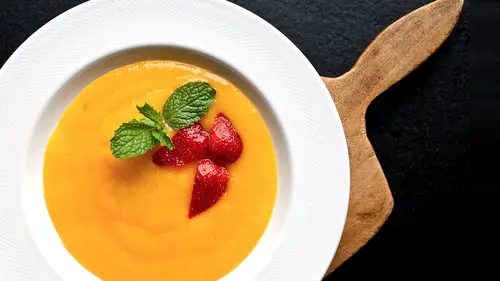
15:54 16Student Shoot: Soup Photography
16:31 17Student Shoot: Pastry Photography
13:08 18Student Shoot: Sandwich and Soup Handheld
17:43 19Workflow Prep to Post
45:16 20Post Demo
27:07 21Food Blogging Tips with Shauna Ahern
36:59 22Q&A With Shauna Ahern
29:57 23The Top 10 Questions for Every Food Photographer
28:32 24Food Photography Business Q&A
33:43 25Photo Copyright
19:22 26Advertising Your Photography Business
36:57 27The Artist vs. the Business Person
36:21 28Tips and Tricks for a Budget Shoot
23:07 29Tips for Food Photography with Phone
38:59 30Student Critique
12:16 31Facebook Contest Winner Critique
16:11 32Q&A and Parting Wisdom
16:05Day 2
Day 3
Lesson Info
Tips for Food Photography with Phone
Well now we're gonna talk about the one thing that seems to be a question that lots of people have when they go out. I want to take pictures with my smartphone and I want to make a great picture of the dinner I just had. Or I wanna have an opportunity to shoot it while it's there. Even maybe with my DSLR or with my point-and-shoot camera. So what we're gonna talk about is kind of that low-light environment that environment that we struggle with and maybe some basic tips that we could talk about. Some of them are pretty obvious, especially to people who have been listening to me talk about photography for the last three days, but it doesn't hurt to kind of just go over some of the basics in the things that you can do, you shouldn't do, and the differences between them. And I have a couple of visual aids. So one of them is about the appropriate styling. Now even if you're at a restaurant (clears throat) and you get something that's fairly plain served to you, there's a certain amount of ...
control you have over to what else is on the table. Where you can kinda pull it in and use it and maybe maybe even decorate your set. Now the first one here, is let's say I mean that's the ultimate in plain. And from a styling perspective, the soup is served in the wrong bowl, it's too red, the spoon is too big. There's nothing else there, there's nothing else to play with. And you know there's not a lot going on. So that would be the same exact soup, just served a different way. Now let's say, you didn't have access to all of those props at a restaurant, but the idea is you could pull in the bread, you could pull in the wine, you can kind of put the spoon, maybe even grab a different spoon that's on the table. Cause sometimes multiple pieces of silverware are presented on a piece, on the table. And you kind of compose it a little bit differently. Now obviously this was shot, these were smart shot with a smart phone, every one of these pictures was shot with a smart phone. And the pictures were processed in a smart phone. The next one would be angle, right? What angle you choose on any particular given item would matter, right? So this is like from the top, these are really plain there's not a lot going on, it's probably a little too far away. You see this shot on Instagram all the time. Oh wow, I see this with my eyes it looks really good I'm gonna shoot down on it. And it's not really that interesting. But if you drop down and shoot it at a different angle, the same cookie may look a lot different. Plus that's unprocessed, through any app that you might have in your phone and that's gently processed with an app on my phone. So again, simple, simple tips and tricks where you're gonna kind of wrap your head around how I can make it look better. But also these are those little things that you can practice along the way. Is how you are envisioning what your real photography should look like. And then, with the flash, without the flash. Sometimes the low-light cameras in the, let's do that again. Ooh, with the flash. That's the big thing. Everybody has to turn their flash off when you wanna take pictures of food. And then when you don't have to use your flash, you get a much better image. Now, again, gently processed after the fact. The cameras in the phones, the better more recent ones, sometimes more expensive as well, are also much better at taking these types of pictures. So that last picture right? What my technique was, a little tricky kinda technique to do that with, was one of the things I do in restaurants a lot, especially at night, right? That's always the challenge. You have a couple of candles on the table, and you have all these other things. You got your pizza. And I wanna make this a better shot. I wanna figure out a way to shoot this, in a dark environment. And I don't really have much ambient light, it's pretty dark. So I'm gonna probably try to get the best setting I can if I am shooting with a regular point and shoot or you know, not your DSLR, but you know you, your point and shoot your camera. And do the best you can. And then you have opportunities that you may not be aware of. So the menu, I have a menu. The menu. Is innately a bounce card, right? A lot of times it is. Sometimes they're not bi-fold like this, but it'll work. So if you are gonna photograph this pizza, you know what I'm gonna do? I'm gonna make one plate. I'm restyling again. And I got some garnish, I'm gonna put the pizza over here. (feet tapping) Okay. So the technique is what I wanna demonstrate here. So I wanna kind of fill my frame, with things that might be interesting. A glass of wine (bottle clicks), (pouring) I got my silverware. A little olive oil. (light bang) Okay so I'm dressing the table like I would if I were going to eat this. Presumably I'm in a restaurant I'm going to eat it. Now I need to throw more light on the subject, right? So outside of the frame of what I wanna shoot, I'm gonna set up some candles cause they're already on the table. Call the fire marshal. The candles are gonna throw, in a darkroom, candles throw a lot more ambient light than you might think. And then, you can box off your light sources over here, we're doing the same thing we do with any source of light, right? We're boxing off the light. We're creating light on one end and we're pushing back with the other side. Now you need to create a little bit of space to shoot. watch this trick guys, this is fun. So now that I've kind of set this up, I wanna to frame out the light source and box myself around, I have some of the elements in there. So this is the technique. So I've kinda picked up some of the elements from behind and I kinda, you can see, (laughter) You could see that. Where did it go? There it is. So, I kind of just, the idea is to kinda create a light source, create some environment and then give yourself some front and side. So you can see that this doesn't really go that dark. Because we have the bounce card that comes back. Now unless this room is completely dark, you're not gonna have a complete sense of what that could do. But the reality is that in a restaurant, the restaurant lighting is what is appropriate for that particular shot. Again, this is things that you wanna do for Instagram or your Facebook page or any of the other social media things. And you wanna share your meal. But there is ways to make it better. You can improve the light that's coming on, and honestly then, once you push it through, let's see what I can do with some of the apps that I use. So now I like Camera Plus. Camera plus is one that you can, first you put it in your light box, and then what I like to do is resize to the square, because I'm gonna say and I want to put this on Instagram. So now my frame is even smaller, so I can even be a little bit more condensed. And then I go to the scene setting, and I like the filter called clarity. And you can see how it kinda over-saturates the picture. And I like that about this. So now I have a little bit more saturation in the picture, and that's about all I wanna do with this one. So now I'll save it. And then when I wanna go post it on Instagram, which I think I'll do right now, with this hashtag food photo live. (laughter) Really live. (laughter) Should I call it that? Food photo really live? So now again, I'll go on Instagram. And we're gonna post my picture. And I'm gonna do whatever I can do here and you can always, you know what's one of the nice things about this one is you can do this kinda shallow depth-of-field treatment on it, so now it kinda resembles a little bit more of a real photo where it kind of drops off a little bit. And then I'm gonna put the #foodphotolive. There it is. And I'm gonna say hello, and I'm gonna post it. Some of the other apps I think are really helpful in this thing and one of the things that can be like a little bit of a training tool for you, is this thing called pocket light meter. This is a great app to learn how to use a light meter, because basically you can start taking meter readings like everywhere you go. (laughter) You just walk around and be like, "Oh, I should be at 800 ISO, this is great." (laughter) It's a kind of a cool program. I don't, I've only used it a couple of times like in a studio just to test it out, but it's helpful out. when you're out. Because if you don't, you know you don't have a light meter or a handy or you're just learning how to read one, you have the opportunity to kinda set your thing, your ISO first, right? We talked about that being one of the top of the triangle. And then it automatically starts to make settings on your, whichever is the last one you have locked in. Now you can lock in that and it can, as you start switching this around, and you could save the setting. So like let's say you're in an environment and you kind of know that that light happens pretty often, you could save it. But it's a cool way to kinda just learn about light metering and how. Some of the other ones that I like, there's this one called Big Lens that's kinda cool. And it allows you to do a real kind of DSLR kind of real blur out. And it gives you the opportunity to like paint it. So if you do the advanced and load a photo, no, that's not right. Yes, load photo. So I'll put the same photo in there. And you could see how you get an opportunity to kinda paint just the part that you wanna stay in focus with your hand. And then, go and you can see how it really blurs out the rest of it. And you can kind of play with that, and it's artistic, in a way. And you can actually do a lot of different things with this. One of the more advanced apps that I've encountered is this one called 645 Pro. Again, this is a real good practice kind of a camera app. Because this actually behaves like a DSLR. It has all of these kind of controls that you can play with, including white balance control. You can lock and do a focus lock on it. It has all of these different, these settings, where you can have different color settings. You can adjust them in the in the camera. I mean it's almost like having software in your pocket. And the thing that's nice about this is it mimics a four, a three four five, what is it? A six four five frame, which is a medium format frame. So it's kind of fun to play with that where it's not something that we normally get to play with. So there's a lot of really cool apps and then there's the ones that can resize and do, you just want the pizza, I know you do. I know. (light laughter) Andrew, just real quick. The photo there, Yeah. That's already got 20 likes. All right! (laughs) Bam! So, you know one of the fun things about these cameras and in your phone now, is that you carry it around all the time. But it is like this kinda mini training ground for a lot of the things that we do professionally. And the more knowledge you have, about how to operate a real camera, the more you can kind of do these things and kind of produce some pretty interesting artwork. I think the other misconception about the social media food pictures that we post, is that they have to look like professional pictures. They don't. What they have to do, is be interesting. Make them look interesting, it doesn't have to be perfect. You're not going to make the same kind of a picture with this type of equipment, that you can, with all the equipment that we've played with this week. It's a different, it's essentially a different medium. It's something else other than. It's another form of photography. All the filters and all the other things and the the apps that you can manipulate the photos with, in the app and you could do it all so quickly. It's very different than what we do in real photography. But it's fun and it helps you, again, develop your craft, it's a good form of inspiration. Because you see what other people are doing. So it gives you opportunities. And these are fun. These are fun things to do especially as a photographer, for sure. Do we have any questions coming in? Can we just say one more time, what the app was that you use as a light meter? Could you say the name? Oh it's just called Oh, light meter, okay great. That's it. Perfect, that's why maybe it went over everybody's head. Yep, it's just called LightMeter. There's another one in here that's like more of a post-production one, called Art Studio. Which is again, almost like, and then they have Photoshop for your pocket. They have a couple of different really cool ones that you can manipulate photos in. And people are asking about your other favorite apps. Yeah, I mean I again that's a rabbit hole. Of course. Because there's We don't we do that all day. There's so many great apps, and I think they change so quickly. And there're so many things that, you know you can play with. I think it's also a matter of preference. Because there'll be people like, "No, that's not the favorite one, "there's better ones than that." And I think it's all a matter of what you're comfortable with, so. One thing I wanted to ask is, you know, using an iPhone the aperture is always like F/22, pretty much. Yeah. So you know for the most part, everything's in focus. So are you, for every shot, are you going in to any of those apps and making the aperture look more-- Not always but there's a good portion of the pictures I'll take with the camera phone that I'll process in one of these apps. Because I think that's the fun of it too. I think they come out of the camera, they look a certain way, but it's also cool to be able to kind of play with it and see how good you can make the picture look, just with the apps that are in your pocket. So for food stuff, yeah, most of the time I'll filter the pictures and do something with them, for sure. We're good. Ready to go. Paula? And in the same as you were saying what you put out on social media, to be mindful of it's your business. Our clients, do you think looking at Instagram feeds and judging you on your Instagram photos, Yeah. and things like that? Well I make sure that there's a balance. I think when you look at my Instagram feed, I think it's pretty clear, that when I post food photos a lot of them are just repurposed off the internet of stuff that I've already published. Unless it's something that I feel is close enough, where it's not really hurting my brand. You understand what I mean? Yeah. Is that as a food photographer and as someone who is not separating my personal stuff from my professional stuff, I feel I need to be careful about what I post. Because it is a representation of what, it is a representation of what I'm doing. So, yeah. The answer is yes. (mild laughter) We do have a couple questions. Okay, great. One more from Anna Cunha from the Netherlands. When you process the photos in the iPhone, the processing looks fine, but on the computer it looks over processed. And this was mentioned in a previous Creative Live iPhone course. How do you how do you deal with that personally, if you move it to the computer? Well I mean if I move that picture from the iPhone to the computer? Yeah it does, notice any over processing? You know I don't necessarily do that that often, so it's not something that, I don't usually use the computer as a conduit to the Internet when I'm using my smartphone. I usually go directly from the smartphone to the Internet. And I think it's probably because it's calibrated that way. I think it's just this stuff is calibrated, not necessarily to be processed again in the computer. I don't necessarily know that... you know I don't do it that way. So I'm not quite sure that that's, I haven't experienced that because I don't necessarily do that myself. Cool. Another question from Ruth Kalinka, who would like to know if any of the apps you use save the original photo and are there non-destructive apps for editing images in phone? Yeah because, the one like I just showed you, the camera plus, that light box, you're pulling the photo into that. And when you save it through that, it retains the original where it came from and then creates a new file. It doesn't alter the original file. It just copies it and then you can alter it and save it. So you end up with two files. You still have the original file you shot with the camera. And of course if you shoot it with Camera Plus itself, not the iPhone camera, then it's only one file. Because then you're processing it after you shoot it. But I don't do it that way for that reason, because I wanna have the original. I don't wanna have just the processed image. And can we talk a little bit about what your thoughts are on the future of iPhoneography or phone photography? Or where that's going? Yeah. I think it's exciting. Because I think that the quality of the imagery that comes out of these phones and the fact that we can process them so quickly, I know the next question is, do you think that it will replace like real photography? I don't necessarily think that's true, because the file size is also an important part of this equation. Is that these are calibrated small, some of them are about a Meg, right? One Meg? They're usually decent size where you can make a 4x6 print of them. But I mean, yes, technology gets smaller and smaller and smaller but again without like significant control over aperture and shutter speed and all of the things that a normal camera does, I don't know. I'm pretty sure that we're probably quite a while from that. It doesn't scare me yet. (laughter) Right, not yet, is the key there probably. Alright, I think we're ready to move on. Alright! We were gonna talk about more of the kinda idea of shooting with your iPhone and with your, kind of in this kind of low budget mentality where we're gonna bring our smartphone or our DSLR or our point-and-shoot camera, around with us all the time. When we're taking our camera with us, you talk about packing kind of to shoot, now we're gonna always have this, because we kind of are inseparable from these things. But what are a couple of good pieces to just carry around with you and what are some of those things that might make a difference that are maybe not necessarily super expensive, but they will help you you know. Things like you can attach to your camera, like filter, like a neutral density filter. Where if you're shooting with your camera and it's super super bright outside, and you don't want to adjust too quickly, you can do something like that. It's just a little cap that you screw on to the front. They have different densities, where it kind of knocks down the sunlight for you and kind of balances out your light. These things are always helpful. And quite honestly when you pack your bag to go out, things like straps and hand grips and all the things that you can carry around. Sometimes you can carry a small monopod around with you. That's always a really good piece that you can work with. Attach your camera to the monopod when you were walking around the farmers market, you can really stabilize your camera that way. You don't have to buy a super expensive one, they collapse really small, you throw it in your bag and carry it around. So that's always helpful as well. Do you have any tips that you could offer people that shoot cocktails? Sure. Cause that's real popular right now. Oh, I think that at this point we've probably covered a lot of what we wanna cover in this and I think that any question essentially, anything that before we get to the critique that we've covered today, and while we have some time before we get into the last part of this we'll take any kind of question at this point. Great! Okay, so cocktails. Yeah I talked earlier about using black cards to kinda give some definition and edge to those, and being able to you know create contrast, also the idea of back-lighting drinks, so that the light will penetrate and create some illumination inside the glass, I think those are some key pieces to shooting drinks and cocktails. Also, those little tricks of kind of frosting your glasses prior to pouring drinks in them, so you kind of wet them down stick them in the freezer, take them out and as you pour drinks in them and they kind of sweat, and that's a really nice look. And you can also kind of cheat a little bit sometimes and use a spray bottle. Spray the outside of the glass to get that nice look. But as far as lighting them, again I like the idea of back-lighting drinks because I think that pushing light through liquid is really pretty. And I like the idea of making sure that your glassware doesn't have too many hot flairs and that's where black cards and white cards and using those to kind of define your edge of the glassware really helps. Fantastic. Okay, another one. When it comes to, and I know we talked a little bit about this yesterday, but talk about where people can get like information as far as working with chefs or learning some basic cooking skills, to help promote their their food photography, especially in the beginning. Yeah I think it's harder to kind of approach a restaurant and offer your services. I think unless you kind of know the owner or you have the opportunity to kind of make inroads into a particular restaurant, but every town around has like cooking schools or some type of classes that happen, where you can learn basic skills. And you can learn how to handle knives properly, and all of the things that will help you in your food photography for sure. So I would encourage you to definitely take a cooking class. Because I think any experience in any aspect of what we've learned so far is valuable experience. So the more you know how to handle, and I'll tell you something. When I'm in my studio, when new assistants first come in, the first thing we teach them is cooking as kitchen etiquette. We don't talk about photography. So if somebody's standing behind me in the kitchen, they're supposed to tell me behind. That's classic French schooling on kitchen etiquette. And I teach my assistants about how to handle knives, about where to leave them, about where to put them, everything about kitchen etiquette happens before we do anything. Because until you learn all of those skills, it's very hard to work in a food studio. So cooking school or just even some classes. And some of them are free, I mean they do them at the Y and they do other things. So it's important to kind of educate yourself on all aspects of what we're doing with food. That's a great comment. And bring your camera along with you, right? Take the class, shoot the food, then eat it. So Elle from Vermont, would like to know where do you do your research? Could you offer some advice for whether it's the library or competitions or blogs and where do you get, where do you pull inspiration from? Well I'm like a search engine junkie. I think that I like to look stuff up on search engines. I find that you know, when you get good at it. And it's sort of like a skill too, to kind of figure out the words that will give you the information you want on a search engine. And I have a tendency to wanna look stuff up all the time, cause I'm a little bit of an information junkie. So I would say that, if there're let's say food, styling tips, put that in there and boom! You'll probably end up on my blog, but the reality is that you're gonna find a wealth of information by just putting in the keywords into a search engine and seeing what pours out. Because there's so much information on the internet. And speaking of that, a guest in the chat room had asked, do you always have your camera accessible wherever you go and are you now relying on your iPhone for that? You know, that's a great question because, I do carry my, at least my Fuji with me, all the time. It's always in my bag. But more often than not, I rely on my smartphone. So, it's with me, it's there. And I kinda have this kind of newspaper guy mentality where it's like, "Oh no, what happens "if there's a big accident or some natural disaster "and I'm not there with a camera?" So it's sort of that kind of, you get that kind of journalists mentality when you're around newspaper people a lot, but also I think that's a photographer you should probably pretty much always have a camera with you. I think it's part and parcel to what we do for a living and it's part of who we are. And it's probably good to have a real, a real camera, even if it's a small one. And your pocket phone is probably good too, but I would recommend carrying a camera. Because life happens on a regular basis. It happens on a regular. so Thisiscoop, just going down this line of questioning, Thisiscoop asks, what do you photograph for fun on your own time? Do you like events or, food festivals, Or dinners? Or do you stay away from the camera during your time off? That's a good question. I do. I actually don't take pictures of food normally when I'm not working, I try to avoid that I still do appreciate photography in different forms. I have a couple of series that I run on my Instagram feed, and we were talking about them earlier. I have in New York City we have a lot of billboards and on the billboards a lot of times the people who put them up will post the words "post no bills". And I have this collection that's upwards of a hundred photographs of different "post no bills". Different colors, different fonts, all kinds of different things. There's you know, I have other ways you know, that I wanna express myself visually and I do take a break from food photography when I'm not working. So if you went on a vacation to Italy, which is a food mecca, right? What would you be most excited about in your mind when you got off the plane, thinking about what you were gonna shoot or would you just mostly think about what you were gonna eat or what would you be? Well I've been to Italy many times. And it's such a target-rich environment, as a photographer not just for the food that's there, but I think that when I'm traveling abroad, what I really wanna capture is the lifestyle. I wanna to capture the moments and the differences between their culture and ours, no matter where I am. And a lot of times that comes through food. I've taken some really cool pictures in Sicily of farmers markets, but I also took some great pictures of cathedrals and landscapes. So I think it's all part of the whole package. But if you go through my vacation pictures, I would say a majority of them are not food pictures. Cool, it's good to know. Cool. And how do you deal with permissions? When you walk into a restaurant you're with your iPhone, how do you deal with that? Cause I know with people there's certain rules-- I've had I've had some really interesting experiences early in my career when I was shooting in restaurants where in particularly some neighborhoods where everyone might not be in the country legally, I mean it's a problem, because you're there and you're with a camera and immediately people are afraid. And you don't wanna put people in that position. And I've been in restaurants where I've walked in with a camera and I started to aim it into the room and people literally parted like the Red Sea. And I've had people confront me, when I was in a restaurant with one time. I think there was one time I was trying to take a picture of somebody who was having dinner with somebody who wasn't his wife and he got angry and he threatened me. And I was there and I said, "Listen man, "I don't have to take your picture, "I'll take someone else's picture, "it's not a big deal." So yeah, you have to be sensitive to the fact that people are eating they don't wanna be bothered and that if you are conscientious enough to walk up to people and say, "Do you mind "if I take your picture?" It's a simple answer, yes or no. And that's what I did. And I would walk up to people and ask them if, because the person who confronted me, I wasn't aiming my camera at him, I was aiming it in his direction. Because I had been taking pictures of some other people but he was very sensitive of the fact that I was there with a camera. So it'S important to ask permission, for sure. So Andrew I think we do have some questions in the studio audience. Okay, Paula? This is all completely on a tangent. Could you talk a bit about how you develop a style? Whether you think your style is evolving, where you think it's gonna go, how you would work on making changes and why you'd make changes? I think the style is that when you start to do your editing, you start to notice that your eye gravitates to a certain thing that you do. So if I'm shooting things that are backlit, I can tell that when I look through my edits, I'm picking that one more often than not. And that's where you start to kind of identify in yourself what it is that you like about your own work. And I think that's kind of the beginnings of the developing of style. And then once you've kind of identified the particular type of lighting you like or the particular angles that you like to shoot from, then you can craft that further and evolve like you said, evolved into other variations on that theme. And get better at it. And I think that's where I found the kind of two styles that I really like that you've seen in a lot of pictures is that kind of backlit luminescent kind of lighting on things, and then also that kind of dark background, where it's really kind of painterly. So those two things are the things I consistently went back to, because I felt like I could make beautiful images in that style. And you know, now it's, at this part of my career it's about trying to evolve even beyond that, and try to make variations on those themes, for sure. So it's coming from within you, rather than drawing inspiration from other photographers and other people? Yeah, I mean I think there is a place in there for the thought process of I like, I admire what someone else did, and I'm gonna put my own spin on it. I think that's absolutely probably even the first step before you start to identify it. Because it's almost subconscious. Where you start to mimic things that you liked. I think that's probably absolutely true. It just kind of gets in your head and then you start to make pictures like that, sure. Li? This kind of steps back a little bit in the conversation but, I'm just wondering if you have any specific resources or anything with other tips like you taught us on the spaghetti on the first day or just styling of specific foods like that. I'm sure there's-- You mean like the food styling Wikipedia page? (laughs) Something like that, yeah. (laughing) You know I don't know about specific resources. Just off the top of my head where I'm gonna say, "Yeah, you should go to this website, "because they're really great at it." But like I said, I'm a bit, when I want information, I plug it into the internet and I try to see what's out there. And I think that's probably the best advice. Because quite honestly, Every specific website is different and might speak to you in a different way. You may glean something from one and maybe some not something from another. So I would say that it's better to kind of pull from lots of sources and then kind of sift through and decide what you think might fit your style and what might fit your learning. Not just your artistic style but also your learning style. Sometimes it's video. And I think video is a really good thing. You can go there, you could see it. If you're a visual person it really helps. Like here, right? This is what we're doing. Steve you had a question. (clears throat) Going back to shooting, I was curious if you had any tips on controlling reflections in cutlery, particularly spoons. You know... (laughter) a lot of that, well i talked about earlier about having things that are a little bit more matte and dull and trying to avoid things really have a high shine on them, cause that could be problematic. I mean a lot of that stuff, professionally you know like in when you see advertisements and other things, that's all done in post-production. But the idea with doing it, I think it's the same as glassware. Black cards, anything that's reflective, needs something to look at. Okay. And you kind of, if you tint off the areas that you see the shines coming from and kinda get your lens into the little hole that's created, that's probably the best way. I've done it, I mean I've cut a hole in a piece of foam core and stuck the lens through it, because I was having that problem. I think when you're working with natural light, that's probably more problematic, because you can't really deaden out that much light, because then you have nothing to shoot with. But when you're shooting with strobes, I've done that very thing. You know you put the soft box up and you cut a hole in the in the foam core, show the black side so that it's reading black and then when it pops it's not seeing anything, but the softy box that around it. Yeah. Yeah. Okay, so we've got a kind of a dual question here, from Dena D and from Jerry D, not related. So the question is, can you recommend some best places to look to build up your collection of props and ways to learn and improve your food styling? And kind of part two is recommendations for just finding a food stylist. Yeah. Especially for testing. For testing. For testing, yeah. I think that there are some resources, like the way photographers have, I'm trying to remember the website. But a lot of trade professionals, will have organizations that they're kind of part of, like food stylist organizations and things like that. I don't know exactly, off the top of my head where to go it's like www.foodstylist.com and I don't think that's what we're talking about. But as far as the other one, you were talking about with propping, I think it's really important to understand that what you wanna do with propping is have a wide range of things that you can draw from. If you look at some of the stuff that we've played with today, some of it is modern, the last few days, some of it is modern, some of it is antique, some of it is you know grandma's old stuff. I think that you have to have kind of a wide, you have to kinda cut a wide swath through all the things. And I also think that some of the discount stores, where you're buying like mixed-matched pieces, like of really good cookware or excellent service pieces but they don't have a match or something like that, that's always really helpful. Your local goodwill, the The Salvation Army. I've found things like that. There's lots of value in things that are old. Because they fit into what we do in a number of ways. You kinda want that, if you do want that eclectic kind of shabby chic look, you can add other things to it. Also the fact that we talked about having high shine on things and a lot of older stuff doesn't have that. Also the beauty of older pieces of flatware, where they have like delicate work or carving in it. Also wood, and I kind of group things in my studio sometimes by, I have one shelf that's nothing but wood and I have one shelf that's nothing but rectangles. And I have one shelf that's nothing but small squares. So if you start to think in those terms and I'm thinking I'm trying to find wood stuff and I'm trying to find big rectangles and I'm starting to find squares, I'm trying to find small, you know rounds and now I have a thing where I can play, I mean I visit the the local thrift shop, that's next to my gym in Soho, three times a week. And I find tough stuff there all the time. So thrift stores, antique shops, yard sales, that's where all this stuff comes from. This is a question from Michael, who would like to know, is there an etiquette to photos of people eating? Any tips as to when something is gross, (mild laughter) versus a cool food lifestyle shot and there's a fine line of shooting subjects that are eating? That's a great question I think we touched on it briefly We did touch on it. the other day, but I definitely would suggest that you try not to photograph people while they're shoving food in their face. I just think it's really uncomfortable for them, it doesn't make for a good picture, and it's intrusive. So the idea is that, I like the idea of gesturing, laughing at a table you know, people raising a drink. It's about the moment not necessarily about the food going into the mouth. So I think that when you're photographing food lifestyle, it's really more about the environment, that we're in and the way people are interacting, talking, gesturing, toasting, food on fork, cutting. All the things that happen before you actually eat the food. That would be my best suggestion on that question.
Ratings and Reviews
Brendan McGuigan
This was one of the best workshops I've ever taken in my life – in person or digital. Andrew is a fantastic teacher – if I hadn't known his first career was as a professor, I would have guessed it based on the quality of teaching. He had a casual attitude, sense of fun, and easy-going manner of speech that made him immediately accessible, and a joy to watch for the entire sixteen hours (which I completed in just under three days). For me, the main value of the workshop was to be found in the first day. Andrew went through his artistic process, dropped tips along the way, and gave a real sense of how his brain works when thinking about a scene – everything from creating the food, to styling, to composing the shot. I happen to love his use of light, and getting an insight into how he crafts his backlighting and bounce was very useful. Day two had some nuggets of wisdom – and some great hands-on – but much of the tool tutorials and post-production workflow aspects will be less useful to those who are already professional photographers looking to branch out into a new discipline. Still, one of the standouts to me was seeing just how little he does in technical post – a good reminder that incredible shots can be captured 90% in camera. The segment with a food blogger, although not relevant to me, was captivating and insightful, and the rapport between Andrew and Shauna James Ahern was delightful. Day three was great for anyone needing a refresher on the business aspects, and some of specifics of the food photography business were good to hear in detail. For those already selling their work, who are familiar with licensing agreements, copyright, stock, etc., this may be redundant, but it's always good to be reminded of these things by an expert at the top of their game. Andrew's conclusion nearly had me in tears. He is obviously an incredibly passionate, giving, and humble artist, who not only feels blessed in his own life, but feels compelled to pass on some of his good fortune. That's a wonderful thing to see, and honestly gave me a nice boost of motivation to up my personal game. Throughout the workshop I found Andrew's lesson plan spot on. His in-studio students asked great questions, and the questions selected from the online audience filled in a lot of the blanks. While I may have liked to have seen a bit more hands-on from Andrew – just to get more of a feel for his process – all in all I felt like this covered everything I was hoping to gain from it. I would highly recommend this to anyone looking to get into food photography – whether you're a complete novice or a seasoned professional photographer who wants to explore food. Whether it's for advertising, editorial, stock, or blogging, he really covers it all, exploring both broad concepts and very specific practical applications. I can't rave enough about this. If you're at all on the fence, buy it. You'll be glad you did.
a Creativelive Student
Day one was a good investment for me. After that... not so much. Not sure this is really about photography. For sure, Andrew is an artist, he's great at communicating the art of the food, the art of proping, but explanations about how to make images is very simplistic. For instance he makes a pretty big blunder explaining the "math" of photography. He says his favorite setting is f4/125th, at iso 100. His grasp of lighting beyond window light and reflectors left me a little flat. He does a good job of explaining his style -- which in spite of it all -- I like. And to be fair, Andrew is an editorial food photographer. If you're interested in opening a food photography studio and doing product work -- this may not be the class for you. I think this is a good class for cooks and bloggers who want to make images of their food. If you're a beginning food shooter, you will find the information about styling and proping useful. Having watched some of Pennhy de Los Santos and Andrew, the editorial people seem to over simplify lighting and camera and lens work. At the same time, there seems to be a theme emerging in photography and that is that it's really almost better to be highly versed in another discipline and come to photography through the back door... (e.g. a rock climber who picks up a camera, a conservationist who decides to document the changing landscape and wildlife, a cook who just so happens to like taking images). Photography, for its own sake, seems to be a thing of the past. At the end of the day the class is $129 -- so... not like you have to take out student loans to get something out of it. This guy is likable, and sincere, and makes a huge effort o be helpful to anyone interested in shooting food -- and it's hard to ignore his personal success.
Ben Adams
Andrew's class is excellent, through-and-through. The mere handful of negative reviews focus on the underwhelming results of his test shots in the class -- they're kind of missing the point. The instructor's test shots aren't about the final product, they're used to tell about the process, and boy does he do that. This course is comprehensive and concise. Scrivani talks about the ins-and-outs of the job itself (how much is styling, how much is buying the food or preparing it yourself, how much is just pure photography) and furthermore gives insight as to the nature of the business and pricing. He is clearly a strong teacher with an ear for student input, and it shows. He explains things in stages so that he doesn't 'lose' a novice student, but doesn't dumb it down so much that he's wasting the time of veteran photographers. Within each lesson (let's say he's describing the function of aperture, something most photogs already know) he's keen to pepper in little details about equipment, styling, or lighting so that there's useful information for a broad scope of the audience. The other courses, taught by Penny De Los Santos, are a joke compared to this one. De Los Santos I'm sure is a nice person, and she produces wonderful work, but her course provides little practical information and she effectively ignores her audience saying only "yeah this isn't good", making some unnamed adjustment, then "yeah okay this works" while the audience just sits there wondering what's even going on. Andrew Scrivani is very different. In one student-photographed shot, he recognizes that a more experienced pupil can easily snap his 'handheld' photo challenge, and so he throws them a curveball -- take an additional shot with a different background or styling -- and communicates clearly to the audience why he's changing the task and what the significance is. For a novice pupil, he assists her with the camera and explains to the audience the importance of getting settings right. All told, I had been unimpressed with CreativeLive's tutorial offerings until I stumbled upon this fantastic instructor. Yes, some of the information is dates (iPhone photography has taken giant leaps forward since 2013) but the practical information (lighting, budget options, business advice) is all salient and relevant. Andrew, if you by chance read these reviews, I'll say once more what was true the moment I started watching -- this course is excellent.