Soldering Other Shaped Wire Bangles
Lesson 15 from: Foundations in Metalsmithing: BraceletsMegan Auman
Soldering Other Shaped Wire Bangles
Lesson 15 from: Foundations in Metalsmithing: BraceletsMegan Auman
Lesson Info
15. Soldering Other Shaped Wire Bangles
Lessons
Prerequisite #1: Basic Metalsmithing Tools
18:08 2Prerequisite #2: Tools for Soldering
14:21 3Prerequisite #3: Soldering Basics
21:14 4Class Introduction
09:39 5Design Considerations for Bracelets
10:33 6Choosing Your Materials
16:12 7Sawing Bracelet Blanks
26:47 8Forming Cuff Bracelets in Wire and Sheet
21:41Determining the Length of a Riveted Bangle
08:11 10Creating a Standard Rivet
16:26 11Creating a Tube Rivet
09:25 12Making a Hinged Bracelet
21:02 13Drilling Holes Cutting Interior Shapes And Finishing Your Clasp
10:33 14Soldering A Basic Round Or Oval Wire Bangle
28:56 15Soldering Other Shaped Wire Bangles
35:17 16Soldering Wire to Sheet to Create Bangles
08:44 17Soldering a Basic Round or Oval Bangle from Sheet
14:09 18Soldering Other Shaped Sheet Bangles
05:59 19Pickling Metal After Soldering
05:42 20Filing, Sanding, and Basic Finishing of Bracelets
11:50 21Patinas: Achieving a Dark Finish with Liver of Sulfur
08:37 22Patinas: Creating a Heat Patina
05:21 23Patinas: Green and Blue Liquid Patinas
08:56 24Sealing and Finishing Patinas
08:35 25Taking Your Bracelet Designs to the Next Level
03:45Lesson Info
Soldering Other Shaped Wire Bangles
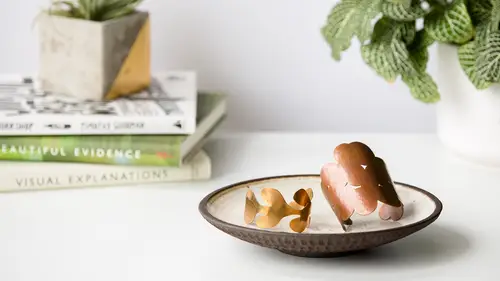
Alright, so now I wanna talk about sautering some other shaped bangles. Because, we can do circles, we can do ovals, but it's also fun to kind of think about some other shapes, and some other interesting pieces to kind of play around with as well. So, the biggest challenge with these obviously, is thinking about the size and length of materials for these sorts of pieces, because we have to figure out, it's pretty easy to do the math, but then how do I know what size this is supposed to be? So, generally what I recommend is one of two things. You can calculate out the length, just like we did with the round thing, and then just use that to divide up what you're doing for segments. That works really well for something like this hexagon here, because if I do that math and it gets me to eight inches, and then I divide that evenly by six, chances are pretty good it's gonna fit, because it's pretty close to a circular shape. For things that are a little bit more unusual, and I'm just gonna s...
how you guys a couple of basic shapes, but you can really extrapolate this to create pretty much any shape bangle that you want. For things that are a little more unusual, what I usually like to do, is I kind of create, we can hopefully maybe see this. I drew it in pencil because I was doing it for my own information. So, what I'll usually do is sit here and draw the circle that's the diameter that I want, and then in this case I said okay, well let's just pull that out into this kind of U shape, and then I can take my ... I can take my tape measure, I can measure this, and I can say okay, this is shape is six and three quarters, and then this shape is basically three, so I can kind of play with the math that way. Again, it's not totally perfect. A lot of this is trial and error to really get the sizing, but this is a good way to sort of play around with this. If I was gonna do a pure square, I might make it a little bit smaller, because really the diameter that we have to get is from here to here. So if I were making a square, I wouldn't necessarily need it to match all of this. I would actually want the diagonals to match. Does that make sense? So you can kind of play around with different- so if you actually look, this is pretty small ... I was like, hold on, I have one. This is pretty small, but it still actually would fit on my wrist, because I'm going, I just need the diagonals to get that distance. Maybe a smidge small for my wrist. It's not actually sautered yet, so I can fake it. So that's how you can kind of play around with figuring out lengths for different shapes. Make sense? Alright. So, now let's talk about doing a little bit of some of these fancy shapes. So the first one that we can think about, is scoring and bending. So, if you wanna make shapes that are a little more geometric and precise, we don't wanna just bend these with our pliers, because we're gonna end up, if I were to take one of these guys here, if I were to just bend this, even if I flattened it first, if I bend it, it's always gonna be kind of a rounded bend. It's not gonna be ... And you might want that, you might decide I want this kind of rounded bend, in which case, absolutely, just bend it. But if you want something that's a little more precise, we actually need to take a little bit of material out of this corner. And so to do that, we're gonna do something that's called scoring and bending. So I went ahead and, just to make our lives easier, I actually pre measured this piece that I needed to be a hexagon. So what I actually did, I know it's a little hard to see, but I took my strip, I straightened it, and then I did the math to figure out whatever this length was, divided by six. And then went ahead and just marked each little section with a Sharpie. So now that I've got these marked, what I can do is grab my needle file, come over to my bench pin here, and I'm just gonna take the corner of my needle file, and I'm gonna file this to create a groove. Now, how deep you need your groove to be, depends on the shape that you're making. So for something like our hexagon, I can probably take out about a third of the way down in our material, so not, it's gonna be a little deeper than this, but I don't have to go super far, because I don't need a true 90 degree bend. I just need that kind of hexagon. If I were doing a square, I would go a little bit past half. So just past halfway with the bottom of my notch. So, come in here and file. I found that the biggest trick with this, is keeping every single one on top. It's so easy when you get to the second one, to have it twisted slightly, so this is one of those cases where either you could do something like, if you wanted to work on the edge of your table you could tape it down. Or just really kind of know, take your time, make sure it's rotated correctly, and really get all of those in there. So, because no one actually wants to see me file six notches, pretty sure that one of these guys in here is already ready to go, let's see. Yep, here we go. So now I've got one that's already notched. So now I would still recommend using your pliers to make the bend, because it's gonna be crisper, but if we go in here and we bend, now we've got a spot for that material to give, and it's gonna look ... Actually, some of these are probably a little bit further than they need to be. I wanna say when I did it last time, I ended up with something that was past a hexagon. But so I'm just gonna go around, and you can see this is what happens when you don't get those all lined up on the top, is it wants to twist a little. So now I'm gonna go ahead and bend these all around. And then I still need to make sure that I've got this filed to meet. So, I find that doing the math of filing the angle on this, before I bend it, just sort of makes my brain hurt. I'm also realizing it's a little past center, so I might wanna trim one of these. But we'll just to it the way it is. So, I like to just bend this, and then come back in with my needle file after, and file it so that they're flush. So now I'll come back in here with my needle file, and I'll just open it back up. And I'll file these two ends until they're flat. That one looks pretty good. And Megan, you're generally just sort of ballparking that angle, is that correct? Yeah, so basically what I'm trying to do is just imagine that I'm keeping my file even between the two, but then I'm only filing one, if that makes sense. Yep, thank you. I have friends who are much more precision metalsmiths than I am, and I'm sure that they would draw lines, or do things that were a little more precise. That is so not me. I'd rather just make round things and smack them with a hammer. (laughter) But, and so you can see as I'm doing this here, I can see the bottoms are still creating a little bit of a gap, so I'll just come back in here and adjust the angle a little bit if I need to. It becomes pretty obvious pretty quickly if you don't have the angle right, so you can just come in and adjust, and file as needed. So now that I've got this to fit, we wanna sauter. But the thing with this is, because we've done the scoring and bending, we've actually weakened the metal, so we actually wanna sauter every single one of those joints, and not just the end. But the good news is, we can do that all in one sautering step. We don't have to set it up six times. So, let's go ahead and set this up. So we've got this guy to fit in here. So now in this case, we do wanna flux the whole thing, because we're obviously going to be putting sauter in each of the corners. Got a little dimensional bend happening here, but that's okay. We'll pretend that's intentional. There's no rule that says your bangles have to be totally flat. We're going for some artistic license on this one. So I'm just gonna go ahead, I'm fluxing kind of the bottom side, and then I'll set it down and flux the top side of those corners. Now, if I were doing this in my home studio, or for my own production, I would use, you can get silver sauter that's actually yellow in color, so I would use yellow silver sauter, because it's gonna be a closer color match, but I actually didn't even bring that with me, because we're gonna use the silver sauter so that hopefully you guys can see it just a little bit better. So let me get these sauter pieces on and then we'll turn down the lights after that. So I'm going to, I can't help myself, I'm like an over sauter placer. I can't, even though I know better. So I'm gonna place two pieces of sauter on the joint that I actually have to join closed, so the place where the two ends meet. And then I'm going to resist all of my impulses, and put one piece of sauter on each of our scored corners. And that's it, I'm not putting any more. I'm gonna fight it. But at the end of the day Megan, is it better to over-sauter than under-sauter? Not really, because honestly, sauter, even the tiny pieces are gonna cover more ground than you think. And when you over-sauter, it's just a lot more sauter that you have to file off later. So, it is actually better to use as few small pieces as you can get away with. Alright, so we can turn down our lights again. And you know, the thing with this is, with any of this, is that worst case scenario, your sauter doesn't flow. You stick it the pickle. You let it get clean. You try again. So, because of that, it is easier if you have less sauter. And if it doesn't flow, you just come back at it later. So, I'm gonna try just to ... Right now I'm just kind of trying to dry my flux so that my sauter pieces don't go flying everywhere. And then we'll kind of focus in. Generally what I do at home is, I'll just keep, I keep my sauter kind of close to what I'm doing. I'll keep my tweezers kind of close at hand. So if I do lose a piece of sauter ... Or I'll keep a sauter pick close by. So if I do lose a piece of sauter, I'll try to ... I think that one just went away. I'll try to get it back up there. For this I'm a little less concerned. So now I'm gonna start to kind of heat it up a little bit more. And really my primary goal is first and foremost to get this seam where they're not connected joined. So I'm gonna kind of focus there, and make sure I'm coming up to temperature. And sauter, if you get your sides heated unevenly, sauter will flow to one or the other, so you can kind of see how it went this way, and then I kind of had to heat it back up and cheat it that way. So now I'm gonna come in and get my seams. I think I lost my sauter piece there. We'll come back to that one later. That one worked. So that's what we really want. See how the sauter kind of balled up really nicely, and then just sucked, hopefully you guys saw that, and then sucked down into our seam, like that. That's perfect. That's what we really, really want. And this will be kind of a little bit easier to see in a few minutes when we use the sheet sauter as well, when we sauter on sheet metal, because there's a bigger seam to look at. So, in this case, I think I lost about two pieces of sauter in my corners. I'm not gonna worry about that. I'm just gonna quench this. Throw it in my pickle. We can bring the lights back up. Throw it in my pickle, and then I'll look at it once it's clean, and evaluate if I have to go back to any of those corners and add more. So then the next kind of joint that you can think about for your sautering, is actually what's called a T-joint, and it's called a T because generally things come in at a T, though in this case we're gonna use it to make this nice little U shape. So the thing is, you don't have to construct any of these out of a single piece. It doesn't all have to be that kind of score and bend. If it makes more sense, you can join multiple pieces of wire together. So, in this case, what I want to do, is I want to start with actually a top piece that's longer than it needs to be. So what's nice about doing it this way, is that I've got a little bit of freedom. I don't have to get it perfectly lined up when I sauter. I can do this, and then I'm gonna come in later, and cut this off with my saw. So I'll start with kind of a nice straight top piece. And again, since our wire doesn't really come ... I pre-straightened this, but since our wire doesn't come straight, I'm just gonna go ahead. Make sure it's straight with my pliers. And them I've got a piece of wire. And to get that U shape that's happening here, I didn't do anything fancy. I just sort of eyeballed it. You could bend it around your mandrel if you wanted to. If you haven't noticed, I'm kind of an eyeballer. Like ah, that shape looks pretty good, right. If you wanted to be a little more specific, or if you were trying to do a lot of these, you could have that shape drawn on our piece of paper here, and then you could actually bend them to kind of match that shape if you wanted to. Those of you who like precision. So now I've got that shape bent in there, but then the next thing that I need to do now, is actually go ahead and file the ends of this again, so that they sit flush against this joint. So back to our trusty bench pin. And Megan, Mary would like to know, do you generally file in one direction? So, needle files can actually work in both directions. So with a needle file, you can actually go both ways, but I find it's a little hard to control, so I usually just push. If you've bought a bigger file, like a bigger half round, or a bigger flat file, those only work in one direction. They only work as you're pushing. And so, because of that, I tend to develop the habit of just pushing, especially when I'm doing something like this, like flattening wire. But as I'll show you in a second, there are times where a back and forth motion is a little bit easier. Just let me get this guy flat really quick. So, the thing to think about with this is, even as I'm flattening it, I am actually trying to butt this up against a round piece of wire. So flattening doesn't give it that perfect fit that we really want. So after I've got this flat, so I've taken off all of that kind of pinched end from my wire cutters, I'm gonna come back in with my round file, so my actual round file, and I'm gonna come across the top, and I'm just gonna bring this back and forth a little bit, just to try to put a little bit of a curve in here. It's very subtle. I don't even think you can see it, if I were to hold it against any tiny, any camera, because it's barely noticeable to the eye, but I'm just basically trying to take down the middle of this, so that it fits against the wire a little bit better. And this is a case where it's really much easier to kind of do this back and forth with a really small part. Let me get my finger out of the way for you guys. There we go. So I'm just basically trying to kind of make this little bit of a groove in there, so it fits against the wire a little bit better. It's one of those where I like to keep my finger up here, because it gives more control, but obviously it blocks your guys' view. So I'll pull it back a little. Alright, so now that I've got this done, now I can come back and set this up on my sauterite board, and this is gonna fit just a little bit better. So let's go ahead and put that there. So, I'm noticing that this has got a little bit of a bow to it, and it wanted to stick up in the air, so I literally just flipped it over, so that the ends were actually sitting on the sauterite board. So that it was easier to get it to sit up against that. So, sometimes, if you're like oh, it doesn't quite fit, sometimes just flipping things over, or kind of finagling them will make your life a little bit easier. So them I'm gonna go ahead and just like everything else, I'm gonna flux this. I'm just kind of holding this in place while I do. And again with all of these, as you're setting up, take your time. I always say sautering's not a thing you wanna do when you're hungry, or you have to pee. You wanna actually be kind of focused. So take your time in getting it setup. And then really the worst thing that happens, for the most part, is that you have to stick it back in the pickle, get it clean, and start over again. You never wanna get it so that it's so hot that the worst thing that happens is that you melt your metal into a giant puddle. If your metal gets to a point where it's really dark, and really black, and your sauter hasn't flowed or hasn't flowed where you want it to flow, just stop working, because it's better to just stop, clean it, and start again, than to accidentally melt something. Because, sauter not flowing, or sauter not flowing in the right place, totally recoverable problem. Melted ball of metal, you're not coming back from that. Alright, so I've got a couple pieces of sauter placed in here. If we can turn down our lights again. Alright. So, because sauter wants to flow towards the heat, and we've got one piece of wire that's much smaller than the other piece of wire, the sauter is gonna wanna naturally flow towards our straight end, so I'm actually gonna put a little bit more heat on our rounded piece to start, just to bring that up to temperature a little bit faster. Megan, it seems like you generally work from the outside in, is that correct? You work from heating the whole piece, and then work your way towards the sauter. Thank you. Yeah, so outside in doesn't always apply, depending on the shape. Right, but you know what I meant. Yeah. And again, part of this is I'm trying to let my sauter, or let my flux dry a little bit, so that when I get the heat directly on it, I'm not sending it bubbling, and sending sauter flying. And now that my flux is starting to go ... Oh, see I actually, I overcompensated, and it all ended up jumping to that side, and not actually to my little piece. There we go, that one went the way it was supposed to. So I think what we have here is a case where I was like, oh, it's gonna be really important that I get this outside piece done, and yep, all my sauter flowed to that instead of that one, but then this guy worked just fine. So, you guys can turn up the lights again. So I'm just gonna go ahead and quench this. And like I said, worst case scenario, now it goes in the pickle, and we come back and we fix that other joint. So, things not working is never the end of the world. Oops. It's a very long reach. Alright. So then, in the case of this one, because we left that overhang, what we need to do now, is once it's pickled and clean, we wanna take it out, and we actually wanna cut these ends off. And I think this is one of those processes that is just much easier to do with our saw than with our ... Michelle, I need you on the table one more time, because last time I used our saw, we were cutting out an interior shape, so my sawblade's not in anymore. I thought we were done. Line up. I appreciate that, I really do. Alright, perfect. So, now I'm just gonna come in here, and actually just cut this guy off. And I'm actually gonna move this torch handle because I'm about to knock it off with my leg and it's gonna bother me. And then I'm gonna do the other side. And you can see that there is an awful lot of sauter on here, because I was really fighting this one at home. And that's really unfortunate, because now that's an awful lot of sauter that I'm gonna have to clean up. So even after I cut this, I want the joint to look a little bit more seamless than kind of like two ends together. So now I'll come through here, and I'm actually gonna kind of round this off together. And because I've got a ton of sauter on here, I would also need to file this until all my sauter goes away. Because the only place we would wanna see sauter, is in the seam. And you can see how like, as I went to do that, you could see this bent a little bit, so anytime you sauter something, it's automatically annealing it, so it's automatically making it softer, and it's just nature what happens when you sauter. So because of that, on something like this where, even though it's a fairly thick gauge, it is pretty soft. So, I would wanna think about how I could work harden this. In the case of this one, and I think I did it with our sample, I wouldn't want to put a hammer texture on this, because I would worry about distorting our shape, so I would throw this one in the tumbler to work harden. So I would just file this until the joint has kind of a nice cohesive feel to it. And I've gotten all my sauter off. So you can see hopefully how this one that we filed is starting to look a little bit more joined than the one that we haven't filed yet. Question. I actually think the difference in color with the sauter and the bronze looks kind of cool. Is it ever a bad idea to use sautering as a decorative element? It's generally frowned upon. The one place that I have seen people do it, and I still personally, I don't love it, is I've seen people do some where they use a actual gold sauter in steel, so that there's a really strong contrast, but generally, even if you think it looks cool, it just usually ends up looking kind of messy and sloppy. So what I would say is, if you like that contrast, what you could do is think about things like, this piece of metal is bronze, and this piece of metal is silver. So you can get, you can sauter different metals together, so I would use that to get the contrast, rather than just leaving your globby silver, globby sauter. That is a couple of different ways that you can work with wire. And again, there really is no limit as far as shapes ... Oh actually that's a lie, I have one more for you, in just wire I almost forgot about. The little magic guy hiding in the bowl here. So, you can also start to think about putting wire together in a way that's a little bit more three dimensional. So you can see I've got this guy here. Everyone just was like, oh, and I almost forgot about this one too, right? (laughter) So this is something where you can actually think about sautering this in two different ways. So, one is to actually make a jump ring. And I literally made this jump ring the same way we made jump rings earlier. I just used a much bigger dowel rod. So I made a jump ring, and then I literally sautered the end of the wire to this, so it sort of looks like the things that you blow bubbles with. I was like, bubble wand, what's that called? The bubble thing. So it kind of looks like this. And then you can just come over to your mandrel, and bend this guy around until it meets up. And then we can come back in and sauter that joint here. So that's one option. The kind of positive or negative, depending on what aesthetic you're going for, is that that bends this circle too. So you might like that, but you might actually want this circle to be flat. In which case, what we can do, is actually sauter this as two different pieces. So I can take a flat circle here, and I can sauter this directly to it, having bent this first. So, I feel like there was one where this fit a little bit better. Let me see, there we go. Alright, so just like we did with our other examples, in order to do this, I need to go ahead and actually file this wire flat. I know you guys are loving, how many times can we watch Megan file things? But it is an important part of the process. Alright. So, I'm gonna cheat a little. That could probably be better, but, there's a lot of you guys watching me. So in this case, one of the things we have to figure out, is if we're setting this up, how do I hold this in place, because obviously I can't hold it while I'm working. So we're gonna use something called a third hand. So in our case, we have a third hand that actually is mounted on our annealing pan. It's this little contraption here. You can also buy them that they're freestanding. In my own studio I have one that's freestanding. And then in that, goes something called cross-locking tweezers. So the way that these work then, is you pinch them open, and they can hold things in place while you're sautering. So in this case, I'm gonna set this guy up here. And sometimes this takes a little bit of finagling. You wanna make sure that things touch tight, so I always like to kind of let gravity help me here. If I were to take this away, this piece, see how it fell to the table, when I took that away? So that means that it's gonna have a nice tight fit. So, actually our one isn't quite there yet. So again, things that are, kind of take a little bit of finagling. So a couple things just to keep in mind while you're working on this. For whatever reason, most cross-locking tweezers have wooden handles. Wood is flammable. They do it because they don't want you to touch hot metal after you've sautered, but half the time you end up setting your handles on fire. So pay attention to where your torch is when you're doing that. And then, once you've used them once, they're gonna be warm for a while. So all that touching of them I just did, the next time I would go to set this up, if I had just used those, these are gonna be warm and I'm not gonna wanna touch them. So, it's important to kind of recognize that as you're working, so that you don't burn yourself the second time around. Alright, so then, I can go ahead and come in here with my flux. And, because I don't want a random sauter seam somewhere else, I am actually stacking the jump ring seam underneath this other seam. So I sautered the jump rings beforehand, just like we did the round bangles. And in this case, the jump ring, because I wrapped it around a mandrel, it didn't have to be reshaped. It was already round. So I already sautered the jump ring with hard sauter, and now I'm coming back in here with medium to sauter these two other joints. But I'm lining this up so that I don't have a third seam somewhere randomly in the middle. Tweezers. So you try and match where you have already sautered? Yeah, it's not always the case. Depending on what you're doing, you may not wanna do that, because there's a chance that the ... So the sauter that's already on here is gonna wanna re-flow. Ah, right. But in this case, because of this shape, and the way this is setup, if that sauter re-flows, nothing is gonna fall apart. So I'm not worried about it. So in that case then I do wanna line it up. Thank you. So now I'm just gonna put some sauter. And so I put the sauter on this side, because it was facing me, but then to actually sauter it, I'm gonna spin it around. Because then what I can do is keep my heat on this side, and actually draw the sauter through the seam, which is gonna make it nicer than if I were to hang out on the side where the sauter is. So we can turn down our lights again. So thinking about using your cross-locking tweezers, you can really build three dimensional forms and wire as you're making bracelets. So there's definitely no rule that says you only have to work flat. You can really start to think about making kind of complex joints, and more complicated forms. So I'm just trying to, again, let my flux dry for just a second. I'm actually just gonna spin this so I can see. I'm so used to, in my own studio, not having an annealing pan, and I'm like, oh wait, I can spin it. And again, I am kind of being mindful of where my cross-locking tweezers are, so I am not accidentally setting them on fire. So now I'm just gonna come in here. Now this is not the best fit joint, but there we go, see how that flowed under there? And then I probably almost just set my cross-locks on fire. Can't see what's happening. I don't know where my sauter went there. I may or may not have lost my sauter. That got a little hotter than it should have. I was pushing it a little bit, because I honestly couldn't figure out where my sauter went. But that's, yeah, thank you. So then, again, you wanna be careful. These are hot now. So even though they put the wood on, because it's supposed to make it easier, I like to take my regular tweezers, and use that up ... Neither one of them sautered, such a bummer. So, again, not the end of the world. We just put that in there, pickle it, start again. And if it sticks to your sauterite board, also not the end of the world. Sometimes stuff doesn't sauter. We just do it again later. Not a big deal. Alright, questions about that. So, in the case, I'm not gonna sauter these, but in the case of these then, I wouldn't actually have to use my cross-locks. I could just set this up and sauter it, or I could set it up this way. Whatever kind of feels the most comfortable. If you were afraid of re-flowing this joint, you could put it in your cross-locks just for safety. But I probably wouldn't worry about that. Alright, so questions about that? I think you had mentioned medium and hard sauter, can you explain that a little bit more? And then another thing, you had talked about having your flame on the opposite side, to have the sauter come towards you? Yeah. So both of those things, if you could just explain a little bit. Yeah, so hard, medium, easy, are different melting temperatures of sauter. So hard melts at the highest temperature, meaning it has to get hotter. Then medium, and then easy melts at the lowest temperature, so you don't have to get the piece quite as hot. The reason that you use those, is if you've got multiple sauter seams, because you're bringing your whole piece up to temperature, you have to worry about re-flowing old seams. On a lot of what we're doing here, where it's only one or two seams, it's not so critical, but as you get into more complicated pieces, you really wanna work your way from hard down to easy, so that you're not re-flowing joints. Does that part make sense? Yeah, and if you, in our pre-req video, I actually talk about the specific melting temperatures of all of that, so you can go back and watch that pre-req video later. It's not important that you know, like I don't really remember what they are, it's just important that you know that hard melts at a higher temperature than easy melts at. And then remind me what the second half of the question was? You had talked about having the flame at the opposite side of where your sauter is, Oh yes, yeah. so that it flows towards. So sauter always wants to flow towards heat, and that means a couple of things. One, it means that it wants to flow towards wherever the torch is, because that's the hottest thing. But then it also will flow towards whatever parts of the metal are hottest. So, in this case of what I did wrong there, is I was too concentrated on that lower jump ring. I didn't bring enough heat into the top piece, and so it never flowed towards the top piece. It only flowed towards the jump ring on the bottom. But putting your torch on the other side means it'll flow through. I also didn't have the best fit there, because I was being lazy. So that probably also contributed to it not working. Sure. So, I like to save steps, but would it be a bad idea to try to sauter the jump ring at the same time that you're trying to sauter the ... Because you said you sauter the jump ring first. Yeah, I sauter the jump ring first. I would do that in two separate steps- Okay. Just because it's a little hard to see the seam, and see what you're doing. So I would do that in two steps.
Class Materials
Bonus Materials
Bonus Materials with Purchase
Ratings and Reviews
user-d7f7ae
This is a great addition to Megan's metalsmithing series. She makes the topic really approachable. Bonus that metal patinas were added in to the class. I loved the class!
a Creativelive Student
I really enjoyed this class! It was very informative and gave me a lot of ideas for expanding a jewelry line to include a variety of bracelets and finishes.