Lesson Info
18. Photoshop
Lessons
Class Introduction
01:29 2Outline
03:36 3Creative Cloud Overview
07:07 4The Camera
16:38 5Perfect Exposure
27:39 6Exposure Test Comparison
15:31 7Lightroom Overview
16:49 8Importing Images
18:01Image Review, Organization, and Selection
11:52 10Image Editing and Enhancement
54:16 11Profiles and Presets
22:16 12Local Adjustments
30:50 13Black and White
09:24 14Retouching
22:48 15Synchronization
10:40 16HDR (High Dynamic Range)
28:14 17Panoramas
13:27 18Photoshop
19:10 19Sharing
37:24 20Sharing Via Connections
05:49 21Adobe Portfolio
43:14 22Printing
10:38 23Lightroom Mobile Overview
37:32 24Lightroom Mobile Camera
06:12 25Tips and Tricks
37:44 26Archiving
15:51 27The End
09:10Lesson Info
Photoshop
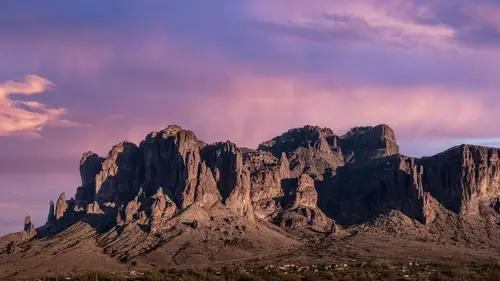
So this is not a Photoshop class, but I'm gonna go to Photoshop right now. And the reason for this is because I need to show you in light room how to round trip to Photoshop. The reason that you want light room to do this and this is really important. You want all of your editing to go through light room? Don't open up files from your desktop to Photoshop or from a hard drive somewhere to Photoshop. You wanna be inside a light room, find your image, send it to Photoshop, edited from Photoshop. And then when you finish in Photoshop, when you close it and save it, it's gonna come right back to light room. That way you have everything organized. All your images are always inside of light room, the original raw image and the edited Photoshop image, or sitting right next to each other or stacked on top of each other. That's the way you want to deal with your photos that's going to keep you organized, and that's gonna make sure that you never lose a photo. So we start inside of light room. S...
o here I am, inside of light room, and you remember we did this exposure test and I made a panoramic image while we were doing it. So I've got this panoramic image that I've already told you. I think it's fairly boring because the sky is is the same. It's There's nothing in the sky. It's is boring the skies you can have but But I like the foreground. I like the shadows on the mountains and things like that. That that looks good. So what I'm going to do is I'm going to round trip this to Photoshop. And the purpose of this lesson is to show you how to round trip. But there's gonna be a bonus. And that is I'm gonna show you how to replace the sky and actually make a boring image look pretty awesome. So what we're gonna do is we're gonna right click this image and I'm going to go down to this middle area here and here in the drop down menu is the edit in Photoshop Option, or you can hit shift command E or shift control E on on a PC. So what you're gonna do is you're gonna click edit in Photoshop, and then we're gonna wait for Photoshop Thio. Take it and keep in mind that this is a huge file because it's a panoramic image that was created from, like, 17 photos, and each of them were 45 megapixels. So it is a really big, and so it's going to take a while for Photoshop to open it. Just keep that in mind while we're working on this and we'll speed ahead so that you don't have toe sit and watch this. Now Photoshop is a very specific tool that needs to be used at certain times. In this case, we're doing a landscape image. So layering is kind of what we would be doing here if you need to do liquefying or really heavy retouching, or you need to put multiple images together. So you're compositing images in our case, replacing a sky. Those are the kind of things that you do inside of Photoshop. Most of the other stuff that you need to do, like small retouching removing a coke can from the, you know, foreground or moving a cactus. And we even on this image when we were working on it originally and making it a a pan Oh, we actually removed a house. We removed a cactus. We did a lot of stuff to this image already. And so what we're going to do here is we're doing it in Photoshop because we need layers. We need to be able to replace the sky. Plus, Photoshop has a really cool new tool, so I'm going to replace the sky. But the first thing I need is a sky. So I'm gonna go back toe light room and I'm going to go to an album with clouds. And I'm going to look around for some clouds and already identified a cloud that I hear. I already identified and adjusted Cem this image and I think that it will work really well. So I'm going to export this image, and I can either right, click it and export it and then use one of my export options. Or I can go up to the top right hand corner and click on the export button. I'm just going to use a full, large 100% quality JPEG. And I'm just gonna export that. It's gonna ask me where I want to export it. I'm going to export it onto the desktop because I only need it temporarily, and I'm gonna hit export. So now it's exporting this file, and I'm now going to go back into Photoshop and I'm going to replace the sky. So the new sky replacement tool on Photoshop is in the edit menu. Down about halfway, you'll see Sky replacement. I'm gonna click on Sky Replacement and it's gonna open up a dialogue box and immediately it's going to go to town editing that sky. It's looking for the sky. It's gonna find the sky, and then it's going to replace the sky with that or whatever was the last thing you used. So, um, so right now it wants to replace the sky with this, uh, rainbow, which I'm not interested in that this is not the right image for this photograph, but I can go over here and use the Sky Replacement Dialog box and click on this Rainbow E might use it if it had a unicorn flying that that might make it better, but I'm not going to use it, so I'm going to click on it, and it's going to give me all sorts of other options for skies. Now, if I want, I can choose a sky that's already inside of Photoshop or I can choose my own sky. And to do that I'm gonna go down to the very bottom here and I'm gonna click on this plus button and then I can go and choose a sky here and I'm gonna choose the sky that we just exported and hit open It's gonna ask me to name the sky I'm just going to call this dark blue sunset sky and hit OK, and now I've got an image here and see once I once I imported it automatically selected it, but I can use it later A swell So now it's just a sky inside of Photoshop s reservoir of skies. And so now I'm going to go in and start editing this sky, and I've got a whole bunch of controls to do that down below. But the first thing that we want to dio is we wanna look at the sky and see if it's the right direction. So I'm gonna flip it right now. Just so if it came in the wrong direction, So let me show you what that means. So if I I have this control right here on the top left hand corner that I can move the sky around. So if it came in like this, you can see that the sunset looks like it's coming from the left. But on the foreground, the sunset is clearly coming from the right and creating shadows on the left, so this would be the wrong direction for the sky. So what I'm going to do is click on that flip button and that's going to put it in the right direction. So now when you look at a sunset coming from the right, it makes sense for this photograph. So we now have the correct direction of light in the sky in comparison to our foreground. But the next thing that we have to decide is how big is the sky gonna be? So I'm gonna scale this sky up a little bit because it's obviously a little bit too small right now, So I'm gonna just scale it up to, like, 140%. Now I've got the sky big enough that I could kind of negotiated around until I like the way it looks. So I'm just kind of dragging it around until I like there. Like that there. I like the sky now. I like what I'm getting out of it. Actually, I might want Thio. Oh, that's looking good too. I'm not sure that looks pretty good, but I've got all of this other sky up here that could be useful. So the question is, what do I really want to do with that sky? Do I want the blue in it, or do I want it to actually have sunset? I could probably get if I scale it down just a little bit to 120 I can get the actual sunset and some of that in it, so I like that better. Okay, so now that I've done that, I can go up and start playing around with shifting edges and fading edges. So let's look at that So you can see that you've got a shift edge and a fade edge option. So let me show you what they look like. So if I shift the edge negative all the way, see how it shifts the edge away from the actual edge of the mountain or if I go the other way, it actually goes over the top of it starts to look like there's actually snow up there or something, so it's kind of going over. The top of the sky are of the mountain, which is also not advisable, so we don't want either of those. We want it somewhere in the middle, so I'm going to go down to the middle and probably I want it to just overlap a little bit, just just by five. So now you can't see the overlapping It's not. It's not going over and making snow on the mountain, But it's also not creating a like a blue line between the mountain and the clouds. So I like that. Then the fade edge Notice that the fade edge here, you can see that there's a slow fade between the edge of the mountain and the sky itself, so there's a little bit of like a mortar blue right around the mountain. And if I go the opposite direction, it goes right up to the edge of the mountains so you can see that it gets yeah, see that there's a much harder edge between the sky or the clouds and the mountain. It finds the edge so somewhere in between this see how it's you can see the blue creeping out and this is the right amount. And I would say that somewhere in like, the 25 range will probably work. Maybe the maybe the 36 range. That looks really good again. That's a really nice crisp edge along the mountainside, and it looks very riel. So we're gonna play with those two things, shift the edge and fade the edge until that line looks great and you're gonna have to doom. Or of that if you're working with something with trees because there's just so much more lines to deal with. So these air, the two edges, the shift and fade edge that you have to work on. Once you've done that, then you can start playing with your brightness and your temperature of the sky. So I'm gonna go in, and if I brighten up the sky, it starts to look a little bit more like are seen. If I darken this guy now, it doesn't look like it belongs. So you really want to match the scene? So you want to match whatever the foreground is to the sky. So I'm gonna brighten up the sky just a little bit. I just needed to start matching there. That looks pretty good. So I think that that's a pretty good example of a match. Um, if I go a little bit, too, if I go brighter, it get's. It's not quite as interesting a sky. If I go to dark again, it doesn't look like it's riel. And so that's probably maybe 35 ish or something is pretty good. I like that. Okay, And then I'm going to take the temperature, and I can either take the temperature down cool, which doesn't seem to work very well or warm. That works a lot better, so because the surface of this mountain is very warm, I kind of want the sky to also be fairly warm. So I think those two are gonna match a lot better and again. Once I've done that, I can still negotiate the sky wherever I want it to be, because it's independent of the mask that's been created, and then I'm going to go down to the bottom and on the bottom. You'll see that I've got three options. I've got a lighting mode. I've got a lighting adjustment and a lighting color adjustment, and all of this is for the foreground. Now that mode is either screen or multiply. Multiply is usually right, but screen sometimes is right, and you'll know because when you click on it, it'll look wrong. So if it looks wrong, choose the other one and the other one will look right. So this one, we need to multiply lighting adjustment. If I go up, Do you see how it darkened the foreground a little bit? And if I go the opposite, it's gonna kind of light in the foreground. Eso I'm just gonna play with that until it feels correct. That looks about right. Then I'm going to do color adjustment, and if I go way up, it's going to take the pinks and the warm tones, and it's gonna kind of color the mountain a little bit. I go the opposite direction. It keeps the original color of the mountain, which doesn't match the sky. And so I want to find where that happy medium is, where the sky looks like it's actually affecting the foreground, and I think that's a pretty good match. You can see the pink from the sky. That's what we're looking for and you can see over here. There's a bit of orange hitting over here, so it's it's really trying to match the foreground to the background. And then the last option down here is how you wanna output the results, and we want it to go to new layers. So I'm gonna hit okay, and it is creating a set of new layers. Now look at this. This is so awesome. It has created a set of layers. There's the original photo that's the background image, and then it's created a set of layers in a folder called Sky Replacement Group. When you turn it on, there you go. You've got your sky and you could go in and readjust any of these layers to your heart's content. You can work on that mask a little bit, and if I click on it and show you the mask, look at that. It created that mask, and that's what's making the sky work. So that mask is awesome, and it just it cut it out perfectly, and it will do that with trees, too. So it's amazing at masking, but also you have a burn dodge layer here, and that's what's creating the lighting on the foreground. And then you have an adjustment layer here for the foreground, and that's what's creating the color on the foreground. And if I want to play with that, I simply double click the adjustment layer so you can see that little icon there. If I double click that, So let me double click it. You can see that it's created a bunch of curves to adjust the color balance on the foreground, and it's also masked it so I can play with the mask on it or I can play with the actual adjustments there. I don't need to, but I might wanna play around with the sky, the brightness on the sky. So I'm gonna double click that, and you can see that I can play with the brightness of the sky and kind of where is the actual best? Maybe that's it, but I'm gonna add some contrast. That's even better. Okay, so I was able to adjust the adjustments that were made originally inside of the Sky Replacement Dialog box. But now I could do it really quickly here, anytime I want and because I want to be able to come back to this at any time. I'm just gonna leave it as a as a layered document and I'm going to go up to the file menu and either close the document so I can just hit close or I can hit command W. And it's gonna ask me, Do you want to save this? The answer is yes. I want to save it. It's going to save this document. And that tiff photo is going to go back into light room and it will be organized so that I can find it and the original image together. And now you can see that an image just came in to light room that was recently added one minute ago. You can see that right up here was added one minute ago and that actually got added automatically by light room because it knew that it sent out an image to Photoshop. That Photoshop image got saved, and when it came back, light room added that Photoshop file back into light room. So now I have an image here that is the original Pano. And if I click on this right above on the right hand corner of that image. There's a little stack. This is 18. Remember, this was 17 images as a stack before, and now if I click on that, if I click on that 18, it opens the actual stack, and you can see on the on the right hand side here all the original images that created the Pano. And on the left hand side you can see the actual panoramic image, and then you can see the resultant image that has the sky replacement. And if I right click it, I can tell it to be the stack cover. So now this is the stack cover, and if I close that stack, all I will ever see or export is this one image that then becomes the representative for the entire stack. But let's compare the two images now, so let's just look at one image. And it's either this image or this image, this image or this image clearly the Photoshop it image with the sky replacement winds, and I think now that is an actual good photograph. But before it was just data information that needed to be taken to Photoshop. Now again, this is not a Photoshop class, but there's a little bonus there for you. I needed to show you how to take an image from light room to Photoshop and back. And rather than just taking it to Photoshop back, I figured you might as well learn how to replace the sky. So have fun with that tool because it is amazingly powerful, and it's very quick. Thio Edit a sky. You don't need to know Photoshop in and out to do what I just did.
Class Materials
1. Lightroom Presets and Profiles
2. RAW Images To Follow Along With
3. Lightroom Creative Cloud Schematic
Ratings and Reviews
Teresa Piccioni
Great great great class: Jarett explains the Lightroom workflow clearly and thoroughly. I am not a native English person and my English is quite poor but Jarett explains in a very simply and clearly way everything and I understand all chapters perfectly. Thanks guys, great job. I highly recommend this lesson to everybody,
Roger
I have watched each and everyone of Jared's classes on Creative Live and they are first class. I've waited a long time for a new one and now we have it and it's another gem. This is a wonderful overview of Lightroom and will repay watching sections (or all of it) several times to absorb the wealth of information presented. For anyone new to Lightroom, this is just what the doctor ordered.
Gabrielle
Really in depth, so helpful! Thanks