Creating and Installing Brush Presets
Lesson 6 from: From Shoot Through Photo Editing: Fashion RetouchLindsay Adler
Creating and Installing Brush Presets
Lesson 6 from: From Shoot Through Photo Editing: Fashion RetouchLindsay Adler
Lesson Info
6. Creating and Installing Brush Presets
Lessons
Class Introduction
03:14 2Three Reasons to Shoot for Photoshop
16:00 3Shoot: Working with Dress Length and Color
12:53 4Shoot: High Key Image with Flowers
28:01 5Shoot: Dance Pose with Water Splash
27:51 6Creating and Installing Brush Presets
12:36 7Compositing Dance Image with Water Brushes
27:46 8Toning and Retouching High Key Image
12:02Lesson Info
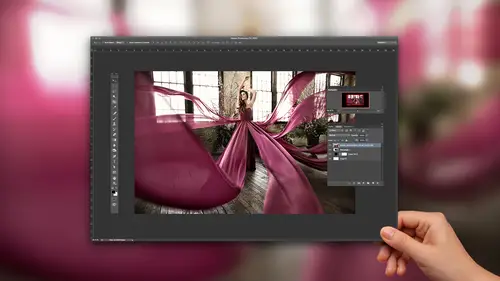
Creating and Installing Brush Presets
The first thing that I wanna do is actually work backwards, so we're gonna start with what we just finished with. We're gonna start with brushes, and the water brushes, and all of that technique. So what I'm actually going to do is I'm gonna show you a couple different ways to make your own brushes. That being said, there are thousands, and thousands, and thousands of amazing Photoshop brushes online, of all different sorts. And most of them are completely free. Of course, perhaps some of the better quality ones and higher resolution ones, you're going to pay a premium for because they're higher quality. But there is a website called Brush Easy. There's one that's like Brush King. Like, there's a bunch of these. Just search Photoshop brush pack, or, for example, smoke Photoshop brushes, and it'll bring up endless different ones, and I'll show you how to install them. But, backing up before that, I wanted to start with how to make your own. And the first thing I wanted to talk about is ...
Adobe's mobile applications for doing this, and the first way we're going to make a brush could either be done with an iPad or an on iPhone, and it used to be called Adobe Brush, and now it's folded into an app called Adobe Capture. This is free. And what we're gonna right now is we're gonna do it on the iPad here. So, this is opened in Adobe Capture, and you'll see at the top something that says brushes. What I'm able to do is I'm able to photograph anything I want and turn it into a brush, and I can turn it into a vector brush, which is pretty cool. So, I could photograph, for example, this table, if I wanted to have a brush with wood grain that I could then later on use as a grunge texture, I could do that here. Or, another thing that you could do is you could take paint, splatter it on a white piece of paper, photograph it, and make paint splatter brushes. I mean, there's so many different ways you can do it. So, one of the things that I want to do to tease to another class that I have is I'm going to make my own eyelash brushes. So, sometimes when I'm retouching and I've done a beauty shot, sometimes I wish that they eyelashes were a little bit fuller, or a little bit darker, and so I can actually make my own eyelash brushes to enhance the eyelashes. So, what I'm going to do is I'm just going to take a white piece of paper, and I went to CVS, and I bought a bunch of eyelashes of different shapes and sizes. There's tons of different ones. I'm just gonna grab one kind of at random. Probably grab this one. And what you want to do, ideally, would be to shoot this in a flat lit situation, because if there's shadows in the shot, it'll make it harder to isolate what the actual brush should be. It'll think that the shadow should be part of the brush, 'cause it's just taking a picture, and then you're telling it what to include. So, this is not the ideal lighting situation for it, but we're going for concept here, right guys? Okay, so you'll get the idea. So, I'm here in brush within Capture, so it's Adobe Capture, mobile app, phone or iPad, and I'm gonna hit the plus sign on the very bottom there. Okay, so what it brings up for me is a camera. And let's see where the heck my camera is gonna pick up the brush. All right, there we go. Okay, so, what I wanna do is I wanna try to fill the frame, more or less, with these eyelashes. Let me see if I can get them to, maybe that way would be better. Okay, cool. Also, the newer iPhone or an iPad is gonna give you a higher resolution, so ideally, use whatever device you have that has the highest resolution camera. Okay, so what I can do now is, whatever I click on, I just clicked, it knocks that out, so I'm saying this doesn't belong. So, I clicked on the white and it knocked it out. Does that make sense? Do you see the pattern there? Okay, then the next thing is, on this bottom right hand corner here, I can slide this to tell basically the threshold of how much to knock out. And so, at some point, it starts getting rid of some of the eyelashes, and so it's kind of finding that ideal area, and with a higher resolution camera, it tends to handle this a bit better. But notice how it will pick up some of the shadows, so it's trying to get that just right. All right, so I'm gonna take a shot. All right, so then the next step of this is just to crop, you know, what should actually be included in this brush. So, I'm going to crop in. That looks good, all right. And then I'm going to go up to next, and it's asking me what kind of brush or what style of brush. What I need to do is, on the bottom left hand corner there where it says Adobe Photoshop CC brush, I'm making this a brush for Photoshop. You can also do this for another app, which is Adobe Sketch, which is a mobile application, but I'm gonna be playing with Photoshop CC, so I'm gonna click on that. And you can go in and actually make quite a lot of changes. You can change the jitter of it, you can change how far it's spaced, like if you just hold and drag how much space between the brushes, all the controls you would have if you would make it in Photoshop, you have all of these different options. I can make a tail ahead of it. We don't need to do this, it's just gonna be a single stamp, basically. So, what I'm going to do here is I'm going to hit save brush, and because I have Adobe Creative Cloud, even though this application is free, by having Creative Cloud, what it does is I was able to save that under my library, or I could save it in a different library. So, I could save it under brushes, for example. So now, when I pop over to my computer and go into Photoshop, if I go to brushes, there's my eyelash brush right there. So now, I can just load that brush and have it available to me. So, this is cool for photographing, doing grunge textures, or items, or I mean, whatever you want. I can also just do everything controlled within Photoshop, but I think it's a pretty cool and pretty easy way to do it. So, let me just open up a blank document. Let's just do a blank document there. And I will grab an eyelash brush that I created. Let's see, I think it's the one that was loaded. Okay, so here's an eyelash brush, okay? So, that is one way to do it. All right, let's take a look at another way to create your own brushes, and I'm just gonna stick with the eyelash theme, even though we're gonna do something completely different later. What I could also do is I could also photograph an eyelash, and I should totally be a little more organized than this here, right? Let's find that eyelash brush. Okay, here we go. Okay, so I could also photograph eyelash details with a macro lens. So, for something like this, you would use maybe like 100 millimeter macro, 150 millimeter macro, 180, so you can get all of that detail. All right, so I can bring it into Photoshop and I can figure out which one I prefer. I prefer the one on the right, so we are going to just work on that one, so I am selecting it with the marquee tool, and I'm gonna hit command J, and so I'm just going to be trying to isolate that eyelash brush. And so, I need to knock out the white, and we're not gonna get into a ton of different extraction techniques. What I could do is I could just try to use the magic wand tool and see if I could select some of this white. But what you'll notice is it's not really precise. Like, it kinda struggles. And I just grab a little bit of this. So, I used the magic wand tool there, and it makes a guess of roughly what it thinks. So, another tool I have available to me to try to narrow this down even more is my refine edge. So, up here, now that I've made that selection in the top right, I have my refine edge. And so, I could go in and try to be a little bit more precise on the edges of the eyelashes here. And let's see if I can get it a little smarter. And I'm gonna select the eyelashes this time. Let's see. All right, so refine it again. Okay, so it's giving me the outlines of the eyelashes, and I'm just tracing it over, and I'm telling Photoshop this is the edges of the eyelashes I'm trying to select. All right, let's do that. And I'm gonna hit command J and copy into a new layer there. Okay, so, what a brush needs to be is it needs to be black, and everything else needs to be knocked out. So, ideally, what I need to do is find whatever way that I want to do it to just get rid of the white selections. So, when you're all done and you get rid of that, just knock this out, okay, you'll have something like this. This is after I did my refine edge. I'm able to get more precise with those eyelashes. All right, so I'm gonna crop in, so that it just fills the frame. And you're going to go to edit, define brush preset. So what you should have is whatever you want the brush to be black, and the rest of it shouldn't be white, it should be gone, it should be translucent, deleted. So I'm gonna hit define brush preset, and I can name it whatever I want, MINK EYELASHES, and hit okay. So now, when I want to be able to access that brush, if I grab my brush tool, if I come up here to the top left, that was the last one that loaded, and now I have an eyelash brush. So I'm gonna just open up a new document so you can see, and now I have those eyelashes. And I can always go in and refine it and change it. And one of the things that I like about using these eyelashes if I do a completely new, I'm just gonna do a completely new layer here, what I like is, if I create the eyelashes and I need to better fix them to the eye so that they fit the shape, I can warp and bend them to fit. So I'm gonna talk about warp a little bit more later, but I can, you know, bend it to fit the curve of the eye, and extend the eyelashes, and you know, whatever I need to do. So I will individually place the eyelashes, and then warp it to fit. So, in summary, you can do it on Adobe Capture mobile app, specifically under brushes, and then you sync it with Adobe Creative Cloud library, and then you can access it here. Or you can photograph something, knock out anything that is not part of the brush so the only thing that's left is a blank layer, and then what you want the brush to be on the top. And then you go to edit, define brush preset, and you save that as your brush.
Class Materials
Bonus Materials with Purchase
Ratings and Reviews
Avril McPherson
Yet another fantastic course from Lindsay. She is by far my favourite photographer as well as a brilliant teacher. We are so lucky she is willing to share her brilliance )
Phyo wai Moe
Lindsay is awesome as always . I should have bought this course long ago . Its well worth of money and i recommend to people who like to start fashion shoot with cheaper option . Thank you Lindsay . As for Creative Live group , please fix the " Purple Skirt Picture " as crush or corrupted . Thanks .
user-f37802
I love Lindsay's tutorials. She speaks "our" language. She has very simple, but highly effective approach to studio set ups as well as post-processing. She is very (very) creative photographer. Highly recommend.