Checking the Hierarchy and Structure
Lesson 7 from: Fundamentals of Adobe Character Animator CCTony Harmer
Checking the Hierarchy and Structure
Lesson 7 from: Fundamentals of Adobe Character Animator CCTony Harmer
Lesson Info
7. Checking the Hierarchy and Structure
Lessons
Class Introduction
07:44 2Sketching Out the Character
11:52 3Building the Face and Head
16:32 4Developing the Eyes
06:17 5Phonemes and Visemes
09:55 6Building the Body & Adding Gestures
17:46 7Checking the Hierarchy and Structure
14:33 8The Best Way To Test and Fix Problems
11:07Lesson Info
Checking the Hierarchy and Structure
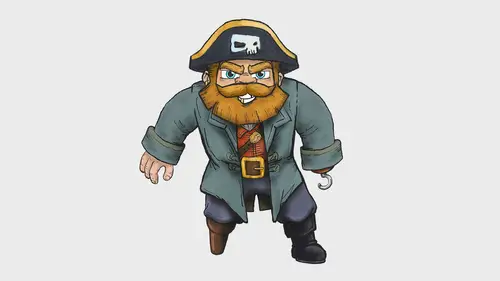
Once you've got all of these things in place and once you built out all of those gestures is you need to actually check the hierarchy. So make sure that all of your folders and structures have the right parents and children in them. Eyes, mouth are children of my face which is a child of my head. My arms are a child of the body and they're siblings, those two just there. You can have more arms I guess if you needed to. So they're siblings but they are both children of my body. My legs are also children of my body. Does that make sense? And then all of the different things in there so let's go just scroll down through the face, for example, let's go back up to Gold Beard's face here. So I'm just gonna collapse the body and just turn that off. Let me just fit this thing here and then zoom in on Gold Beard's face. So I've got a few extra things in here because I built Gold Beard kind of a separate beard. Let's have a look at this here. Okay, so here are his eyebrows. They're children of h...
is face of course but they're also, they've got their own thing going on, almost literally, really there above his eyes. So his eyes of course underneath there as well. So and then the mouth. The mouth there is a separate thing with its own divisions in there. Thank you. So you can see all of the little separate components in there and that hierarchy really easy to understand. And then the eye here you can see that the left eye has a left eyelid as a child, a left eyelid bottom as a child, a left blink, a left pupil, a left eyeball, and so on and so on and so on. And the way they're stacked makes sense. It wouldn't make any sense for me to have the left pupil underneath the left eyeball because you're not going to see them, they'll be behind the eye. Although if maybe if you got a semi-transparent eyeball, maybe if you were doing like a lizard shade maybe that would work but you'd have to name it kinda separately. Okay, here on Gold Beard, if I turn all of these things off here and come back to this. This is Gold Beard's face. So his mouth actually sits sort of underneath his face here. So that's Gold Beard's face and that's the bit that distorts inside of Character Animator. And then behind that there's this background. You can see how crudely painted this is because really, at this point, so this is for the mustache here, all that that is doing, this region around here, is making sure that there are no gaps up here if the mustache distorts upwards. So you won't get any gaps in there so I've just over-painted that. That doesn't have to be delicate. Of course you can, there's nothing wrong with you taking pride in your work and doing that really, really carefully. In fact, it might even be a good way to do it but I tend not to. I tend to just make sure that bit's done, get on with the next thing. And that way I can test and adjust as I need to. So moving further up, Gold Beard's nose. You see how his nose is like an overlay. If I turn off the face there, can you see that's like a separate component? I'll turn off the background as well because that means I can do some things with it like wriggling it around and those things because the nose is something else you've got that you can do things with inside of Character Animator. Let me just swap back out there for a second so you can have a look and we'll go back into the rigging space. Remember it's rigging where all of the joining up takes place and where we'll be spending most of our time in the next section here. There you go, there's a nose just there. So that's another component you've got that you can play with that you can tell it that's a nose and it will do various different things with that as a nose. Okay, so there's all of that on there. Just making sure my other screen here is being nice and behaving itself 'cause I've got some over the shoulder stuff going on here and turn those things on. Right so of course the eyes over the top of that and all of the sub-components of the eyes. I've got this as a jaw because this is something I tend to, I'm not manipulating it in this puppet but at some point in the future, I'm going to build, there's a thing you can do called a nutcracker jaw which behaves more, this isn't kind of set up for that at the minute. But you can do something with the jaw so it, sort of Terry Gilliam Monty Python style which probably you'll have to look that one up maybe the majority of you will have to look that one up but it's that sort of motion there like. So we all know what a nutcracker puppet looks like, right? One of those things you actually crack nuts with at the holiday time typically. You might do it all year, I don't know. But you can do that and so I've got that built in there for just in case I do want to do that. So I've got that on there as well and then of course the eyebrows that sit on top and they're all named properly. Now I know that's quite a lot of information to take in just in that structure in itself, right, but I'm gonna refer you back to the Start workspace inside of Character Animator. Let's have a look at what you've got from the actual product itself. Okay, so I've got the Chloe puppets in here, of course, let's go to the Chloe puppet. My lower middle daughter's name is Chloe, by the way. I've got four daughters so I've get an upper middle and a lower middle so Chloe's the middle lower. It's her birthday in two weeks, like I'm not being reminded all the time that it's her birthday in two weeks. But we'll just go to Chloe in Photoshop. In fact, I might be able to open that from the recents. One of the ways you can get through to all of the parts of your project, so a project is like a folder, all of the things that are in here are things that have been brought into that folder or are a part of the folder for this project and you can gather these together. If you're gonna move them across between systems then you've got this option here to copy all the media files into the project folder just in case you're linking them from other locations 'cause that's a good idea. If you ever do lose anything, you'll see here at the top of the properties that it shows you where that is, it shows a path. Your pathname might be different if you're on Windows, this is what it looks like on the Mac. It's very similar, it's just the slash is the other way around between the two generally and of course, where you've got it nested in your system might be slightly different. So let's just go and have a look at the Chloe puppet. I should be able to get that here from recents. So let's just go for recents and there's Chloe PSD. The best way to learn about these structures, open a puppet like Chloe. If you want something more sophisticated we'll look at that in just a second but you can see here how that structure breaks down. I'm just gonna get rid of that instructional guide, don't need it for us today. So there you go. If we go with the head, twirl that open, we can see it's got some right eyebrow groups there. That's because there's three different states. You've got worried, angry, and normal. Chloe's worried, you can see that her eyebrows tilt up like that and that's something you can force. It will map to eyebrow movements if you turn that behavior on but it's something you might actually want to force a point. You can actually add keyboard triggers to do that. And if Chloe was angry there like so, that would be my Chloe right now thinking, "You mentioned my birthday while you're doing this." So there you go, you can see how that draws down. Left eyebrow of course has got a parallel group for that. Right eye in here. So right blink, right pupil, right eyeball. And it's really easy to learn. Again, and I know I said this earlier on, get used to making something to start off with and the best way to do that is to work from these things in the first place. I like doing mine in Photoshop and I did a lot of mine in Photoshop to start off with because you don't have to worry about moving the vectors off the layer in the first place, you can just overdraw them in Photoshop and it's really, really straightforward to do that. Okay but do get used to using that. So check those out, make sure you've got the structure and you'll pick it up. Familiarity with something like this is built really simply. Do it often and think about what you're doing, that's the best way. Frequency and repetition, those are the ways to pick up things. When you learn new skills, if you just think like, "Great, I've learned that, now I'm off for a coffee "and I'm gonna go and do this "and then this afternoon I'm going and doing whatever," you're gonna start to lose some of that information straight away. So the more you can commit and actually do something with it to start off with, you'll become more familiar. And here's that group here, so right arms. And I appreciate, by the way, in saying that that you may have other things to do in your day. I'm not saying, "Go and do it right now," if you've got other things to do. But don't let it go too long before you do it and then don't leave it too long before you do it the next time and so on because you'll pick it up. And once you've got it, that information's in there and you can do with it what you will. So you can see the structure in that. Now I said I'd show you a slightly more involved puppet. Let me close out some of these things. I'm gonna close Gold Beard, I don't need to save Gold Beard there because I've made no changes. Get rid of my hands there and my initial sketch. This one I'm gonna come back to in just a moment. This is just the thing I'm gonna wrap up with here which is drawing the other components but I'm gonna go and open another recent file. And this one's Wendigo. So this is one of the first puppets that came out with the very first pre-release of Character Animator. Actually, let's bring this one into, let's bring it into here. In fact, I'll create a brand new one. So I'm gonna go to Start workspace, wind on a little bit here and I'm gonna pick the Wendigo which is a Photoshop only puppet, it's not in Illustrator at all. Okay and here we are. So this one's got a lot more going on inside of it. You can see this is a much, much deeper structure. So the Wendigo's got this chest thing going on here so there's a slightly different structure, there's the head structure there. There is a body structure underneath that and there are different things here. This thing, origin, is an invisible layer that just pins parts two different places. That's more advanced than you need to be at the moment or than any of us need to be right now. So the legs and so on from there, lower torso, upper torso, and a shadow which is something, there's a really actual very, very cool way to do a shadow based on your puppet by duplicating the puppet itself inside the Photoshop file but dropping all of those things to a lower opacity dark color there and that way you get a puppet that moves along so you've got shadows that move dynamically as you move. It's very, very cool indeed. Okay, so let's go back to the stuff at the top here or to the head rather. So this has got a lot more going on. This one has got antlers, for example. It's got a few different eye shapes so this one is right angry eyebrow. Just there it's over laying with normal eyebrow. And you'll notice it's got an A there as a trigger. Now, those kinds of things, triggers still exist, but I'm not sure whether this one will still fire. We'll find out in just a moment because this is in a very, very early puppet. This has a nose also, there's the nose there like so. And then quite a lot more going on in the mouth shapes. This is where it starts to get a bit complex. I urge you not to start off with the Wendigo because there is a lot more going on in this file. Start off with something like the Chloe puppet or one of the other simple puppets from the link I showed earlier but the Wendigo, maybe leave that just a little while. Or have a look at it once you've done something with one of the other puppets but don't overload yourself with more information than you really need. Like everything else in life, if you're gonna do it really, really well, you start off in small steps. Imagine how alarming it would be if we arrived on the planet and could instantly walk and run around. It'd be crazy and probably be quite erratic. We learn to calibrate ourselves and your approach to doing this should be very, very similar. So you can see here it's got all the visemes that you saw earlier on in there okay so all of those things there. It's also got some profile action there as well and if I just turn off the frontal which is the view you get at the beginning here. So if I just come back up it should have a frontal folder just there. This one maybe does not. Oh, it does, there you go. So this is a frontal group. So this is a subgroup in the head there and you can drive that into other things. And just to close on that, if I just swap out here and close up the two Wendigo things. When you get to that particular stage and you want to move on and create three quarter views and profile views, this is pretty much how I sketch out Gold Beard's. I have a copy of the head in a separate document here. I tend to draw some rough direction lines so I can map out more or less where the nose is. Now as you turn, your nose either dips or rises depending what you're doing. So you've gotta vary it slightly, it's not literal, straightforward, we don't run on a screw turn there, we run on a nice little pivot. And then you go across to the full profile and sometimes draw one and draw the profile it makes it easier to draw the three quarter view.
Ratings and Reviews
Gary
Great Class! I am just beginning to learn Adobe Character Animator and this class was a great starter for me to learn some of the background on how the program works.
Student Work
Related Classes
Design Projects