Lessons
Class Introduction
17:26 2Welcome to Photography
13:08 3Camera Types Overview
02:00 4Viewing Systems
28:43 5Viewing Systems Q&A
08:45 6Lens Systems
32:06 7Shutter Systems
13:17 8Shutter Speeds
10:47Choosing a Shutter Speed
31:30 10Shutter Speeds for Handholding
08:36 11Shutter Speed Pop Quiz
09:06 12Camera Settings
25:35 13General Camera Q&A
14:38 14Sensor Sizes: The Basics
15:33 15Sensor Sizes: Compared
19:10 16Pixels
20:13 17ISO
21:13 18Sensor Q&A
13:34 19Focal Length: Overview
11:09 20Focal Length: Angle of View
15:09 21Wide Angle Lenses
08:48 22Telephoto Lenses
25:23 23Angle of View Q&A
09:29 24Fish Eye Lenses
10:39 25Tilt & Shift Lenses
23:42 26Subject Zone
17:19 27Lens Speed
09:56 28Aperture Basics
08:46 29Depth of Field
21:49 30Aperture Pop Quiz
13:23 31Lens Quality
18:30 32Photo Equipment Life Cycle
03:57 33Light Meter Basics
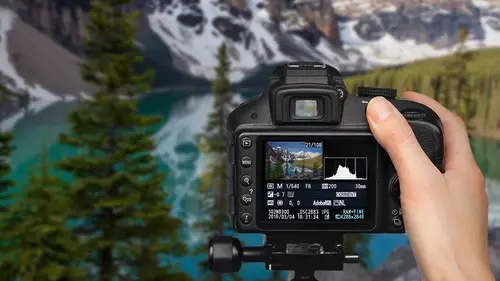
09:25 34Histogram
15:25 35Histogram Pop Quiz and Q&A
10:58 36Dynamic Range
06:03 37Exposure Modes
15:58 38Manual Exposure
09:38 39Sunny 16 Rule
05:54 40Exposure Bracketing
10:18 41Exposure Values
27:21 42Exposure Pop Quiz
26:43 43Focus Overview
16:15 44Focusing Systems
05:15 45Autofocus Controls
11:56 46Focus Points
07:35 47Autofocusing on Subjects
20:19 48Manual Focus
07:52 49Digital Focusing Assistance
03:40 50Focus Options: DSLR and Mirrorless
04:58 51Shutter Speeds for Sharpness and DoF
05:20 52Depth of Field Pop Quiz
12:14 53Depth of Field Camera Features
04:54 54Lens Sharpness
09:58 55Camera Movement
05:20 56Handheld and Tripod Focusing
04:32 57Advanced Techniques
07:12 58Hyperfocal Distance
06:50 59Hyperfocal Quiz and Focusing Formula
04:36 60Micro adjust and AF Fine Tune
05:34 61Focus Stacking and Post Sharpening
06:00 62Focus Problem Pop Quiz
18:07 63The Gadget Bag: Camera Accessories
25:30 64The Gadget Bag: Lens Accessories
12:46 65The Gadget Bag: Neutral Density Filter
20:43 66The Gadget Bag: Lens Hood and Teleconverters
08:55 67The Gadget Bag: Lens Adapters
05:43 68The Gadget Bag: Lens Cleaning Supplies
04:34 69The Gadget Bag: Macro Lenses and Accessories
15:57 70The Gadget Bag: Flash and Lighting
05:08 71The Gadget Bag: Tripods and Accessories
18:50 72The Gadget Bag: Custom Cases
11:20 7310 Thoughts on Being a Photographer
07:37 74Direct Sunlight
25:04 75Indirect Sunlight
18:49 76Sunrise and Sunset
18:39 77Cloud Light
14:48 78Golden Hour
09:50 79Light Pop Quiz
07:53 80Light Management
14:00 81Artificial Light
13:56 82Speedlights
16:02 83Off-Camera Flash
27:38 84Advanced Flash Techniques
09:49 85Editing Overview
08:24 86Editing Set-up
08:06 87Importing Images
16:45 88Best Use of Files and Folders
20:54 89Culling
20:56 90Develop: Fixing in Lightroom
18:13 91Develop: Treating Your Images
10:53 92Develop: Optimizing in Lightroom
14:51 93Art of Editing Q&A
06:01 94Composition Overview
06:53 95Photographic Intrusions
10:10 96Mystery and Working the Scene
16:18 97Point of View
09:11 98Better Backgrounds
16:02 99Unique Perspective
11:02 100Angle of View
15:06 101Subject Placement
41:14 102Subject Placement Q&A
05:18 103Panorama
07:39 104Multishot Techniques
13:57 105Timelapse
16:13 106Human Vision vs The Camera
20:07 107Visual Perception
08:35 108Visual Balance Test
22:56 109Visual Drama
12:25 110Elements of Design
28:57 111The Photographic Process
12:28 112Working the Shot
27:38 113The Moment
04:42 114One Hour Photo - Colby Brown
1:04:32 115One Hour Photo - John Keatley
1:03:05 116One Hour Photo - Art Wolfe
59:01 117One Hour Photo - Rocco Ancora
1:01:20 118One Hour Photo - Mike Hagen
1:01:20 119One Hour Photo - Lisa Carney
1:00:52 120One Hour Photo - Ian Shive
1:08:00 121One Hour Photo - Sandra Coan
1:10:29 122One Hour Photo - Daniel Gregory
1:06:07 123One Hour Photo - Scott Robert Lim
1:05:41Lesson Info
Point of View
So the first thing to really be considering once you have chosen a subject is your point of view. This is all about where you are in order to take this photograph. This is often where I get the most frustrated in photography because I wish I was 20 feet tall, I wish I could go anywhere I wanted and I had no restrictions, I wish there were no security guards, no fences, no board walks, I wish I was a human drone that could go up and down and around and go anywhere I wanted to and so this is all about being creative and dealing with what you've been dealt with and the situation that's available to you. This photograph is probably the photograph that has changed attitudes and perceptions, elicited so much talk and it's because it was from such a unique point of view. It's said that this photo, single-handedly, started the environmental movement. It makes you look at everything completely differently because we really hadn't seen this point of view before. While this point of view is gonna...
be a little tough for us to get to, we do all have our own point of view, our own history, our own experiences, and that's what we can put into our own photographs. Let's talk about how we can maximize our point of view. One option is just looking for what's the best point of view to tell the story of any particular subject. In Morocco, they have this thing called the goat tree, alright? There's these goats, they're real live goats, and they're really in a tree, okay? As you drive down the road, you'll stop on the side of the road, along with a dozen other tour buses, and you will get out and you will stand next to 50 other photographers and take photos of goats in trees. But most people get out of the bus, they take their photo and they get on the bus. It's that whole effort thing, okay? It's that whole time thing. Now I was leading a photo tour so, of course, we give people time to go out and shoot. We're gonna be here for 20 minutes, folks. There's kinda this just dirt field out here and so if you don't mind getting your feet a little dirty, you go out there, looking at the different angles of view. I mean, this shows goats in trees, but I think this angle of view does it a whole lot better. So what I've done is I've gotten down lower to the ground and now I have lots of blue below the goats. It's more clear that they're up in the tree compared to this first shot where it's all kinda muddled in the background. If you see that as a small photograph, it's hard to even tell what's going on and so by getting down on this low angle, by noticing this little very angled arch of this tree, that kinda has some interest to it in itself and now you can really see these goats up there very, very clearly. Moving around, finding that angle view, and I would like to say that I am just the smartest photographer and as soon as I got out of the van I knew that I needed to go exactly over there to get the shot, and sometimes I kinda feel like that's probably where the better shot's gonna be but I usually, I gotta see it with my own eyes. That's how I can really verify that this is the right place. I am as wrong as I am right. Oh, this is gonna be great over here, I'm gonna go over here, and I'm like, oh my gosh, look at that background, I didn't expect that. This is the type of thing where you really need to wander around and check things out before you shoot through an entire memory card while you're on the road. At the race track ... So it's really hard to get much higher than you are. However tall you are, that's kinda your limit unless you bring a ladder out, and I have been known to bring a ladder out. In this case, I didn't have my ladder with me. Standing up, this is not a bad shot. I like this because it has a very clean background and we can see the cyclists pretty easily, but as I progress through these series of photographs, I'm getting down lower and lower. Now, one of the things that I don't like about this photograph is that I see more of the crowd up here. Now, do I wanna see the crowd or not see the crowd? Well, that's kind of a give-and-take. I kinda like the clean background but I like getting down really low because if you noticed the way these guys ride bikes, is their heads are really tucked down and they're only looking up, and if you wanna see their face, you have to be really low to the ground because they're just kinda pointing their heads up a little bit trying to stay as aerodynamic as they can, and so I am prone, laying right down on the ground, alright? I got people looking at me like I'm a complete idiot but I'm getting shots that I'm happy with, so I don't care and so what is going to be the best point of view for any particular shot? If you have kids, if you have animals, getting down to eye-level and seeing the world from their point of view is probably one of the best tips for shooting those types of subjects. Getting down lower to the penguins, how do they see the world? Getting down on one knee, crawling around with them. Getting down nice and low so that we can see the foreground, the camera is relatively low to the ground so back in that gadget section, I talked about tripods, needing to get down low to the ground and not having that center-post, absolutely critical, I do not wanna go out with a tripod that cannot get me down low to the ground because I'm willing to get down to the ground. I may not be able to be able to get 10-feet up in the air but I can get down to the ground and that often gets me a unique point of view. I don't have a penthouse. I don't have a really high point of view that I get to look from a lot and so anytime that I do get a balcony or a restaurant or an overlook that I can look straight down on, I'm looking for something because that's kind of a unique point of view. Number one, it gives me a really clean background which is a topic that we'll continue to discuss. It gives me a clean background and just a different point of view that we don't normally get to see things. So shooting straight down works for a lot of different types of subjects, partly because it simplifies them in many ways. We don't see the clutter of everything else going on around. So Seattle is a long and skinny city. We got lots of waterways around us and so the city is very spread out and from the Space Needle on the right to the tall buildings on the left, it's somewhere around about a mile and a half, couple of kilometers, from one end of town to the other end. But if you go up to Kerry Park, which I've mentioned a number of times, you kinda line everything up and it seems like it's just one big jumble of buildings right there. The Space Needle and that black building to the right, that's about a mile and a half apart, so using that compression technique of a telephoto lens. Sometimes you'll choose the point of view based on the lighting situation and so sometimes you'll walk out, you'll see what the light is and you'll immediately know which direction you need to be facing and you're gonna have to move forwards, backwards, and move around to find the environment that is correct for that sort of lighting. I would not be shooting this subject if it was not for the lighting. That's what's forcing me into a particular composition in some ways, where I'm going to move and position myself as subjects move around. Strongly thinking about the lighting. Where is the sun setting? Where do I need to position myself? Where do I need to avoid putting my footprints in the snow? Very key component in a photograph like this. I had mentioned Bryce Canyon before. Where do I want to be when the sun comes up? Where is it gonna strike with nice side light so that I can see the hoodoos in Bryce Canyon? Sometimes you're gonna be choosing your point of view for focusing reasons. If you recall, I don't know that we talked too much about it, maybe not, in macro, kinda want to be shooting straight on to your subject so that you can hold the focus across the whole thing, being perpendicular to your subject, if you have a flat subject and so in this case, I'm very carefully positioning my camera so that my plane of focus and my subject are parallel so that I'm getting the correct plane of focus in here, I'm getting the right things in focus. I'm lining this up as straight as I can, sometimes using the grids that different cameras have in their viewfinders, there's options that you can turn on.
Class Materials
Free Download
Bonus Materials with Purchase
Ratings and Reviews
a Creativelive Student
Love love all John Greengo classes! Wish to have had him decades ago with this info, but no internet then!! John is the greatest photography teacher I have seen out there, and I watch a lot of Creative Live classes and folks on YouTube too. John is so detailed and there are a ton of ah ha moments for me and I know lots of others. I think I own 4 John Greengo classes so far and want to add this one and Travel Photography!! I just drop everything to watch John on Creative Live. I wish sometime soon he would teach a Lightroom class and his knowledge on photography post editing.!!! That would probably take a LOT OF TIME but I know John would explain it soooooo good, like he does all his Photography classes!! Thank you Creative Live for having such a wonderful instructor with John Greengo!! Make more classes John, for just love them and soak it up! There is soooo much to learn and sometimes just so overwhelming. Is there anyway you might do a Motivation class!!?? Like do this button for this day, and try this technique for a week, or post this subject for this week, etc. Motivation and inspiration, and playing around with what you teach, needed so much and would be so fun.!! Just saying??? Awaiting gadgets class now, while waiting for lunch break to be over. All the filters and gadgets, oh my. Thank you thank you for all you teach John, You are truly a wonderful wonderful instructor and I would highly recommend folks listening and buying your classes.
Eve
I don't think that adjectives like beautiful, fantastic or excellent can describe the course and classes with John Greengo well enough. I've just bought my first camera and I am a total amateur but I fell in love with photography while watching the classes with John. It is fun, clear, understandable, entertaining, informative and and and. He is not only a fabulous photographer but a great teacher as well. Easy to follow, clear explanations and fantastic visuals. The only disadvantage I can list here that he is sooooo good that keeps me from going out to shoot as I am just glued to the screen. :-) Don't miss it and well worth the money invested! Thank you John!
Vlad Chiriacescu
Wow! John is THE best teacher I have ever had the pleasure of learning from, and this is the most comprehensive, eloquent and fun course I have ever taken (online or off). If you're even / / interested in photography, take this course as soon as possible! You might find out that taking great photos requires much more work than you're willing to invest, or you might get so excited learning from John that you'll start taking your camera with you EVERYWHERE. At the very least, you'll learn the fundamental inner workings and techniques that WILL help you get a better photo. Worried about the cost? Well, I've taken courses that are twice as expensive that offer less than maybe a tenth of the value. You'll be much better off investing in this course than a new camera or a new lens. I cannot reccomend John and this course enough!