Light, Composition & Location
Lesson 4 from: Get Started with Lifestyle Family PhotographyElena S Blair
Light, Composition & Location
Lesson 4 from: Get Started with Lifestyle Family PhotographyElena S Blair
Lessons
Class Introduction
10:48 2What is Meaningful Lifestyle Family Photography?
15:37 3Settings for Shoots
10:50 4Light, Composition & Location
10:47 5Settings Q&A
08:54 6Why Connection is Important
15:11 7Connection Q&A
09:36 8Session Experience
10:43Marketing Strategy for Lifestyle Family Photography
09:34 10Family Preparation
14:11 11How to Get to Know Families Fast
12:22 12The Actual Shoot
08:10 13Considerations for a Photograph
11:43 14The Family Session Workflow
07:38 15Shoot: Start Standing
05:49 16Shoot: Money Shot & Siblings
05:08 17Shoot: Time to be Seated
06:41 18Shoot: Portrait of Each Child
02:09 19Shoot: Laying Down
04:25 20Shoot: Mom & Dad Alone with Child
06:50 21Shoot: Movement Poses & Everyone in The Frame
04:07 22Shoot: Parents Together & Mom Alone
04:40 23Additional Shoot Considerations
04:38 24Review Images from Shoot
07:17 25Shoot Q&A
08:23 26Pricing & Business Strategy
21:15 27My Editing Strategy
04:54 28How to Cull Images
03:44 29Outsourcing Post Production
12:53 30Image Gallery Delivery
08:42 31Pricing & Business Q&A
11:00 32Finalize The Client Experience
05:20Lesson Info
Light, Composition & Location
So now we're gonna go into some important considerations that you need to take into account. So remember we're thinking about, we're laying the foundation right now. So important considerations for lifestyle photography. So you gotta think about light. Of course, right. You gotta talk about light a little bit. You gotta think about composition. So you want your image to be pleasing to the viewer. You want your stuff to be compelling. You want people to stay awhile and look and composition has a lot to do with that. We gotta talk about environment and location because with this type of lifestyle photography, like I said, I'm almost 100% on location and I think that the environment really sets the tone. You can do it in studio but for my style, I think it helps. And then we're gonna talk about connection. Making connection happen. This is the most important part and this is where a lot of what's missing from a lot of people's work is connection. A lot of people learn about the light. The...
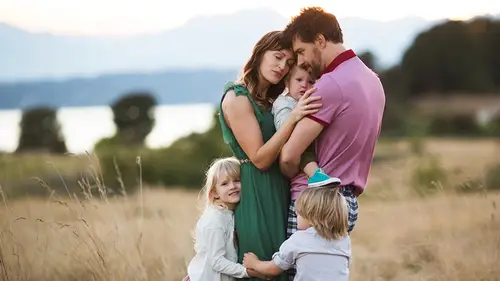
y learn about the camera's settings. They learn about composition. They've got the perfect environment. They're shootin' at golden hour and there's no connection. And that's where it just falls by the wayside. Okay. So we're gonna start with light. This is one of my favorite quotes about light. It says, "Embrace light. Admire it. Love it. But above all, know light. Know it for all you are worth, and you will know the key to photography." George Eastman. This couldn't be more true. Anyone that's in here that's kind of you know traveling along this journey, you'll know this. As soon as you start understanding light, it's like a light bulb goes off and all of a sudden, your work changes. So this is one of the most important things I think. Learn light, you have to be obsessed with it, okay. I see light in my kitchen and I'm like, "Oh that's really amazing". Or outside or even I love moody light. You'll see me use my light really moody and it's probably 'cause I live in Seattle and I have no choice. But even like deep shadows, all of that stuff. Light is something that you should start paying attention to all the time. Not just when you're using your camera. Every second. Like look at how light is illuminating human subjects and think about it. Think about what that's doing for your emotional connection just with that person. So first kind of light that I want to talk about is flat light. And so every location that I go to, I know all of my locations, I'm kind of a control freak about my sessions. And I make sure that I have a spot to do portraits in flat light because I do think that it's special for parents to have these really just simple, beautiful portraits of their children. Flat light is so wonderful for the eyes like that. It just really makes the eyes pop if you've got it on their face. And it's just beautiful for skin tones. It's really even. This is just a nice safe use of light. Important to know. But safe, it's pretty safe. And then there's directional light. Now outdoors directional, like if you're a lighting person and you know you're shooting in studio, you can manipulate this yourself. And I have had a person just tell me, "You need to learn how to do studio light, so that you can make the kind of light you want anywhere that you are." Well I want to go out to the beach and do this instead. And so directional light is gorgeous because it really creates, it almost makes the image feel like it's three-dimensional. But when your outdoors, you really need to be shooting at golden hour. You need to be shooting when, the sun has to be low enough to get this directional light. And so that's what's happening here. It's dipping well below the horizon and I arranged them so it would be coming at them like it sounds, from the direction, from the sides, directional. And it just kind of creates depth and interest and it's that moody feeling that I really like. And there's a baby butt, so that's cute. This is one of our audience members' family. And then there's backlight. So I use backlight creatively all the time. And I have had internet people tell me, "Why would you put this picture, you're blowing out so and so's face or whatever?" I love it. I'm obsessed with it. I'm all about blowing people's faces out. I think that backlight is almost like a prop. It's like a creative tool when you learn how to use backlight correctly. It really kind of creates this warmth in the image but it's also a layer of interest. It's just like, it makes, this family is beautiful so they would be interesting and beautiful no matter where you place them. But this light just kind of add, it's another element, it's another layer of interest, another layer of creativity. So I love to use backlight creatively, which is why I love shooting at golden hour. And you'll see that in my work. And then there's direct light, full sun. I'm gonna be totally honest with you. I avoided this for a long time, like until two or three years ago. And you know why? Because I learned when I was first starting out that you should never shoot in full sun. That you should never take a portrait in full sun. All of the lies that we learn in the beginning. You gotta unlearn all of this stuff. Full sun is incredible. It is absolutely stunning. If you're using it correctly. It's kind of contrast-y, it really is interesting. It's warm. And one thing about full sun is you really can't have them looking right at you because you'll have really deep shadows. I will do it with children sometimes because I have them look up at me. So it's kind of a way that you can do that. So it's more for this, you know, a shot that's a little bit more movement oriented or that kind of thing. But full sun, don't be afraid of it. Once I started doing it, I get really excited. I became obsessed. So full sun's really fun. Okay. So now we're gonna talk about composition. Just super simple composition considerations that you need to think about when you're making a lifestyle photograph. See there I am, blowing faces out again. Here is just standard center composition. I'm actually sort of obsessed with center composition. I do it a lot. I just feel like when you have the family right in the middle and there aren't a whole lot of other distractions, it just really shows the viewer where you want them to look. Right there. There's nowhere else to go. You're looking in the center. You have great framing, evens on each side. And so center composition is kind of a simple composition, but it's very beautiful and it's one that I use a lot. Of course there's the rule of thirds. You know the rule of thirds is the rule that this is how our eye naturally looks at something. It's broken up into these nine different squares. And so you're lining your family up in the rule of thirds. I like the rule of thirds. I like center composition. My one piece of advice to you between the two is don't be in the middle. So if it's not quite rule of thirds or not quite centered, it's awkward to look at. And you don't want your work to be too awkward to look at. I mean I break rules, it can be awkward sometimes, but if they don't know that's what they're doing, but they'll move right along if it's not compelling, if it's not comfortable to look at. So just make sure you're either within the rule of thirds or centered. Extreme composition is something that I like to do a lot. It's kind of fun. It's where you have your subjects on an extreme part of the frame, whether that be bottom, top, on the side. And I think it's just kind of a fun interesting way to portray a family. And kind of adds that element of interest, but also the environment can be really a big part of it, as well. And then, you can fill the frame with your subjects. So this is the last composition piece that I'm gonna show you. I do this a lot, too. I want the family to feel like they remember what it felt like to have that photo taken. And I want the viewer to feel like they are kind of getting a glimpse into this family's dynamic and feel like they were actually there. I like it to feel like you could reach out and touch the subject. So I fill the frame a lot with my subjects. When you do this, there are no distractions. This is all there is, is the family. And so filling the frame is a powerful way to create connection. Okay, so we're gonna talk about location. In lifestyle photography, location has a lot to do with the end result, I think. Especially in my line of work. I love to just the environment in my work. And one thing that you have to think about with location that you really need to consider is the ages of the children and the developmental stages of the children. So I shoot primarily in three or four different types of locations. I shoot in fields, which is what this is. I shoot at the beach a lot, we live in Seattle. I will do urban locations, forest and mountain. So like I said, I'm very lucky, you guys. I know that some of my California friends have to drive like two hours to their locations. I mean, all my locations are an hour or less, more like 20 minutes usually. Lucky. But I'm kind of a creature of habit. I shoot at the same locations over and over again, as well. Here's beach. Beach is really fun. We almost always get wet at the beach. It's not always this warm here in Seattle, but (laughs). That's full sun we were talking about. I really love to bring the environment into my pictures, though. If we're gonna be at the beach, we're gonna get in the water. And when it's colder, we maybe won't get in that deep and we won't be like having a splash fight, but I really love to use those elements. So urban is probably one that I do the least. And it's because I work with a lot of small children. The last thing you want is for your mom to be stressed out about anything, much less her child getting run over by a car. So I will only do urban if, when parents request this, we talk a lot about the disposition of their children and whether or not they're gonna be able to behave, really to handle it. And parents are, if they mention it and I sort of say that, I say, "Sure, we can shoot in urban location, but we need to make sure that you know that Johnny is gonna want to run around and is he gonna be cool with being able to stay close to us?" And a lot times they're like, "Yeah maybe we'll wait until Johnny's five." Because the other locations allow for movement, allow for the kids to run around and when you're in an urban location, you don't really have that freedom, so you just have to take the kid into consideration there. Mountains, I love the mountains. I love to go out to the mountains for family shoots. It is just a magical element to bring in and don't be afraid to drive a little bit to get out there. I just think that it's so fun to incorporate this into your family work because it just really makes it even more interesting and artistic. And the forest, Pacific Northwest. The forest and parks are really great for little kids because they have room to wander. So that's what my biggest thing for you is to think about the ages of your children when you're thinking about what location you're gonna choose. Because you really want them to be comfortable and you really want the mom to be able to relax.
Class Materials
Bonus Materials with Purchase
Ratings and Reviews
Armstrong Su
is super knowledgable, yet down-to-earth and relatable. I love how he explains the exact gear he uses but also describes ways to accomplish the same look using DIY and less expensive alternatives. The segment where he demos a live shoot in multiple, difficult lighting situations is worth the cost of the class alone! Bonus: He's super funny. He could probably double as a comedian on the side, but I digress. This class was informative, funny, and very practical for any photographer that wants to increase their profit and expand their business into the professional world. He gives all his prices and workflows so you can get up and running in 2 days! :) Awesome class overall, and it's a great sequel to his professional headshot class (which I also bought and loved.)
Sandra Kay Hayes
I am totally in tears watching this, and think that every person going into Photography should watch these. She is a great teacher, and helps us to understand our "why" so much better. I also LOVE that she helps one feel confident with the non-perfect, (or so called) shots, Thank you so much for giving me more confidence to shot what I love and not worry about "rules!!". Best class I've taken I will recommend her to every group I am in!!!
Julia Khris
Elena is a great presenter. Delivers information in a very fun and engaging way. This course would be good for a beginner photographer. She shares the basics, but unfortunately doesn't quite provide advice on the more tricky questions. She shares a lot about her current state of business (10 years in and making enough profit to afford hiring staff). This is great to know what to aim for, however, it would be more beneficial to hear more about HOW to get to this stage. The main idea that I took from this course is: outsource as many processes as you can. Elena doesn't have a very distinctive style (no offence, but there is a huge competition in the style and editing that she works with), I would love to hear her advice on how to win in such high competition, how to convince clients to choose you and pay higher price tag for an equal quality of work. This is a fairly inexpensive class, so I would recommend it to the beginners, but not to the more experienced photographers.