Image 7 - Portrait
Lesson 47 from: Get The Most Out of Your Photos With Capture One Pro 12David Grover
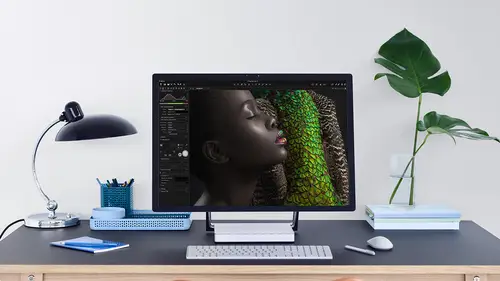
Image 7 - Portrait
Lesson 47 from: Get The Most Out of Your Photos With Capture One Pro 12David Grover
Lesson Info
47. Image 7 - Portrait
Lessons
Interface Overview
04:08 2Customizing Your Workspace and Keyboard Shortcuts
15:55 3Making Your First Catalog
07:02 4Importing Your First Images
11:51 5Virtual Organization
20:21 6Basic Tool Behavior
13:32 7Starting Approach to Editing
24:02 8Next Level Editing
20:10Color Tools Overview
16:28 10Basic Copy Paste Workflow
10:40 11Basic Export
13:32 12Getting Started on an Edit
05:13 13Adding Layers to Your Toolkit
10:25 14Radial and Linear Gradients
08:21 15Luminosity Masking
10:12 16More Advanced Layers
22:44 17Removing Simple Objects and Local Adjustments
14:52 18Advanced Color Edits
05:31 19Using the Color Range to Select Just What You Need
05:45 20Editing Colors in General
03:48 21Editing Skin Tones
14:30 22Combining Color Selections with Layers
08:58 23Creating Masks From the Color Editor
10:28 24Color Grading with the Color Balance Tool
16:34 25Intro to Second Day
01:37 26Session Overview
05:47 27Tethered Basics
05:04 28Setting Up Simple Sessions and Setting Naming Conventions
10:11 29Controlling the Camera
05:08 30Handling Next Capture Adjustments
07:39 31Using Live View Focusing and Overlay
19:40 32Selecting Images and Using Smart Albums
14:55 33Saving a Session Template
03:51 34Overview of Process Recipes
05:28 35Tokens Overview
26:21 36A Simple Round Trip
14:04 37Sharpening Workflow
08:06 38Creating a Recipe for Web Output
15:50 39Selecting with a File Name List
11:46 40Using Plugins and Sharing to Clients with PRODIBI
06:06 41Image Review 1 - Sometimes Simple Works!
08:44 42Image 2 - Radial or Gradient Masks, Object Removal
07:28 43Image 3 - Keystone Tool and Aspect Ratio
09:11 44Image 4 - Using Styles in Capture One
10:04 45Image 5 - Black and White
09:13 46Image 6 - Landscape
07:22 47Image 7 - Portrait
05:06 48Image 8 - Action in Lowlight
07:46Lesson Info
Image 7 - Portrait
So first of all, we can see the exposure is not quite right. So it's kind of under exposed because we don't have anything from the mid tones to the highlights. Let's get a crop in place first. Doesn't need much just a little bit, Um, maybe down the bottom as well. It's like so, so looking at the exposure we need to bring the exposure up the touch. And I don't want to go any more than that because I think then the skin will get to washed out. But we might be able to just do a little bit with the brightness, so I'm happy with that. If we look at the skin, we can see, you know, there is some skin tone variation, which is normal for all of us. Now, this is kind of a casual portrait snow, a beauty shot so we don't expect totally uniforms skin, but we could correct it a little bit. So if you remember when we used the color editor, then we have the skin tone tab, which works specifically for that. But it always works better if you do it on a layer. So my preferred method was to Let's add a ne...
w filled layer. Let's call that skin tone skin Tober, skin tone like so go into the cholera deter. I'll make this big a few guys. Did I feel that land? I can't remember. Yes, I did. So let's zoom in. And if you remember the workflow, we grab our skin tone color picker and we look at our subject and we decide where are desirable or the best skin turn it. So I'm going to go down here somewhere like that and click once. Now I'm gonna expand out this tool just to make sure I can capture all of the potential skin tones on our subject on because I'm going to do it on a layer. I'm gonna be quite, you know, broad with this as well. So now our uniformity, sliders, if we drag these to the right, that will correct our skin tone quite nicely and would be careful with the lightness. So if you remember what the uniformity sliders do is that everything in that triangle in that wedge is being transformed to that desirable skin tone color that I picked. Now, of course, the unfortunate effect is that it's changing in a lip color as well. But no matter, we're gonna brush that back in. So let's close the color editor and we're going to say, clear mosque, going to grab a brush and we're going to selectively brush in where we want that correction. So nice low flow. So we're gonna go up here, zoom in a little bit, So around here, across the bridge of the nose, up here in the corner, Andi under the Oise and doing a nice job of correcting that. But we don't go too far because it is natural. So just around there and again, if I think I've done too much, we can grab all capacity slider and then go somewhere sort of in between Around here, I think, looks good. And that's pretty much, you know, a great edit without too much adjustment. This is super annoying. This whatever this highlight is in the background. So this probably will work quite nicely with the hill layer. So let's make a new here layer, grab my brush, Weaken selected bit of the background from over here, I'm guessing. And then just most that in perfect. So now that destruction has gone away and to finish. Let's drop in a bit of vignette ing as well. Looks really good. So if we hold our option key down and click on Reset, that was before and that was off, like so. So generally I don't tend to do much clarity on people. It can be, you know, a bit too aggressive on the face, but it might actually work quite nicely on a hair. So what we could do? Uh, let's just do a quick here, lion, grab a brush and we're just gonna go full flow, nice and soft. And let's just mosque the hair like so careful not get face around 10 and right click. That's make that a bit smaller on, and it's pretty good. So now if I take clarity, we condemn boost that up. Just a touch. So so once again received before and after very simple edits, but does make a big difference
Class Materials
Bonus Materials with Purchase
Ratings and Reviews
Leon
This is a superb course. David is an excellent teacher. I'm coming to the end of it and have learnt so much. I've been using the software for a year, self-learning as I went along. I had watched the odd David Grover video on YouTube, but never got much further in my understanding of the software. Capture One is brilliant software and to do it justice you need to learn it properly from an expert. Highly recommend this course if you want to produce professional results.
lakiut
Excellent course and a very engaging speaker. If you are starting with Capture One 12, this is the best class to take. The lessons are presented and explained in an organized way that it shortens the learning curve. Thank you, David. Cheers!
Jino Lee
One of the best course I've purchased. Very helpful and I learned so much more with this course and in a short period of time, than all the official Capture One You Tube videos put together! Anyways David Grover is the same guy who does the Phase One C1 official YouTube videos, so there's no better person to conduct this course than him! Truly excellent and if you think you know all about C1 Pro 12 interface, wait till you watch this course.