Lesson Info
4. Demo: Oil Paint Glazing Techniques
Lessons
Class Introduction
06:06 2Colors of Oil Paints
15:16 3Solvents and Varnishes For Oil Paints
06:19 4Demo: Oil Paint Glazing Techniques
16:05 5Oil Painting Brushes & Palette Knives
08:01 6Demo: Oil Painting Brushes
14:34 7Demo: Oil Painting Palette Knives
08:15 8Oil Paints Tools and Supplies Q&A
04:22Lesson Info
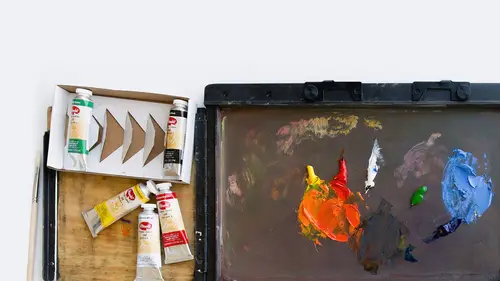
Demo: Oil Paint Glazing Techniques
But let's do a little testing here of the glazing technique, and I'm gonna use some cups, which is a standard thing to have in the studio. The cups allow you to mix larger quantities of color, and also separate out your gloss varnish, your solvent, etc. I'm gonna pour a little bit of each of these things in here. We'll start with the linseed oil which is what we're gonna use to thin the color without reducing its vibrancy. And it's literally just an oil. If I'm strong enough to open it-- there, I got it. And you can see it almost looks like cooking oil, and it sort of feels like olive oil or corn oil. And the consistency of it is very, very similar. Put that aside. The next thing I'm putting in is the thinner, or the solvent. Again, this is what you use to... If you're using traditional oils, you're using a solvent to clean your brushes, to thin the paint like water does. You can't use water with traditional oils. But today, we're using these water soluble oils. The solvent is just an ...
additional way to thin the color. You don't need to clean it in the solvent. We've actually got water to do that. Put this a little bit closer... So it's within reach, okay. So the next two things, and I can smell this, I don't know if you can smell-- Not yet. No? Okay. (Kenna laughs) Yeah. Even though they are water soluble, there's still a slight odor to the stuff. By comparison to your traditional oils, it's significantly less. I have a sensitive nose, so I can smell everything. But this is a very, very gentle scent. It's not really, really strong. But if you are sensitive to that, you might still wanna have some ventilation. So this is a gloss varnish. Again, this would be used at the very end of a painting. Certainly not at the beginning. The consistency is very similar to the linseed oil. And all this will do is, when you seal the final painting, it'll be shiny and it'll keep that dust from attaching to your oil paint. And this one is your matte varnish. It's a little more cloudy. As you pour it in, just slightly different, this is the same thing you're using at the end of a picture, and it doesn't have a shine to it, so it's good for work that's gonna be reproduced or that you might take a scan or photo of. So I'm gonna put the bottles in front, so I remember that they all look pretty similar. So I wanna remember what is what. You can sort of see that the linseed oil is a slightly deeper color, and we have extra here, which is actually a more amber tone, but it's the same material. Then I put my caps back on, so that I don't tip them over. Okay. So, what I'm gonna do is also talk to you a little bit about what I think is kind of a critical piece to oil painting. Almost more important than with acrylics, but it's certainly as important. It is what's called fat over lean. When you're painting, you don't want to put a thin glaze of color over a thick what I call a blob or chunk of color. Because if you do that, you're sealing in literally paint that's still damp underneath. Think of if you had pudding and it's dry on the top. And then underneath it's still kind of moist. That happens with oil paint and because it takes so long to dry, if you're doing thick layers of color, you don't want to put color on top of that until you know that oil paint is absolutely dry. Thick amounts of color can take weeks to dry. And you can't really know by just touching it because it might feel like it's dry on the exterior so you do want to make sure the thicker the paint the longer the dry time. So these are fairly thin applications of color. Now what I'm gonna do is I'm gonna test with my glazes. And we'll talk about the brushes in a minute. But I just want to start with our glazes so you can see what it looks like. Just even looking at this color on the surface, this surface is a pre-gessoed board and it's smooth, so it's really really slick. And I test it here with a lot of thinner and it looks really different than when you have just the pure pigment. So the thinner has a kind of reaction to the smooth surface. It's like it's resisting it. So I found that really interesting. I'm used to working more on a canvas than on a board like this. Now, I do use, again, I mentioned this before. My security blanket is a blotter or paper towel. You can use a sponge as well. I use this because it's what I'm used to and familiar with. And so it's just a comfort thing. But someone mentioned in the comments that they use a sponge. A sponge is a really good tool too. All you're doing with this is you're blotting your brush if you're using water or solvent with traditional oils to get the color off the brush. So let's start with glazing some of this color so you can see what happens when you use solvent versus linseed oil. And I'm gonna turn to Kenna to ask, you know I like to ask you, what color should we start with? Alright, well, let's just start with a blue. Any blue you wish. Any blue I wish. So I'm gonna grab ultramarine which is a more purple blue. This makes gorgeous purples because it already is shifted towards purple as opposed to green. Now this is the palette that I would standardly use for oil, but we have two of them. We have two types. This one is a metal tray that's covered in a ceramic coating. And it's really a nice, smooth, slick surface to move the paint around. I also recommend glass because it's also really smooth and slick and easy to move the paint around. I do notice that people sometimes use, and I don't have it here because I loathe it, it's paper covered in a kind of waxy surface. My students use it and it's in a pad. But the color, acrylics, oils, they kind of resist that surface and react to it so it's harder to mix a big pile of color. So I recommend glass or ceramic as a really fine surface. But we'll start with a ceramic. And you notice also I have this big bowl here. You can use any kind of container for, if you have water, you're gonna use a huge quantity of it. If you're using a solvent to clean your brushes like traditional oils, you might not need quite as big a bucket but it's still gonna get full of paint and color. So you should be changing that color frequently. That bucket of water frequently. Because it will be filled with color before long. And then that color starts to be reintroduced to your painting. So you wanna keep that clean whether solvent or it's water. Okay, so let's test three different ways of creating a glaze. Glazing, again, is a wonderful aspect of oils. We'll start in this case because it's water soluble with just glazing water on top of one of the pigments that's here. And let's just see what it looks like. I'll test it with this orange. I can already tell you what going probably to happen here is it's gonna resist the surface a little bit. Yeah, you can see it's thin. It doesn't have a lot of yumminess to it when it lands on this and it kind of beads up on the surface. And that's because the surface is really rather slick and smooth. So that's water. And water is thinning out the color. But let's test our next kind of color which is... The solvent or the thinner. It acts like water, but it's a little different than water because it's a chemical meant to create transparency but not break down the color. And that's really what's happening here is the water is diluting the pigment. The pigment is bound by oil. So the solvent doesn't do it the way the water does it. The water just breaks it down a lot. And so it's not an ideal material. The water's not great for creating glazes. It's great for just cleanup. So I'm gonna put... This is with solvent. And again, it does have a scent to it but it's not as strong as traditional. And you can even see how it's laying on the surface. I've used basically the same exact quantity of solvent as I did with water. But you can see the color's holding its integrity. Is that visible on the... And I think it still streaky because there's a lot of solvent there but it holds its integrity. Which is wonderful. Now let's compare that to, and I'm just gonna blot my brush so that I don't have too much solvent in here. I'll clean it out. Again, probably the hardest thing to remember is to continue to keep your brushes clean whether you're using solvent with traditional or water. You wanna make sure that the brush isn't full of pigment when you go to your next color. So now we're gonna use some linseed oil. And linseed oil is the best medium for creating glazes. Because it's oil, it's functioning with the oil of the color to create a wonderful thinning without reducing the vibrancy of the color. And I'm trying to thin it. It takes a lot of oil to get... I have to keep dipping into the oil to get the color to be as thin as it is here. Let's try it. Now look at how that color holds up on the surface. You can see more of the brush stroke and it's like this window. It's almost like a stained glass window that you're looking through to see the color underneath. Now that is yummy. I love it. And I'll just show you aside that's what that looks like. So if you compare this kind of color and how it looks with the linseed oil versus the same exact color with the solvent versus the same exact color. And I'll do it again a little bit more with water so you can see what that's doing on that surface. Here, this is with water. They react really, really differently. And that's important to note because look at how that beads up. You never wanna use just water obviously with only water soluble oils because it's not going to give you like with watercolor or acrylics that thinning aspect or glazing aspect that you can achieve with those other media. So linseed oil is the superior choice for making beautiful glazes. And I wanna show you over here if we add linseed oil. And I'm not gonna varnish these yet because again that's what you do at the very end of a picture. And that's your gloss. And that varnish. That's your last step. But if we do a little linseed oil and add some white to this I want you to see how the opacity looks on this color. And opacity, again, is you can glaze with a lot of white or a little bit of white in your color. Let's just add a little bit of white. And then we're gonna thin it out with a little linseed oil. It's called translucent. You're seeing a little bit of color through the opacity that I'm putting on top. It's not super opaque. It's translucent. So you have opaque color. Can't see through it. Translucent can see a little bit through. Transparent, you can see right through like a window into the color below. So let's put it not on blue. We'll test it over here. So this is with a little bit of opacity and some linseed oil. And again, it makes beautiful, beautiful color. I can follow the brushstroke that's there. Or I can go against the grain. There's no right or wrong way. It just depends on the texture you're trying to make. But that creates some quite glorious sort of coloration to create this translucent window. I'll now make it super, super opaque. Again, I'm using the linseed oil to make the color a little looser as opposed to a thick pile of color. But you don't need much of the linseed oil to do that. I'm looking for a color to react to. I'm gonna use this red here. Then we use a thick pile of this. Okay. So the color. Right now, I'm sort of burying that reddish color underneath. I'm letting just a little tiny bit of it show through. And I'm stroking the opposite direction that I stroked before. Now again, if I stroke in the same direction it has just a different visual look than if I stroke in the opposite direction. No right or wrong way. It just depends on the effect you're trying to make. So that's an opaque patch of color on a transparent color. We can sort of see that blue pops forward. It has a kind of... White tends to make colors pop forward. I'll test it on another spot. I'll put it right next to this which is actually the same color. I want you to see that reaction. The white is making this color, same blue as here, jump forward. Can you see that, kind of? Is that visible? It's something good to know because spatially when you're painting something you're using white to create volume. Because you're using it to suggest light. But you're also using it to create space. So the things that are gonna tend to have more white in them will tend to jump off the transparent colors. You can break that rule, and people do. And that's fine. But it typically works that way. So the other thing I want to show here. I'll just clean my brush a little bit. I wanna start talking to you about the different types of brushes that we typically use for oil painting. And there's a really nice variety. You don't have to have as many brushes as I have over here. I have a lot of brushes. But I wanted to be able to show you what the potential is. I'm sort of of the mind, and I'm gonna pull out the sample that I made ahead of time, that basically shows the different kinds of brushstrokes. And I'll remake them so you can see it. Let me get this down here. And I'll just mention that with oils, people often work with easels. And the reason why is because if you're making a big picture and you're painting, the chances that you're gonna smear the paint when you're working on a flat surface like this are pretty good. If it's a tiny painting, you can control it more. And I'm gonna try to control it here. I don't want my hand in the paint. Because if it's wet, it'll be all over my clothes. An easel allows you to keep your hand up to hold your brush and be away. That's why these are so long. It's to keep you away from the surface of that painting. So that you don't smear it. You're letting the brush do the work. You're not letting your hand or your arm mush that color around. So some people don't work with easels. They might work on a tilted or slanted surface to paint. Just because when things are flat, they tend to... You're not seeing exactly the composition in quite the way that it would if you had it directly to your face. So I'm not trying to draw or paint a fully-fledged picture here. I'm just making test marks. So I'm not worried about that. But if I were working at home and I were doing an oil painting I wouldn't necessarily use an easel because I paint so small. But I might tilt the surface. And you can buy wedges or you could just make one yourself. I've made them out of a rolled-up towel and a piece of plywood. And I lean my painting so it's just on an angle where I can see everything I need to see. And the composition hasn't changed because it's tilting away from me. But I'll leave this flat for now.
Class Materials
Bonus Materials with Purchase
Ratings and Reviews
CG
I've been a silk painter for decades and am just starting out with oils. This course was extremely helpful, especially the demos. One thing--at the very end she says that with traditional oils you'll need to clean your hands with a solvent before washing with soap. Not a great idea if you want to be healthy. I remove pigment on my hands by rubbing a clean oil on them, then washing it all away with soap.