Watercolor Tools and Supplies Q&A
Lesson 7 from: Getting Started with Watercolor & Gouache PaintsMary Jane Begin
Watercolor Tools and Supplies Q&A
Lesson 7 from: Getting Started with Watercolor & Gouache PaintsMary Jane Begin
Lesson Info
7. Watercolor Tools and Supplies Q&A
Lessons
Class Introduction
06:26 2Materials For Watercolor and Gouache Paintings
14:06 3Opacity and Transparency of Color
08:48 4Natural Man Made Synthetic Sponges
07:34 5Demo
07:40 6Brushes and Other Tools For Watercolors
15:34 7Watercolor Tools and Supplies Q&A
14:25 8Soaking and Stretching Watercolor Paper
07:08Lesson Info
Watercolor Tools and Supplies Q&A
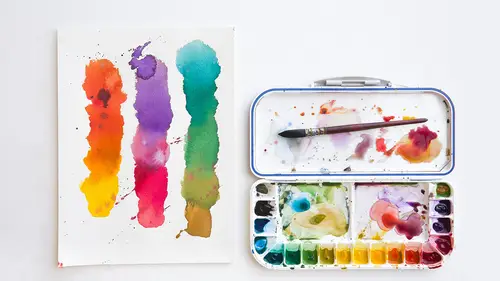
So I'm gonna go back to when you were talking about making your sample boards. And one of the questions from actually Rebecca, was do you use a blow dryer when you work with watercolor so that you can see the dried color sooner? And does it affect the color at all when you are using that blow dryer? That's a really good question. Thank you Rebecca. So yes I do use a blow dryer. For two reasons. One, because I want to speed up the time it takes to make up a painting. I don't want to just have to wait around sit around and wait for the color to dry. So I use a blow dryer in my studio. We're not using one today because it's tedious to watch someone blow dry a picture and it's very loud. But the blow dryer also works well for people who are impatient. And I am impatient. If I didn't use a blow dryer, what I might tend to do is go back into the watercolor that's drying and not dried, and try to add the next layer. And then you get this weird color split which we can demonstrate later. The...
color split does this weird crunchy thing that isn't very appealing. So the blow dryer keeps me from going back into that almost dry, like this is almost, I'll move this out of the way. Almost dry here. And if I go back in and start monkeying around. I'm lifting the color right off the surface and I might be trying to add a color, another color to it and all of a sudden I'm neutralizing this color because I'm mushing it all around. And it's because it wasn't fully dry. So blow dryers are your friend. They're great to have in the studio for acrylics as well. Oils not so much because it takes time to dry the oils. I'll use a fan for oil paints if I want to speed up drying time. But with watercolor, yes, love the blow dryer. Okay, fantastic. Elizabeth D asked why not just use the artist tape instead of the blue tape? So can you tell us again when you use each of those. That's a really good question. So the artist tape, there's a couple reasons. The artist tape is, it's expensive. More expensive than the other tape. And you might have a tendency to use a little bit less of it. And if you're doing your basic first run with a tape like this or this. The other issue is, and even more importantly, is that these tapes are designed for using with wet media. So when you press it down on the surface, that watercolor is not going to leak underneath and create leakage. This tape is not designed for that. It's designed for other purposes but not for necessarily for painting. So I always put the tape that I know will keep leakage from happening around a picture. And we can even look at let's see if I have an example. Hopefully it'll work. So if I look at these, when I'm finished with my piece, I would have a tendency to you know. And it's sort of one of my favorite parts of making a picture. Is pulling off the tape. But you'll see when I pull off this blue tape here. You should be able to see a nice clean edge. It should not bleed. Yay, it didn't bleed. So with only the white tape, you would not get this clean edge. So I think it's really important to have the white tape for color but use the painter's tape. The blue or a traditional masking. And should be a masking, you want to test it. Because some tapes are not designed for painting and they tear the paper. So you want to test your tape first to make sure it's not tearing your watercolor paper. But that's the reason why I do that. Very pro tip, thank you for that. You're welcome. Okay question from Ryan Love. Is there are ratio rule in mixing colors to create a chart? So going back to the water and the color when you are making that sample chart. Yup. Is there a ratio in terms of? I think in terms of the amount of paint and the amount of water. Oh that's a really good question. And I'm going to grab the chart again to show you. So this particular chart is on the light side. Because more water was used rather than less. My rule of thumb with charts in general is 50/50. Is I want there to be enough water to move the pigment around but not so much that it makes a light pale wash. If it's too light, you can't see the color. Conversely, if there's very little water, that color gets so dense you can hardly tell the difference between one and the other. So I'm of sort of 50% value of your tonality of color. These colors would land in that range. Some of these a little pale, too washed out. 50% water, 50% color. If you're finding that 50% water is a little too much water, reduce it but don't go down to just, like with these liquid colors here using the pure pigment. You need some water to move that around. The second thing I'd say about that is I tend to like to do wet into wet for my color charts. You put the tape down or, you know use your brush and wet the paper first. Wet into wet makes a more solid shape of color. And it's a little easier to read your chart than if it's a lot of texture and movement of the color. You can see there's like a little spot on this here. If you drop the water by accident in that spot. When the color is really smooth like this, when it's wet into wet, it's just easier to look at that color as a consistent tone. But that's roughly the ratio. Great, great, so consistency, important. Yes, yes, yes, yes. Great. Okay so Ryan Love and I'm not sure if you're going to talk about this later is asking about cleaning brushes. And is there a best practice? And if so are there soaps you recommend? So with watercolor brushes, especially with the sable and Kolinsky brush. I'll just go back to those. You want to keep them clean. I don't generally use soap for my watercolor brushes. I might for acrylic brushes or oil brushes because the pigment tends to be more heavily embedded in the brush. Like for example this brush, which has a lot of purple in it. The first thing I would do, is make sure I, and the water would be clean. I would have pure water, no pigment in the water. And I would make sure I'm pressing that brush a lot before I, you know, tap it. You can still see, there's purple. There's still purple in that brush. The brush looks clean but it's not. There's still pigment in there. So I would do this, I'll rinse them in the sink until literally they become clear. Just like you would if you're painting a house or a room what have you. The next thing that I do when I'm storing my brushes is I would use a stand like I showed you or lay them flat. And let them dry out. Never leave them in the bowl. But the thing is with soap and watercolor is because soap has a kind of, there's a chemical nature to soap and its reaction to watercolor. Sometimes if there's still soap in the brush, that's gonna activate with the watercolor and it may do odd things to your color. So I think that watercolor brushes unlike acrylics and oils, can be cleaned beautifully with water as long as you just keep tapping. To make sure there's no pigment left in the brush. The other thing is if you use your color in a really thick way. For example if I do a little dry brush here. Trying to find to find a color that's as dry as I can. You know, if you're using it fairly thickly and you're getting a lot. Now look at that. I love the texture of the dry brush. It can be really wonderful. Particularly for landscape. The dry brush can be fabulous. And I'm controlling it by pressure. The more pressure, the more pigment comes out. So if I'm trying to make just a sort of, a grazing of tonality, I'm just gonna go back and forth really lightly to create a kind of light texture and tone. But if I get a lot of pigment on that brush, and it cakes up and dries, it's gonna be harder to get it off. So I would never leave a paintbrush sitting on the side with a lot of caked up watercolor on it. You can get it out. But it's going to tend to tear the fiber, the hairs from the brush. So it's not, watercolor is nice in the fact that it's easy to clean up. It think it's one of the reasons why I like it. Because it's super easy to clean up. All right, great. So if somebody were interested in creating their own cake sort of out of the tube paint. Can you talk to that a little a bit of that. So basically what I did here is I squeezed out the tube watercolor. I just made a little circle dot. You can also literally fill that whole rectangle or square with a chunk of pigment. So it's literally a square cake like this. I did it to save paint. This is a pretty big tray. And I didn't want to use up all my paint testing these as dry. But you just squeeze it out, you let it dry usually over night. That'll be fully dry. Some of the colors stay a little more tacky through time. Like even now, cadmiums in all pigments dry very slowly. I don't know why they just do. Cadmium yellows, cadmium reds dry really slowly. The other thing when you're making your own sort of cake system is, you want to make sure that you cover it. And this is the cover to this tray. Because if you don't and it dries out too fast, the color kind of cracks and literally flecks off the surface. So this I would keep my watercolors, my cake watercolors after I've squeezed them out of the tube. And I'll show you. It's not complicated. Let me put this back here. Yeah here this color. Kenna's favorite color. I would just squeeze it right in. And then it'll attach to another piece of color. And it'll dry and I can reactivate any of these colors. I'll do that now. And as I said reactivate just means you're waking that color back up. This blue right here with is a cerulean. I'm gonna add water to it. And the color's back to life again. I like the tube watercolor colors a lot. I kind of like them more. Even though I think these are really nice. Even more than pre-caked color. And I like to cook. So I would have a tendency to make my own little portable kit like this. I'd probably do it a little smaller. I'd use a smaller tray. But there's your color. It's active, and you can see again, where the watercolor hits that edge. Watercolor hits the dry paper. You're creating an edge. And people get crazy about that, like why is that happening? And it's like well because your water plus your dry. That's what watercolor wants to do. So let it do that. It wants to do that. I hope I answered the question. That's great, thank you. So Lauren McDowell asks in pulling color, I've read of watercolorists using Magic Eraser type thing for a stronger pull. I was wondering if there could be a chemical reaction with that type of thing. That could change the paint over time. For the piece. It's called a what? Magical? A Magic Eraser? They're one of those things that you use to erase things on the wall. Whether it's scratches or what have you. And I guess using that instead of these traditional sponges. Well I would wonder about the chemical reaction. When you're using a subtractive tool like a natural sponge, the brush itself will literally pull the color. It doesn't do it as well because it's a soft brush. But it can pull that color off that surface. There's no chemical, it's just water. So in all these uses, you're just using water. And that's to my mind that seems wiser than using anything that has a chemical in it. Because these colors can break down over time. Sunlight will change it. It's a question mark what that would do to the color over time. So I would tend to use these tools that you know aren't going to change the color. It's just water and the tool itself. So I have not used a magic eraser. But I would not be inclined to, I think because of the question mark of what would I be doing to the color of this picture over time? And I wouldn't want to risk it. Great, all natural, way to go. All natural. Okay one more final question. And this is getting into a little bit of practice. Donna Galiano is a calligrapher. And so she says what is the best way to use watercolor for illumination? She is a calligrapher and wants to add illuminated letters into her text. Ooh, so is the question about the brushes or? She just wrote what is the best way to use watercolor for illumination. And maybe is watercolor the appropriate tool? If you're talking about illumination as in gilded. Like illuminated manuscripts that gilding? Is that what she's referring to, I wonder? Potentially, yeah. So you can actually buy pigments that are gold and silver and have the liquidity. And are tubes, tube color. And I would go to that with a really good brush with a fine, fine point like this one to create that. And I would also check the density of the color. Because you don't really want a transparent color if you're trying to create, if I'm assuming, I'm understanding this right. An illuminated manuscript has, gouache like color to it. And gouache might be the best, actually the best kind of thing to use. I don't think we have gold here. I don't think so, no. I think the illumination can be many colors, not just the gilded. Okay, so I would tend to use for that kind of thing. I would tend to use gouache because gouache is more opaque. It's gonna be more densely colored. It's gonna have a flatter tonality and sitting next to your calligraphy. Your shapes, I think that's gonna be a more beautiful color. Watercolor is gorgeous. But because of its transparency, my sense is that it wouldn't quite work as well as gouache for the flatness that you would typically try to achieve in say in illuminated manuscript. Much of that color is really really flat. Gouache loves to be flat. And we'll talk more about gouache later but that would be my recommendation for a use of the pigment for something that's supposed to be illuminated.
Ratings and Reviews
shoney
I really enjoy Mary Jane Begin's style of teaching--I have a degree in Fine Art and have been painting for years, but think she does such a good job of building on the basics and encouraging play. Get your supplies ready ahead of time, if like me you want to play along. Thank you!
Kelly LaFrance
Awesome class! Awesome instructor! Exactly what I was looking for, and highly recommended. :-)
user-b0a82a
Fantastic class - so informative and inspiring. After watching the lessons, I picked up my watercolors and started playing around with some of the covered techniques. Highly recommended!
Student Work
Related Classes
Design Inspiration