Lesson Info
8. Catalog Shots
Lessons
Course Introduction
03:20 2Understanding Lighting Diagrams
12:11 3High Contrast Portrait
12:43 4Finding The Light
12:02 5Subtle Beauty
06:10 6Soft Fine Art
10:46 7Color on White
08:33 8Catalog Shots
06:00Light From Below
07:38 10Fresnel Beauty
05:58 11Old-Time Fashion
11:31 12Superhero Light
09:11 13Simply Stunning Beauty
11:10 14Controlling Shadows
13:20 15Soft Fine Art
04:51 16Front Bokeh
08:28 17Large Soft Light, the Easy Way
06:51 18Creating Motion
07:28 19Dramatic Light Using White Balance Shifts
05:47 20Simple Soft Light
05:50 21Grinder Girl
10:28 22Large Soft Light
07:30 23Vertical Contrast
07:17 24Light Rays
10:57 25Wide Angle Texture
05:08 26Closing
06:08Lesson Info
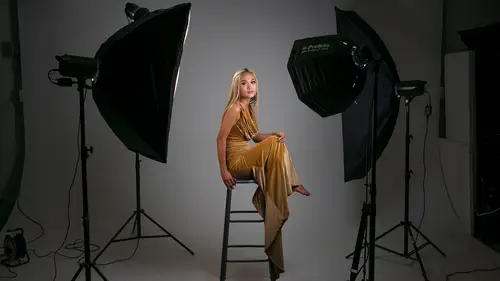
Catalog Shots
Now it's time for us to do some catalog shots. And we're gonna do this with a lighting setup that's so easy, that it feels like we're cheating. And so let me describe exactly what the goals are of this shoot. And so, this is something you might do if you are hired by an ad agency or local company, and they wanna have some photos of a product or usually it's wardrobe, and they wanna use those photos to put in flyers or in a catalog, or some kind of marketing. What you want to do, is you wanna give them nice clean photos, that they can then put clipping paths on, and then maybe put some words around them, or copy and paste whatever that product is into something else. And so you need consistent lighting, with a nice even background that they can change out with whatever they want. And so, here's what we're gonna do, over here we have a cyclorama, this is an infinity wall, and so it is nice and perfect. If you don't have one of these in your studio no problem, you can just use a roll of s...
eamless white paper. And so what we're gonna do is we're gonna shoot on this, and so Teresa come on over here. We're gonna have Teresa stand about three feet, from this wall something like that. And then, we're only gonna use one light modifier, to light Teresa and the background. It's a really fun light modifier. It's 160 centimeter light motive direct. We use this in my understanding light and light modifiers class. It is gigantic. When I bring this over, I'll turn on the modeling light, and you can see that I can walk in here and it's huge. So this is about six feet inside this light modifier. And so what this is going to do, is it's going to surround Teresa with light, and it's gonna give us really nice form. So what I'll do, is I'll place this about 11 feet or so from Teresa. And then what I can do, is because of the inverse square law, when this light comes over here and hits Teresa, the exposure on the wall and Teresa, are gonna be pretty close. And so that white wall is going to stay almost white. It'll be light gray, won't be perfectly white, but pretty darn close, but it's gonna be clean. If we turn off our video lights, you can sort of see how the shadows are cast behind Teresa. So we have nice even light around her, but this shadow because it's directly behind her, is going to disappear, because where I'm going to be standing. So we'll turn the video lights back on. You'll see that I'm gonna be standing right here in front of this light modifier, and so I'm not really gonna see that shadow at all. It's gonna be a very, very nice clean shot. Okay. There are some things that we have to remember, when we meter this light. I'm gonna go ahead and meter this really quickly, that is a nice value. So, it's about 13. So if I go over here though, where I'm standing, I'm gonna be blocking some of the light, that we're gonna be using. Teresa go ahead and meter that for me. That is at 13 right there. So let me meter it myself. So we'll meter it with me just right here, that's 14. And then when she meters it and I stand right here, that is metering at 13. So, the difference between where she is and where I am, it's about a third stop difference. It's just something to be aware of to get your exposure exactly right. Okay. So what we're gonna do now is I'll grab this light meter, I'm fortunate that there is a fantastic model, and she knows a lot about photography so she can meter as well. I'm gonna get right back here, and I'm going to frame up the shot. I'll take a photo, and then, I'm gonna come over here. Here's our shot in the computer it's just popped up, and you can see that that background is nice and clean. We have nice even light on Teresa. We have form, because we have shadows and directional light from that nice parabolic light. But this is gonna be easy for a graphic designer or for you, to pull her out of the background, and place wherever you want. So we're gonna shoot a few of these images, and I'll just show you how easy these are. So let's shoot a few Teresa, so looking straight at me beautiful. I'm gonna widen out so we have, head to toe shots, that looks great. And then I'll even get a little bit closer, even closer, there we go beautiful. Okay. So we can see all of these shots side by side. We have a nice even clean background, that's gonna be easy to work with. I think this shot right here, is my favorite shot. And so with that, it is just easy, easy, easy. So have your model as close to the background as possible, without having her touch. Use a gigantic light modifier. This is one of my favorite light modifiers. And then, have your model meter, or have an assistant meter the light, and then just shoot straight on, and you're gonna have fantastic results. Okay. Now that we have everything set up let's take a look at our last looks. (upbeat music)
Class Materials
Bonus Materials with Purchase
Ratings and Reviews
LeCompte
The class is comprehensive without being too complex! An all around 'how-to' guide with examples in real time with real people doing it for real. Showing 'What If' structured classes and showing 'Here is Why' Does not drag along but quick and concise. AND brought the support staff for deserved bow at the end. Nice Guy & Nice class 4 Stars at least!
Student Work
Related Classes
Lighting