Lesson Info
14. Controlling Shadows
Lessons
Course Introduction
03:20 2Understanding Lighting Diagrams
12:11 3High Contrast Portrait
12:43 4Finding The Light
12:02 5Subtle Beauty
06:10 6Soft Fine Art
10:46 7Color on White
08:33 8Catalog Shots
06:00Light From Below
07:38 10Fresnel Beauty
05:58 11Old-Time Fashion
11:31 12Superhero Light
09:11 13Simply Stunning Beauty
11:10 14Controlling Shadows
13:20 15Soft Fine Art
04:51 16Front Bokeh
08:28 17Large Soft Light, the Easy Way
06:51 18Creating Motion
07:28 19Dramatic Light Using White Balance Shifts
05:47 20Simple Soft Light
05:50 21Grinder Girl
10:28 22Large Soft Light
07:30 23Vertical Contrast
07:17 24Light Rays
10:57 25Wide Angle Texture
05:08 26Closing
06:08Lesson Info
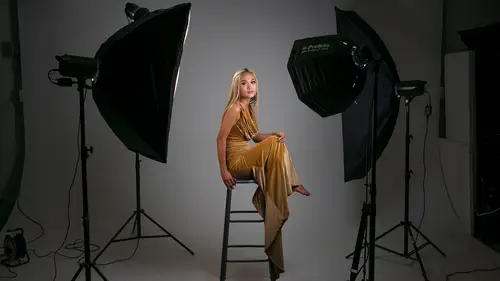
Controlling Shadows
We're gonna take a little bit of a break from our lighting setup marathon to do a one light setup and a little bit of teaching because one of the things that you might struggle with, I know I struggled a lot is controlling shadows. And so I just wanna take a step back and show you some really simple techniques for controlling shadows on a white background. And I know this stuff is very basic and simple, but sometimes when you have multiple lights, these things can really mess you up. So we're gonna start with just a single light with a normal reflector. And what I'm gonna do here is I'm gonna meter, you have the meter? Yeah. So I'm gonna meter this light. I know somewhere, and I'm gonna see what our value is. So right now it is F9. That's perfect, I'm gonna let you keep that. And so F9, I'm gonna dial my camera into F9 and I'll take a shot here, sort of wide mid length shot, click. Okay, we can clearly see on our little picture once it loads in. Okay, we can see on the computer her...
e, a shadow, okay. No big surprise there because of the position of light. So how do we control that shadow? How can we eliminate it, minimize it and make it look something more appealing to us? Well, there's a bunch of different things we can do as far as the position of our light, our model, the distance of our model from the background. And so we're gonna walk through those things one at a time. So the first thing I wanna do is talk about how to move the shadow off the frame. So we're gonna kill all the lights, and I wanna show you how this shadow moves. So if I move to the right, my light to the right, clearly the shadow moves to the left. I move closer to the camera, shadow moves back in. So if we look at Lexi's camera, she's on axis with my camera, you can see how I can just move my light to the right, and then that shadow will exit my camera's frame. And if I take a photo, I should have metered this first. If I take a photo of that, what will happen is you can see that the shadow has moved. So here's before and after. So the shadow is moving back and forth. But it's still there. So to get rid of it completely, I would maybe have to move way to the side. And when I do that, yeah, now what I'm getting is a very side lit photo. And that side lit photo is just too much. So then I would have to add some reflectors or do whatever, but that's how we get rid of the shadow, step one is just to move our light. That doesn't always give us pleasing results because moving the shadow also changes the quality of light on our subject. Okay, so the second thing that you can do is, whoa I almost tripped, change the light modifier. So I'm just gonna add this, this is a deep little lux. So it's a roundish softbox here. And so what I'm gonna do is I'm gonna replace my standard reflector, turn off this modelling light. I'm gonna replace the standard reflector with my softbox. So I will line this guy up. There we go. So now that's on there. Now what I'm gonna do is I need to meter this again. So make sure that's all on there. This, yeah. So lemme meter this again. First I need to get the light out of my camera's frame. So I'll just take a pic here. Okay. Let's meter this light. Thank you. So this light is metering at seven so I'm not really too concerned with my depth of field or anything like that. We're just giving a demo of how this would look. So I'm gonna go back to seven. We'll take a photo. Now what's happened is we have softened the light and that also softens the shadow. So you can see that shadow is very very soft and the light is still pretty directional low contrast on Teresa so we can get away with that. The other thing I can do is I can move this even closer to my camera and make it, raise it up just a bit. So it's out of the frame, make sure it's this way. And now, because I have soft light, let me do this again. It's 5.6. So normally I'd be changing my light to get exactly what I want. Okay. When we look at this you can see that now we have blinking Teresa. Sorry I didn't give you any warning. So look right at me and let me go back here. Okay, there we go. I always try to show my model in a flattering way. There we go. Now we have a smiling Teresa. So now look we can still see the shadow, but it's much softer. It's much less of a distraction in the image. And so that's one of the ways that we can control that shadow. The other thing that we can do is I'm gonna take my light here. I'm just gonna put it to the side. Teresa I want you to walk forward about four or five steps. Just keep coming. There you go. Right there. Now what happens is I can shoot something similar. Meter this light. That's F9. Now we're at F9. Now what I can do is I can shoot a portrait here of Teresa. And what we can see is the shadow. It's still there, but because of the distance between Teresa and the background, it's sort of off in the distance. And so I can move this maybe to the side a little bit, or maybe more on axis. And what we're doing is we're getting rid of those unseemly shadows. So I move this more on axis. So moving it more on axis, see how that shadow is coming closer to Teresa. Also, I'm not giving her any warning. So you get blinks, sorry. So we can do that. The other thing I can do is I can take my light modifier and I can move it closer. So I've got that pretty darn close to Teresa, too close. There we go. And then we can play with that just a bit. And I forgot to meter the light. Let me meter that again. The other thing you would normally be doing in a studio is you wouldn't be shooting a video at the same time. And so you can see the shadows. That's why the modeling lights are on. So what we're gonna do is we're gonna turn off these modeling light. I mean, these video lights just for a second, it's F11. So now I can see what I'm doing with all the video lights I can't see the shadow. So now I can see if there's a shadow, where it is and I can see that we have eliminated that pretty much. And I forgot what my meter reading was 11. Now let's take this same shot and now we can see that we have no shadow on the background. It's pretty cool. So what I wanna do here is I wanna play with this just a bit to show and hide some shadows and see what makes sense and what doesn't make sense. So what we're gonna do is I'm going to have Teresa sit on a stool. So Teresa we're gonna have you sitting on a stool here. And we're gonna bring you out from the background a little bit. So she's about eight feet from the background right now. And so that distance is gonna allow us to throw the shadow back here and it shouldn't show up in my scene. And so what I'm gonna do is I'm also gonna move a little bit farther away. This is why sometimes you need some depth in your studio to be able to do this kind of stuff. This cyclorama that we're on right now is about 35 feet. Oh, there's one more thing I forgot to mention before we do this, silly me. So Lexi I'm gonna have you show your camera. So the other thing you can do is instead of going left and right, you can go up and down. That's one of the best ways. So let's turn off all the lights and then I will show you this. So Lexi, if you can sort of... Yeah, there we go. So if I move up with my light, see how the shadow's going down behind Teresa. So it's going down back there. So I can illuminate her from above and the shadow is going to be way below her down here. And then that way we have nice soft light but the shadow is falling on the floor instead of the wall. So let me meter this. I'm metering this at F8. It's nice soft depth of field. Not too much in focus but not too much out of focus should work just fine. So F8 is where I wanna be. And then I'm just gonna take sort of a nice relaxed shot of Teresa. Ooh, this is so cool. You don't see a shadow at all in this image. This is a vertical shot. There's no shadow in this image. I'm gonna do a horizontal shot here. We've got a bit of cables and stuff in the background. That's okay. And again, look at this just by elevating that softbox I was able to get rid of the shadow by changing the distance of Teresa from the background. I was able to eliminate that shadow. And this is sort of a nice, soft look. We're gonna do a couple more shots here. There you go. Beautiful. Look right at me. Chin down just a bit. Excellent. I love that. Perfect. Okay. Now what I'm gonna do is I'm gonna do just a very very minor bit of post-production. Oh, one other thing I need to mention. One more thing I need to mention and that is not only does the position of your light up, down, left and right change where the shadow is and the light modifier and the distance but where you stand also will show or hide a shadow. So let me do that really quickly. Let me show you how I might get a shadow. So to see this, Matt, can I get no studio lights? So there we go. Okay. So if I'm up high, elevated this is such bad composition, but if I was up high notice we can clearly see the shadow down here on the floor. So the shadows down there intentionally, so we don't see it. So I'm gonna take my camera position from up high go down a little bit low. And then when I shoot that, you can see that now the shadow is gone because the position of my camera. Okay. Very, very basic stuff. But that's how you sort of control shadows. So before we get going here, I wanna do a tiny bit. Just a tiny bit of post-production on this shot because I think it's worth it. I'm gonna open up the shadows here just a bit. My white balance is off just a bit. Well, that's off a lot. Here we go. Open up these shadows here. That's good. I'm gonna desaturate this just a tiny, tiny bit. That's better. So there is our final shot. Okay. So I'm gonna step out of the way and we are gonna take our last looks. (upbeat music)
Class Materials
Bonus Materials with Purchase
Ratings and Reviews
LeCompte
The class is comprehensive without being too complex! An all around 'how-to' guide with examples in real time with real people doing it for real. Showing 'What If' structured classes and showing 'Here is Why' Does not drag along but quick and concise. AND brought the support staff for deserved bow at the end. Nice Guy & Nice class 4 Stars at least!
Student Work
Related Classes
Lighting