Lesson Info
22. Large Soft Light
Lessons
Course Introduction
03:20 2Understanding Lighting Diagrams
12:11 3High Contrast Portrait
12:43 4Finding The Light
12:02 5Subtle Beauty
06:10 6Soft Fine Art
10:46 7Color on White
08:33 8Catalog Shots
06:00Light From Below
07:38 10Fresnel Beauty
05:58 11Old-Time Fashion
11:31 12Superhero Light
09:11 13Simply Stunning Beauty
11:10 14Controlling Shadows
13:20 15Soft Fine Art
04:51 16Front Bokeh
08:28 17Large Soft Light, the Easy Way
06:51 18Creating Motion
07:28 19Dramatic Light Using White Balance Shifts
05:47 20Simple Soft Light
05:50 21Grinder Girl
10:28 22Large Soft Light
07:30 23Vertical Contrast
07:17 24Light Rays
10:57 25Wide Angle Texture
05:08 26Closing
06:08Lesson Info
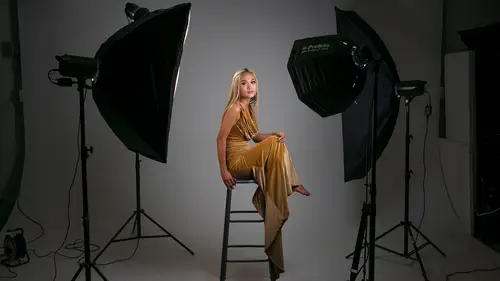
Large Soft Light
There are times when you want large, soft, light, and just a beautiful portrait, mid-length, without a lot of hassle, and so, this is my go-to lighting setup for that, 'cause it's a no-fail lighting setup. And so, what I'm using here is, I have 135 centimeter octabox here, so this is a Rotalux Deep, and it's big. So, 135 centimeters, I don't do well with metrics, but you can see that this is pretty large, it's like five feet across; something like that. And so, what I've done is, I've just placed this to the side, and as close as I can get it to the camera. So, it's on axis as much as possible. It's gonna give us really beautiful light. And so, what I've also done is, I've had Shayla, she's sitting toward the light, and that is key because we want that light to fall on her face, in a way that shows all of her beautiful skin, and the shadows sculpt and shape her. And so, that's what's going to happen with this beautiful light. The other thing is, we're shooting on a white background bac...
k here. And even though it's way far away from our model, so it's about 12 feet away, 10 feet away, something like that, it is still going to show up as a nice, soft gray. So, that light fall off is gonna give us a nice gray. If you want white, then you can add some, but I like that gray look; it's just very plain and simple. It doesn't draw the eye away from our subject. And since we have a beautiful model, we don't need anything in the background. The other thing that we're doing here is, I have this Rotalux Strip light, and so this is about three feet by eight inches; something like that. It's very tall and narrow. And the direction of this light is, it's hitting to one side of her, which is sort of like, because we have this shoulder that is toward the camera, and since it's toward the camera, we want light to fall across that, and give us this really nice, soft highlight; and that's exactly what we're going to get. Now, in this lighting setup, I try to balance my key light and my separation light, equally. I try to have the meter, essentially, the same value, and we get this really amazing look. So, we'll have sort of a dark shadow right here, but that highlights the shape and form of our subject. So, what we're going to do is, I'm gonna, first, meter the key light. And so, I need to make sure I don't have anything in memory, here. So, I'll clear all of that out. It's cleared out. And now I'm gonna meter that key light. And that meter's at F/11. So, we have F/11 there, you can see that. Okay, F/11. And then what I'm going to do is, I've put that in memory, now I'm gonna use my Delta EV feature that I love, and then I'm gonna meter that. And you can see that is, essentially, the same value; so, it's at -0.1. So, it's 1/10 of a stop difference. If I just nudged my strip light just a little bit, it'd be exactly the same. So, I'm not gonna fuss over 1/10 stop difference in lighting; they're essentially the same thing. And so, what I'm going to do is, first I wanna take a portrait really quickly. And so, what I've done is, I've directed Shayla. So first, let's have you have your arms on your lap, just sort of down. And so, what I've done is, I'm directing her how to pose because this is a mid-length shot. So, if her arms are in her lap; I'm gonna take this shot. And there we go. Ah, such a beautiful light. What we're gonna see here is, when we look at this, there's a lot to dig into here. But the first thing is, you can see see that her arms look unnatural; they're sliced off, her hand has been lost, we have sort of a left arm over here that's just growing out of her stomach; it looks weird. And so, we need to fix that; it's a posing issue. So, Shayla, let's have you put your arms up. There you go. Beautiful. And I'm gonna shoot that. There we go. Now, look at the difference that that makes. I just need to recompose my shot. Sorry, I wasn't paying attention. There we go. There we go. Now, you can see I've included all of her head. That looks so much better. And so, instead of, in fact I'll show you these side by side. Instead of the first shot where we have her arms chopped off, we have this beautiful pose, which works great. Okay. Let's also go in and start unfolding what's happening with this light. So, the thing I like about that separation light, that kicker light back there, the little strip softbox, is it's giving us this highlight on her arm. You see how we have this beautiful sculpted light right here. And then the shadow that's next to it is giving form to her arm. It's really giving us this soft look, and see how this soft light on her shoulder, it just has a highlight right here and then it fades out, it's sort of dark, and then we have this line from behind. That's really beautiful. I like how it's illuminated one side of her hair. I could have added another kicker to match both sides of her hair, but I think this looks fine. I'm not gonna worry about that too much. I wanna show you what each of these lights are doing, individually. So, the first thing I'm gonna do is, I'm going to take a photo of just the key light. And so, let me first do that. So, we will take a photo of the key light. (camera beeping) Then we're gonna take a photo of the kicker light. (camera beeping) And then we will take a photo of everything together. Okay. So, I'm going to show you these side by side by side. You can see what each one of those is doing. I'll show you this, that's the key light. Notice, without that kicker, this all just falls into darkness, and so, we don't get that shape; we don't get the form that we're looking for. And this is just the shape and form, that's that highlight there. It's so beautiful. And when you combine those, you get this finished portrait. So, I'm gonna take one more shot here, so we can make sure that everything is exactly the way I like it. Beautiful. Turn your shoulders just slightly toward me. There you go. That is perfect, just like that. Wham. Ah, that is so cool. And so, this is just a beautiful, beautiful portrait. I'm gonna zoom in really quickly here, and you can see, we have this beautiful, soft light. We don't need any other reflectors or modifiers. It all works great. You can see that we do have a tiny bit of lens flare right there. I could flag that light at a grid or something, to get rid of that, but I could just get rid of it in post-production by cropping this just slightly. So, I could do something like that, and I'm not losing anything from the shot. And so, there we have it, it looks really, really wonderful. And so, with that, I think it's time for us to have our last looks. (upbeat hopeful music)
Class Materials
Bonus Materials with Purchase
Ratings and Reviews
LeCompte
The class is comprehensive without being too complex! An all around 'how-to' guide with examples in real time with real people doing it for real. Showing 'What If' structured classes and showing 'Here is Why' Does not drag along but quick and concise. AND brought the support staff for deserved bow at the end. Nice Guy & Nice class 4 Stars at least!
Student Work
Related Classes
Lighting