Student Questions and Critique Part 2
Lesson 10 from: Group Mentorship: Grow Your Wedding Photography BusinessSusan Stripling
Student Questions and Critique Part 2
Lesson 10 from: Group Mentorship: Grow Your Wedding Photography BusinessSusan Stripling
Lesson Info
10. Student Questions and Critique Part 2
Lessons
Day 1
1Mentorship: Introduction and Overview
20:49 2Mentorship: Business and Marketing
30:42 3Mentorship: Shooting & Post Production
15:21 4Social Media Marketing
13:07 5Google Analytics
29:16 6Targeting Your Market with Social Media
25:54 7Social Media Marketing Q&A
10:21Common Issues and Problems
20:01 9Student Questions and Critique Part 1
26:18 10Student Questions and Critique Part 2
20:41Day 2
11Month 1, Week 1 (Sept 8-14) - Assignment Video
10:28 12Month 1, Week 1 (Sept 8-14) - Feedback & Weekly Review
53:10 13Month 1, Week 2 (Sept 15-21) - Assignment Video
09:43 14Month 1, Week 2 (Sept 15-21) - Feedback & Weekly Review
43:05 15Month 1, Week 3 (Sept 22-28) - Assignment Video
07:12 16Month 1, Week 3 (Sept 22-28) - Feedback & Weekly Review
39:17 17Month 1, Week 4 (Sept 29-Oct 6) - Assignment Video
06:41Day 3
18Office Hours Overview
13:42 19Name Your Business Review
31:41 20Where are You Running Your Business Review
09:41 21Get Set Up Legally Review
16:12 22Personal and Business Finances Review
26:58 23Banking and Paying Yourself Review
15:42 24Pricing Problems and Case Studies
35:12 25When the World Isn't Perfect Review
23:56 26Mission Statement and Target Client Review
25:46 27Shooting: Macro and Getting Ready
17:26 28Shooting: Portraits of the Bride
14:24 29Shooting: Formals, Ceremony, and Cocktail Hour
16:30 30Shooting: Reception and Nighttime Portraits
18:46Day 4
31Month 2, Week 1 (Oct 6-12) - Feedback & Weekly Review
57:47 32Month 2, Week 2 (Oct 13-19) - Feedback & Weekly Review
55:04 33Month 2, Week 3 (Oct 20-26) - Feedback & Weekly Review
57:13 34Month 2, Week 4 (Oct 27-Nov 2) - Feedback & Weekly Review
47:48Day 5
35Details Critique Part 1
28:49 36Details Critique Part 2
23:57 37Getting Ready Critique
29:38 38Missed Moments Critique
11:44 39Bride Alone Critique Part 1
12:39 40Bride Alone Critique Part 2
21:04 41Ceremony Critique
12:36 42Wedding Formals Critique
19:18 43Bride and Groom Formals Critique
24:23 44Reception Critique
18:33 45Introductions and Toasts Critique
18:14 46First Dances and Parent Dances Critique
17:47 47Reception Party Critique
20:08 48Night Portraits Critique
15:38 49Month Three Homework
18:45Day 6
50Month 3, Week 1 - "Office Hours" Checkin
43:05 51Month 3, Week 2 - "Office Hours" Checkin
28:11 52Month 3, Week 3 - "Office Hours" Checkin
36:06Day 7
53Get Organized
30:40 54Editing Q&A Part 1
28:57 55Editing Q&A Part 2
32:18 56Editing Critique Part 1
33:32 57Editing Critique Part 2
31:48 58Editing Critique Part 3
28:43 59Editing Critique Part 4
29:33 60Editing Critique Part 5
21:51 61Final Image Critique
36:28 62Album Design and Final Q&A
21:57Lesson Info
Student Questions and Critique Part 2
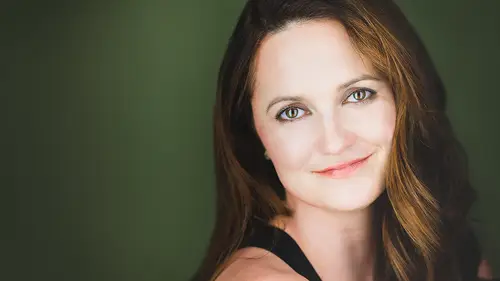
So you remember this one where we were talking about putting your clients in the sun to get that blue background I loaded in an example of mine Where, and I wish I were there right now. I mean, they're looking into the sun clearly because there's big brights on on them. By the time I focused and exposed for their faces, it darkens down the rest of the scene because their faces air so bright and then you can see that sky. Now, if I've got clients in the sun, I'm not going to shoot an entire family formal session like this, cause that's just mean But a one off picture like this, I will actually put them out there. And I'll say, OK, you guys right, Close your eyes. Look, I know you're looking straight this on and you're super blind. But if you could just close your eyes for me right on the count of three, open your eyes and smile at me. Close your eyes will give them a three count. They'll open their eyes will smile at me and mental squint. But I've got my picture before they squinted. Al...
l right, worry. All right, We're in the tee times, right? We want we have shade in the foreground, son in the background and a really cool background if you back those. Okay, Go again. You see that space 20 feet behind them where the sun is, If you put them there by the time you exposed for them, that's what you're seeing is gonna look like I swear to you, that's what you're seeing is gonna look like Now you'll notice here my clients are facing each other. If you want your clients to face you out in that bright sunshine, you either need to reflect light back into their faces. Or you need to pop a little flash on their faces. Because if Blair and Jeremy, which you guys saw during 30 days, if they turned and looked at me and I exposed for their faces, that I have lost my background again. So if they turned to look at me and I wanted this picture, I would have needed a reflector or a flash toe lighten up their faces. Does that sort of help Illustrated a little better. Okay. And when we're talking about the shooting down technique, how it needs to be a slightly faster shutter speed 14 instead of 45 and she needs to face the window. If you do that, you'll get this. I swear to you, you will get this. I promise. Promise? The church ceremony pictures. Seriously, that is not a problem picture. It's beautiful, as my example. Stayed the same. Come on, buddy. There we go. There we go. All right, seriously, you're on your way there. Promise. And nothing that anybody sent me was terrible. Like, you're like you're getting there. You're just missing that last little bit. That that's gonna help you really be there. And that's what this mentorship is for is to personally give you those last little bit in a 1,000,000 different directions. Okay, Good. Now you got some more. All right. I hope I'm not being greedy by posting to images, but I also struggle with first dances. My biggest concern is getting in the way, so I tend to use my needed 200 at 28 from a distance usually racked out all the way or close to it. This image of the father daughter first dance was shot in 80th of a second to eight with an IA so of 10,000. My assistant was lighting up the scene with a light gun and I was firing in between the led light strokes. God bless your heart, which were blobs of all kinds of lovely patterns of red, green and blue. The images right out of camera. I find I regularly get images like this. I would appreciate any feedback on how to approach this ongoing seen a little better before I even show you the image. I want to talk about what you're shooting here. First of all, if you are shooting like a light gun or a video light for your first dance images, you're gonna have the same problem. This guy has shooting it at an 80th of a second. I bet you've got a lot of out of focus images because you can shoot with flash at an 80th of a second, you cannot shoot with video light at an 80th of a second moving subject. The reason being is that at an 80th of a second, your flash power will freeze your subject. But with a video light, there is nothing to freeze the subject. You're gonna get a lot of blur with the shutter speed that low. Also at an AYSO of 10,000. That's a little high. You're still going to be fine. You're fine. These guys, I mean it really nice, But you could be doing the exact same thing with a much lower I s. So instead of if, instead of using a light gun, you were using a flash and God bless your little heart on the led light bulbs. So this is the image which I think we can all hear agree, is kind of beautiful, right? Like, this is lovely. I would highly recommend that you swap that light gun out for an off camera flash. Get that I s o down lower your 80th of a second will no longer be a problem at all. And you will be feeling less men because you won't be working with the limitations of shooting with a light gun versus a flash. So that would very much be my recommendation to you. But this is a beautiful image. And if you think this is a myth, you are wrong. It's beautiful, all right. I struggle a lot with composition lighting. This was 50 millimeters at F five I s 0 800 a 2/ of a second with an SB 700 on camera stop. First of all, this image is fine. Like this is if these air your egregiously terrible problem images, we're gonna have a good mentor ship because with a few little tweaks, you're gonna be singing like you're going to be great. So the first thing is, let's talk about a 2/100 of a second. Does anybody know what you don't have any of? At a 2/100 of a second with flash ambient light, you have none whatsoever. Your shutter speed is so fast that you're crushing all of the ambient light out of the room, right? So even just with his exact same set up 50 millimeters at F five s, 0 800 with your on camera flash, if you changed your shutter speed from a 2/100 of a second twist 60th of a second, you're gonna have much more ambient light coming in in your final image, which is going to improve the warmth and the mood of the frame. Second of all, if you just got that flash off of the camera, which I swear to you, this person is already a student there in. I didn't have to hook him in today. You will be doing amazingly by the end of this because this room would have been a killer room for an off camera flash. You are already on the way with your settings. They're not egregiously awful at all. What I would suggest to you is a slightly longer lens for dancing, which will help you eliminate some of the distracting background. We're gonna get that flash off camera for you, no matter how you choose to use it. Whether you use it as a direct off camera flash, a sidelight, a diagonal light or a backlight, you will have the tools to do whatever you want with it. Let's say you like this look of their faces being very filled in. You don't want a dramatic shadow. You don't want a dramatic highlight. You can still achieve that with an off camera flash. We're just gonna tweak some of your gear selections and the way your light is coming from a little bit of an angle and you're gonna be good to go. We struggle with getting true silhouettes while keeping the ambient light their struggle. Okay, here we go. We had a couple problems here. First of all, your son is in the right place your clients in the right place, and you were in the right place. So you're 90% there. The hardest thing out of all of this is defined. The light and you found it. You've got it your good now, two things. First of all, your clients, you either need to move your clients. You need to move yourself because you see where they are, right here in the frame. They need to be right here in the frame to make a silhouette. Your clients need to be against the brightest part of the background because when you change your settings and you bring them down to make it a true silhouette, the background will darken down with you. Therefore, when you start darkening down this background and I can I can probably guarantee you tried to do this, bringing the exposure of this image down, you start to lose them because they're spilling over to some of the darker part of the sky. So when this darkens down, you won't have much separation between your foreground. Background. Your subject in background. If you put your clients here in this bright spot of the setting sun, then you will have the power either in camera or in post later to bring the exposure down, which will give you that dark, crisp truth silhouette that you're looking at looking for. Second of all, she is good. He is not. If you're trying to do a silhouette, this client can't look at you because otherwise you're losing their facial features. If what you want hear their faces lit up, that's not a silhouette. That's a different picture entirely. When you make those few tweaks, you'll get something that looks like this. This image is literally this image with a couple of tweaks. So you see here, talking back and forth how I say if you put them here, you're going to get a ballot. Better silhouette. That's what this is back here, right? Therefore, I was able to darken down the whole scene, giving you that ambient like that you're wanting and creating a true silhouette, and they're both looking at each other so you don't have the problem of the fact that he is just kind of ahead. Outline. You get something like this, you're 90% of the way there. You've almost got it. I hate flash photography that lights up the room, destroying the mood of the first dance. I have to. I slights and I'm learning off camera flash. I want to master this as I live in a small city in a country one and I live in a small city and a country one at that. We really don't have any amazing reception venues. When it comes to backgrounds for images, we have no choice. We talked about this, right? Like let's leave the venues out of it entirely. And let's start working on the images and a lot of your venue problems are going to start resolving themselves. First of all, if you think that this is a bad venue, I don't know what I can do for you, because this looks a lot like my venues. That's not bad. Actually, you've got a good background that can be darkened down. You've got an interesting visual going on on the ceiling. This isn't so terrible. And second of all you guys have been used may be terrible, but It's also their venue, right? Like you have to remember, your clients picked these places. And just because you think it's awful and very well might be awful. They picked it for a reason. So showing it it might mean more to them than you think. You know what I mean? And also, with a longer lens, some different choices, you're gonna be able to kind of eradicate some of the backgrounds of it, and I'm gonna show you how to do that. So, for example, this person is getting it right, Like you can see that they're getting it. The light is coming. You can see where it's coming right here. The problem is not with where the light is. The problem is not with where you are. The problem is simply with the positioning of the client, you're not gonna be able to get good dramatic light on them if they're kissing because their faces or mashed together case kissing pictures are actually one of my least favorite. It happened you really faces. You're just kind of move together. I like the moment before you kiss for the moment after you kiss a little less concerned with the kiss itself unless it's the kiss at the end of the ceremony, which is incredibly important. But for this, the second he lifts his face off of her face, his face is gonna be in the light. And that is gonna be sick, like it's gonna be beautiful or as they continue to spin, if he's looking at her, you'll get that beautiful slice of light. So you know what? It's not the venue. It's not the lighting. It's not even your gear selection. It's just the fact that they kissed and smash their faces together. That's all your good. So, for example, this venue was awful. This was a dark, creepy, weird catering hall in Long Island. And these people are phenomenal people. I mean, you can tell, Just look at their faces. They're great, but you can't see this than you at all because I used a long lens because I shot it 35 or F four. And because I used the light to mostly illuminate them. Your venue problems suddenly or not, the new problems anymore, right? I want to learn how to pose a large group family photo I shot. This is an 80th of a second F seven. I s 12 50 50 millimeters. Okay. I'm not gonna try to force you to shoot like me while we're doing this, but I'm gonna tell you what I would do in these scenarios, and I would do a couple of different things. First of all, an 80th of a second is kind of a tricky shutter speed to shoot a group at now. If you're with a 50 millimeter lens, you might be okay at an 80th of a second. I would suggest shooting your larger groupings of the 72 200 to get compression from the background and also compress the people. It's much more flattering. The longer lens is more flattering on people. If you are going to go with a 72 200 you're going to have to make a shutter speed adjustment because you're not able to shoot a millimeters at an 80th of a second without camera shake F 71 You're good to go. So here's the grouping. It's not bad. Guys, this isn't bad, But what would have made this better? It looks like there's a lake or something in the background or there's like a palm tree and not really sure where you are. First of all, the posing of the group is not terrible. And it's rough, right? Like you've got a lot of people together. What I usually do in situations like this bride and groom go in the middle. Parents. If there are parents, go right next to them. It's the parents of the bride to go next to the bride of the parents of the groom. They go next to the groom, and then I fit Lynn kind of exactly like you've done here. But I'm very careful that heads go in between heads. And if the bride and groom were in the center, I don't put a single person behind them. I don't want to head between the bridegroom, but I'll put heads between other heads. This is pretty good over here. This guy actually either needs to come more this way or go more out. They out that way, and I have no problems with people, um, crouching or sitting or whatever on the ground. The issues here to make it kind of elevate to another level is not the posing. It's the Linds selection and the lighting. If you backed off with a longer lens, you would have had a better foreground background relationship. And if you used an off camera flash in the way that I swear that I will teach you how to do during this mentor ship, you would have been able to retain your background, which have been which would have been really helpful. And those things would have popped up this image even more So. For example, if I'm shooting a large group, I'm going to try to actually get them in no more than two lines, right? And if I'm shooting a long lens and I've gotten really far back from them, I can make the group wider and still be able to include everybody. So I would rather go out this way before I go this way and add more rows. If there had been another 10 people in this, I would have had them kneeling in the front. This guy right here, I really want a photo shop his head because he's not doing the right thing, and this girl right here should really be in between those guys. But other than that, this is what I'm looking for. But what makes the picture here is the lighting and the lin selection. And what would make the picture before better is not the posing. It's the lighting in the Lindh selection. So sometimes what you think is your problem is not really your problem. It's a different problem entirely. So yeah, So this is kind of what the image critiquing is going to look like, especially when we get into the shooting part. And when we're doing month one, which is business and marketing, it's gonna look a lot like this just on a more spreadsheet side of things like this is not your problem. This is your problem or you're almost there. But have you thought about this? And then when you come back, you know, in one month when we're all back here together, we're going to do exactly this month one. We're doing it with spreadsheets. Month two, we're doing with images and 13 we're going to be doing it with a workflow and post wedding client care. So hopefully this gave you kind of a little bit of ah taste of what that live day will be like. That you'll only get access to if you're part of the mentor ship. Hopefully that kind of helped. And I mean, I really feel like for me I learned a lot from watching images be critiqued, even if they're not mine. Which is why I get so excited when I get to judge print competitions. Because I learned so much from seeing an image come around and be like, Oh, that's really good. And then seeing the judge say, But if you had done this and you have done this and you had done this, it would have brought you up to that next level. And I'm like, Oh, yeah. So hopefully, if these were your images, everyone should be proud, Um, for submitting an image, because starting out on the very first day with Show me something and let me rip it apart for you on air. That's kind of scary, but it takes a lot of courage and guts to get out there and do it and just do it, and I will help you and I I swear none. None of these images were unstable. They were all on the right path already. They just needed a few tweaks to go from good to really, really good. So yeah, any questions from you guys out here about anything? And now is the questions for anything about this or just anything at all? Yes, I have said this. So did you flash on this picture? I had a little fill flash on this picture because it was later in the day, I was able to use that backlight. But I did use a little flash to fill in their faces. Yes, man. Logistically, how do you manage posing people from a distance with long guns? I have that trouble. And then I don't want to scream across and look like a complete lunatic Like trying to make them say where they're supposed to be. So how do you approach their work within, if if meant no, I want to get to the point where I would honestly if I were going to spend money on my wedding business. Before I ever shot a first wedding, I would find an assistant. Honestly, because it just nothing. I couldn't do it without it, but it helps. And that's part of what she does for me. I stay back with my 72 200 I watched the group come together. She puts the group together and then turns around and looks at me. And I'm like, If I need to tweak something, I still get up and kind of dog midway in between. But she's my middleman so that I can stay really far back. She knows what I'm looking for, and she gets them together for me. She's extremely good at it. She's way nicer than I am. She just is. I get exasperated face like I don't know how to get it off my face and I When I'm back there, I could be like And in fact, I'm thinking just stopped moving. Stopped moving. But no, she's got it. She's great. Yes, ma'am. Wondering about the flash that you used for this particular photo? Is that one flash or more than one and what kind of power? One flash at full power and she's standing right behind me. And this is something that we're gonna get in great depth on with a group this big. If she's coming from an angle, you're going toe light one side more than the other side. So she is directly behind me at full power. And literally, it is just a baby kiss of light on their face here. When I'm doing things like flash in the church stuff like that, which will really get into during the program, the flash is going to be much stronger. This was just helping me get It was literally, like 1/4 stop of light on their face. It was not much at all, because she's behind me and I'm with a 72 200. So it is barely by the time the light reach them. It was like So it was just to get that little bit of shadow off their faces. Yes, ma'am. I was just wondering about video light a little bit more. Um, because I know, like as photographers, we wanna go more towards a flash. But what if you're working with a video team and they're using a video light? How would you approach that situation? Would you just go with their video light or how do for what for, like, receptions for, like, the first dance? If they've got a video light up, I'm gonna try to use it to my advantage. I'm not gonna use it as like my main light unless it's super strong and I can get my shutter speed up enough in my eyes so low enough to utilize it. Ah, lot of times all actually like, let's say the videographers light is here. All put my assistant here and the clients air here and I'm over here. So it's kind of like I have to flashes. Okay, Um, sometimes it's just awful, and you have to work around it or overpower it. But at that point just cursed them in your head and my husband's videographers about his No, but like you could really especially for God sakes, if you get to go home with the videographer like I don't recommend going home with videographer like you're married. You know, I was going with that, but like, if you can talk to him and be like, Hey, listen, like your your video light is really helping me out like, but what if we moved it over a little bit? You still use it that way, like it would be a really great thing if it's working for him and then you can leverage it to work for you, too. I would just use it in conjunction with flowers so we can't make videographer jokes around you. Great. I'll save my videographer jokes for the days that you're not in the Facebook group.
Class Materials
bonus material with purchase
Ratings and Reviews
a Creativelive Student
A couple years ago I attended WPPI and sat in on Susan's class. Out of all the classes I sat in on that year her's was in the top 2 for actual information and not just fluffy feel good hype. So I figured her Group Mentorship course would be a good one and it definitely has! A bit of background on me, I've been running my own wedding photography business for the last 6 years, 5 of those full time. I've taken tons of business courses and have circled back around to taking more classes to improve my craft. Susan's class focuses on both business and improving your craft. The big warning I have for this class is that there is a lot of homework, A LOT!!! But that is not a bad thing at all. I was swamped with weddings as the class started and was late to get to my homework but I'm so glad I didn't skip it because there was a lot of things I learned about my business just in answering her questions. I believe there were homework assignments every single day and while some are quick others will take awhile. So my recommendation is to take this course in your off season and use that down time to really concentrate on doing the homework and putting together questions to ask during the weekly chats. I was not able to do that as much as I wanted because of my schedule and I feel I did myself a disservice by not taking full advantage of what was offered. As another reviewer stated there were a lot of basic questions that were asked like how to get proper exposure in an image, etc. If you aren't sure how to do that then this class is not for you. I believe this class is geared towards those who are past the portfolio building stage and are looking to set their business up for success on the back end while improving their craft. Remember to ask questions, keep a notebook and write them down while doing your homework. Don't focus so much on what she uses for everything but why she uses it, if you understand the why you can apply that better to your business vs just the what. Again I would say to properly allocate time to take this class, treat it like a college class with weekly homework and study required. Don't buy it to watch later as you will lose out on most of what this class is about which is access to Susan for questions and feedback. Do the homework, I found the questions she asked us to answer led to a lot of revelations for myself in my business. Her questions led me to ask my own questions and review a lot of historical data for my business to get a better grasp on where I am. Luckily for me I'm doing way better then I thought ;)! Also I recommend for image critique to not just submit your best images, while we all like a pat on the back that won't make you better. She requested a mix of your best and areas of struggle. The images I submitted that I was struggling with are the ones where her advice will improve my craft.
Carissa
Susan, simply amazing photographer, amazing woman, amazing business woman! If you want your but kicked then this the course for you! A kick start for your 'business', awesome .. honest .... brutal.... critique.... don't take it personally.This is a course for beginners and for those been in business for 4 + years. I have been in business for 4 years and this helped me seriously start from the beginning again on the business side of things and fine tune my processes. I learnt so much.... but was also great to know I was on the right track. For those beginning - oh I wish I had this as a guide 4 years ago!!! Enjoy! worth every penny! cheers Carissa www.capture-t-moment.com
a Creativelive Student
I found this course helpful - but I also did all (well most) of the homework and I think to get the most out of this class you really need to be prepared to do the homework - which does require a reasonable time commitment. I found the business information (month 1) invaluable, and Susan was very, very active in the Facebook group, constantly answering our questions, which was great. Month 2 was a big image critique and I also found this very helpful. Month 3 was about editing and it was also a critique, which was helpful as well. Susan, Sandra (her assistant), Jen (her post production person) and CL worked very hard for us so we could get the best out of this course and I really feel I did get the most out of it that I could have gotten out of it. It is definitely worth it if you are willing to do the work. All of my questions were answered and I feel like my work is going to improve for the better now. If CL run any more mentorships such as this one, I would highly recommend them as I found I learned a lot more than in a regular class - because of the homework and the feedback (direct from Susan) on the homework. I am so glad that she was honest about my images because now I am seeing them in a new light (no pun intended).