Lesson Info
8. Image Review & Q&A
Lessons
Lesson Info
Image Review & Q&A
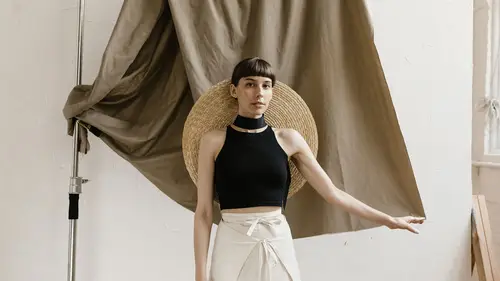
So we got Abby starting off at the beginning. I like that one there, so I'm gonna mark that with a P. And then we got the PVC wall of light, we'll mark that with a P. I like that one there because it's instructional. And then we had the collapsible back drop. So that totally awesome Abby smile. Let's make those just a little bit bigger. Even though that wasn't my intent on that one, we'll mark that. And then we went to the brick backdrop, which was pretty cool, and let's go with that one. And then we've got the seamless, so we had the black seamless, we'll go that one. And then we had the red seamless. We'll go that one. And then we had the white seamless, with the little bit of sass. And finally, not finally, we had the reflective floor. Okay there's that one. And then we had that one. Okay, P. So now what I'm gonna do, I'm in Lightroom of course. I'm going to just filter. I do a lot of Lightroom teaching so I have to speak when I do these things. I'm going to filter by just the flags...
, and then we're going to command A to select them all, and then we are going to put them on this screen. And we go shift, tab T L L. (laughing) All right, let me interact with this screen here. Seven backdrops, even though that one's a bonus one. I just like that one. Let's just look at the different, the difference between them all. Let's kind of talk through them real briefly. I got to have my cheat sheet in front of me just to remember exactly what I'm looking at. This was the muslin. Remember the muslin's the big honkin' thing. It's 10 foot by 12 foot. A lot of options with that muslin. A lot of space to move around. I recommend if you can afford it, get a 10 by 20 or a 12 by 24. You'll never regret buying a big muslin. Although the person you pay to steam it will regret it. This was that PVC wall of light. I love this tool. One of the things I didn't say about this, and the reason why I showed this one here, you can use this PVC wall of light as a light for the front of the model. It's a great key light. Imagine a full body, full length light, head to toe, in the front, between the camera and the model. So it's a great light source as well as a background light. All right, we've got the smile backdrop, which I love. That's the collapsible. That one's made by Savage. And these collapsible backdrops make me smile too because there so small and portable, easy to move around. We got the brick. Man that brick came out cool. I love this brick. I just bought my first brick paneling last week, and I'm going to use it for all kinds of stuff moving into the future. So thanks for CreativeLive to allow me to teach this class. I got to learn a new technique also. And then we went to the black seamless here. I love black seamless. A lot of flexibility. Remember you can make that black seamless black or gray, depending on how you light it. Red, there are lots of different colors of seamless. Those of you who have shot with it know, you can buy yellow, and green, and blue, and purple, and orange. I like red. I think as, for photographers, red makes a lot of sense. A nice red backdrop every once and awhile, puts a lot of variety in your photographs. White seamless. Tons of flexibility with that white seamless. You can make the white look white. You can make it look gray. You can see that the look of that white seamless looks very similar to that wall of light. Adding just maybe a third of a stop more of light here would have made that really electric white. And then we went to the reflective floor. That was the, what do I call that stuff? The inexpensive product, I've forgot the technical name. Thrifty White, thank you. You were paying attention. Yeah, Thrifty White, love it! Photographers who have been doing a lot of studio work always have this stuff around in the studio. And it's so inexpensive, after it gets all scuffed up and used after a season, you just throw it away and recycle it and then bring in some other stuff. And then we've got this thing called the X-drop. And the X-drop works great because it's portable, it's easy, it's lightweight, and they have all different types of options. So there are seven very useful and very actionable tips and tools for you to use for backdrops. Questions? Two in the front. I know you had, let's go to you first because you have been waiting patiently. Thanks, my question is specifically for the white, the two white backdrops down in the bottom row. And when you do full length, and you did suggest that you were gonna use, it would be better to use a larger light source for that. Yeah. Would that lighting the floor as well, to get a more pure white, is that what you would be shooting for there? Yeah, excellent question. When you're doing these reflection shots, pretty much everything has to be well illuminated. And so I've got smaller light sources in here today. My soft box was that Profoto two foot by three foot. Really what I should be doing is having like a six foot umbrella or something like that. And if you look at some of my previous CreativeLive classes on lighting and flashes, I show some of those really big products that I use. Very helpful. Yesterday we had a CreativeLive class on green backdrops. Green screens. Green screens, and what are your thoughts about using a green screen and just swiping different backgrounds. I made a joke, this is Ben's class right? Yeah, Ben taught another class on green screen. And I made a joke, because I saw him around, and I said I'm just going to refer everyone to your class because the simple solution is do green screen and just swap in the background. This chroma key concept works great. There's a lot of companies out there that actually sell backdrops that you literally drop in, in Photoshop into your green screen photo. So that's a perfectly viable option, but it does take some post processing. And so if you're, let me just riff off of that for one second. Let's say you're shooting a big job, and you've got kids. Let's say you're shooting a classroom at the school. And those kids are coming through your studio very rapidly. And you've got hundreds and hundreds of photos. Well, that would mean you've got hundreds and hundreds of backdrops that you've got to bring in. And you've got to mask each one just so. Make sure the hair is coming out fine on the green screen. So it can take a little bit more post processing effort, and where as this is kind of one and done. Great question. Tell us where everybody can follow you at home and make sure they stay in touch with you. Okay cool. You guys can all find me online of course. I'm on all the socials, so I've got an Instagram account. That's mostly my wildlife. I do a lot of international wildlife and nature photography trips, so lots of birds and lions and tigers and bears. At my Instagram that's @MikeJHagen. And then my Facebook is VisualAdventuresCo. That's the name of my business, Visual Adventures. And then Twitter is @MikeJHagen. And so if you ever need to contact me, you can find me there. You can also go to my website, visadventures.com and you can email me and I will get back to you, I promise you. Feel free to contact me anytime.
Class Materials
Bonus Materials with Purchase
Ratings and Reviews
Mr. Baggins
This class is pretty basic for the most part, but I definitely got some good ideas from it.
a Creativelive Student
The thumbnail on this video is very disbelieving. The video is very basic, where the thumbnail shows sort of an advanced type of backdrop. Dissapointed.