Lessons
Lesson Info
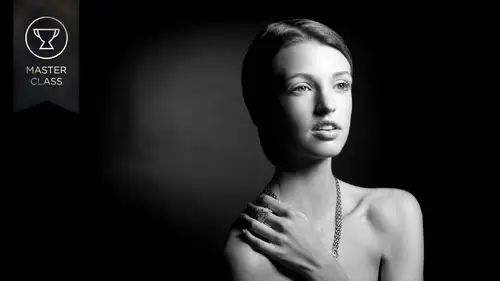
Shoot: Beauty Dish with Female Model
So we're just going to start off with a bt dish now for the crew here um I am going to be demo ing patterns of light on the face so I don't know if you wanted to close the the blind I don't know which is better um I think that would be better for the cameras to see thank you very much and I would love my lovely female models come out here and grab a stool for you okay often visit you right here so let's talk about how to use a bt dish I'm actually likely going to skip a lot on the soft box because I think a lot of us know basically how to use the soft box so we're gonna go for a little bit more high impact let's talk about some more unique modifiers and way to use them since I'm not here for a full day doing this that will use their time a little better all right let's dio went to my twin this all the way up yep. Perfect. Okay, so thank you very much this over a little. All right, so here's the thing about a beauty dish one of the things that I love about the dish is that it gives you,...
uh, more focus light a little bit more contrast the light, but one of the things you do have to know is right now how I have it positioned, okay, clearly I'm missing her head, right? But it's still lighting her the beauty that has a very specific, soft sweet spot where the light is good and the general rule of thumb to be able to hit the sweet spot. Is he one of line up the center of the beauty dish with the subject's face? Because I don't know if the camera can get a really close shot of this just on her face if you'll be able to see this the edges right here of the beauty dish what's actually hitting the subject when those edges hit my face is actually just raw light and raul itis contrast in harsh, however, when the center is pointed at her face. So right now it's looks straight at me real quick, okay, so you can see really chris shadow on the side of her nose? No, she has really nice skin, but if someone had more wrinkles or blemishes, catching the side of this beauty dish would give you, uh would actually show those blemishes worse. And so she barely has anything but like you can a little bit see and I'm gonna move out of the way a little bit of texture on her forehead and in between her eyebrows just a tiny bit, but if she actually had bad skin, it would really show so what you're looking for is you're looking for right? See that see how different that is that the camera caught that but here's before that's the edge and there's the center who was making a funny noise okay tiffin alright like I don't wanna break it, okay, so the reason that matters is obviously you're not going to do this right? I don't think anyone would think to point b dish that way, but when it matters is it a further back shot? If your subject is moving, you have them safe jumping, okay? And here they're in the sweet spot and here there at the edge and so you'll get a drastically different quality of light, so it has to be finessed a little bit more than a soft box does you can get bad light out of a beauty dish if you're not careful with the placement. So right now this is that gorgeous like that beautiful glowing light and I'm gonna raise this up for the cameras just a tiny bit great there are to mean it already looks like magazine light because people your hair behind your job so what you'll see is she has and then shin down just a little bit she has more to find shadows under her jawline and a little bit more defined shadow underneath her chin and her nose but it's just glowing on her face so it just gives me a little bit more control if I want to move the light off to the side and give her a try over here like a little bit more chris shadows it's still gentle, but not as spread out as you'd get with a soft rock. So I like this, but here's something else to watch out for with a beauty dish generally when I'm shooting beauty photography and I'm a fashion and beauty and portrait photographer based in new york, and so I shoot a lot of beauty. One of the things that I see people do incorrectly with beauty dishes is they have them too far back a beauty. It has a sweet spot that really is about this distance, like three, five feet, maybe because what happens is after you back it up far enough, it loses that same quality, and it actually just kind of becomes more dull, so I would say this is still probably passable, but if you're tryingto light from, you know, ten, twelve feet away, you should be using a beauty dish it's kind of defeating the point. So even though we're talking about these three core modifiers, if you want to back it up really far at that point, I'd probably say you're better off with parabolic umbrella. Because it will give you more spread in a better quality of light from far away where the bt dish just has that better close distance. So this is my go to beauty light a cz long as the person doesn't have really bad skin, a lot of times I will do this for a portrait. Kind of depends and there are modifiers for this so let's say it's great that she doesn't, but let's say that my subject have really greasy skin. Okay, I can add a diffuser on the front, which is basically it's called the socket is the piece of diffusion like like you have in the front of the soft box, and I can soften that on her skin. So if I wanted to be more contrast and more focused, I can have a grid so it's very, very, very diverse, very versatile. Okay, so that's essential about a beauty dish, but how would I use it to be high impact? All right, so the very first thing that I would let you know is that the height of the light makes a big difference and this is with any modifier. But if I want high impact in drama, you don't wanna have the lights too low there's a lot of times, it doesn't really shape the fate. It's it's it's kind of flat on the features so if the camera's khun get this and if you guys could see this the higher ups that I raised my light, the more I see her cheek bones and jaw line because it cast shadows underneath so I'm just gonna raise this up so here's flat and then it gives me just a little bit more shape. So in general, like super easy go to high impact lighting would be a basic beauty clamshell and I'm going to pop this will you hold that for me? Um a cool thing that I do not have here but something that you might like there's there's two things that are made toehold reflectors set your subjects don't have to hold them if you're doing beauty photography like I do it's really important because a lot of times I want my subjects to be able to use their hands and I don't always have an assistant so westcott makes, um an arm the actually grips it's made for this reflector and then another one I really like is from last delight and it's called the tri reflector and it will try reflector and it holds three reflectors on the stand that I can move in any angle in any way which she performed it is awesome and it's about it's under two hundred dollars for that one um it went this continued then got ri continued I don't know I think it's I think it's still around but I use mine all the time all right, so what you want to see I want to take this away from your quick what you want to look at is right now I raised that light up a little bit what happens is great at me it's pretty good she starts to get a little bit of shadows in her eyes when you add this silver reflector now she's blowing from every direction and she had these bright catch lights in her eyes the thing to watch out for is if you bring that light too high and catch too much light uh what we'll do is we'll kind of flattened out the shadows if you have it too low maybe it's just like right ready right here when she smiles I can't see the kids like it when I do this then it just puts it right here. All it does is it adds a little bit of catch like in the bottom of right? All right, so I'm gonna shoot this because this is a must like must have for high impact if anyone shooting beauty photography and then I'm going to grab our gentlemen to show you a variety of uh take on us we hold that real quick to grab my can't run thank you all right switch my white balance here oh yeah that's not the right settings oh yeah this isn't even close story and I'm gonna be shooting with the twenty four two one oh five um for beauty shot I might go a little closer you seventy two hundred but I don't really want to change my lens too much in this presentation so all right so look great at me great uh yeah probably turning that on hotel good again. Oh wow this okay don't she has your eyes okay, so I started to get ahead without one more time. Good. Okay, now with my beautiful perfect okay, so all right, so you see how it starts to get like, a little bit of bags under the eyes and then that's going to give you a lot more glow the thing that you want to watch out for when you use a reflector this this right here this particular set up is called clamshell lighting um I remember it as you know, this late above and the reflector below her head's the pearl in the clan basically it's a clamshell could the problem you want to watch out for is if you reflect too much the subject's jaw and chin blend into their neck and so if you want one of the things that we like in portrait as we like to have defined doll lines and to be able to see people's chick bones and separation between their neck. So maybe it wouldn't reflect that much, maybe just a little bit last, someone perfect. So white, what it's going to dio here, it's going to soften those shadows a little bit, but it's not going to fill as much. So what? It'll dio it, see if you still have a little bit of separation there, it's going to be, uh, not a speculative highlights in the eyes, but it still looks nice. Okay, so that's, a go to beauty shot looks nice. You did a good job on your reflecting skills there.
Ratings and Reviews
joanne duncan
I got so much out of this workshop! so many wow moments. the set up with the light behind the model, was just wow wow wow, and the fun bit at the end just sealed it, thankyou so much!!!
stephen lenman
Really fantastic. The thing which i liked most, is how Lindsay gave options on how to do each set up with speed lights, and shoots in smaller home studios. John is also amazing as is his purple bandanna. Hope he gets his own creative live course at some point. I would be interested in what he would teach, and how? He would have to wear the purple bandanna though!!! But not just the purple bandanna? Maybe that would work too.. Maybe we should start a crowd funder "John to teach a creative live course wearing nothing but a purple bandanna" .. It could be the future :)
Patricia Solano
This is about the 5th class I've watched of Lindsey. As a teacher myself, I am impressed with how great an instructor she is….she has a way of explaining a concept in a manner that the less techie person can understand. I love how she uses water as an analogy to light. I'm a retired Spanish teacher and one of my favorite stories is Isabel Allende's "La Luz es com el ague" (Light is like water). Bravo, Lindsey! Looking forward to watching even more of your videos.
Student Work
Related Classes
Lighting