Lesson Info
5. How to Shoot in Tight Spaces: One Speedlight
Lessons
Class Introduction
02:39 2Overcoming the Challenges of Working at Home
34:25 3Using Everyday Objects in the Home
38:31 4Using Everday Objects Q&A
08:46 5How to Shoot in Tight Spaces: One Speedlight
30:25 6How to Shoot in Tight Spaces: Two Speedlights
06:09 7How to Shoot in Tight Spaces: One Studio Strobe
20:37 8How to Shoot in Tight Spaces: Two Studio Strobes
10:20Lesson Info
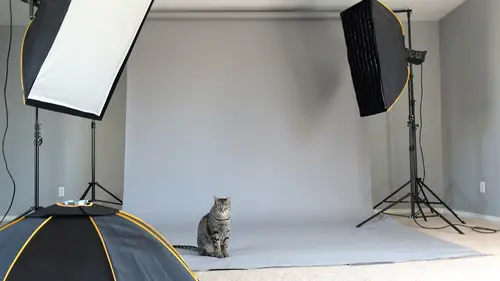
How to Shoot in Tight Spaces: One Speedlight
To tag on the back I think the problem is uh do you need to do the family of four five or six full length if you do it's one of those things that you probably ought to check off the list because you're not going to be doing full length well because you're gonna have to have you're gonna have like that's gonna be an issue and you're going to use a lens that so why you're going tohave distortion problems and with your optics my recommendation and we'll talk a little bit more about lindsay's as we dig into this a little bit but for me uh you know fifty millimeters has always been called a normal lands on thirty five aspect ratio of thirty five millimeter format fifty two fifty five depending on which book you read uh uh but but that is about right for and the reason it's called normal is because it just about uh equates to human eye minus the peripheral if you took the peripheral out of the human eye you're getting about the same thing as a fifty millimeter lens so what's great about that...
is that uh the good news about that is I know I can get normal perspective anything wider than the fifty I know that I'm getting slightly wide wider wider and wider is it gets shorter and shorter shorter and those become the issues but fifty it's pretty decent and on dh that's great now I know that in most of my work especially my outdoor work I want people to look at my pictures and go well that's different so I know I want to use really wide or really long I don't like anything near the normal I don't like anywhere near fifty, but for this kind of work in this home of fifty and a seventy eighty, eighty five oh my gosh and eighty five is a great length uh and you know the ideal portrait lens uh for a thirty five millimeter size uh is always ideally been about a one thirty five that's kind of like the that's the sweet spot or longer uh eighty five is great too don't misunderstand, but we know that there's going to be limitations to what you can do in a small space with optics there's you've got to be able to work for most of you you've got a twenty four seventy which will be a go to lens for you to keep on hand uh, I've put on my camera for today session a little twenty it's a walk around lends my twenty eight one or five that's my travel linds um plenty sharp believe me, but that's my sort of my go to walk around lands when I'm traveling uh so we're gonna go through a couple of different scenarios here let's see if we can't uh make some sense out of this uh do we have any questions from any of you before we begin this segment is there any concerns that you have or anything specifics that there you want to see no okay okay good so then let's do this let's bring on the lovely and talented mckenzie come on in woo there's mckenzie everybody hey she's awesome and she's got purple in here um let's start mackenzie let's put you back there just a little ways and so so to start with what I want to do is just begin the session with speed lights let's just talk about one well we'll start with one speed like they will do to you uh and we're going to bounce a speed like first off to increase its size not everybody has a soft box for their speed light and so but what you can do is if I bounce the speed life into that side over there that's white from this distance what I'm getting is pretty good angle on her face and I'm increasing the size of the source dramatically which is going to soften the edge of the shadows so I'm doing a pretty good job I'm getting a pretty good bounce there and I think it's gonna work out really well so let's do this let me back you up just a tiny bit further kind of like that and let me get my camera over here set up uh if I can put this guy red in here okay, so that just came off a standby now just for everybody's to answer the question about what I'm shooting this uh I have great respect for this set up with this transmitter and this flash unit's on e t t l and with this set up as my master and that set up is my slave so right now they're talking to each other the green link light just came on so now that we know that they're set up, we know they're talking what that means is I can kind of pick my own aperture based on what she's wearing based on what I want the background to look like and I don't have to spend a lot of time thinking about this our first exposure should be pretty darn good in this enclosed space that's pretty I mean you've got white reflective walls pretty neutral balanced everything I'm going to have no problem I think with my exposure so let's uh come forward just a half a step right about there yeah you're perfect put all your well yeah you did that put all your weight on that one side there you go let's just bring your head around just a little yeah that's just let me fire one off right there and let's just take a look and see how we're getting on to start with yes, I've got my my one o five and I'm set right now at one o five now you might be saying, well, wait tony you're kind of too far back, okay? So let me move in I'll move on him and I'll get closer to her let's check our first shot there if you want to punch that up, see if it makes the trip across we'll see how that did yes oh, that looks pretty darn good. Uh, let me get a little bit closer here and I'm just gonna pull my focal length back a little bit so let's come down to write their seventy millimeter and I think I have no problem working with seventy right about that distance and your chin down just a tiny bit right there. Great, great great good! Now one of the things that I noticed here I've got a beautiful light quality this is something that's that's uh for me it's pretty important and a lot of people don't think about bouncing light, especially speed light, but in a case like this I'm in a small room with white walls I'm going to have to do something because if I am that speed like directly at her, there are several several problems that we have it's a very speculative life meaning small light high speculator ity small highlights that are very bright and hard shadows non stop, but in this case I think we're not not doing too bad it's pretty good like quality on her face and pretty good overall soft feel to the photograph you wouldn't know that's one speed light lighting this whole thing one thing about a small room you've got to be mindful of you can see that back wall that light is bouncing back there and it is doing in that wall depending on where I positioned her, I could have myself in a little bit of trouble if I put that if I put her a little bit closer to the background, I'm gonna have a shadow from her on that back wall. Now the problem that people have when they have that shot on the back wall there always like, how do I get rid of that it's a it's an element of working often a little bit too close to the background with your subject, you've got to get your subject a little bit away from the background if you can do that. I know it's hard, but if you could do that, it'll help you a lot, and if you've got a door way here and you can't back up well, then you're kind of stuck uh, you just have to do the best you can and may be you offset it with another flash, too offset the shadow and light from from a light down below and let that kind of fill in that wall a little bit a little space so that'll work pretty well too, so we'll try a couple of different options here in fact, I'll create a shadow for from her and I'll make that kind of happened then we'll see how we can fix it so let's do this let's move you just a like a half step straight back maybe even a little another half step yeah, there have step there you go and I'm just gonna come in there with you I'm in the same room with you now we're in a small little room really small and I'm just gonna put this guy right about there and you know, think about you know, that whole rule uh that we've all learned in photography which goes the angle of incidence equals the angle of reflecting its meaning that whatever angle that light hits that wall that's the same angle is going to come out. It comes off the exact same angle unless I've got a reticulated surface of some kind or it hits something weird like water, but in this case I've got it's it's a runner it seems to be in about the right spot so it's going to hit her I think it's going to hit her just about right right there I think I'm also gonna get a shadow here I may not we'll look and see I may have her far enough away, but in this case the debt, the depth here these air four by eight sheets panels so right now I'm in I'm about ten I'm about eleven feet from where I'm standing from the back wall my whip is as you can see from the top segment that's up over her head that's a four by eight sheets so I'm eight plus a little bit so I'm ten foot I'm ten foot by about eleven feet here not a very big space and but I'm working on my twenty eight one or five and I met about seventy on that shot right there so let's take a look and see what happens bring your head around just a tiny bit makings there you go great great great great, nobody moves hoo hoo hoo! Yeah, I'm starting to get just a tiny hint of a shadow behind her, but I've I've mostly got it covered because this this is surface and these white walls are so big they really kind of help they fix a lot of problems uh if I had a smaller source there, I would probably beginning a little bit more of an issue with that light on the back, but you can see in the lower right corner behind her shoulder you're starting to see just a little bit of the edge of that shadow that could cause you trouble and if that is too objectionable then you're gonna have to put some light back there. Uh you're gonna have to add another second light back there at this point, I don't think it's a problem how about the ratio should highlight side of the face of the shadow side of face? Is there any issues with that it's a like it's a gigantic soft box it's like I've got a four foot are five foot wide soft box in this little room with us folks, I know you're gonna have problems with this if you've got painted walls that are not white and if they're dark, I know this is gonna be an issue great put a sheet of on the wall, put a piece of foam core upon the law, take a piece of foam core that you keep in the garage when you're not shooting and bring it out and stand it up and hanging on the hook are on to light stands of course they stick out in the room and that makes less room uh everything that you do takes up space in those walls in this little rooms so you don't have a lot of wiggle room here there's not a lot of space tow to do very much let's move you forward a half step and I'm just going to bring this back to me a half a step and I'm gonna do one more yeah, that looks pretty decent I think and so right now I'm shooting it f eleven so my background is going to be fairly sharp good, good, good this way by bringing her forward a little bit I'm got a little bit more of a ratio than I do. They're so what's this ratio coming the shadow side of the face is a little bit darker, so I just wanted to increase the ratio just a little bit and by moving her forward slightly, I was able to bring in a little bit more shadowing. So you have a question in there? Use an e teo, I'm gonna tell you what if you didn't have a tl speed light, you can use automatic use use a t t l you can use auto which turns on your auto fire esther in the front of your flash all flashes haven't auto setting all speed lights will have an auto setting of some type, so it doesn't really matter as long as as long as I mean she's kind of a neutral atonality subject and that's what it's looking for into the automatic modes is this looking for reflect its value of sort of normal mid range tony you sure you don't have to like me you didn't like use your light meter not any reason the meter I just turn this on and pulled the trigger how donald enough eleven because I want the background to be a little bit sharp so I can see the bricks so I just pulled the trigger and the exposure found it it found its way because that's what it's designed to do that's what the hell is all about? And it and it doesn't matter it's canada nikon nikon does the same thing with there teo intelligent detail and this is e do you have any diffusion on the speed light or okay no it's wrong thinking yeah and I mean speed like listen guys these speed like they're terrific these days they've gotten so much better than I ever used to be their output it's solid their light is clean uh it all works pretty well I I use I used speed lights some but I'm much much more comfortable using studio lighting and larger life shaping tools and all that because that's just me that's who I am uh but I'm just this is an illustration to show you you can't tell me you can't do this you can do this it just sometimes it's not the tools that make all the difference often it's the knowledge behind the tools that make all the difference so so make questions that make sense yeah, tony, I've got some questions you're coming in from some folks at home, so similarly, a lot of people have maybe flashes that don't talk to their cameras. So could you talk a little bit about sort of the approach to that power setting? And also yesterday, you talked a lot about using a meter? Would you be using a meter in this scenario? I would use the meter in this scenario if I had a flash that doesn't have any kind of control. Okay, most flash unit's, depending on them, it doesn't even really matter which brand almost all speed lights have emanuel setting, and they have some kind of an automatic setting, whether it's auto, artie, tell one or the other, try it on the auto setting and see if you see is working for if it's not, then go to the manual mode and then bring your meter out and take a meter reading exactly like we did yesterday, and I'm going to bring some other lights out in a second. We're gonna be meeting all of them, but you can bring your meter and hold it near the face. Aim it toward that wall, which is now my light source. Fire off the meter and it says f eleven, shoot enough eleven and if it's too bright, then go to the manual setting and go down from full power to have power to quarter eight sixteen, thirty second put it wherever you wanted to go, to give you the aperture that you want, but do what the meter says, and you can't get fooled. The only reason I'm not used to meeting here is because I know the accuracy of this, not everybody has it. So do use the meter when you have to, when you've only got that manual setting, or if you don't like what you're camera and meter combination are giving you but know this the difference between e, t, t, l and t teel sorry, e t, t l and auto is, and many people have an auto setting on their on their speed lights, the e t, t l or for the nikon cameras, the flash works in conjunction with the camera and there's, a sensor inside the camera that basically when that sensor senses through the lens that there's enough exposure on the sensor to reach a midpoint mid value, it cuts off exposure stops. At that point, auto is different auto works differently. Auto works in such a way that in front of the flash, this big red guy right there in front of flash that's a fire ist er basically and it's reading the reflective value when it sends out the light signal to your subject and it bounces back it's reading the light that reaches the sensor there in this case, with the light bouncing like it is auto might not be very accurate and that's, why that's? Why it's a good it's a great question it's a good reason to talk about using manual because if you don't have ti e t t l e or e l and your auto isn't working so good, go to manual use a meter and you can't, you told me so I hope that you filled that in a little bit now in this case, all we're doing is just bouncing this in here, but we do have some other options too. We don't only have two bounce it let's uh, let's do a couple of things, let me shoot uh, let me grab these. I'm going to grab an umbrella here, let me grab a white. I'll do a reflective umbrella first and let's just umbrellas don't take up much space. This is not a very it's, not a very large umbrella, but it's white reflective on the inside, so now I'm just gonna turn this thing around and I'm gonna bounce light into the umbrella and do the same thing with the same settings and let's take a look at that see how we do so uk there mackenzie yeah all right, so I'm just going to lower that down a bit I'm gonna angle this back this way this time and sit on this guy right through the hoop like that probably about like that maybe something like that I don't have any compensation on my detail, so I'm not trying to overpower it up or down either way just it's on zero it's just neutral balanced right now so let me raise it up just a bit kind of like that and I'm not changing anything. I'm not changing any of my settings I'm just going to pull the trigger and see what happens let's bring you forward a half step and maybe just tiny bit of this idea let me just come in here and take a look make sure that little green light came back on it look green to you okay, good so sometimes when your camera goes to sleep it loses the link because it doesn't know what you're doing. So I just wait my camera up and to stand by and they come in them and green light came back on, so that means we're talking again there you go, that's great that's real pretty right there don't move don't move who so in this case now we're att f eleven still all settings are the same still and my exposure I didn't take any meter rings and how's it look right so the system works it's a pretty good system and it works pretty well now I'm not telling everybody to go out and spend the kind of money that you have to spend to buy high end e t t l speed lights but I am saying if you have him this is a great way to use him if you don't go to manual take a meter reading it's exactly the same thing as we did earlier enis we're gonna be doing with the other studio lights which will bring those in just a second john so okay now I do want I do want to show one other thing to let's go ahead and reverse this guy a little bit well let me shoot a couple more variations let's just check that background let me just look at that background a little bit here yeah, I'm uh I'm pretty happy with that. Do you notice hey in the booth back there if you're available there steel can you put those last two two side by side and let's just take a look at the difference is I want you to look at the difference in the shadow uh from the first one to the second one so on the right is look at them look at the difference yeah if you look at the difference in this one the catch light's pretty small in the eye so I know that's the umbrella this one over here the catch light's pretty big and it's a little bit softer I know that's the big wall the shadows much much softer then it is over here it's a little bit more of a contrast your look I don't know what you're after and what you want but you do have the option there and like I say the umbrella doesn't take up much room the umbrella does send light all over the room and it will like a group of two or three people pretty easily and we'll probably do that before we get to them the session so some of you standby yes you that didn't get in the family yesterday um let me do a couple more real quick I want to do I'm gonna do a couple of variations here uh I'm gonna move this and a little bit closer right about like that and you're just pretty adorable just like ur stay right like that good and I'm just gonna zoom out a little bit and see a little bit more around her great good good that's uh yeah that's not too shabby right there so I think that we have with that coverage of that umbrella right there it's covering probably on area it's probably covered an area from here all the way over to there so I think we're probably okay to do two or three people here with this set up so um before we do that let me change let me see how yeah let me change that a bit I want to drop this guy down and I'm just going to swat this umbrella and put up the translucent shoot through him brother because a lot of people are doing that jason and it should give us a little bit of a softer look but in terms of overall quality is going to be pretty similar but it is another it is another option to look at so ambrose the cost of umbrellas has really dropped in the last few years because I'm in fact every kid that you buy every like it comes with free umbrellas now don't discard him because don't discount them because they didn't cost you much use um kid about to do something with them they're great so in this case I'm gonna I'm gonna push the shaft instead of down here close to the head I'm gonna push the shaft out so that I can and I can really increase the size of my source the most I'm lighting the most area that I can of the umbrella makes sense size relative to distance it's what I preach okay so now I'm gonna angle that down a bit now I'm gonna turn it around and I got it down way too much can I like about that and now I'll just turn it let me get behind it here I'm just gonna aim it right at her house that look it's beautiful thing, isn't it it's just a beautiful thing can you just flip your hair, shake your hair, shake your head around, relax a little bit let's loosen you up a little bit let's turn you a little bit to that side this time just for fun then back up a half step and, uh let's just do something different with your arms this fold your arms just get comfortable do something there you go good and turn your head to me just a little bit that's it right in there right in there so I'm going to stay in the room so I'm gonna stay back up in here where I am, huh? And in fact let me zoom back let me show you so hear this at this focal length right here I'm at fifty let me just dial it into fifty so now we can look at it. So at this distance from her to the wall I met fifty let's take a look let me do one more of those because I got a look at the way your eyes right hear me good great exposure wise dead on now I'm seeing the floor and I'm seeing the edge of the floor, there's a couple of things that you can do first off this is a fifty millimeter, and you can see where she is relative to the wall. If I move her closer to the wall and keep the fifty, I can still do that. And as long as I can keep that light off to that side, I'm not gonna have a shadow problem on the wall think about the shadow guys and think about this by having her away from the wall a little bit from the back wall forward toward me, my highlight I mean, my my life created from the main line, falls downward and falls to the ground so you'll never see it. If she backs up and gets closer to the wall, I'm gonna have a problem with the shadow, but that's the same in the studio to you're going to have that anywhere you go, so then it becomes a no element of how do we compensate for the shadow? Well, there's a couple of things you do, you can bounce the light or increased the size or just try to get her a little bit forward away from the wall that makes all the difference in the world. Now if you don't like what you're seeing on the floor if you're seeing a baseboard you don't like, then you can drop a background back there and let it drop down and pulled and drape it out just a little bit uh that if that's something that bugs you a lot or get closer tour if you stuck with just the fifty something you guys at home that are watching this you might only have a fifty millimeter lens um it's the normal ends it comes with a lot of cameras, so maybe that's what you have to work with and that's fine, you can still do this work so the fifty in this case what I would do I would recommend from an optical perspective I would probably lower my camera height just a little bit so I'm not slightly looking down at her just because it's comfortable for me to shoot doesn't mean she looks out her best I've got to make her look her best and sometimes to do that I've gotta lower that camera angle a little bit and then over there was an old guy that used to shoot the cover for cosmo magazine got in francesco scavullo and he got really old and was still shooting the cover for years and years and years and it had this specific look where it was long lens down low slightly shooting up and he bent over and shot these models every cover of cosmo from thirty years probably you saw they always had the background that was the same tonality color as the dress for years and years scavullo anyway was brilliant he made a trap door in the studio in new york and so what he would do is he hinged this trap door and he opened the door and then he could walk down two steps and by walking down two steps he could stand upright so it was great so he didn't have to bend over because he was getting a little bit old it does make sense his back was bothering him so he don't want to bend over anymore everybody's going what? Yeah okay so let's let me come in and do I'm at fifty right now and I want to zoom it's a little bit more but hang off talk to kenneth first know several people who are tuning in and just asking can you reiterate sort of the size of the space that you're working in yeah and then also a big question folks at home are asking is is your flash zoomed in at all at this point? Great question first off on the size of the room uh these panels are four feet by eight feet so I've got two of them taped together in the middle so the width of the room is eight feet plus that much so it's about almost ten feet deep the whip that's eight feet across on the top there in the ceiling so that's about nine feet wide so we're not using a very big space at all on the question of the zoom and the height is eight feet it's about it's about eight and a half feet yeah uh the zoom on the lens I mean on the flash is set to zero is just set to natural to neutral so I'm not zooming the flash at all I rarely zoom my flash head uh the only time I really zoom it when I'm doing like a fashion any kind of a look outdoors I might squeeze it down and set it to two hundred millimeter and then I'll shoot with a sixteen down low shooting up where I've got a spotlight effect and it's very very cool but other than that I wanna light is big and areas I can so I keep it back so I'm not as a middle and in this scenario the angle of sort of the flash itself is just a little bit down if you think about it I wanted to be at about a forty five degree because it's the same thing that I use in the studio lighting whether to soft box uh translucent fabric a diffusion panel whatever in the studio on a full big studio is the same thing I want a forty five degree lighting whenever I can get away with it because it's it's one of those thought small standard cliches that is almost always right is almost always better if I can get my light source at a forty five I almost always win in just about every situation yeah, yeah, you bet. So in this case it does look like it could come down a little bit in the angle but from the results I think we're okay but I might take it up a little bit and drop it down just a little bit so let me just drop it down just a tiny bit more and then let's back you up toward the wall just a little bit just tio take care of that. Yeah that's probably good. I just want to get her a little closer to the wall to illustrate the point of how the light with a large with a shoot through panel like this the diffusion material really kind of spreads all around the place. So you guys does that make sense to you that light this is a really good way to work in a small space with the shoot through umbrella because it's really goodbye getting outside of itself going out it's not a wraparound thing but there are some there are some issues here that you have to deal with oh that's pretty who nobody moves nobody gets hurt o that is a beautiful thing except I kind of messed up my framing let me redo that because I'm a goober. Nice. Nice. What a great but a great expression. Good face, let's. Try this one. Everybody ready below on the screen. Ready? Here we go. That's better look how even the light is on the background. Look out! Look, if you look at the distance, if you measured that floor she's about three and a half feet away maybe forty inches away from the background from the wall and there's no shadow on that wall if you take that umbrella off there and use just the flash there's gonna be a shadow on that wall and that's, the point is, you've got to sort of think this forward, uh, towards things that you can do to improve the quality of this picture. Um, and there's a lot that we can do here. I mean, way don't have much space work, but we can at least employ some good quality minded techniques. We gotta make it look good at the same time. We've got a small area working. Okay, this is smaller than most people. Most people's home studio room. So I'm trying to exaggerate the point a little bit, so I'm kind of making it a little tough for me, but it's, okay?
Class Materials
Bonus Materials with Purchase
Ratings and Reviews
Heiko Kanzler
This was my very first course at all, and it was a great one from the beginning. I never thought I could gain so much fun from my limited small space at home. Thanks, Tony! (And thanks to folks of Creative Live)
joanne duncan
Havent used my studio gear for a little while, and last time i did, i just shot too flat with no shadows, this was a really great refresher, love the attitude and the language used, worth it! a must if you are new to studio lighting, including sppedlights, got some good info for when i use a speedlight outdoors in sunlight. thankyou.
CawfeeJunkie
I've been lucky enough to see Tony present in person and enjoy his CL courses. Love his courses!
Student Work
Related Classes
Lighting