Shoot: Hibiki Whisky Part 2
Lesson 10 from: How to Be a Commercial PhotographerRob Grimm, Gary Martin, Aaron Nace
Shoot: Hibiki Whisky Part 2
Lesson 10 from: How to Be a Commercial PhotographerRob Grimm, Gary Martin, Aaron Nace
Lessons
Day 1
1Photo Shoot for Duratran Backplate
09:13 2Class Introduction
26:47 3Roles in Commercial Photography
33:41 4Breaking into Commercial Photography
23:46 5Establishing Your Brand
16:40 6The Commercial Industry
09:15 7Anatomy of a Photo Shoot
30:08Photo Rep Interview - Lesley Zahara
24:23 9Shoot: Hibiki Whisky Part 1
29:14 10Shoot: Hibiki Whisky Part 2
36:55 11Shoot: Hibiki Whisky Details
23:52 12Shoot: Glass and Fake Ice Part 1
31:25 13Shoot: Glass and Fake Ice Part 2
21:21 14Building your Portfolio
27:39 15Marketing
15:38 16Search Engine Optimization
35:28 17Equipment Overview
37:23 18Working with a Creative Director - w/ Pat Olds
27:26 19Shoot: Beer Bottle Ad
36:27 20Shoot: Beer Bottle Diffusion Trick
27:32 21Shoot: Beer Bottle Star Flare
22:08 22Shoot: Beer Bottle Icy Effect
21:46 23Shoot: Beer Bottle Reflecter Cards
27:06 24Shoot: Beer Glasses
38:01 25Retouching Meeting With Aaron Nace
19:27 26Retouching Hibiki Bottle: Neck
31:42 27Retouching Hibiki Bottle: Label & Sides
30:28 28Retouching Hibiki Bottle: Glass & Bottle
32:28 29Retouching Hibiki Bottle: Label and Adding Back Plate
44:59 30Retouching Beer Ad: Meeting and Set Up
34:41 31Retouching Beer Ad: Adding Glasses
17:39 32Retouching Beer Ad: Beer Body
26:45 33Retouching Beer Ad: Beer Glasses Finishing
38:47 34Retouching Beer Ad: Flares
26:31Day 2
Day 3
Lesson Info
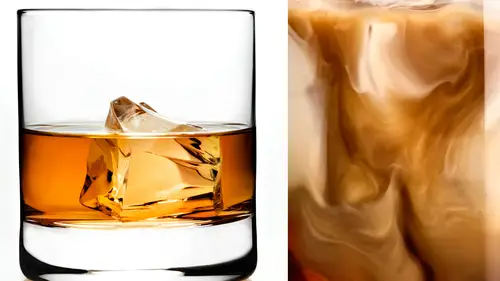
Shoot: Hibiki Whisky Part 2
I'm gonna start to bring some other lights and because I know I got to make this a little bit more interesting so I want to kind of replicate what's going on in the background I need some hits a light in the in the glass itself so I'm gonna attack it from a few different perspectives so right now what I'm doing I angle of incidence equals angle of reflection okay? So the angle which the light comes into bounces off that equal angles that's something that is always always always in my head so I'm thinking about the perspective that I want to bring the angle that I want to bring the light into subject because I know it's going how it's going to bounce off that's a big determining factor for me that again goes back to my kind of sculptural element of how aircraft light I think about these camp these light angles how they come into the subject how they bounce off so right now I'm gonna bring a light in here it's going to hit down in here and it's gonna give me a lot of light coming through...
the base of it one of things that's really interesting about glasses it has a refractive properties so if I put a light on the right side it'll give me a highlight on the right side but it's also going to give me a highlight on the left side it transfers to the exact opposite side so it multiplies every time, which makes it a little bit more challenging. It's also one of things I really enjoy about it it's just complex questions. Okay, so I want to get a little light on the label a cz well, so I'm using bronco or, you know, lights and right here I've got a you know, light with a p seventy reflector that's great it down pretty tight. I very often use something called olympus spots, which go on a lot of the vis attacks that I have, which is also um uh, brown product way don't have those here, so we're just going to try to try to come in, carve this light down as much as we can, but I also want to soften it up because I know even as I'm bringing it down it's gonna make it really pretty harsh, so I'm probably gonna grab some diffusion here so you can see like we've made the overlay and I can kind of get to the approximate size and see what's different, but from everything that we've done is usually side by side. I know it seems almost overly simple, but when one disappears and the other one comes and the transparency it's, you could get a pretty close either way, I think, um I guess we're just old school like to do it's at best way do a lot of cyber side plus it's never gonna be one hundred percent exact because I'm using two different cameras I'm using two different you know, I'm calculating the focal length and I'm getting pretty getting close but you know, it might actually be eighty one point three, you know? And I'm in eighty two so that's going to give us a little bit of a variance on how that png overlays you can tell it's pretty close in the end it's gonna be very convincing. All right, so let's put a little I also have a big fan of roscoe I use a ton of roscoe diffusion um it just really makes life beautiful. This is one of my favorites. This is roscoe three thousand eight it's just a great bit of diffusion and really, uh, it makes me happy that's way to put it really does get some more pieces of that here. Ok, ok. I had too many lights on, so I'm gonna systematically go through and I'm gonna start to knock out like, and we're gonna see what we get and this will be good because this will really show us how we build this thing up, so what I'm doing now is I'm not turning off the power packs I'm just turning the head off there's a button on all the bronze color that allows you to turn off just that hat so the capacity is still on I'm not shutting everything down I'm just not allowing it to release its energy you figure question this is a little bit uh not the technical question but I notice you guys work very calmly and at a very good pace would this be comparable to like during its you think this is quick I mean you just just saying that very nice and calm and you're staying on task but you weren't rushing around and like freaking out no no way you know, first of all, if I'm rushing if I'm moving too fast that's going to indicate panic or a lack of com on my part that then transfers to the clients and my crew and then suddenly everybody is a little bit and um that being said there are times where the clock is ticking and you've got to make it happen. We were on a craft shoot last year we did two two days in the studio and one day on location and it got kind of complicated there was there was a discrepancy and ideas between the creative director in the art director on some of the stops so we lost a little bit of time as we were just working through those challenges and it got to the point where stuff had to happen or the budget was going to blow. We had so many people on location that the talent was just going to go skyrocket once we hit one hour of overtime it was gonna cost a lot of money I said very directly I said okay, we now have a time crunch I'm going to be loud and I'm going to be direct I'm not gonna apologize I'm gonna tell you right now we have to make this happen and I'm going to be the one to do it. So I did that's exactly what I said to the clients and I just started going uh and they respected that there was there was amount of time that I had left were going to be in trouble a day end of the day I was saving them money so they appreciate it and I just directed it, but for the most part, I want to become I want to enjoy this process. This is actually fun, you know, I'm making pictures, kimberly people pay me to do this. This is awesome it's a great gig. The other thing is if I'm running around, I gotta really a chance of breaking something. If I'm moving too fast I could hit the set with my hip I could do something stupid, I could break the light, I could break a product I think it's much better to work in calm collected fashion do you find that clients hire you because they come in knowing that I think has come back to me because of that that's hard to know before you work with somebody it's hard to know they're there demeanor and how they run a set until you've been on a set with him I think that's one of the reasons why I have so much repeat business it's just I try to make it relaxed I try to make my studios as homey as possible I want people to come in and just kind of who you know I can hang out here um and that means that I've got to be relaxed gary's got a bee relax and thankfully by nature gary is very relaxed cool so it's all right? You're usually yelling at me but you know I have ever yelled at you just kidding maybe I should start all right. So right now all I'm doing is looking at the background and where have thirteen one twenty fifth one hundred so eso is one hundred, which is where I want to be. I like being a hundred particular with his big cameras there much they're much better um at that I'm a little bit dark on the background so you can see what's happening is I'm just starting to get some light coming through here but I want to get a little bit more so I'm going up this pack quite a bit we're going to see what happens okay? I'm gonna have to stop in three tends to it and with broncho broncho gives me the ability to control everything in one tenth of a stop and I often used those I don't know my I definitely see a tenth of a stop and I really enjoy the ability to kind of craft an image based on what is that black speck it's been in every photo that is a that is uh something that got on the sensor which is a bummer because we tested this camera out last night and it wasn't there um right now I'm really not gonna worry about it because it's in was it her eyes it on that yeah it's right there it's pretty it's pretty big so that's dust that's a beast um we clean our sensors regularly because that will mess you up right now if it stays where it is it's a non issue because that's the background that's gonna be replaced with high rise version if it was coming in on my product I would definitely stop pull the camera part and clean it but I'm not gonna do that because I want to keep I want to keep on track so that's well the better we got some more light coming through there right bottom is starting to look nice like I love the way these facets are starting to show up you're really see them on the base they're starting to come up here that by the way was carbon copy cloner so gary's got this hooked up or carbon copy cloners constantly running everyone saw that little message will be popping up and we know the data that we're shooting is being backed up all the time so we're never never endanger losing anything I think all right I'm at a couple more tense to this and then we're gonna start adding other lights so three tents I like I had had it please okay now let's that are top flight the background on this door a transition addresses really quickly its accretion it's crashing all right background looks terrible I mean that I would never present that that's awful but I see what it's doing to the inside of the bottle when we had that background darker it wasn't giving me that glow that I wanted to come through the bottle now I'm starting to get there but again the bottle the bottle looks terrible crashing let me restart this let me just restart focus and see if it's there but we might have to just part on let's just do it anyway save time this isn't totally out of the ordinary crashes from time to time uh I'm getting a restart camera here so this can happen lots of electronic devices batteries, cords all kinds of stuff going through thanks can freeze up um way just restart sometimes it happens at the most inopportune times as well. This is a great time to ask questions by the way, are there any questions from the interwebs out there? There are let's say the first one is from eighty one who's asking if you could use a projection screen to get an image on too your background screen instead of using the background background image print that you're using you can and I actually used to do that. One of the reasons why I moved away from that is because when you're using a projection screen you're projecting light that can be washed out by the strokes so it becomes far more complicated teo cut your strobe light off in the background in order not to wash it out versus pumping light through a door a trans that gives you that light coming through it's far more complicated I actually that's kind of where I started with that whole thing but it took a lot longer it was just a pain so I dumped that approach but you can you can do it it's absolutely very viable I just wanted to also let people know that we people are asking technical questions about white balance and things like that but we are going to be getting into that in the next segment aren't we going step by step kind of breaking this down a little bit waken go over white balance? Um, I guess I'm already there. I kind of know where this camera is and everything and doing a little testing, but yeah, I will have to, so just let people know they're asking technical questions that we'll get those later. No, no problem. Okay, second good. That actually looks pretty good in terms of my top life. Let's, do this let's make the top right look mad. Let's. Go ahead and pop that we'll see if I start to get up and get a nasty highlight. Okay, you see that so bright out here, I'm just showing them what the cursor so that's, the highlight that just came from the top. Now I changed my polarizer a few steps back, and I'm I'm sorry if I didn't show you guys that, but you can see how much more reflection is on the surface now. Before the surface was pretty black and my polarizer was knocking that surface out, I wanted to bring some of that back. I really like the way that this is coming forward on the reflect in the reflection. I want some of that to mix in, and I want erin, my retouching that have the ability to make something that in so I changed my polarizer on the scene that's why I said it the first time that's why I'm setting it initially now what I'm gonna do is I'm going to set the polarizer on that top light because the top gives me a good amount of light in the shoulder areas and in the lips on on the glass but that's hideous highlight so that's the one light that I'm gonna wind up dual polarizing okay, uh there's too much ambient light for may normally I would look through the camera and I would have gary or a new assistant spin the polarizer to see exactly where it goes away. I can't do that because there's too much ambient light in here, so we're gonna do it by feel, which means we're gonna take shots until we see it go away better better yet there's still a little of it they're my walking point so won't completely go away but it's a lot better and it's certainly something for thank you it's certainly something for erin to work with. He can now remove that highlight without too much complication that's that's a pretty small thing to retouch versus the other highlight that we had it was pretty hideous okay the other thing that I want to do right now so I want to lock this camera stand down because this thing is really rowley um once I start shooting everything if the camera moves I've created a nightmare for by re toucher keep in mind I'm going to be shooting multiple different things and they've got he's got overlay those together so cam has got to be really steady I prefer camera stance the ones I have in my studio or even bigger and heavier than this but this gets locked down and it doesn't move theoretically you should know that label so crooked it's probably not the last time I'm going to say that by the way okay, so we know what the top whites doing I want start to get some back whites coming through this so I'm first gonna go to this light which is like number one and let's see what that does okay so looking at it now let's see what happens when we introduce this first background who so I like that that's starting to give me some interest here I'm getting some nice highlights that air coming through here all those little dots were starting to remind me of the chandeliers and he's little laval ears that are there go on back highlights a little harsh coming all the way through that I'm not gonna worry about that so much because I know we can fix it a little bit but I like the detail that I'm starting to get let's however here we pop a couple form you want to move this around we'll see what position is best at that okay I actually like that morning that's giving me a little bit of definition down here it's not blowing stuff out so I'm going to raise this light a little higher than what I had it I'm bringing in slightly too so one of the things I'm doing I have the model I don't here and I'm just I'm kind of popping it in there and I just want to see where it's highlighting I'm not looking from the camera side which is really gonna tell me how it's hitting but after doing this long enough I have a pretty good sense of where it's gonna hit so let's go do that we'll start there we're gonna have more see what you think okay let's get the same thing going on the other side of the light so what I'm doing now while he's getting that going and as we get closer to completing different parts of of this I gotta take notes on everything for a re toucher so I'm just gonna do it very simple we're not too complicated we just use tax that it um and will say that in the file itself and just I'll just take notes if he says something about it a part of the bottle I'll make a note of it um and then at the very end will export those is sixteen bit tiffs can I ask you a question sure, um, from a perspective standpoint, are you guys just using this background as kind of a guide? And will it be fixed in post, like, in terms of the landscape being slightly skewed and yeah, absolutely. Well, we're going to take the bottle. Yeah, and we're gonna take the glass and we're gonna drop it onto the other surface so it'll wind up being in the other bar surface. So the fact that the background is a little bit off here, it's negligible, but it's not gonna affect us. Well, we might want to do is take some of the reflection and just kind of brushed that in and that's something that could be kind of massage a little bit. Because what what I did, I came further to the right. Then what thing? Where the bottle was in the initial set? Because I liked a little bit of what was going on the background just a bit more. And so, like, even with the lamps that doesnt matter that they're on different sides of the bottle. Okay, because it's not gonna be there in the real image, right? That that background isn't really gonna be there. The high rez version of it, which is darker and more interesting, is gonna be in the background, okay, right now, best way to describe it the dura tran background it's affecting here and here in these sections, and it's also giving me some of the glow that's going on in there, but the detail isn't there. You can read the people in there if this was shot on gray or shot on white, and he dropped that in, it would have this horrible white spot, or you wouldn't be able to get that background to really come through there. This coloration is enough to sell it like that. That's really what we're going for some of the details down here in the smoke last that's what we're going for, some of the background coming through, but it's not actually we're not actually taking that you can see plexiglass is a nightmare to like we'll clean it up, you can see how much dust is already picking up on this and really getting kind of that plexiglass does that, so we'll wind up cleaning it out. But that's, this will not be our final surface. Thank you. Sure. Okay. So that's starting to feel a little bit better for me now I want to get some light on the foreground because it's getting pretty dark there's a plug in that we use for text at it it's called stay afloat so if you know if if I were to click on you know focus right now technically this box should go away and should go behind it but this plug in called stay afloat keeps the notes always at the front it's a free plug and just look it up theo camera doesn't like me today is it not responding there goes I just turned it off because it's it's george media missing that glass of water you spilled his really messed things up okay got everywhere dana okay that you showed back up not here he's giving me that missing thing another opportunity for a question tony go rob outside of this right here when you put the hero labels on the bottles are using to it here that just sprayed he said of some sort of uh spray adhesive is actually kind of a bummer um spray mount isn't quite strong enough super seventy seven is too strong what I actually uses rubber cement rubber cement is a great bonding because it allows you to appeal and repeal um so what you do I brushed the rubber cement on the label I stick it on the bottle and I pull it back off so I get some onto the the actual glass itself rubber cement works better when it's had time to air dry it makes it much better bond but it still workable so I can then put it back on get it perfect and even though rubber cement like squeeze out on the outsides you can bugger off, you know, you just roll it, roll it told makes little boogers and pull it right off. You can't do that with seventy seven, or it was spray mount that that stuff is really interesting when you try to get it off, it's smears and winds up picking up oils and stuff up, and then you know you, you've ruined the label and trust me from years of experience with working with spray mount, it just doesn't work as well as rubber cement. Robert spence, an old trick all over my father studios, and and I never knew why I'm like this is the best stuff ever. Once I really fell in love with it, do you ever have any issues with the light transmission on the lighter labels and being able to see the rubber cement strokes on the back? No, not so much with that, because if you do rub it down pretty small, the place where we get the biggest amount of trouble with light transmission is with the pl labels, which are the applied plastic label um, it's in a lot of bud lights a lot, a lot of different labels have it so like the solution and the blr on there, and they're floating on a clear background that background is acid tate, and they contend to rainbow particularly once you had a polarizer on, it gets even worse. That gives this way more trouble. Um, that would kind of have to, you know, maybe change your angle a little bit, maybe change it a little light. We have to go back and work with the polarizer, and sometimes you just can't kill it completely. You get this weird kind of blue ing and green greening and you just got to rely on rita cher's fix it in post, which I say I hate to dio I really hate fix it in post, but sometimes you got it. Latte last question on labels. What about that? Some of the newer bottles have painted on labels. Is there a way to get that stuff off of there with the need to say that again? Some of the newer bottles I've seen on beers and stuff have almost like a silkscreen label. Yeah, that stuff is it's like bombproof. That stuff is almost impossible to get. You could try a reasonably tio come off it's like ceramic it's crazy that you gotta live with. Just no two ways around it. That's, that's really hard stuff to deal with. So some good news and bad news what's that camera move, so just bad news, actually, no. Camera moved so it's it's not that bad um yeah this doesn't lock too well does it? The actual ball head wasn't completely tight so it moved to the right a little bit ok I mean here's the difference between where we were and what happened um not you say so I think the pitch of it is down a little bit yeah that's all right I can fix it which I'm gonna pitch down even more because I'm gonna pick up more than a reflection so we're gonna make some of the background go away even more okay that ball heads titan sounded so that might have created uh what do you think I'm side by side just the top looks the same what'd you say just in terms of since you pitched down a little bit more you want to make sure that we didn't lose the top um I think it looks fine when I'm with you so when that happened I actually I just pitched the camera down a little bit more changes that angle ever so slightly but not enough or it's really a big issue and I'm picking up mohr that reflection which I think I'm going to need actually that final the final image so I'm gonna bring in a little strip light too because I want uh I want to get a highlight on here so what I'm doing I'm using this is a life are which is a really great light I use he's quite a bit it creates a beautiful strip of light and these boring doors air fantastic you can control highlight beautiful strip highlight that we're gonna put on there so let's add a little front I like to see what we think so you got your glasses you can see what's going on with the glass there's a lot of highlights that I don't like these dots are pretty hideous um I'm just absolutely not in love with him that's coming from our grids over there we'll deal with that later right now I'm just really kind of worried about the bottle of making sure it's pretty heroic and I don't feel like I have enough of a highlight on that bottle so I'm gonna open this up just a little bit more try that just now I have had some clients say that watching me work is like watching paint dry because it's slow and it's methodical that's the nature of product photography and probably my calm demeanor it's just a slow methodical process so I don't think it's a pain trying I think it's pretty fascinating stuff personally much better okay so what we've done now yeah it's looking good so you can see what's going on in this top that's really pretty it feels like it's got the you know that little bit of jule hits of light coming from the background but you also see the people and their coloration in the bar coming through it, we're getting a little bit of highlight and stuff hitting down there. I've introduced this front highlight to try to get some of the of the front just to show its dimension I think it's too far in the middle, I think I'm gonna bring it around and probably dream or in that area bases looking kind of interesting and this is this is an interesting shot because I'm not making this bottle really glow if you look at my website, you'll see lots of bottles and they really glow there like it's, almost like you stuck a lamp on the inside of them and they're really luminous that's not gonna happen here, right? Because we're in a nighttime bar scene it's not gonna do that? If it did, it would look weird and it wouldn't be completely sellable. So that's where that's, why I'm going where I'm going with this life? Well, that's up so you can see what's happening now is the facets are changing because this bottle has thirty fast it's going around it each one is a different plane, so it's going to be giving me a little bit fits as I move through it pull did you guys see how far I move that that was like maybe a half an inch and it created that hideous highlight still better but I'm losing a little of it somebody turn it up just to hear you going back through it you just look like this highlight maybe when the camera moved came back polarized was that that's not remember being that strong so you are correct good so why don't the four minutes let's go back up? Let's go to the beginning of where we started today and we can show you the transition of what's happened with this bottle so put it out there didn't really have any light out there just wanted to take a look at it and cnn's position just working on the background to get some light to come through it. So I'm systematically now going to headlights adding the top light working on the highlight your right that highlight really did come back now adding some light to come in through the size in order to get some bottle is a very technical term by the way you all should use it for the camera move whoa that's well that's after you had far too much to drink obviously let's start to feel pretty good, but not that way that's where we are right now, so I'm liking it I'm seeing that the highlight on the top has come back now that we've been kind of cheating my camera angle a bit and I think that the the the stopper on the very top of the bottle has become too hot so I want to turn that back down and that's the way this goes it's just just a process you know we're going back and forth on stuff on dh it takes a little time to make it work you know what carried that might be from this so let's take a really quick look at that just to verify just got phenomenal tangled when we moved everything good grief was papa no it's not that like okay like I don't know if it is that I really could use these it could be these life's showing up way saw one toy fifth yeah hold it wait a black card way fence right did he have a blacker uh wait we can turn this kino fall off if you if you think it's affecting the lighting as well uh it might be what is it that way it's the background was gonna be that way nothing like being a nevada twenty years against owned by a little light huh did you go back to where you work? You ask question before four minutes because their problem it's probably getting pretty close so it came just a nod thing the the pole right there with the cameras connected to because I've ran into that problem in school it was actually flashing off of that she didn't know it would be something weird mohr of ah tighter line. That's really wide and really broad. I think another suggestion for it might be a simple matter of that. Crown is away through hot and it's reflecting here's where it became really apparent between we turn it off here in here, tony what's your suggestion let's hear it when you added this thing striking player that's, it lightened up the court top so much that it looks like it's reflecting into the bottle. Is it the reflection of this onto there? Yeah, yeah. It's got to be so this being eliminated this lighting that strip right, let's just start turning lights off. Yeah, I think it is. I think it's, that guy coming down so much most part? Yeah, for the most part, it's gone it's still crown is still kind of lighting up on their plot, magnified for me once he was really going on there's a lot of crap bowl of there isn't a thing. What do you think ing around? What am I pondering what's going through your mind right now? Uh, what's going through my mind right now is I'm taking a look at that shoulder and I want to get it a little bit more rich and a little bit more interesting, so I changed my polarizer to see if that was gonna have a good effect on the shoulder. Keep in mind. You know, the polarizer is work on planes, and I've got the spirit kal thing going on, so I can't completely kill it. I can kill part of it, and I'm just trying to decide what part is the best part for me to kill and then build off of that?
Class Materials
Bonus Materials with Purchase
Free Bonus Materials
Ratings and Reviews
Totoo
I have gratefully been watching this tutorial for free online, and as always CreativeLIVE has done an awesome job in bringing one of the best instructors of the trade and his creative team to help us improve and enjoy a higher level of understanding and performance in the skills we would like to achieve. I am humbled as always and ever so grateful. I would love to purchase the course myself, but since I live abroad, it is practically impossible, I hope those who can, would. I would just like to add one of the most interesting things I have learnt from this course is the careful attention these guys are paying to minute details and the amount of patience it takes to achieve their goals in each project. Stay inspiring, Totoo in China
Ivan
Outstanding course! I'm a former creative director, now photographer full time and have had the unique experience working with studio photographers for commercial products in the past. This course is right on and very close to my experiences, and now that I'm behind the camera, it's nice to see some of those trade secrets revealed. Commercial work is fussy and you often have to sweat the details, but the results can be astonishing and rewarding. Rob and Gary do an excellent job explaining the ins and outs, without any pretention or hold-back on secrets. Something that's always annoyed me in the past, photographers never liked revealing their process. It's great fun watching Rob and Gary work a shoot, and Aaron Nace is beyond amazing in his retouching skills. I don't expect to break into this field, but I wanted to learn how things are done, for my own personal projects. I particularly enjoyed learning how they get the look of ice, ice crystals, and frost on the sides of glass bottles. I purchased several items from Trengrove, as they suggested. Their acrylic products are not cheap, but the quality is amazing and I'm very pleased and looking forward to experimenting. Thanks to all at Creative Live, RGG studios and Aaron Nace for this presentation.
Doors of Imagination Photography
This course is outstanding. I would consider it an advanced level. Having a good understanding of the technical aspects of photography and lighting is recommended. Rob Grimm takes you into two real product shoots. These were not canned demonstrations, but the real thing including working to get the lighting setup just right. The postproduction section with Aaron Nace was enlightening. This does require a good preliminary understanding of Photoshop. It was amazing to watch them build the final images for the client in real time. This is by far my favorite course to date.