Lessons
Lesson Info
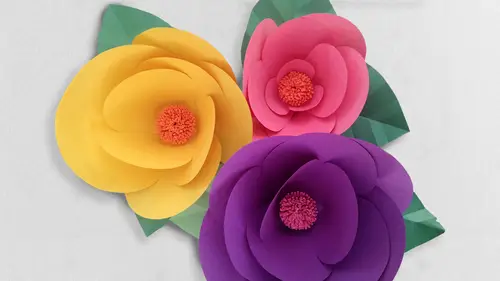
Making Giant Paper Flora
We're going to be constructing a garden of paper flowers. Two completely different techniques were going to go back into our party session to, and we're going to show you what you can do with those flowers to create some fun and festive party decor for your next celebration. So let's begin with the materials that we have at hand. Now you see in front of you, you have some colored text, wait and cover, wait paper, and then we've also got some crepe paper. We're going to set that crepe paper aside for the time being, and we're going to get to that in just a bit. But what I want to start with our some giant paper flowers created with simple eight and a half by eleven sheets of paper. Now you can really use any kind of paper for these. I have done these out of simple and inexpensive construction paper. What you see before you is a little bit nicer. Text wait paper for the petals, and then we've got some heavier cover wait paper that we're going to be using for the leaves. Now how I came up...
on this particular style of flower, I was approached by a nev ent planner ah, while back, who was planning a new year's eve ball, and she had in her mind this huge floral backdrop that she wanted to have in the entryway for her event, and what she sent over to me where these pictures from some of the amazing fashion runway shows where the set designer had built this monochromatic floral set that cascaded down this stairway and all along the runway, she's like I want that look, ok? So you said about trying to figure out how to make that happen and what it came across is actually really pretty simple and it's very versatile on the thing that I love about this is there's no set pattern that you have to follow you. You are really developing your own templates for these and so ladies in the studio, what I'm going to do is I'm going to kind of walk through how I designed the templates and then what I've given you just to save on time this morning are set of temple it's already trade it's out for you, but typically what you need are templates in three different sizes, and you can see here that I have. Three different sizes in front of me the beauty of these type of flowers is that you can create the petals in almost any shape you'd like. You can see I've done it here with a rounded top and sort of tapered, narrow sides, you could totally change the profile and thus the look of your flower if you wanted to go perhaps up to a point or add some scalloping along the edges, and if you saw the extra promotional video that we put together for this class, we did some paper succulence, and they were on a much smaller scale. Most of them had blade like leaves, but they just sort of illustrates the diversity that you can create within this particular craft. So now, if I were at home and I were trying to decide how I wanted tio create these templates, I would take a blank piece of paper and a pencil and what I've used for these are just simple plates, because we need three sizes, you could very easily do a dinner plate, a salad plate and maybe a saucer. You could also trace the tops of various lids from containers in your pantry really, just start looking around your house for anything that might provide that nice curvilinear edge for the upper portion, so what I've done simply is I'm placing this on my piece of paper and I'm tracing that upper portion, and then I'm going to take a straight edge ruler, and I'm gonna line it up with the side of that, and I'm just going to draw a tapered line down towards the center. It's really not an exact science, it's very forgiving. You don't need to worry about measurements for this particular craft. I wanted to be more or less directly across from the other line I drew and tape of that down to the center as far as the tapering at the bottom you can do that is wider is narrow issued like, and as we get into the project, you'll see how that sort of affects the shape of the pedal so you can see it more or less looks like this one that I have at the ready, but it's very simple to put together so those of us in the studio let's, go ahead and just start to go ahead and cut out these templates with just a regular pair of scissors. I have traced these onto a little bit heavier weight paper, and that typically is a good idea if you're going to be tracing these multiple times, it's, good to have a paper that is going toe hold up to a little bit more wear and tear. And again, we're really not going for perfection on these. I think we're going to be creating multiple pedals and all of them and mass really hide any of the little imperfections that you might catch as you're drawing your temple it's or cutting them out. So I've done my large sized pedal I'm going to move on now to my medium and again, if you watched papermaking, all of my paper scraps now go into what used to be my recycling bin and is now my paper making been because all of these little scraps and bits can be incorporated back into some beautiful sheets of handmade paper. Step aside and move on now to my smallest template. And like I said, I am using three different size templates to create this flower. Once we put it together and you get a general idea of the construction, you may want to go back and add in some additional templates. Some additional sizes make the flower a little bit fuller a little bit larger. There's lots of room for creates city here. All right, so I've got those three I'll cut out sethi's aside with them in my recycling now. For the flowers that were creating today I think that I misspoke a little bit earlier I said that I was using text wait paper for the pedals this is actually a cover wait paper for the large scale you can create the's in really any sort of scale and because I'm doing the really large ones sometimes the cover wait paper which is a little bit sturdier helps the pedals maintain their form better and I found it did a lot of these in advance of today's class and ship them up for the next parties segment and I have never shipped them before I was a little bit concerned about how they might travel but the ones that were done in the cover stock really traveled well if you have to ship these off for an event or or put them in storage for a season depending on how you're using them now for the pedals the large size pedals we're going to need five of those the medium sized pedal we're going to need three and the smallest size pedal we're going to need three now a little trip tio save you having to cut all of these out individually I typically will take two to three sheets of paper stacked them together I'll take one of my templates and I will trace it on the very top stack so ladies in the audience you're more than welcome to go ahead and follow along with me doing this step is I do it, so I've gone head and trace that template on my top sheet of my stack of three pieces, and then I'm taking some binder clips. These are a standard office supply that you confined in any office supply store, and what I'm going to do is I'm going to take them and I'm going to pin one along the base and then I'm gonna take my second one and I'm going to pin it along the top and what this is going to do it's going to allow me cut out multiple petals at one time without the paper shifting because I often find that that it was a difficulty, I'd shift it, and then I'd end up with three sheets of paper and three different shaped templates because the paper all skewed, so ifyou've done that go ahead and cut those out. So again, for the smallest size pedal, we only need three of those and again, and I said it a couple of times and I'll say it again. This is a very forgiving craft when you're cutting it out, if you get off the lines or anything along those lines, it does not matter it's going to look great, so now that have cut up those small ones, I'm going to set that aside. Remove my binder clips. I'm going to take another stack of this beautiful violet card stock three pieces and I'm going to trace my medium pedal on the top. Go ahead, place that binder clip right at the taper base of the template and then along the top of the page, cut that out. You do want to be working with a relatively sharp pair of scissors for these, especially three pieces of card stock takes a little bit of muscle to cut through, and a really great aid is a sharp pair of scissors and just in general, in your crafting toolbox. It's, good to have a pair of paper scissors that are designated for paper only. Um, you can very easily dull your scissors by using them for multiple different materials. It's also a good idea to have a pair for fabricas well, I'm just set those aside, all right? So we've got the three medium size pedals now, and we're going to move on to our large one because we do need five of these. I'm going to cut these in two sections, a stack of three in a stack of two now I was talking about there are some craft projects that you really need to pay meticulous attention to. And those would be things like the stamp carving where you're dealing with a craft knife and you really just need to have your eye on that blade at all times however a project like this is perfect for getting that stack of paper beside you and really plowing through some of your favorite movies that's how when I am making these four larger events I managed to get through a whole series of television which I kind of love same whenever I'm doing stuff I'm always watching it's something that's like my friends they're like I'm not a big tv person in then they're somehow I watching exactly well and it's fun for me too especially if I have to pay a little bit of attention to put in some of my favorite movies that I've watched so many times before I don't need to really focus in with any laser precision on them I could just have that as some fund background noise all right I've got the first three of the large pedals and I am now going to do the final two so again stacking of paper together centering and tracing your template on the very top sheet and then just is an aid we're taking these standard office binder clips clipping them at the tapered base of the template and at the very top of the sheet wait so we can set our finer clips aside put our paper scraps in our papermaking then we can also just set our temple it's aside for the time being so if you know that you were going to be doing multiples of these obviously you can kind of do it uh, sort of assembly line style where you cut piles of petals first and just kind of have all of those materials ready to go before you move on to the next step. So how are we doing? O ur speedy guys, thank you. Okay, great. So what we're going to do now in order to turn these two dimensional pedals three dimensional we're going to add some cuts and the way we're going to do this is we'll start let's start with our smallest pedal first and I'm just going to take my scissors and in the very center of the taper bottom, I'm going to cut a slit and I'm basically doing it blade length s o the blade length of a standard pair scissors there really is no right or wrong if you want to cut it a little deeper or a little bit shorter, not a problem. So basically it's just this simple slit in the bottom of your pedal so once you've done that for your small pedals, go on and we're going to do this for all three sizes of petals, creating just a vertical cut in the very center of the paper base now for the medium and large petals I'm going just a little bit deeper you can see my blade length right next to the kind of gone just a tiny bit longer and then I'm going to do the same thing with the large sized petals on the final two of the large size all right, so now the magic behind this little cut is the following if you take these two flaps of paper on either side of your cut and over latham all of a sudden your pedal becomes three dimensional and it stands up almost in a cup like form so we're going to be constructing all of our petals in that three dimensional manner so that we can then construct them into our final flower so let's start with our largest size and what we're going to be doing is this forms the outer ring of our petals so we want them to be fairly open and in order to achieve that pretty open look we're just gonna be overlapping those two sides a little bit so typically I'll take this point of the one that's in my right hand and I'll slide it over to the outer edge of the other that makes sense slide all the way over once you've done that I'm just going to staple it twice to secure it let's do that we're going to do that obviously a couple more times but I'm sliding it over until it hits that outer edge adding a couple of staples we're going to go ahead and do that then for all five of those large petals now as you do two three four a dozen of these you're going to start to play around a little bit with sort of the angle at which you overlap those two flaps and the angle that it creates for the pedal and you can make them a little bit more open you can create them a little bit more closed oftentimes when you're doing these in a group it's nice to have a variety so that you know like flowers in real life they're not all open to the same degree and so you'll have some that are closed a little bit more tightly some that are a little bit more open so we've got a little stack of five will set those aside and we're going to move on now to our medium size petals so for these we want them to stand up a little bit taller then our first round so we're going to overlap those two sides just a little bit more and so what you can see him doing is I'm overlapping I'm going beyond that outer edge and when you stand them side by side you can see it stands up just a little bit taller and again this is not an exact science you just play around with those overlapping of those two pieces until you feel like you've achieved an angle that you're happy with, so go with it. Go ahead then, and we will complete this with all three of our medium size. I do love creating these large ones because you get to use a standard stapler. I just think it makes for really simple construction in our next segment, when you'll see some of the ones that have created in a much smaller scale. Staples were a little bit too large, and I did have to move on to a glue gun for those which is a little bit more tedious but very effective. Still, all right, we're down to our final small size peddles these ones are inner ring of petals, and we want them to stand up tall ist out of any of the three, so we're going to go ahead and just overlap those even more. And so when you see set nets to the medium one it's a little bit higher pitch, so play around with those a little bit I mean, you kind of see it overlapped these quite a bit, um, but just find an angle that you're happy with it. Go ahead and secure those in place, all right? Well done, and you can see it really doesn't take much time at all to put those all together. So what we want to do now that we have all of our pattern pedal forms is we want to construct constructing the basis of the flower and to do this, we are going to be using hot glue, and so you're going to take the first two of your large pedals, and I'm going to apply a little bit of hot glue here at the base. I'm going to take a second pedal, and I'm just going to overlap it slightly and kind of get an idea of the overlap there, and you can kind of play around that as you with that as you continue to construct thumb, get a few extra it's always good to have your extra glue sticks at the ready, you will likely be going through a few of them today. Once you've connected the first two pedals, go ahead at a little bit more hot glue on there, and we're going to move on to peddle number three again, overlapping it just slightly ahead. New glue stick into my gun. We've got two more pedals to go, so go ahead, continue to add some glue with that baby, add in the fourth of your large petals again, just overlapping it slightly. And you could start to see our flower base forming here, and then we're going to add a little bit more hot glue for our final of the five large pedals doesn't take a lot of hot glue. You just want to make sure that there's enough there to hold it securely. It goes without saying, hot glue is hot, so please just be mindful. Um, usually a little scalding on the fingertips is inevitable, and once you've got those three, five petals together, you can kind of see we've started to form this cup shape that really forms a lovely outer ring of our pedal or of our flour. So now we're going to start moving on to our medium size and for these, typically what I will do is I will hold the pedal in my hand, apply a little of the hot glue to the underside of it, and I will press it down into the center, sort of positioning it mme or less between two of the larger pedals. You want to create a little bit of, um, variation in the patterning of your petals as you're placing them into the interior. Robert, do you find that whole clue is the best thing would or really any type of, well, you know what, I have tried it with standard white craft glue, which obviously drives a little bit slower and it doesn't have the same immediate hold so I often find, especially when I'm working with the heavier weight cover stock paper that I've had the best results with the hot glue it just has that immediate hold and drives so very quickly hot glue, guns, air, really inexpensive and are also another thing that you really should always having your craft tool kit. Okay, we're going to go ahead, then in place, our second one in and you can see I'm spacing it out just a little bit further than I had on the previous one holding it there just for a second, allowing that glue to set. Um and I was just telling jake a oh, it sets up very quickly, which is why it's ideal for this type of project and then we'll move on to our third of the medium sized pedals and stick that down in the center give it a little hole something tell me sometimes you'll find that goes this is high camp and you can find there's just like regular in high temp there's indifference, and when I was asking somebody if you were doing to say for a wedding and it was just in your car in arizona, it might kind of fall apart if it's not a high temp oh so you know I'm talking about because it would it would take a lot to really melt this down right? So if you have a low templin that's usually made for kids yeah so it's a little safer your project may tend to fall apart in the heat of your car that's such a good tip and a lot of the most most basic glue guns will come as the hot but if you get some of the little bit more advanced ones they'll have a little switch for the low in the hot so that's a really good tip that's a good thing to know when it comes down I think to what the glue is as far as how it manages the draft stays together I agree I agree all right friends, we're down to the final three we're going to stick those in now and again we're just going position those between our medium petals kind of filling out the interior of our flower really good tips about the hot glue cap because you know you think about it you go to all of this work to do another project like this the last thing you want to do is have it fall apart on you show and it's a really hot day that would be the worst arms start falling off your yeah they're really that's the last thing you want to have happen so once we've done that we have formed the basis of our flour now there are a couple of ways we want to finish it off obviously we want to put a statement in the center of the flower to kind of create that contrast ing pop in the middle and to do that we are using test wait paper text weight is a lighter weight than your cover stock I've taken an eight and a half by eleven sheet of paper and cut it in half vertically if you want to go ahead and just fold each of those in half vertically as well and what I'm going to be pulling out next is one of my favorite little craft gizmos you may or may not have come across these in the past but they are the multi blade scissor which I think are just kind of genius they have multiple blades, they're used for fringing and what we're going to do is on the folded edge of this piece of paper we're going to start at one end and we're going to cut it about three quarters of the way down you can see how deep I've cut there just about three quarters of the way through the paper to create that fringe and you're going to do this with both of your sheets. I originally discovered these in an organization store and they were sold and marketed as a tool for shredding your credit cards but I immediately saw paper app location so they're much more accessible now, and you can usually find them at most craft and hobby stores. I know you ladies in the audience are sharing a pair, so I'm gonna pass this office and as I finish girl, hand that off to you, okay, once you have fringed your pieces all the way down to the end to give it a little bit of added dimension, we're going to open it back up and we're going to fold it in the opposite direction and that just kind of makes it balloon out a little bit um, fold in the opposite direction don't don't press that crease shut just allow that to kind of balloon out a bit. I'm going to match up the corners on this one, and I'm going toe put a couple of staples in it, and I'm going to do that with both of those so again opening it up, folding it in the opposite direction, not folding that crease flat, allowing it to balloon out, giving it a little extra dimension and then adding a couple of staples at the ends. All right, I know you ladies air still cutting, but I am going to continue on with this next step I am just going to take a standard pencil at my stapled end of the sheet and I'm going to start rolling it around and one thing you want to be mindful of when you're doing this, you're just going to do your best to try and keep the paper on the bottom edge lined up the pencil is really useful just to kind of get this rolling process started you may find that it gets in the way and you can't just remove it I'm gonna continue rolling all the way down you will find the paper shifts a tiny bit that you end up with one flap on the end that has extended a little bit beyond the other but that's totally fine and when you get to the end I'm going to add a little bit of hot glue there to secure it in place gonna do that with both of the sheets because you're working on a little bit more intimate scale here you don't necessarily want to burn your fingers. You might want to consider just taking the erase or end of your pencil and pressing that down for second, allowing it to cool and you can see what this starts to do is create a little bit of a pom pom looking stamen for our center. Now this is a little small for the flower, which is why we've created two sheets I want to make it a little bit wider to kind of fill out that central space, and so what I'm going to do is add a little bit additional hot glue here and start my second sheet I'm gonna just overlap it there and start rolling that around again trying to be somewhat mindful of keeping the edges of the paper lined up along this bottom edge we want that to be fairly even only because we're going to be applying hot glue to that and then pressing it down into the center of our flour and we wanted to sit relatively flat no once I get all the way around to the end I'm again going to apply just a little bit of hot glue to secure that like I need one more glue stick in there okay folding that over and then again just sort of pressing down with the race or end of the pencil to avoid burning your finger, you'll find some of a little bit of the glue will inevitably seep out the side don't worry about it it's not going to be visible necessarily in your final product so holding it there just for a second how we doing with the rolling ladies? It can be a little tricky and take a little practice I've had some of them where I've rolled it halfway through and it's gotten away from me and sprung back open like a little bit of a spring um but at that point you just start over again and keep rolling so at this point I've got it where it's pretty secure this is what the top of it looks like. You might just kind of want to take your hand and left the top of that off a little bit to make it feel a little fuller I've seen these flowers done completely monochromatic where the statement and the pedals are the same color, which is beautiful. You can also play around with a wider color palette if you choose a contrast in color for the center and then to apply it into the middle, I'm going to hold it with the flat bottom side up and I'm just going to apply a generous amount of hot glue on the top very carefully place it in the center usually try and position it right over the staples of that last petal to kind of disguise them a little bit and then just hold it in place for just a second. I find that if you just drop it in there and immediately remove your hand, it can have the tendency to tip over or dry at an odd angle, so if you just hold it in place for a second, it should be good those centers like when you were going to accomplish it because I've been looking at the picture class for so long going on behind that those free bringing those in what's the thought you'd be bringing them wait them, you know we're sharing all the information the french scissors are not a necessity but they really are a nice little gizmo tohave in addition tio are flowers we want to finish them off a little bit of foliage and you want them to be justice stunning as your flower and so the way we're going to accomplish that is by taking the's eight and a half by eleven sheets and I'm going to fold these in half vertically now we do have I think everyone at their work station has a little bone folder this's a great paper crafting tool it really is just this beautiful hard blade like object that helps you achieve really smooth creases whenever you're doing paper folding and for what we're going to be doing with the leaves that comes in really handy so take your sheets of green eight and a half by eleven paper and fold them in half lengthwise and then you just take your bone folder run it right along that crease it just makes it really sharp and needs to go ahead and do that with both of these how we doing with those stamens ladies those looking great coming together well yeah give everyone just a minute get those glued into the center I know when you're working with the glue gun you almost have to be ambidextrous because you're getting to the point where you're almost out of the blue and you have to shove another one of the glue sticks in there multitasking excellence great. All right, so if you would please go ahead and take your sheets a green paper and you're gonna fold them in half lengthwise on and then what we're going to do is we're going to cut out a really basic half teardrop shape, so I typically will start at the points up towards the top of my paper, completely free hand there's really? No need to have a template for this cutting it down so that basically just sort of rounds out at the base and go ahead and do that with both of your sheets of green folded card stock. Now these would be lovely, as is as leaves, but I want to show you one additional step to add a little bit of extra dimension to these, and we're going to accordion fold them when you accordion fold something, you're basically folding the piece of paper back and forth, but what we're going to do is do it on an angle so that it creates almost a chevron pattern of folds within our leaf. So we're going to take it at the base and I'm going to fold it up like this, and for each of my folds, I'm just going to take a quick run over that crease with the bone folder just to make it sharp. Then we're gonna flip it over and I'm going to fold it in the opposite direction thus the accordion sort of fold and what I'm really looking for is to create this fold to be parallel with my previous fold and again running the bone folder over that crease and I'm just going to do this back and forth two or three times and each time you can see I'm making my fold over a little bit narrower than the one before this sort of gives thie idea that the folds air closer together as they get up towards the top of the leaf and then I'm going to fold it one more time and pressing get a little muscle in there to get that crease down and so this is what it looks like once it's folded it's a little bit of an odd shape but when she opened it up and then open it up in full, you can see we've created this beautiful chevron pattern down the face of the leaf so I know I went through that quickly let's do it one more time together so I'm taking my my leave shape it's folded in half and I'm going to start at the not the pointed and the fat rounded and and I'm going to fold it up on an angle and then I'm going to run my bone folder along that crease at that point I'm going tio flip it over how we doing? We get it okay great once you've done that first fold you kind of flip it over and you're going to fold the paper back in the opposite direction trying to keep this new fold somewhat parallel to your previous one and you're going to continue that back and forth typically with this size leaf I find myself doing about four folds three to four all right opening it back up I always loved the reveal on these because they're so great and again getting that beautiful chevron pattern down the center of belief it works all right I love it thank you now typically what we would be doing at this stage of the game is applying a little bit of glue at the base of the leaves and sticking it directly on the underside of our flower but I'm going to ask you to hold off on that for the time being because these flowers that were creating right now we're going to incorporate into centerpieces for the next session so we're going to hold off on going down the leaves because we're going to do them a little bit differently but do they do know if you're going to do a standalone flower he would typically just put a little glue on it and hold it underneath and these air just long enough so you can see that they peek out just beyond the pedals and at a really nice addition to that.
Class Materials
bonus material with purchase
Ratings and Reviews
user-c468fb
Thank you to Robert for giving me inspiration. The flowers were beautiful and it has motivated me to go out and purchase the supplies to make some of the projects. I feel that his voice was relaxing and he took his time in explaining how to do the projects. I would definitely make these not only for events but for personal use as well. Great job. It's obvious that he has been doing this for some time,
Elle
Excellent class! It was easy to follow along and create the items exactly as demonstrated.
Student Work
Related Classes
Paper Craft Ideas