Lesson Info
4. Editing
Lessons
Lesson Info
Editing
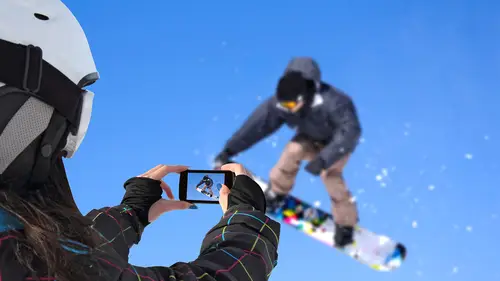
So now that we've shot with Aiden, let's look at some of the photos we created. And right off the bat, I mean the first thing you'll notice is that the photos look great straight out of the camera. So they may or may not need adjustment, but if you want to adjust, you go into the Photos app and the first thing we can do is select the height of the action from the burst of photos we shot. And then we can also adjust the brightness, the contrast, the color. There's a lot of options for how we can tweak the image after the fact. So let me go back to our array of images, and I'm just going to select this sequence, let's go to this closer in sequence here. And it starts out as you will see here kind of in the middle of the burst. So I want to go back to the very beginning, and just go through the images, and you can see there's just a bunch of plain images of the door here, so I don't need to go all the way back. I started the burst before he came into frame. Okay, here we go. Now he's star...
ting the jump. And you know, he's still starting. So there, we're starting to get some of the rotation, that's kind of interesting. Wow, that one's definitely good, so I'm gonna check that box. That's pretty interesting. Lot's of motion blur there in the hair. You know, I think those two that we checked, whoops, didn't want to check that one, are the best. So I'm gonna hit Done up here. And you'll notice that those show up right next to the image. So, if we want to work this guy up, first off, we can zoom in and check and see what's going on. I like that his face is sharp, but his legs are blurred, and the door is sharp in the background, so that shows us that we have a lot of motion and it kind of shows the rotation that it's going through. But I think first off, when I hit the sliders down here for the adjustments, I'm gonna crop in on this one. And I'm just dragging the corner, you know, I can adjust however I want, and maybe even I don't want him in the center of the frame, maybe I want to adjust is so that he's on the edge of the frame over there. And alright, done for that. So we've cropped the image. Let me go back into there. And, first thing is I can use one of these preset modes and adjust the color here, but I don't think I'm gonna to do that, I'm gonna go into our next one and adjust it with the Light, so I can make it brighter or darker, which is kind of interesting, you know it is very intuitive how you use this. So that looks good there, with the brightness. Maybe I'll pull the highlights down just a bit. So, going out there, something like that looks good. And, let's see what else we can do. Contrast, let me adjust the contrast. You know, it depends on what you're going for here. You can get a really grungy contrasty look, if you pull it all the way out. It looks not so great when you go all the way down. The contrast is probably pretty close to where I want it already. Black Point, which is how dark are the blacks, is really nice because I can adjust, he's wearing all black, so that allows me to adjust how bright his clothing is. For the highlights, let me look at that again, I think we already set it, but just... I'm looking at his skin tones here, and maybe, you know, and I want to keep his skin from blowing out there. And let's move on to color. So in terms of color, I tend to go to really far extremes and kinda see how it looks on either end of the extreme and then watching the image, and I'm actually just not even looking down at the slider, just watching the image and seeing where it is. I kind of like it a little desaturated like that. Color Cast, we can introduce a color cast, which can be kind of fun. I think going to the left here gives it kind of an interesting feel. And we could do black and white on this one, but let's look for another image to do black and white on. At this point, I think we're done with this image. So, we'll save that one. Let's go back here and look at some of our other stuff. I think this one's actually pretty cool too, so let's go in and work this guy up. It's a little bit bright, just looking at it. It probably needs to be cropped a little bit and straightened. So straightening, we can just grab this little arrow at the bottom and adjust it, so we're like negative three degrees there. We can also change the aspect ratio here, so if I want to make it square, that can be kind of fun. I might need to readjust the level there. Alright, let's go square. And then go back in there. Let's see if I can crop it in just a bit, to get that carpet out of the picture there. Getting pretty tight on him, but that's a pretty action packed image. So, maybe I'm gonna go black and white with this guy, and I can do that right here, through the Noir or the Tonal, the Mono options, but let's keep it with no corrections, and we'll do a custom job of black and white by adjusting it here. And this is adjusting the highlights and shadows a little bit. Maybe I'll do it in the black and white mode there, then I'll come back up and adjust the highlights here specifically. And then I'll adjust the Black Point, because that's key for black and white. For a really good black and white image, typically you want something pure white in the image, and something pure black. So you get a fair bit of contrast. And if I pull this to the right, you can definitely see those blacks go super hard black. Let me go back up to the highlights. I might want to pull those highlights up just a little bit there. And let's see, contrast. Do you wanna add a lot of contrast or back it off probably just a hair. So, you know, somewhere in there. We're done. And now we have a black and white version of the image, and a color version of the image that we can share on Facebook or Instagram or wherever we want.
Ratings and Reviews
Simone
This is a very short course for beginners wanting to know how best to shoot action. Great tips from Michael.
Nikolaos
A neat little class on shooting and editing action video on your iPhone. It's mainly intended for beginners, but even experienced photographers with no video know-how will learn some useful tips on using their phone to shoot. Short and to the point!
Student Work
Related Classes
Mobile Photography