Lessons
Lesson Info
Biggest Mistakes Beginners Make
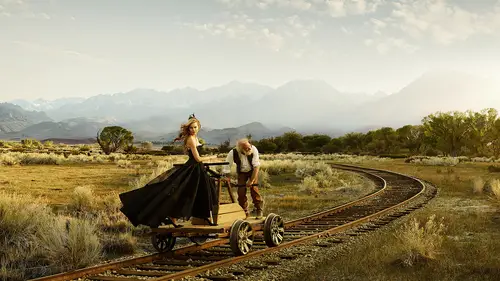
concerned photo shop is your friend. That has to be in today's market. I think unless you're a photojournalist and you don't think that's for you, then you know, put your heart into pursuing a very pure sense of photography. But I think as a commercial photographer like I am today, if you want to make a good living at it and you want to thrive in that marketplace, this is definitely something that you need to either know or know how to do. So you can explain it to other Rita Cher's. It's really I think I mentioned the biggest value I have to my clients, so we're going to speak to the things that's really, really important. And if you want to take notes here, this is the time because I really just showing a lot of examples to get you excited about what I do, because I'm excited about it. But this simplicity behind it, I think, is quite people get intimidated by it. But there's no reason to absolutely no reason to. It starts with the light, right. Everything does so for all pieces to lin...
e out. You got to make sure that the light direction matches. It's really simple. It's very sits on this guy And how hiatus for me. If this is my son, the light that's lighting me. And here's my subject. I know I line up like I did the other day. I want to show you the examples. I'll put it off my girlfriend just to show you some examples. I say my son is here. My subject is here in my back plate. Let me see if I could do this. So if I were to put something into this frame, I would say I'm gonna put them right here on my son is right here. That's my angle. If I'm gonna photograph you, I need to put you over there because that's where my son iss and your line the pieces up like that Really quite simple. That's how you find a direction. Then you want to set the height of it, which is quite important because, you know, the sun is warmer, it spills from the side, doesn't spill over its a lot of different things that comes with the heights. We're gonna talk about that, too. But those are really the two elements when it comes to the light. I want to talk about the like quality for a minute as well. Um, I think I have it on the slide afterwards. But when I'm at it, there's the desert, for instance. And then there's the seat. If you live next to the coast like I did in California, always a soft sure sends a light particles from the ocean. They roll up, you get a softer, like quality in the desert. Chris, Chris, Chris. Not a lot of contamination. You get a different like quality. You gotta be a barrel that those things, though, we can fixing Photoshopped. The contrast it gets setting Photoshopped the color because set in for the show, the direction they cannot. That's my girl. You're on location and this is right next to my house. And I'm filming this to show you that when I got here, I did like this. This is her. That's the son. They're gonna try to put this into the background. We just saw you see how this lines up, person. So on flaring you have even a little bit of this grassy highlight or the trees that matches the back on the reason for me doing this. I want to tell you the big secret. Not big secret, but the process where a lot of people go wrong. You try to shoot compulsive pieces in studio. It's hard to see me do it with the lion. I've done it with other pieces, but the true way, making it really seamless compulsive and it's cheaper to is to have them stand in the same light on the same texture. Ask the place you want to put it in. So there's two ways right. I could put her in the studio for the stroll back there and try to match it up. Not quite my thing. You can exaggerate the strobes if that's your look and put it together that way. But for a seamless composite, like I'm attracted to where I want to create a narrative and a visual that feels really, really like it was there, then you do it this way. This would be almost like she was there in the grass. Same tonality light in the same place you're following so far. Really simply, uh So you have the background plate that you captured when you on your trip somewhere you focus on the foreground for the person in there, and these are the elements to it that they got to pay attention to. And they got in that four. To capture our perspective, we need the camera height from the ground. You need the camera distance to the subject. We need to know what camera lens we shot it. But if you're closest on one, you also got to pay attention to where you tilt the camera. I'm close to you guys, and until the camera down, it will distort a little different than than I panted up. If I panic down, the top of the body will be enlarged, a bit distorted the bottom. Same will do to the feet. So make sure if you're close to someone in a composite that you also match the angle of the camera. Otherwise, take notice of the camera height from the ground camera, distance to the subject in the camera lens. Easier. So that's what I did. I measured 32 feet from the camera to other train court. Waas measured my camera 82 inches tall and I took a picture and we'll see if that lines up. It doesn't look so great lines up. Tried it yesterday. It lines up perfect, but it doesn't look so great Because remember, I mentioned on the other original frame I accounted for. The railroad tracks accounted for the cart. I was part of the idea. Part of the visual I station. I did a front so the cart falls in there beautifully and you get her head but in the horizon line. But it's not that great visually, but for the sake of showing you how the comm positive this is how it's done correctly, you will see it. She will fall right in there and they feel as if she was there to begin with. I think about that one with this match up. So I went a lot higher on my ladder. You don't see the horizon line here, so if you try to put this into that same background, it's not gonna match up. They could put it in there afterwards and see, I have a few examples, and I think you should put in one or two that does not work, and we put in one that does work, and then you're going to get into retouching in the actual cart. That's me going really low. It's imperative, and you do this right became their the lightest right that they get the camera sections right as well. It is really simple. It's really just matching the height, matching the distance. This is what happens if you try to get too close. This is a distortion I talked about. This is the same camera height, but I'm a lot closer. You seem or appear. She has very more volume and it's gonna look weird. You think? Oh, maybe doesn't matter. But look at this. We all know this kind of scenario, right? You get something really close to camera, it's gonna distort a lot. But if you try to put that picture in the background of the landscape, it's gonna look really rare. DEA She's old, distorted, asked if she was close and then she is in the background now. What if you put this picture in the foreground? This is with a long lens, so we're paying attention to our camera lens with paying attention to our camera heights. In the distance, you match up the light and that's it. In photo shop, you got barely anything to do. I repeat this process again and again and again, and it seems complicated because you have all these layers happening. But that's it. It's really then just having an idea what you want to do. So what do you have a background that you love? Or if you're somewhere and you don't have a tape measure, I really do. So that's why I put this light in there who walks around with a tape measure, right? Um, I usually use my belt as my landmark. Around here is where the cameras or around here around here and I'll remember. And then I used the whole rice in line. This is easy to see in these pictures where the horizon lines. It's right. So when you do a background plate, you know where the ice and sits, you match terrorizing. So this is us right here when you're so I photographed. Andrea had a set of trees on the right and the sun further to the right. Same same thing here. And if you look at these women, that's my stylist assistant. Throwing up the dress is one of my assistants. They probably have the same height and right underneath their rights in line like Andrea did their standing below their rail tracks. So this is a picture I could talk to you about ideas, by the way. So I'm intrigued by mythology and the wise old man. And wherever you go in life, right to get guidance, even though we don't think it there. Always someone that comes across your path and they share their system with you. That's the Gondal. That's the Yoda. This one of these figures in almost every movie you see add to that brother, where art thou one of my favorite movies. And in the end scene you have the wise old man coming through, but almost end. And he says that the sea will rise and the cows will float. And George Clooney goes, What the hell? And later in the movie, you see the whole valleys being flooded and the cows float along. So that was my inspiration for this. It's about this escape of this woman that takes off, obviously, and the vice old man is there to guide her on that journey. So that's my inspiration for this photograph. So I mentioned this already, so if you look at this color light qualities there we talked about. This color is a little bit more muted. Doesn't quite have the same vividness. So I mentioned See visitors desert. Those are the classic ones, but whenever you do composites now we're going to line up perfectly. When it comes to the contrast in color, it's subtle, so we'll sit down and talk about that on the computer. But that's one thing to be a barrel. We think about the camera settings, the lens, the height, the distance when you shoot and in photo shopped to match the pieces to quality of light and it's inherit color. All right, this is taking us to photo show. I'm gonna shut down my presentation. I'm gonna open a foot of shop to start by showing you all the layers. If you're curious about it, I think maybe you're and then I'm gonna put just the girl and the guy in there and they're gonna laid it. I was going to say we've got some questions to dive into before we dio go ahead and get into Photoshopped. I think you explained a lot about the using that horizon line and how to think about getting the right perspective. Are there some things that people could go out and do to practice matching perspective? This question was from Sofia Hernandez. Yes. So if you really want to be scientific about it to practice also practices to just shoot, right? Shoot, shoot, shoot. So I love speaking about this. Have another lecture. I talk about creativity and that being a muscle. So me is guilty of this as well. Super ambitious. Want to create all this beautiful work? But I don't shoot as much as I should get busy with life in the process of creating get put on the back burner. But still, we really want to come here. And you listen to me. Talk about composite photography and you wanted to it. It's a trash folder to actually go and do it. So the practicing part is to do it Really Get up and do it. If you want to do it scientifically, photograph a table like this. So a table person is gonna be pretty forgiving when you shoot this stuff. There's anyways right. You could be a few inches off. You could be a foot off. You can make it look OK. The ideal believe it. But if you want to be scientific about it, put it off the table because this table will. This story got four legs. Not too. It will be really obvious really quick. If this is not in perspective, you will see this line being too much of it. Too little of it. You will see if it's distorts wide because of the long is going into the picture. So if you want to do sort of a study photographic table in the landscape and you really quickly find your way and you really, really quickly see what's working and what's not. But it really is practicing and taking pictures. That's the number one. Thank you for that. And I want to shut out from Sunrise. Who says Thanks for showing us what doesn't work. It really helps me understand why you are doing specific things, understanding what you know, the things that doesn't don't work as well. And so a question from Linda Frank, Do you ever use a green screen? Yes, every now and then we do. So do you remember the image of the guy Flying used a green screen for that one? But it's not my favorite thing to use. So everything that you put next to people cast a certain color, right? So if you put a green screen to someone, it's done that way because it's easy to wrote us go about. So when you put a computer onto that thing, it will find all the green pixels and they will go away. It's really done for movies. For me. I like to use fabric or a backdrop that has a similar tone to the background that I'm using. So if it's my time, I'll use a black one if its state time, maybe a white where oftentimes like great, you're gonna cut out of here and stuff something that's like gray or opposite color to the hair, which often is the more difficult to mask is what I produce. So I don't know if you remember. But when I showed you, I saw the girl that was actually a rooftop studio with the red sail to it, and we put her next to the boat with the red sail. That was exactly for that reason to get that red spill onto her. When you shoot the green screen, you get that green spill onto people. There's ways to take it out, obviously. But that so no As a still thing, I would use a blue screen, which is fairly common now in movies as well. And I would use a fabric or back room or you screens coming if it's easy. But be mindful of the cast. What happens if How do you make your lighting match if you're having to shoot at different times of day? Ah, so that's what you don't do. Yes, So it's a good question, right? Because that's where a lot of people go wrong. You don't shoot in different times of the day. You start with the unmovable plate, talked about this. Everything that you shoot follows the like quality and the camera height over that background. If you don't, you're gonna get into issues off. How do we make this fit now if you're on the job? If I were on a job and where to do this picture and I had to shoot a celebrity in the middle of the day, what we would do is to shade it. Let me see in the middle of the day in the sun, coming from straight above I would put a silk up here that will diffuse all the hard shadows. Then it will feel like overcast. All right, so then I eliminated the light source that cast the wrong light. Take exactly 12 body like this. Put it above. Now they're in shape. Son is gone, the wrong son is gone. Then I would add my own son right where the sun is supposed to be for the background and sign it all men, right? Then you're taking away the wrong light source. You added the right light source and then it will match up. So that would be how to solve it if you have to. But I guess what I'm trying to say here is that you can't if you are to make a seamless composite that feels honest to die in natural light. Then you have to follow the simple rules that we just went through with the background plate being the dominating force. It's not a democracy where pieces are equal. This is the one guy that sets the tone for everything else. Thank you. Well, let's dive in. Let's do it
Ratings and Reviews
a Creativelive Student
If you are expecting to learn how to composite, this is not the course for you. However, if you want to know the fine details of compositing well, you want to refine your work, this is the course.