Lesson Info
5. Bringing it All Together
Lessons
Lesson Info
Bringing it All Together
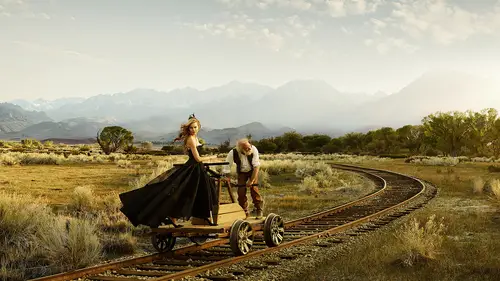
us. Remember I mentioned my assistant that was standing behind the car in the first image. The original one. And open that, too. I'm going to see how close we are gonna do this one next. This is the compulsive piece I did originally. I copied that layer. All right, so this is my reference. I love having references. By the way, if you go and shoot a composite, I often to pictures of myself if I travel a lot of the stuff I did for Crystal Cruises of it with my camera in auto timer going standing it myself side a reference where I would stand like quality. Know that stuff. This would be our reference here, and that's a reference. There must not the best examples because we are going to elevate the cart by a few feet and the ground by a few feet put in the next image. So before I get, they're gonna put this version here. I made it smaller to fit in the back there, but But this next to here, obviously, this is really crude, right? It's not masked out. But you see how her line up you see a s...
lightly above her head. You see everything So lining up with the perspectives, This one which was really low. You look up her nose and you look down at the landscape, right? You could say that All that looks fine, but the I will absorb it and said that does not feel right. That's following it. Doesn't look as bad as I thought. The one on the right. So it is forgiving, right? These tools that I gave you about measuring and making sure you do it right. They can event always. And with footage shot being the exclusive tool it issue can shape light a little bit. You could shape perspectives a bit, but really to get something done right. This is the process. So we're gonna turn that off. You're gonna turn this off. This is this useful? The 1st 2 examples. So when I did this original background, right, the idea was always to have the train tracks coming through the front. I was looking for a railroad close to California to shoot this, but there was not so well they ended up doing was to go into the background that had the grandness I wanted then going to some train tracks. The measured the distance from very wanted to have the train cart in the background and like camera height. When they came to the location of the train court, they set the camera at the same distance in the same height, matched up the light, see the highlights on their face right here, did the same process. What I often do when I'm on location is to do a test fame. I put it in to make sure, but vid this lining up the pieces full right into place, just like the Soviet Andrea. She feels so much lectures in there. Even the bad one feels like she's somewhat in there. Then you, uh, lineup the light properly, so so again, not going to go deep into the retouching of it. But I'm just gonna cut them out decently and then layer them in there so you could see the process. So there's a 1,000,000 mace to mask stuff, right? Um, for me, it's I used so many different tools to start roughly. I just do whatever tool that's appropriate to select as much as I can, and then I go in there afterwards, defined to so for us now is gonna go in and cut out around all this. Do you have any questions? Because this can't get tedious even though we're gonna do it pretty quick here. If you have any questions as I do this, I'm happy to be distracted and an answer. I have a quick question. Earlier you signed you align the horizons when you were placing a girlfriend. Is it something that you always have to do to put the horizons online? Or can you bend that role? Libit Okay, so you shouldn't. So let me see. Uh, yes, you can bend it. And I think you saw it right when I lined up. These two arises. Now the one on the right didn't feel terrible, even though in the rice and was way off. But that's your That's your golden measure. Really? So in this 12 here. So maybe I put a little high now, but you see the you see my cursor, you see how these line up roughly. That's always where you want to start. Always both when you shoot it and then you retouch it. It's released a golden standard. So what happens is right If I put my camera at the white height and I measure it. But until the camera down too much or up too much, it will distort different. You really want to line up their rise in line? Always both when you shoot them in your retouch, especially when you meet touch that is your That's this your constant Yes, great question. I should have mentioned, you know, again. But yes, lining up their rising is the sort of positioning tool when you do composites. And if the resting on your way better off because then you're is a freefall. Really? And when I speak to this, this whole process, it's really about natural light. So if you like the strobe look and you came in handy, strolled the hell out of them, it would be a different kind of look. Then you could just explore and light direction doesn't matter as much, right. This is really to create a natural feeling composite, but you can utilize it to save yourself on a rainy day to give the client great value by not taking the crew all around the world by expanding your ideas by making stuff happen that doesn't really necessarily fit together. All that stuff applied in my process is natural light. So everything I've spoken to really about the like qualities. It's natural light. As soon as you have put a strobe on it and do the side Lee thing that's really modern and cool, then it's a free for all. It feels like a stroke picture. And if the light lineup or not, doesn't quite modern a. C. So I went a little ahead of myself here. We're gonna select these little dots, but I always do. If I use the magic, Montel is the feather it afterwards. So you come in here, but I just just hold option your feather. And depending on the sharpness of what I'm cutting out, it's 1/2 to 1 pixels pixel here. And then when it done that, we can invert other way. And what I do is you make a selection and I fill it so essentially a shortcut. Fulfill his command elite or option delete. Commanding option will fill your foreground and background colors so you essentially just select it and then you paint white into it. Sorry, black into it by filling it with black. Does that make sense. Go too fast. I'll do it again. I'm gonna ask about this dress. Set some anchor points. Just go around this real quick. Yes, I said this tool to feather a pixel to start with. Since I didn't come in here, I'm gonna feather it. One pixel. Now that we made our selection right, I hold on option and a delete. That means that I fill the area I selected with Black, which gives me a black mask and mask out the stuff around the dress. Does that make sense? It kinda iss how everything goes when it comes to composites. It's really masking it out and taking away the stuff that you don't want to see. Make a selection. Now that I put my feather appeared to one picture. I don't have to do the feather again, but I do want to fill this selected area of it black. So I'm ask out what's underneath here so I could do it a different way. This time I take my pencil and I just paint around here and the basket out. Stick over the tracks too. So this is how I start my masking. Everyone's masking process is different in so many ways to do it. But I start really crude. Then I do a second pass. I did to just get a sense of how they feel. You see all these edges around here, get rid of those my But I get it. They're so when you have a little outline like this, we gotta hide it. It's easy to feather the outline and then you could paint in around it. It's an easy way to sort of get a little closer into your area that you want to ask. Gonna invert it and hide it again. And then you're just gonna paint that go too fast? Yes. So I assume out so you could see it. When you do a quick mask like this and you feather it, you often get with white little line that you saw around the edges here. So since I had the white backdrop that was only put up behind there for me to cut it out easy. So I did this really quick selection, right? So there's several ways to go about cleaning up this masks. One easy one is to take the mask that's there, and they can highlight it by coming over to our mask. Hold on the command key and you see you get symbol there to give you a mask on outline. So now we have the selection of then we can feather this. No. We hold down the control key to get our drop down menu feather that outline by a pixel. They're going to murder it. That command shift I so that we now have the exterior selected and not the interior of that mask. I like to hide it, but you don't have to. Um so I had come at age, and that allows me to use the brush tool just like brushing around the edges. It's the same selection that gave us the white, but they have feathered at one pixel inwards. Now this will allow us to. Now I'm getting into a photo shop thing rather than a compositing thing. But it's a good little tool to know. Now, you see, this outline disappears pretty much everywhere. So my process is always to lay the images in there real quick to get a sense of how it feels. And then afterwards, you know, I start fine tuning, making sure everything sits in there. Okay. Now, I tried to move it. And what happened? This? I'm trying to move this election, so we got a decent like that. Hate command, t again. Make them a little bigger. So does that make sense? Did that go too fast? I'm gonna pull up the original picture. That's what I just put in in 15 minutes. Lightest lined out camera. I just the same. And then you can layer it in mid massaging to be like that, and it feels pretty simple. Hi. My name is Valerie. With such detailed oriented work. I mean, even with not a lot of detail, it's hard to let go of that process. That editing process. I was just wondering how you like delegate and how you prioritize and what you do. Outsource. Wow. Okay, so that's a great question on two levels. So I'm gonna answer your exact question first. Um, well, I do a lot of it myself. And I talked about that initially for commercial work. I do the first pass myself, and then I handed off to get help with the fine tuning I would do. I would do this. Put all the pieces in place and then probably handed off. So that's better for me in the commercial world. But my favorite meat toucher is fairly expensive, right? It's to 15 hours over all my personal work. I do the whole process myself, and then it's no timeline. I do. Then I can. So that's how how I get into it now. The bigger part to that question. He said it such detail work, and you could get lost in this right? What I learned the older I get US photographer is that it's more about the emotional content of each picture to make it feel good to make the talent ill. Go to make the talent and most emotion to create something that makes you feel something and that can often get lost in this world or compulsive because it gets so technical and you don't want your work to feel clinical right. You don't want it to feel too technical and too Christmas to for me anyway. I think then you lose a bit of photography. So for me, when I do this composites, it's so important to make sure that it lines up correctly so they take away some of the Photoshopped process and can focus on how it feels process. But I hope the big take away is think about what you're shooting. Don't just randomly start putting things together. Have an idea started. One background plate. The unmovable part that is your hero. Everything else you should follows that perspective, right? So no, your light quality know your perspective on the lens and how high it is not far away from talent. And if you follow those simple, simple things, these composites will fall right into place like this and a lot of my image. We've inclined sees them. They think oId looks so amazing. How is it done? A lot of them don't really realize that they are pretty heavy composites. And that's why I showed you a less stuff in the beginning that you can execute really seamless, seamless composites without that much effort. And then Photoshopped. My process is so simple. It's contrast color you saturation and your top it off of that color. Fill those things, really. You have all the tools you need to start putting together beautiful, seamless composites
Ratings and Reviews
a Creativelive Student
If you are expecting to learn how to composite, this is not the course for you. However, if you want to know the fine details of compositing well, you want to refine your work, this is the course.